This post is the first in the Lightning Experience Pro Tip blog series. Tune in for help integrating your org’s data and business-critical customizations with the productivity-enhancing features in Lightning Experience. We’ll look at ways to avoid common gotchas and work around some of the issues that may have you stumped.
With the activity timeline in Lightning Experience, your sales team gets an easier, more efficient way to keep track of current and past activities. All the key details for each task, meeting, logged call, and sent email are bundled together, right on the page with other record details.
Your sales users won’t be sad saying buh-bye to the old Open Activities and Activity History related lists when you switch them to Lightning Experience. Especially if you do a little advanced work to make sure the activity timeline delivers exactly what everyone needs. Let’s start by configuring the timeline to show the activities-related fields that are important to your teams and that they’re used to working within Salesforce Classic. Then in the next post in this series, we’ll make sure that expected actions like Log a Call and New Task are readily available.
It’s Not Just New, It’s Better
Before we get into the config-y stuff, let’s take a closer look at why the activity timeline is a bedrock of efficiency for your sales team. The timeline organizes all upcoming and recent activities in one place for each of your org’s accounts, contacts, contracts, leads, opportunities, and activity-enabled custom object records. So right off the bat, you see it’s much easier for reps to keep track of how things are going with a customer.

Sales users can quickly review what each activity is about with easy-to-scan summaries. To see more details—including important notes in the Description or Comment fields—simply click the arrow icon next to an activity (1). Or click Expand All to see details for all activities in the timeline (2). No need to waste time navigating away to task or event records to see this information.
But sometimes seeing less is more helpful. That’s where filters come in handy (3). With just a few clicks, users can zero in on the activities that matter.

Configure the Fields that Appear in the Activity Timeline
Yup, the activity timeline is a productivity enhancer right out of the gate. But to be a truly useful tool, it needs to show your sales users the information that they care about. Fortunately, it’s point-and-click fast to configure many of the fields that appear in the timeline.
Breaking Down the Activity Timeline Display
Let’s walk through what an activity looks like in the timeline and see what information is and isn’t configurable. Here’s a task called “Proposal for Willie” as viewed from an opportunity.
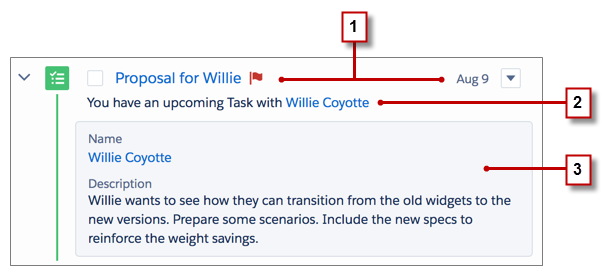
- The first row (1) displays the subject and due date of the task. (Events show the subject and start date, while logged calls and sent emails show the subject and the logged or sent date.) You can’t change what appears in this row.
- The second row (2) shows an activity summary, which isn’t configurable currently. The summary is automatically generated to show information that’s most useful for the context in which the activity is viewed. For example, most of the time this row includes the Related To field—like in this instance where we see that the task is related to the contact Willie Coyotte. But when looking at the same task in the timeline on Willie Coyotte’s contact record, it’s obvious the task is related to Willie. So the summary shows the related opportunity instead.

- The details section (3) that’s visible when the activity is expanded includes fields from the activity’s compact layout—in this case, the task compact layout. You can configure the compact layout to include the fields you want included in this section. Exceptions are the Description field on events or logged calls, the Comments field on tasks, and the Text Body field on sent emails, which always appear in the details section, even if they aren’t in compact layouts.
Getting Under the Hood with Compact Layouts
As we’ve seen, event, email message, and task compact layouts define the fields that appear in the details section of activities in the timeline. But there isn’t always a 1-to-1 mapping of fields in a compact layout to the fields that appear in the details section. Instead, business logic determines which fields are appropriate to display. If a field in the compact layout is one of the fields used in the first or second rows of an activity, it’s not repeated in the activity’s details section.
Let’s look at some examples of how this works, using the “Proposal for Willie” task from earlier. Here’s how the default task compact layout looks.
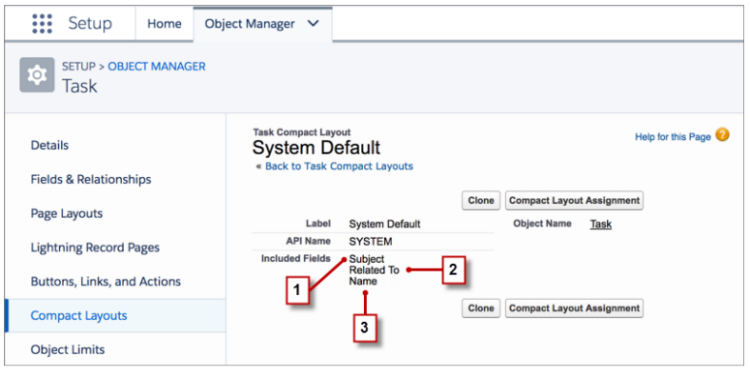
- Even though the Subject field (1) is in the task compact layout, the field doesn’t appear in the details section because it automatically appears in the task’s first row.
- The Related To field (2) doesn’t appear in the details section either because it’s included in the activity summary on the second row. But if this task is viewed from the timeline on a record where the related to information isn’t included in the activity summary, the Related To field does appear in the details section.
- The Name field (3) appears in the details section. And if you customize the task compact layout to include other fields that are important to your sales team, those fields also appear when the task is expanded.
Some fields are essential for the activity timeline’s usefulness. If you remove these fields from the compact layout, they continue to appear in the timeline. For example, suppose that you remove the Subject field from the task compact layout and the Start field from the event compact layout. In the activity timeline, the subject continues to appear for tasks and the start date remains for events.
The Hardest Working Layout in the Lightning Business
When configuring the activity timeline, keep in mind that event and task compact layouts also define the fields that are displayed in other places, including:
- The set of fields that are highlighted at the top of event and task records
- Task lists in Lightning Experience
- Task lists in the Salesforce1 mobile app
In some cases, Lightning Experience uses business logic to make sure the right fields display in the right context. For instance, there are fields that apply more to Salesforce1 than Lightning Experience. These fields are hidden in Lightning Experience, even if they’re included in the compact layout. The reverse is true for Salesforce1.
But there are times when a change to a compact layout appears in other places as well as the activity timeline. Knowing these relationships helps you maintain the effectiveness of the compact layout throughout Lightning Experience. For example, say that you want to show an event field in the timeline but it’s not important enough to highlight on event records. The highlights panel displays the first six fields from a compact layout. So adding the new event field further down in the event compact layout allows you to show the desired information in the activity timeline without diluting the highest-priority details in the highlights panel.
Got Record Types?
Remember, if your org includes record types for events or tasks, some or all of them may use a custom compact layout. Don’t forget to evaluate the activity timeline for each activities-related record type. You can configure all of the custom compact layouts associated with event and task record types to ensure that the timeline is tailor-made for all your users.
Let’s Do It Together
Ready to configure your org? Customize your event, email message, and task compact layouts to show the fields that are most important to your sales team. Here’s how you do it for tasks.
1. From Setup in Lightning Experience, click the Object Manager tab at the top of the page.
2. Click Task and then Compact Layouts.
3. If you only have the system default layout, click New. If you’ve already created a custom compact layout for tasks, select it.
4. If you’re creating a new compact layout, enter a name and label.
5. Select the fields that you want to see in the activity timeline, then click Save.
In this example, we selected the Assigned To, Status, and Priority fields.

6. Click Compact Layout Assignment.
7. Click Edit Assignment.
8. Assign the layout that you created or updated to serve as the primary compact layout for tasks.

9. Click Save.
Tasks in the activity timeline immediately reflect the changes you made.
If someone isn’t seeing the expected fields in the timeline, double-check that you updated the correct task compact layout. If your org uses record types for tasks, confirm that the right compact layout is assigned to the record type and that the record type is added to the user’s profile.
Enjoy Lightning Experience and the Activity Timeline!
Now that the activity timeline is customized for your sales users, they’ll be especially eager to try Lightning Experience. Stay tuned for the next post in this series, where we’ll look at configuring the activity composer to include all the quick actions your team needs.
Additional Resources