Releases happen three times a year, every year, whether you’re ready for them or not. If you handle releases well, you aren’t working harder each release; you’ve just made release readiness a habit, a muscle you don’t have to think about anymore.
A Salesforce Release is how Salesforce delivers new features and functionality to customers. They happen three times per year, Spring, Summer, and Winter, timed with the Northern Hemisphere seasons.
By the time a feature reaches you, it’s usually already passed through a few stages.
- Some features arrive as a Pilot, tested by a small set of organizations who opted in and were nominated.
- Others show up in Beta, rolled out more broadly for public testing but with limited support since they’re not fully finished yet.
- A feature becomes Generally Available (GA) when it’s formally part of the release, fully functional, and in most cases fully supported.
Knowing where a feature sits in that lifecycle tells you whether to adopt it now, wait, or flag it for later. That call is on you. You are the product manager for your org, regardless of whether it’s your job title.
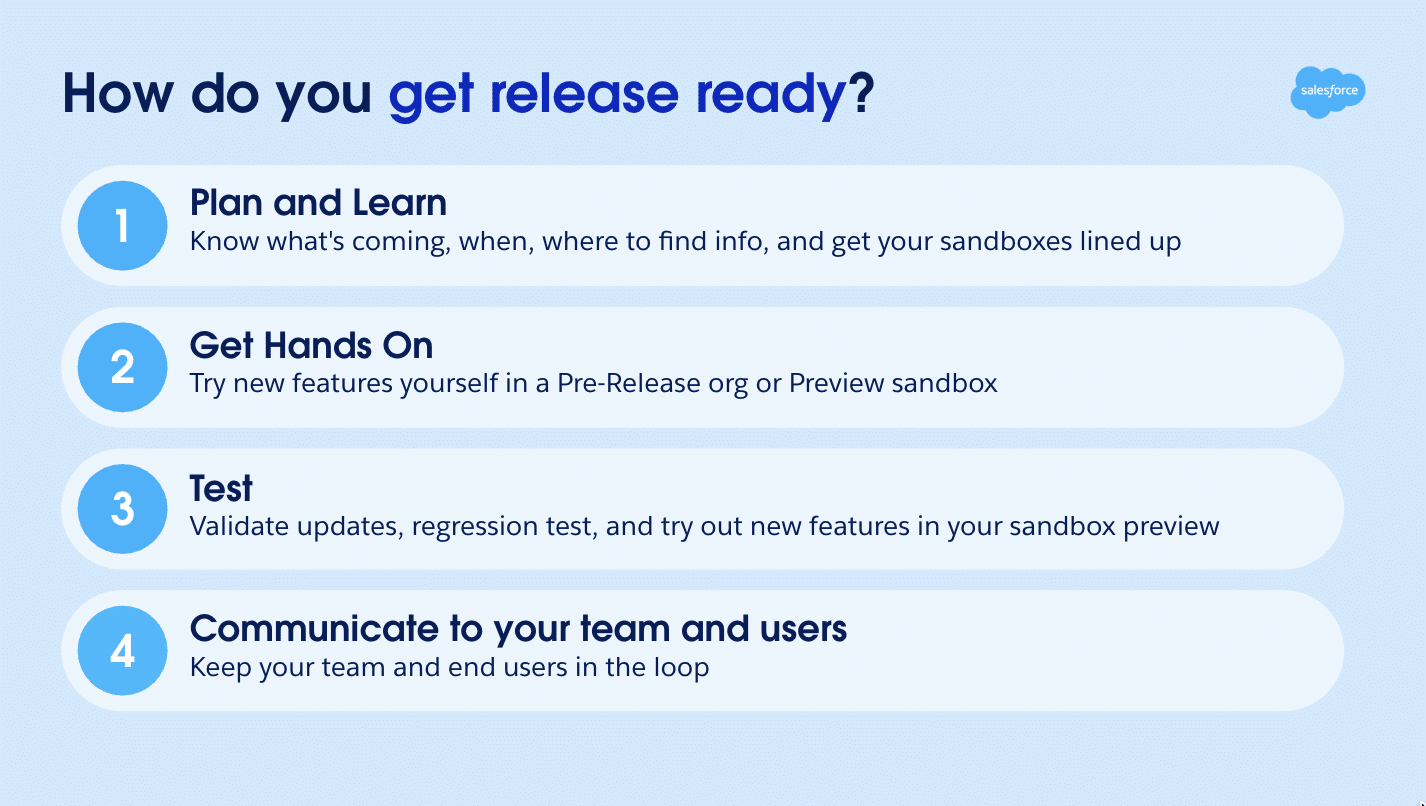
How do you build that release-readiness muscle? With four steps: plan and learn, get hands-on, test it, and communicate it.
Step 1. Plan and learn
Know your milestone dates. We publish a blog every release called ‘Admin Release Countdown: Get Ready for <insert the release name here>’ with a key dates infographic. Take the Salesforce Release Trailhead module, check the release preview site, get into a pre-release org before your sandbox even upgrades. The earlier you’re in, the more runway to catch what touches your build.
Treat your sandboxes deliberately
During the sandbox preview window, not all sandboxes get the same treatment. By sandbox preview window, I mean the stretch from when preview sandboxes become available until Production upgrades to the new release, roughly four weeks. Some sandboxes will upgrade to preview. Others stay put on the current release. It’s your call to make. You want a mix of both.
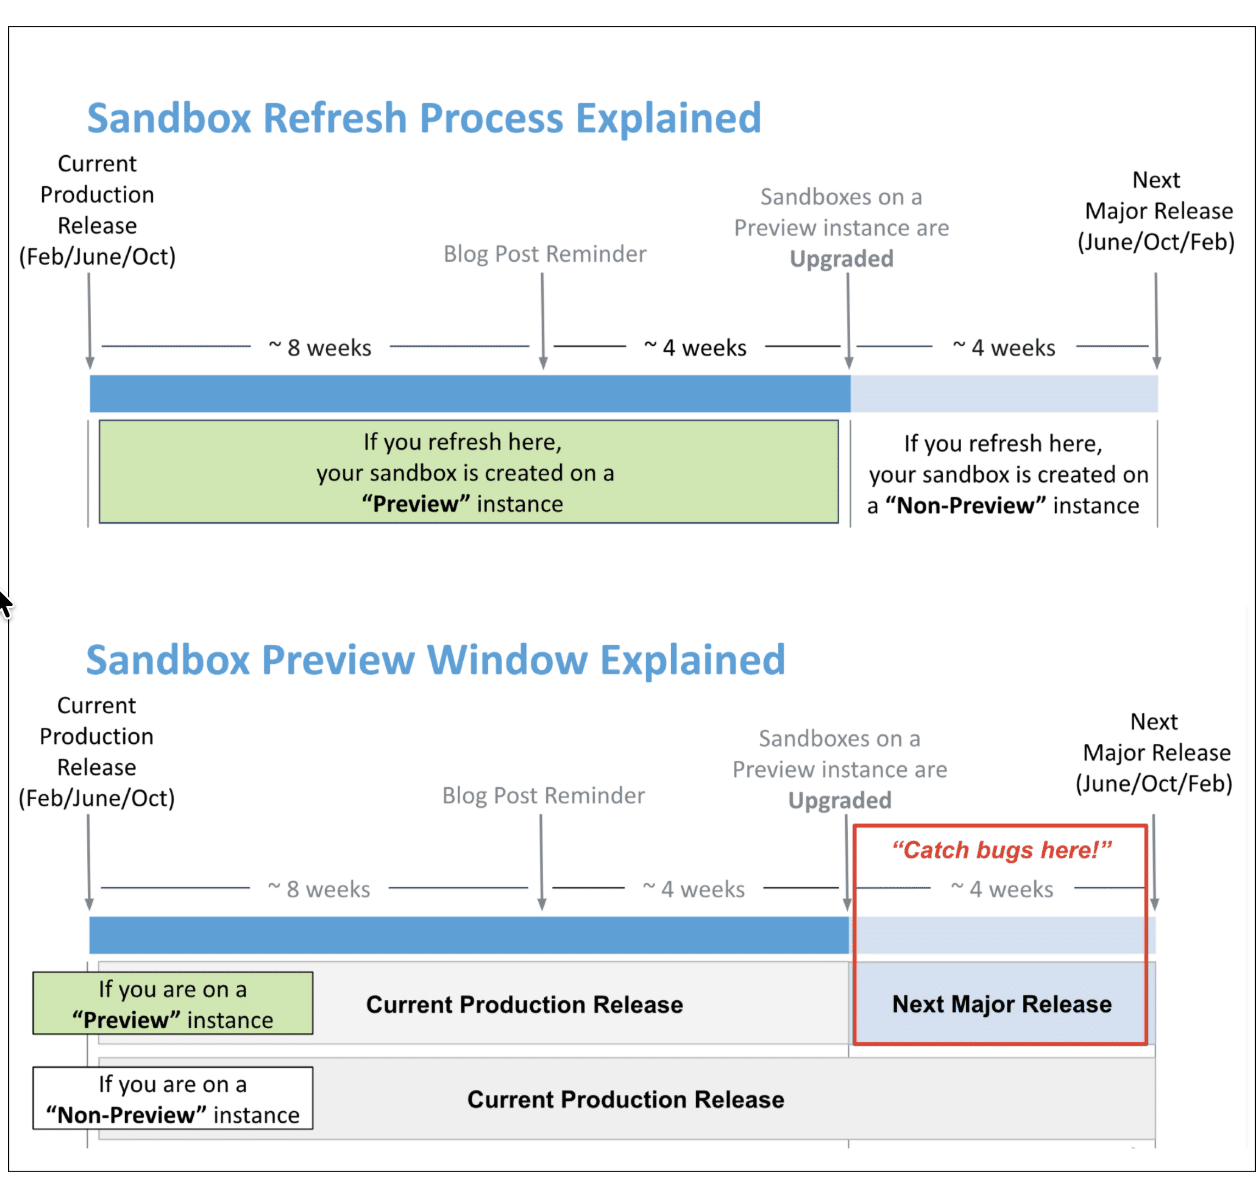
Here’s the split. Preview sandboxes let you test the upcoming release and give you a deployment path once Production upgrades. Non-preview sandboxes do the opposite job: they confirm whether a bug is new or pre-existing, and they act as your deployment path for making, testing, and promoting changes to Production while you’re still in the sandbox release window.
So which sandbox should you choose and when? Start with your deployment path: whatever your admins and developers build in, plus anything used for integration or UAT testing. Those need to stay non-preview. If one is slated to move to preview, refresh it during the sandbox preview window to bring it back to non-preview. While you’re at it, spin up your preview sandboxes fresh too, either refreshed or newly created, so they’re carrying your latest config and code instead of something stale.
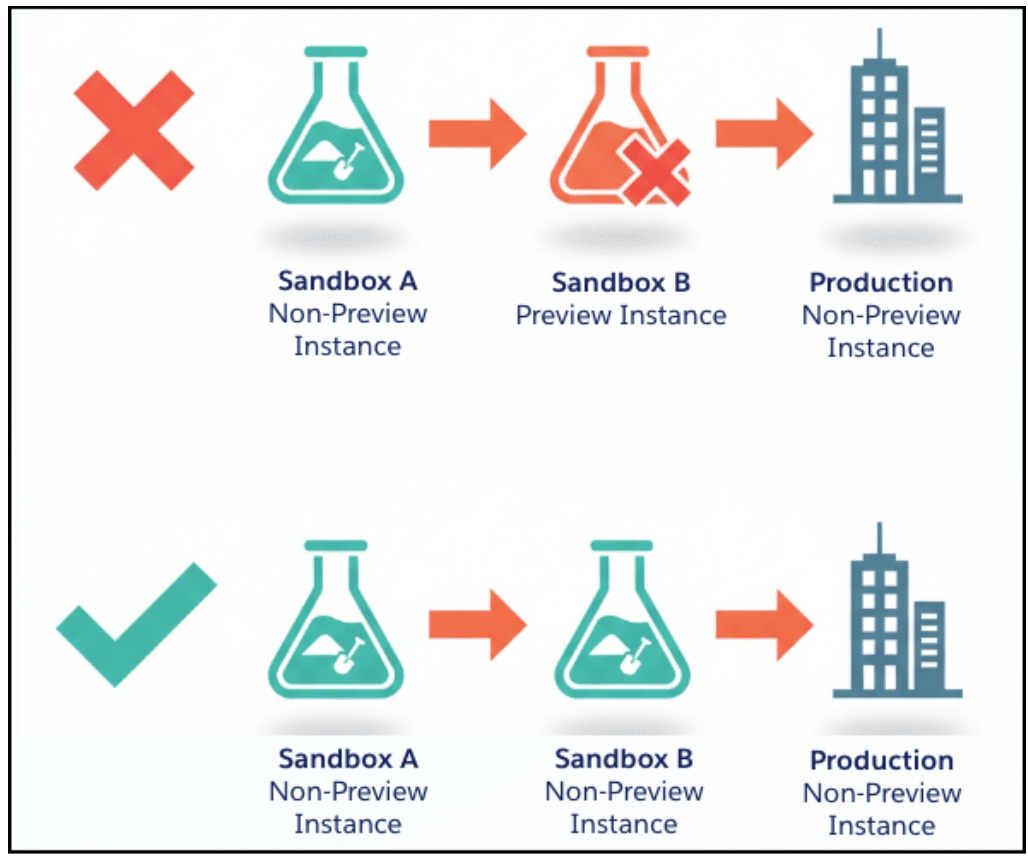
Plan your deployment path before you’re in the sandbox preview window. The rule to build around: deploy from like states. Non-preview sandbox to non-preview sandbox to non-preview Production. Where that’s not possible, you can deploy from a non-preview sandbox to an already-upgraded Production, but you’ll miss out on configuring any enhanced features that came with the upgrade.
The path to avoid is deploying from a preview sandbox straight into non-preview Production. A preview sandbox is running a sneak peek of the next release, so it may carry brand-new metadata that Production doesn’t have a slot for yet. It’s like importing a report that references a field type your org’s edition doesn’t support. Nothing is wrong with the report itself. Production just doesn’t recognize what it’s being handed yet.
Permissions are the clearest example. New permissions come with the new release and don’t exist yet in Production’s profiles and permission sets, so the deployment fails because the system can’t find them. You’d need to manually strip that extra metadata out of the XML before deploying again.
If you’re deploying from source-controlled metadata, like Git, don’t assume version control catches this for you. Git doesn’t track which Salesforce release a target sandbox or org is on, so a release-version mismatch like this slips through source control alone.
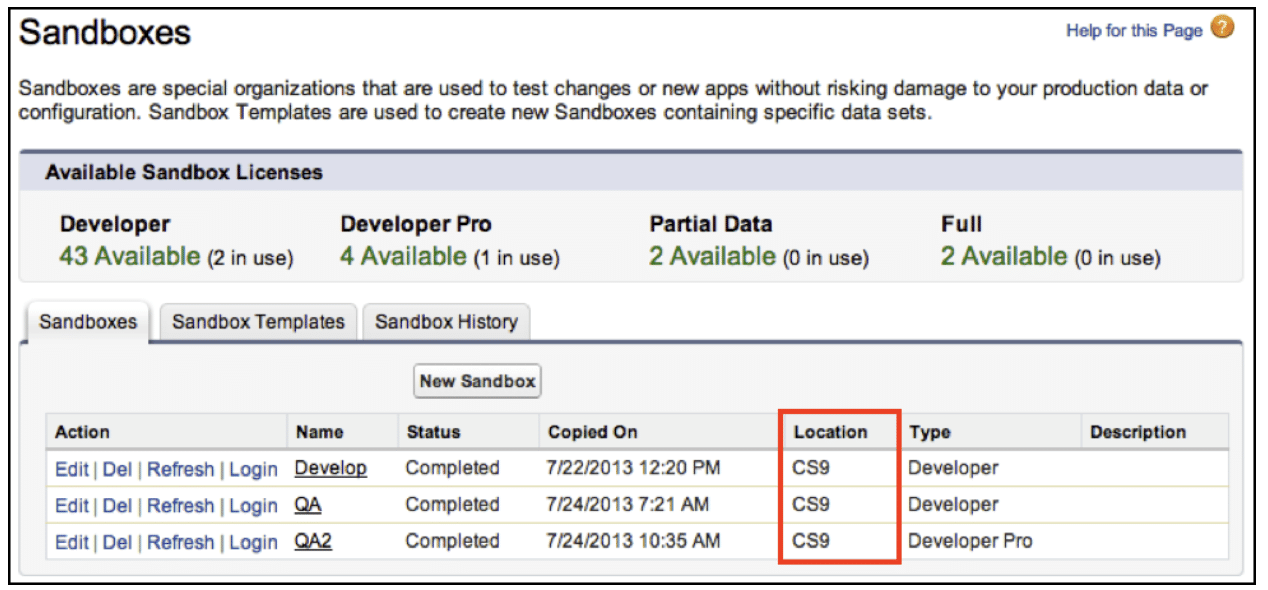
Unsure what state a sandbox is in? In setup, go to the Sandboxes page and find your instance information in the Location column.
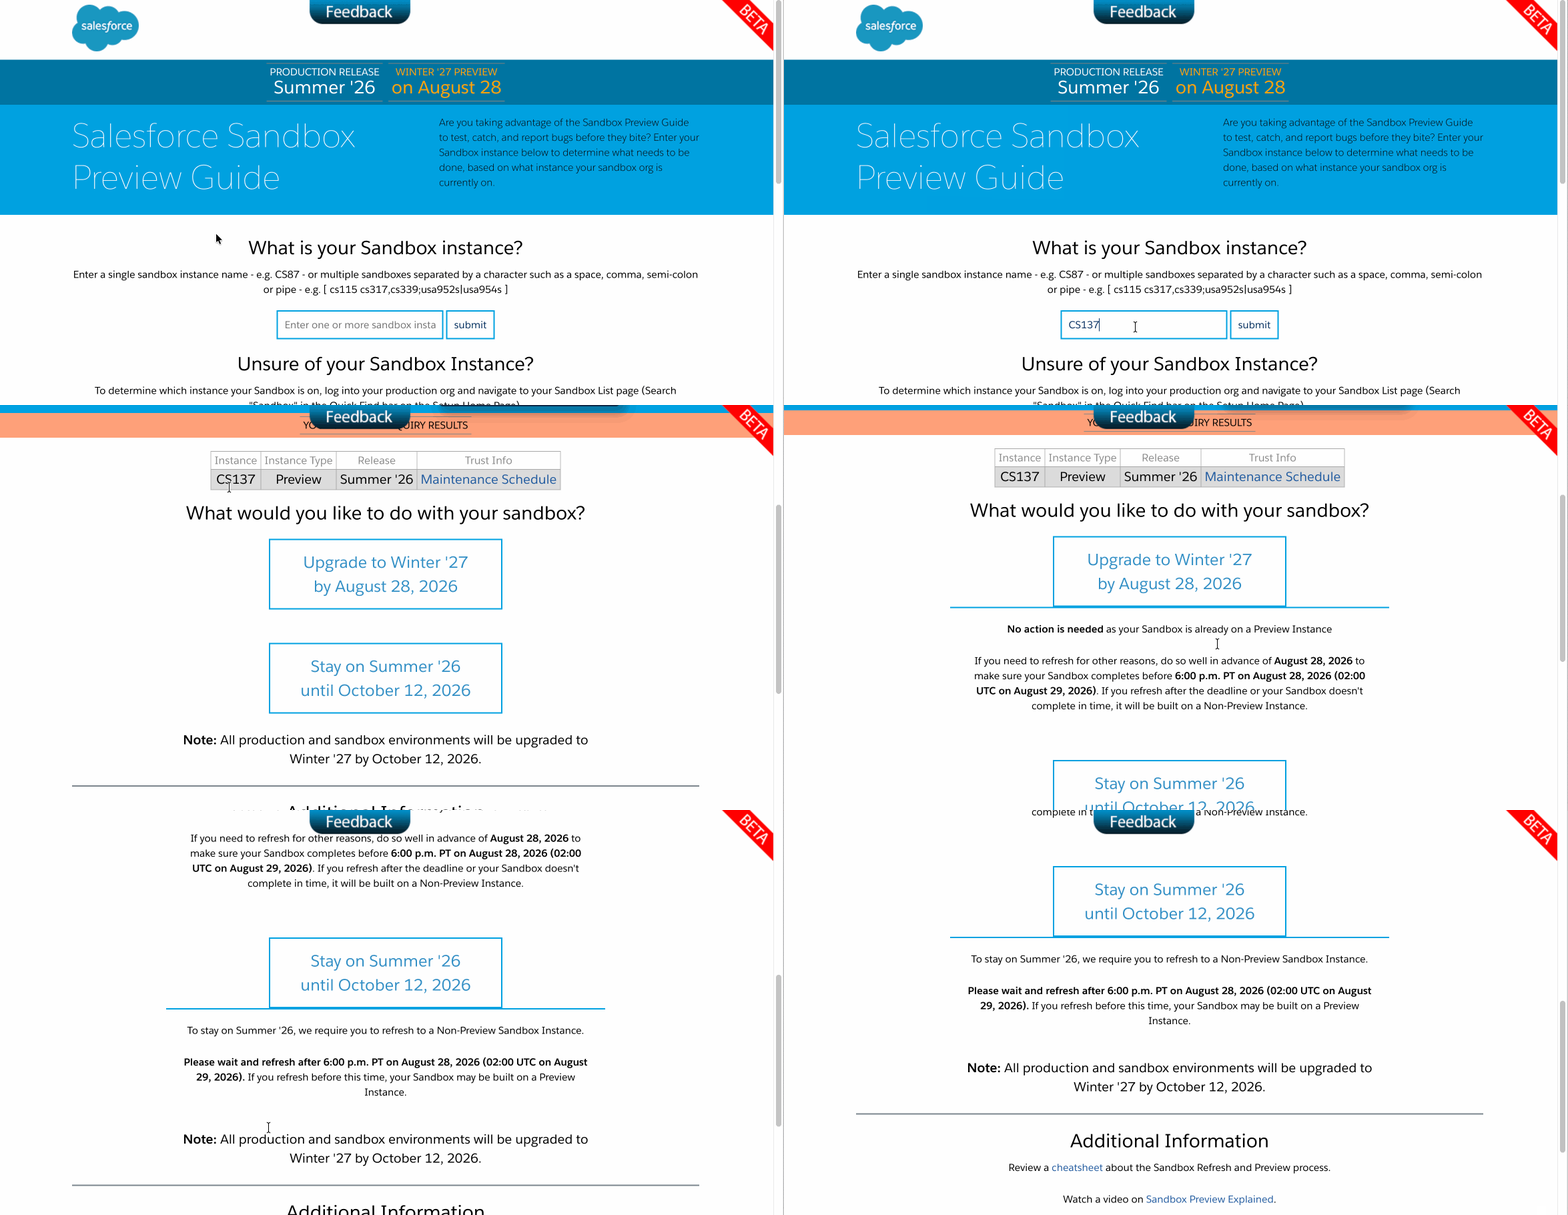
Then head to the Salesforce Sandbox Preview Guide and enter that instance information. Specify what you want to do with the sandbox, and the guide tells you whether to refresh it by a deadline or take no action.
Filter the Release Notes to what matters
Cover to cover, the Release Notes run 600+ pages. Nobody reads them start to finish, and you shouldn’t either. Prioritize and filter to what’s relevant to you, your business, and your industry.
Let AI take the first pass. While preparing for my Winter ’27 release blog, I asked Claude to convert the Release Notes PDF into text files, since it analyzes text better, and gave it the sections that mattered most to my post. I also had it flag the titles and descriptions of sections it thought didn’t apply to admins, so I could double-check its judgment myself. That’s the human-in-the-loop part: let AI do the heavy lifting, but ask it to show its homework. What I got back was a condensed, personalized version of the Release Notes instead of the full 600+ pages.
Use your favorite AI tool to do the same for you. You’ll still need to read what it hands back, but you won’t be starting from page one.
Review the release updates in Setup
Release updates are a curated list of system changes, security enhancements, and performance upgrades that Salesforce introduces to keep your org secure and efficient. They are similar to iOS or Android updates on your smartphone, but with a twist. Release Updates aren’t optional forever. Each one flips automatically after its enforcement date.
Read up on the Release Updates in Setup and figure out which ones apply to your org. Give yourself enough runway to test any required changes in a sandbox well before the enforcement date. You never want to find out about a mandatory change the same week it goes live.
Step 2. Get hands-on
You don’t fully understand a feature by just reading about it. You need to get hands-on with the feature to see how it works in practice.. After reviewing the Release Notes, I jump into a pre-release org and test the feature. I explore its functionality, try different configurations, and see how it behaves. That hands-on experience builds real understanding and helps you answer users’ questions with confidence.
Exploring a new release gives you a head start on evaluating how new tools could solve current business problems. You can configure and adapt the features early to maximize your organization’s return on investment. Use this time to evaluate the new features in the preview sandbox and determine whether to enable them for use for your users. Once you decide a feature is worth adopting, testing takes over to make sure it works reliably before it reaches your users.
Before you roll out a significant UI change or new workflow, give your power users or department heads early access in the preview sandbox. Get their feedback, see if it actually fits their processes, and get their blessing before it ever touches Production.
Use this time to discover configuration prerequisites. Enabling a feature is rarely just flipping a switch. Sometimes, it means also updating page layouts, adjusting profile permissions, or tweaking field-level security. Find all of that in preview so your deployment plan in Production is flawless.It’s not a race. You don’t need to implement every feature from a release on day one. Use the preview sandbox to sort quick wins your users can use immediately from bigger features that need a real project plan next quarter.
Step 3. Test it
Ensure the Salesforce release does not accidentally break your org
Salesforce does a lot of the testing legwork, but don’t assume nothing breaks. Regression test your org with every Salesforce release in a preview sandbox so you catch issues before your users file support tickets the day after Production upgrades. Testing ensures that new features or background architecture changes do not break or conflict with these existing customizations.
I’ve worked at large financial services companies, and testing by hand at that scale is brutal. That’s a good reason to invest in automated testing and let it carry the repetitive load. Search the AppExchange for automated testing tools that help teams handle functional, regression, and end-to-end testing without relying entirely on manual testing.
If something looks off during regression testing, try to replicate the issue in your non-preview sandbox first to verify it’s real. If it holds up, open a case with Salesforce Support, since the sooner Salesforce knows, the sooner it’s fixed for everyone.
Pro-tip: Track your testing progress by building a simple regression testing app in Salesforce. I built mine after juggling multiple production instances and teams, and a spreadsheet couldn’t keep up. Because the app lived in Salesforce, we could customize list views, run reports, and reuse the whole thing release after release.
Ensure your release works with the Salesforce release
You will most likely be working on deploying a release during the sandbox preview window. I recommend deploying and testing your release in both the non-preview sandbox AND the preview sandbox so you have all your bases covered. During your testing, pay particular attention to features that have been enhanced in the upcoming release to ensure everything still works as expected. In cases where there are differences, make note of any additional configuration or customization needed in the upcoming release, as you will need to apply those same changes when Production is upgraded. By testing your release in both non-preview and preview sandboxes, you know your release will work in both the current environment and the upcoming Salesforce release.
Test new features before the Salesforce release upgrades Production
Regression testing protects what you already have. Testing new features for enablement is about proactively improving your org. Your preview sandbox is available 4–6 weeks ahead of the Production upgrade, and that window is gold if you use it right.
Evaluate the value over effort. A lot of the best new features aren’t on by default; it requires you to explicitly enable and configure them. Use the preview window to figure out if a feature actually solves a real business problem and whether the setup effort is worth the ROI, before you commit to rolling it out in Production.
Check compatibility with what you’ve already built. New features can potentially clash with your org’s setup. For example, a new standard button can interfere with a custom Flow you built for the same purpose. Testing lets you retire your old custom solutions in favor of the new standard feature without breaking anything.
Step 4. Communicate it
Communication is the last of the four steps. This step is important, but people often skip it. It’s the step that decides whether the first three mattered. You can plan flawlessly, test thoroughly, master every feature, and none of it counts if nobody else knows about it.
Share with your team of admins and developers
Before the production upgrade, share your release knowledge with your team. Knowledge is power. Be the multiplier. Don’t assume they read anything; they probably didn’t, and that’s fine. But YOU did the homework, so share the wealth. I like to book a lunch-and-learn and show the team features live, or with animated GIFs. There’s no better way to bring a feature to life than watching it in action.
Share at go-live with your internal users
After your production org upgrade, share the release with your users too, or with a select few power users you can train as multipliers. Build your training and enablement materials early. If you’re planning to enable a feature on release day, your users need to know what to do with it immediately. Use the time to create screenshots, write documentation, record demo videos, and build In-App Guidance, so your training is ready the moment the feature goes live. Pick the changes that actually affect their day-to-day, and meet them where they already work. If they live in Slack, meet them in Slack.
Make release readiness a habit
This isn’t meant to be a comprehensive list. Pick one step you’re weakest on this release and do that one differently. Next release, add another. That’s how you can build a release readiness habit.
Resources