Yes, it is release time again. It happens three times a year, like clockwork. While it seems a bit far away at the moment, Winter ’27 will be here sooner than you think. It’s important as an Admin to be release ready. One of those steps is to read the release notes. I know, I can hear the big sighs out there. While it is a 600+ page document, you don’t need to read the whole thing. Focus on the features that matter to your company and industry.
To get you started, I’ve handpicked the enhancements most likely to matter to you and your users, spanning the core platform, plus a look into Agentforce and Headless 360. Consider this blog your launchpad into what’s new in this release.
Releases include pilot, beta, and generally available (GA) features.
- Pilot: Usually the first phase of public testing, pilots normally include a small subset of participant companies. These companies must request to opt in to a pilot and then be nominated for participation.
- Beta: This phase involves rolling out a feature publicly for testing. Beta features are normally given limited support as they are not yet fully functional or finished, so we recommend getting hands-on with these features in a sandbox.
- GA: Once a feature has passed the pilot and beta testing phases, it will be formally included in a Salesforce Release. GA features are considered fully functional and, in most cases, fully supported.
General Platform enhancements
Unlock flexible inline editing on List Views
We’ve added two new User Interface Settings to give you more control over how your users edit records directly from list views. Users can inline-edit any field they have access to, regardless of whether that field is on the page layout AND inline editing now works even when a list view contains records of different record types.
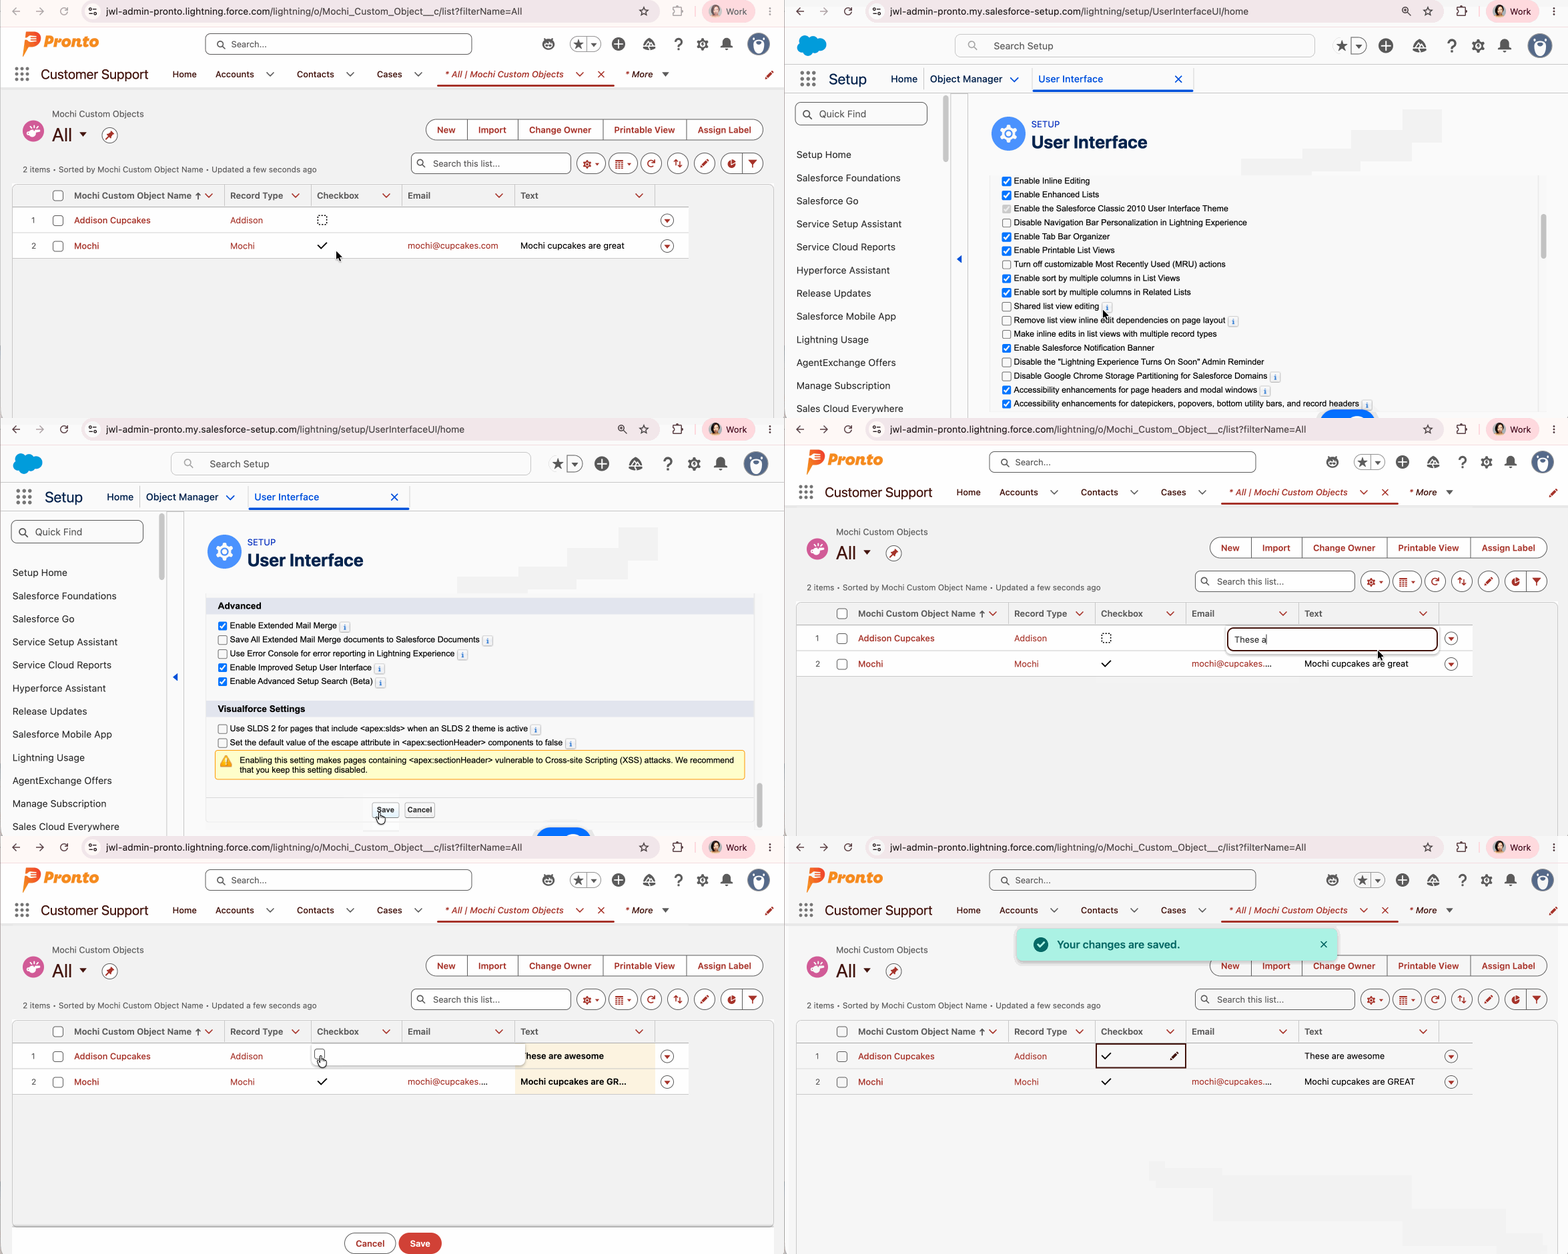
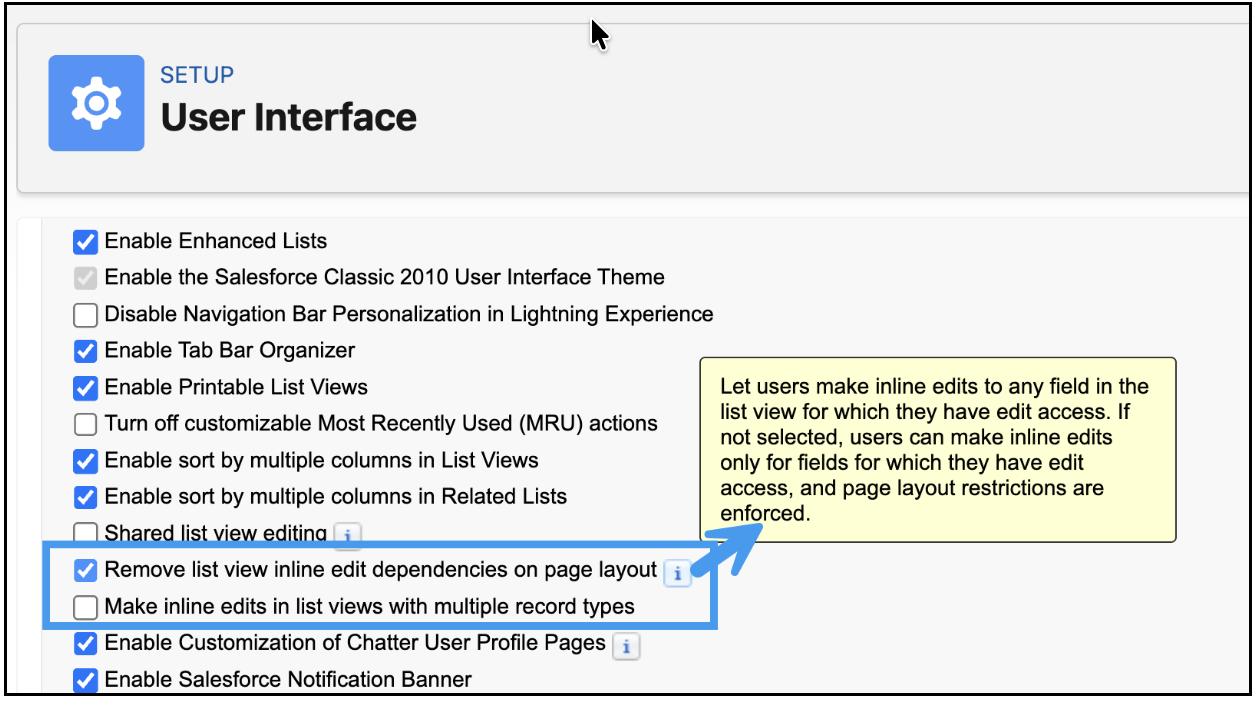
These user interface settings are turned off by default. To enable them, go to the User Interface Settings in Setup. Enable the Remove list view inline edit dependencies on page layout to turn on the field-access change. Enable Make inline edits in list views with multiple record types for the ability to inline edit multi-record-types.
Set Field History Tracking for Users (Generally Available)
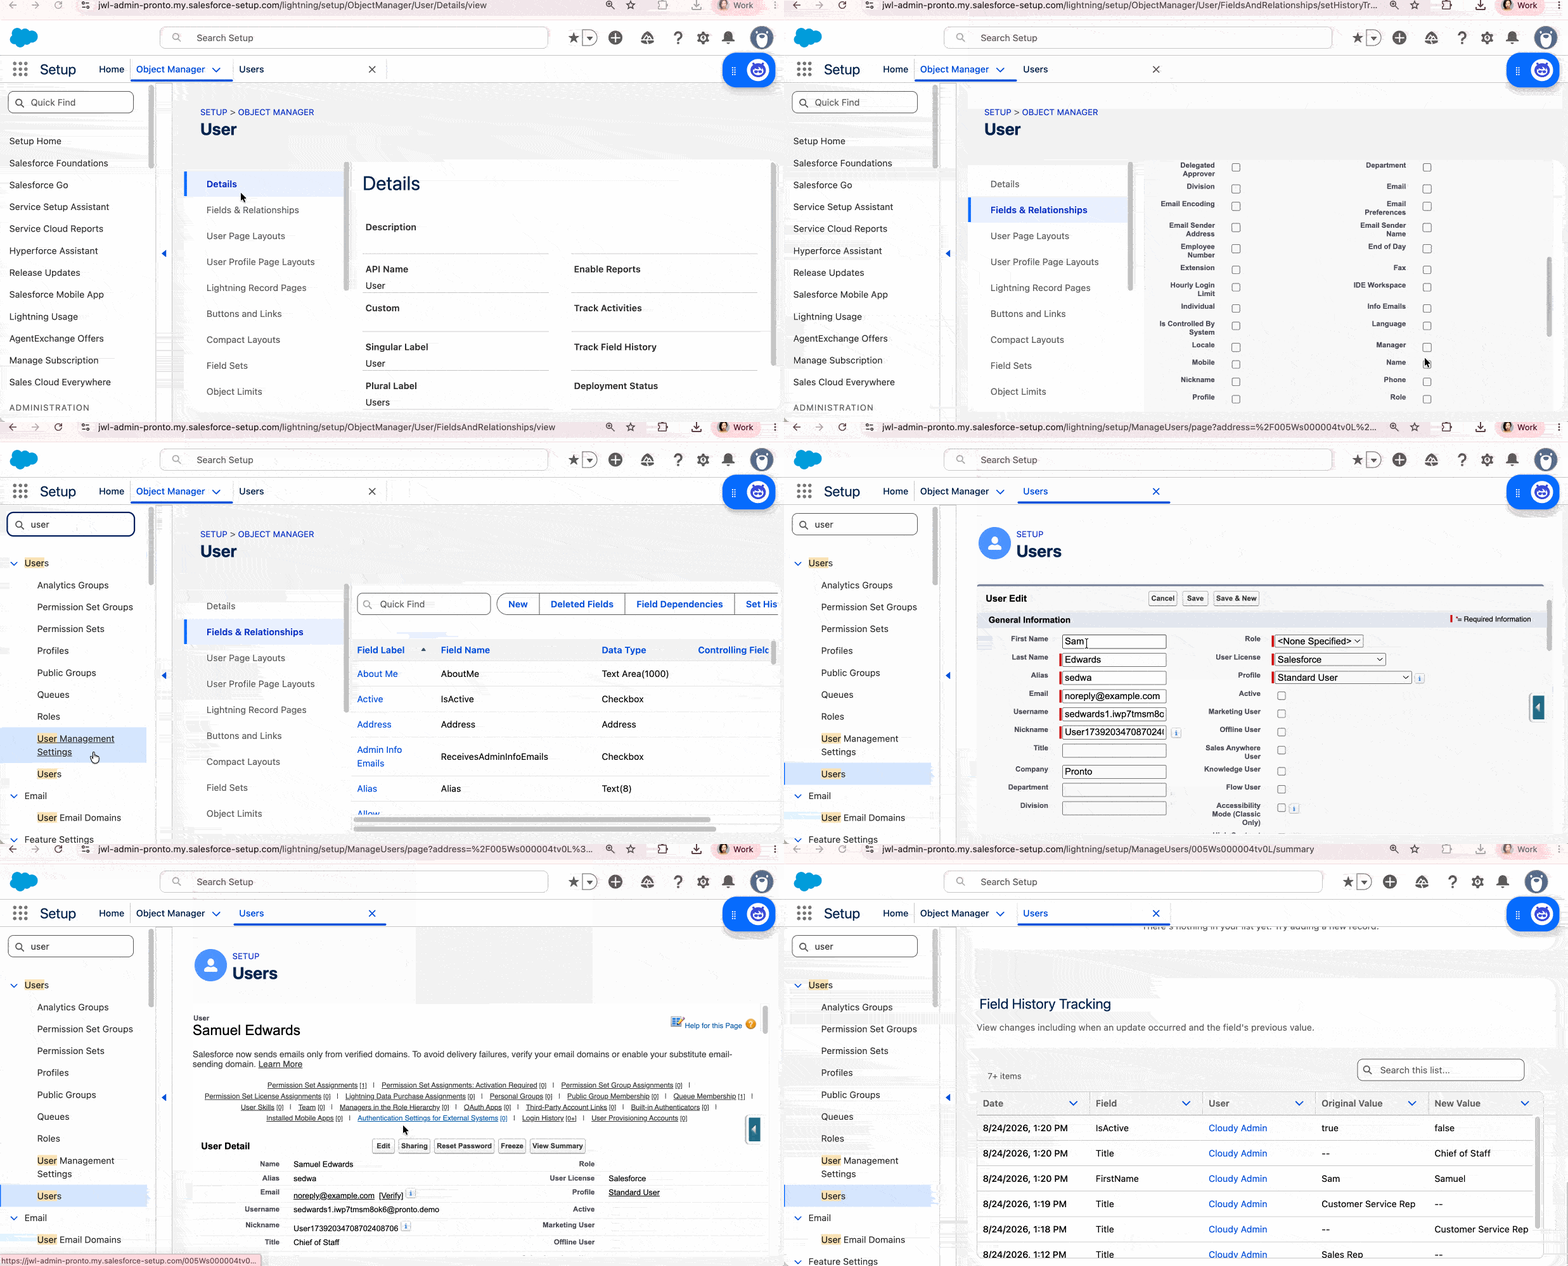
User Field History Tracking is now Generally Available. You can track up to 20 fields on the User object and see a history log with old/new values, timestamps, and who made the change. The feature is auto-enabled in Winter ’27. All you need to do is go to Object Manager | User object, click on the Set Field History button, and just like you do for other objects, select the fields to track history for. Salesforce retains field history tracking data for up to 18 months in the UI.
Put the Follow button front and center in Lightning App Builder
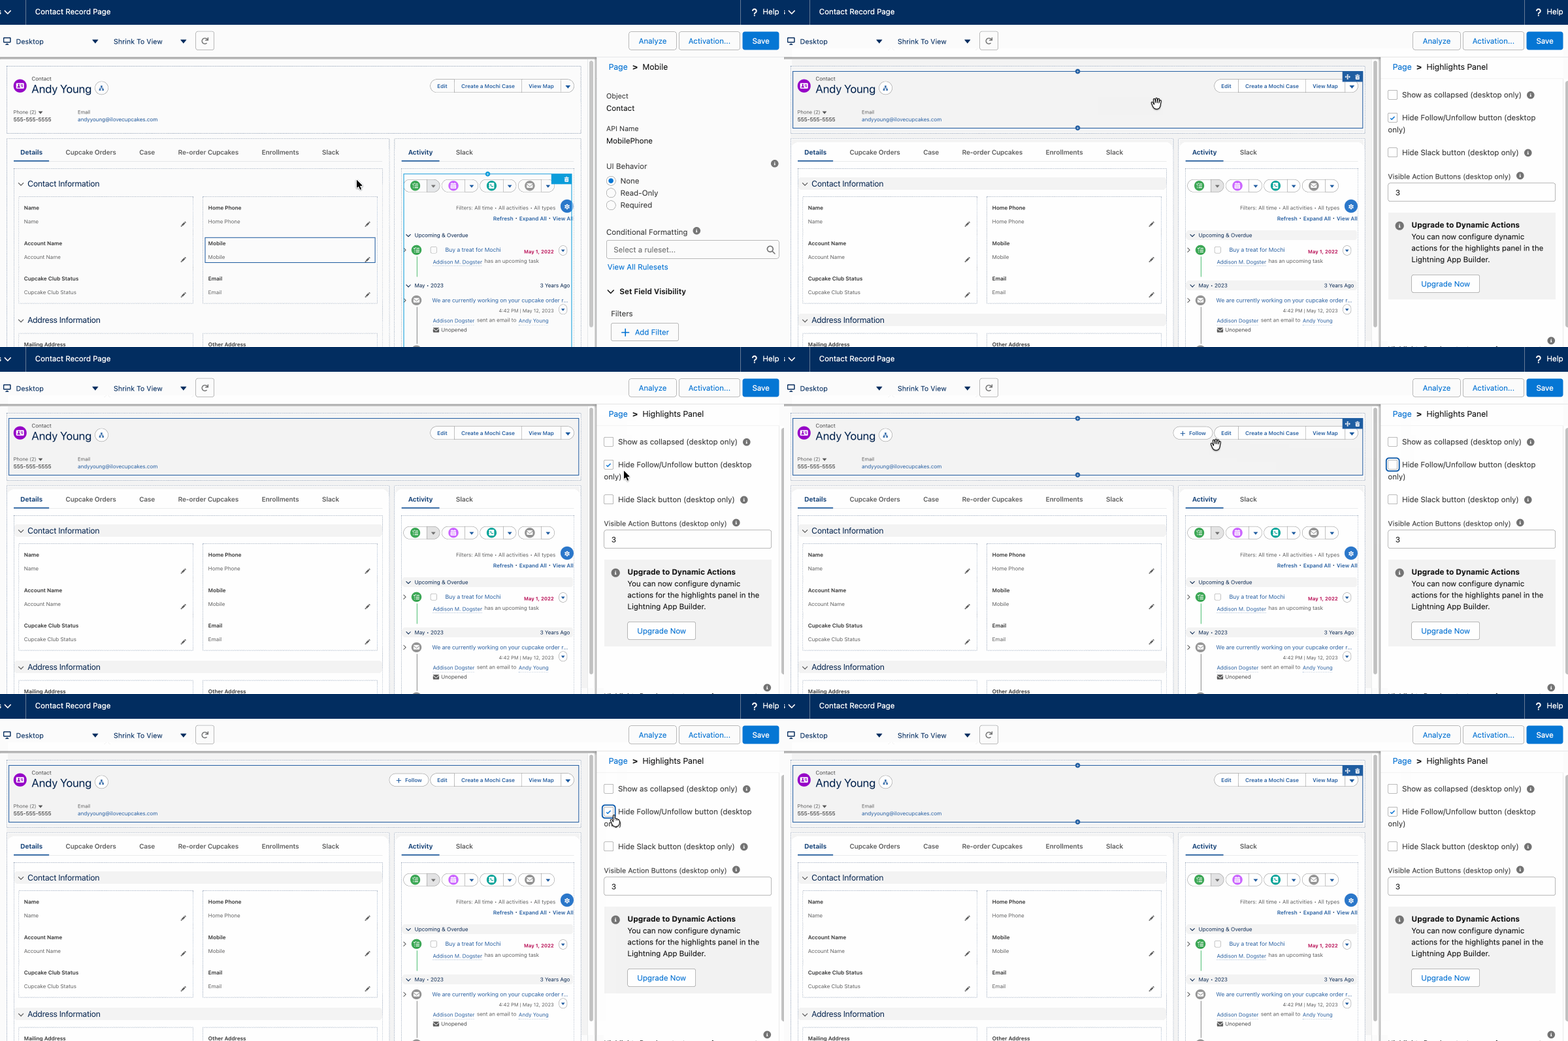
The Dynamic Highlights Panel is one of the most valuable pieces of screen real estate on any record page. You can now surface the standard Follow button directly inside the panel, so your users don’t have to hunt for it. It’s hidden by default, which means you control what object record pages it appears on.
In Lightning App Builder, select the Dynamic Highlights Panel component on the canvas, and enable or disable the Hide Follow/Unfollow button checkbox in the properties pane, and save.
Permissions and Sharing enhancements
Stop losing manual shares on record transfer
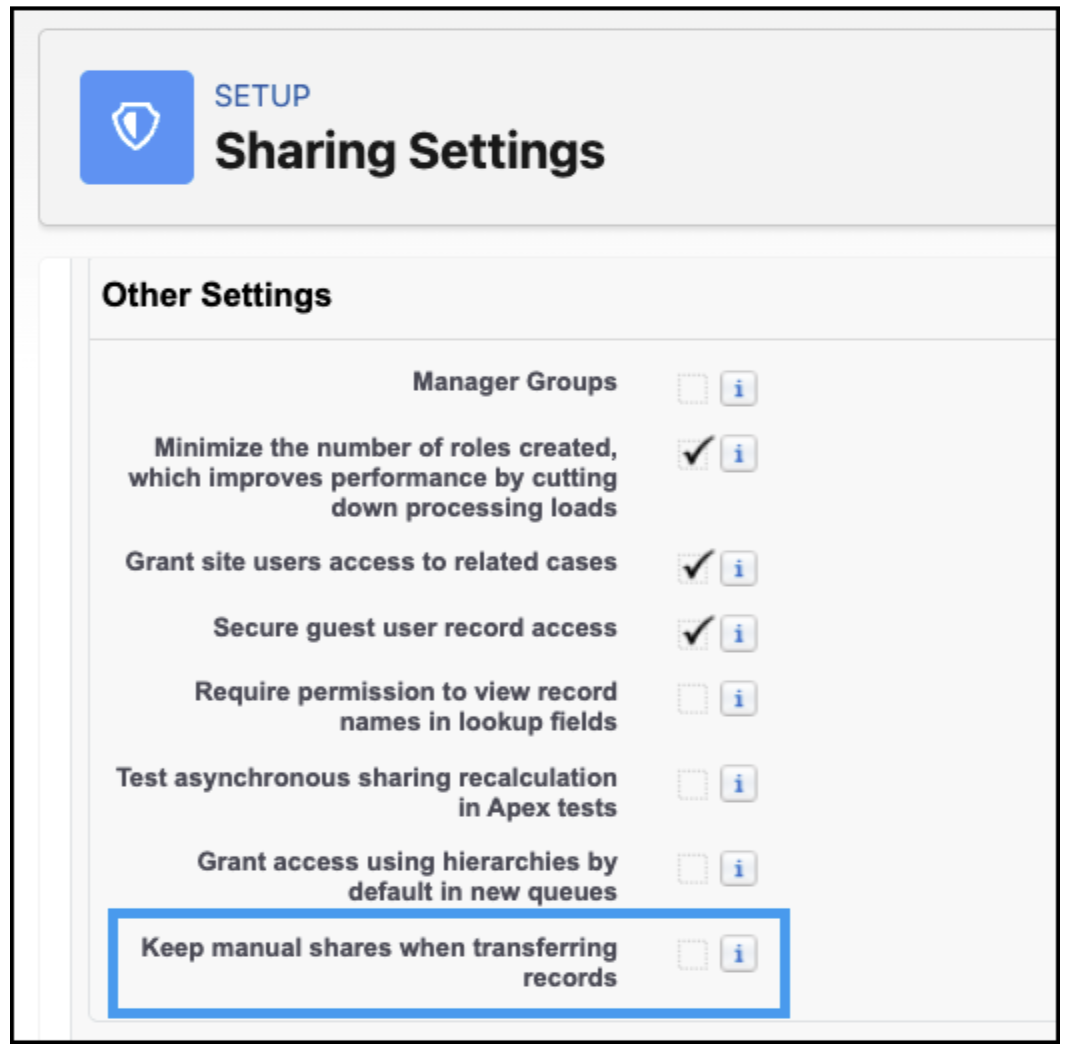
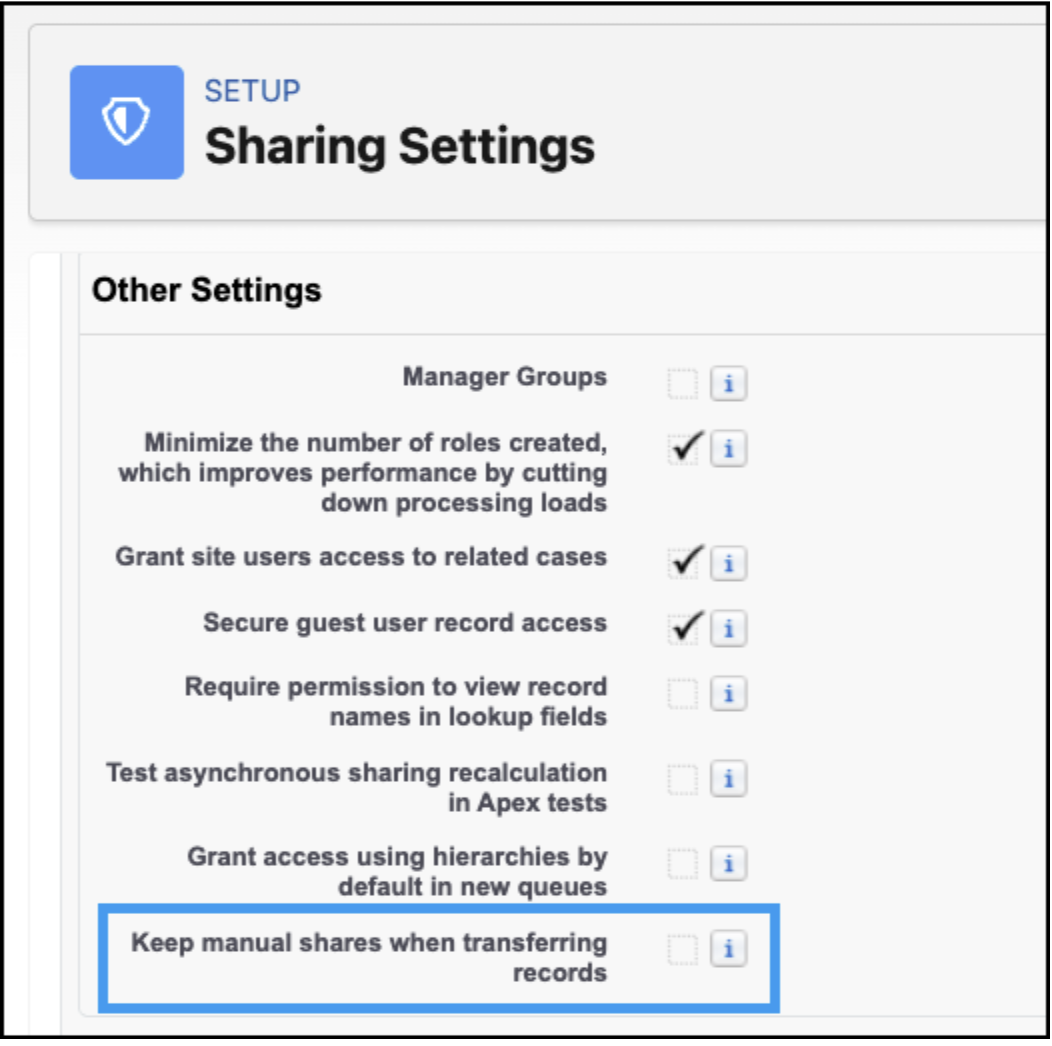
If you’ve ever reassigned a record only to hear from a user that they suddenly lost access, this feature is for you. When a record’s owner changed, Salesforce deleted every manual share on that record automatically. It didn’t matter that you’d intentionally set those shares up. They were deleted and as a result, anyone who previously had access through manual sharing lost it. Now you decide whether to keep them at the org level.
If you’ve built or managed sharing frameworks for standard objects, you’ve hit this wall. You’re stuck with the generic “Manual” row cause, so your carefully coded shares just vanish the second a record changes hands. Well, that’s about to stop.
And there’s bigger news. Forward looking statement…according to a very reliable source (thank you, Larry Tung), we’re targeting October 10 to release Custom Row Causes for Standard Objects via the Metadata API. You’ll be able to finally know exactly why a record was shared. By early November, you’ll manage those custom row causes right in Setup. No more vague share reasons cluttering your audits. No more losing access when records change owners.
Big thanks to the IdeaExchange community for keeping this idea alive for years. This one’s proof your votes actually move things.
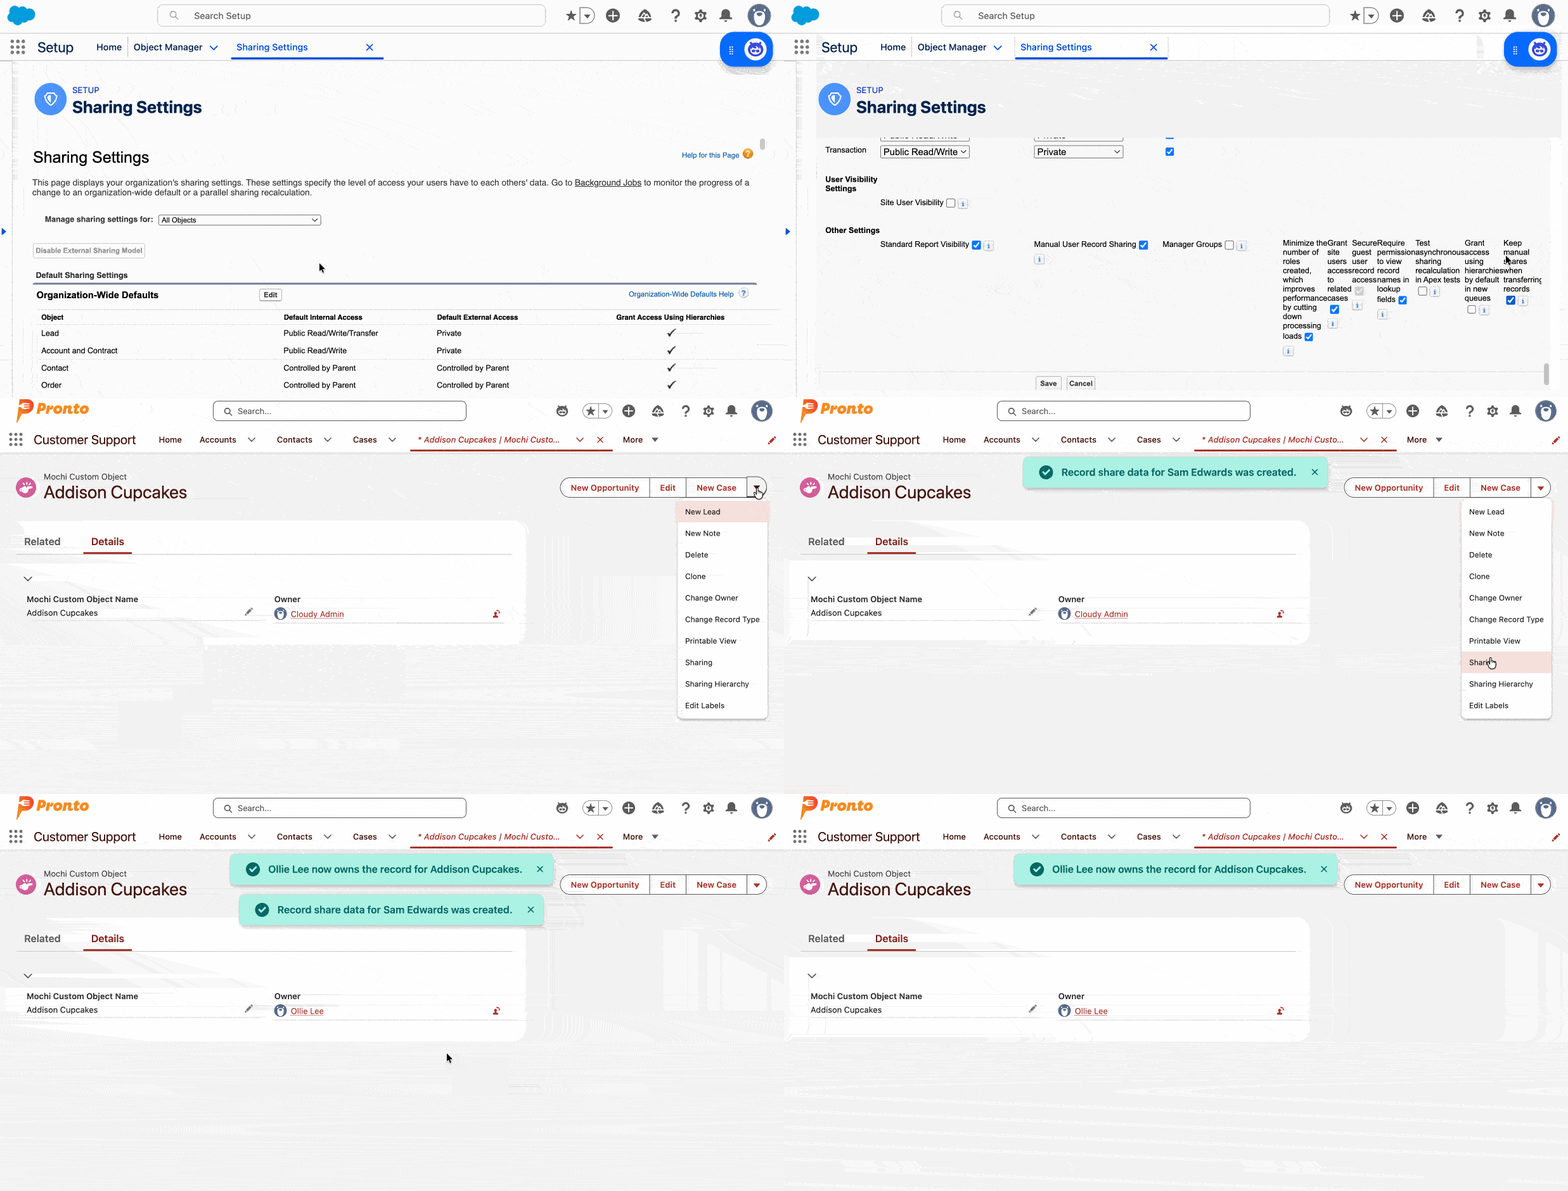
In Setup | Sharing Settings | Edit, enable the Keep manual shares when transferring records checkbox, and save.
Security enhancements
Explore Features That Support MFA and Email Security
Security moves fast, and it doesn’t slow down between releases. Take a look at what’s new for multi-factor authentication (MFA) and email domain verification.
Added late in Summer ’26, these new features and updates help you adopt MFA.
Added in late Summer ’26 or in Winter ’27, these new features help you verify your email-sending domains and manage email verification securely.
See exactly which email domains still need verification
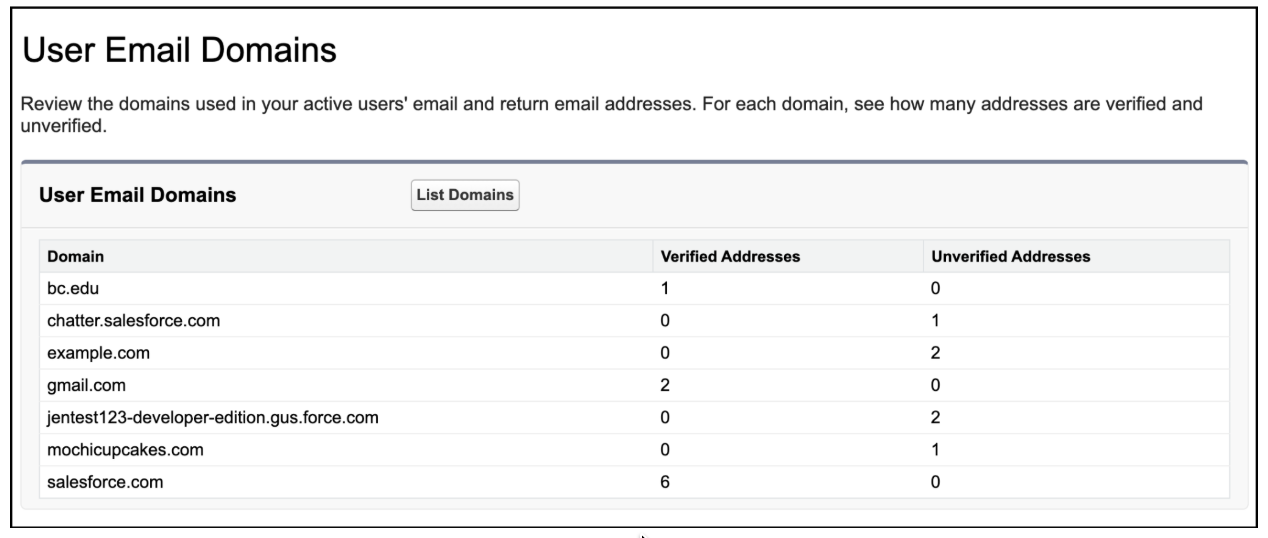
The new User Email Domains page in Setup gives you a consolidated view of every email domain used across your active users, with verified and unverified address counts for each domain. Instead of hunting through individual user records to piece together your org’s verification status, you get the full picture in one place.
Salesforce requires both user-level and domain-level email verification for email to send correctly. Use this page to identify which domains still need verification. You can also use that information to decide whether to use a substitute email address for users with unverified email domains.
To enable, go to Setup | User Email Domains, select User Email Domains, click List Domains to populate the table.
Skip the DNS step when copying authorized email domains into a sandbox
You have a new shortcut for email configuration when setting up a newly spun sandbox. Instead of working through the DNS verification process for each authorized email domain in a new sandbox, you can now copy verified domains from production and import them all with one click. Salesforce generates an org-specific verification code for each authorized domain. When you import from production, that verification carries over.
Set each domain you want to be sandbox-portable in production as a one time setup. Edit the domain in Authorized Email Domains, select Allow copy to sandbox, and save. Now, any sandbox can pull those domains in instantly from its own Authorized Email Domains page. It takes only a minute to set up but saves time for every subsequent sandbox refresh.
Enable this in production by navigating to Authorized Email Domains in Setup, select Authorized Email Domains, edit each domain you want to copy, select Allow copy to sandbox, and save. In any sandbox, on the Authorized Email Domains page in Setup, click Import from Production.
Send sensitive emails securely with a secondary sender email address
Password reset emails, verification notices, anything carrying sensitive data are emails you don’t want running through a corporate relay where interception is a risk. Secondary sender addresses give you a way to route those specific emails directly through Salesforce’s own Mail Transfer Agent instead. This feature was first available in Summer ’26, but it’s worth highlighting now if you haven’t set it up yet.
In Setup, verify the email-sending subdomain for your secondary sender. Then go to Workspaces | Administration | Emails for your Aura, LWR, or Visualforce site, select Secondary Sender Email, and enter the address. Your sensitive transactional emails now take a more secure path without touching your corporate relay at all.
Control email verification requirements domain by domain
If your org has a trusted integration or a system-managed process that updates user email addresses in Salesforce, you’ve probably run into friction with email address verification requirements. This friction is now self-service. For each authorized email domain, you can now set verification to Always, For Updated Addresses Only, or Never, right in Setup. No Salesforce support ticket needed.
To enable, go to Setup | Authorized Email Domains, select Authorized Email Domains, click Edit next to a domain, then for Require Address Verification to Send Email, select Always, For Updated Addresses Only, or Never.
Add Chrome extensions to your Experience Cloud trusted URL list
If you manage an Experience Cloud site and your users rely on specific Chrome extensions, here’s a targeted addition to your Trusted URLs toolset. Add Chrome extensions directly from the Trusted URLs page in Setup, using the 32-character Chrome extension ID in the format `chromeextension://[extension-id]`. Note: Wildcards aren’t supported, so each extension needs its own entry. This also means you’re being intentional about exactly which extensions get trusted, which is the right security approach.
This change closes a real gap for orgs where Chrome extensions interact with Experience Cloud sites and content security policy was getting in the way.
To enable in Setup, go to Trusted URLs, add a new entry using the 32-character Chrome extension ID in the format:
chromeextension://abcdefghijklmnopabcdefghijklmnop
Lightning Reports and Dashboards enhancements
Preview report records without losing your place (Beta)
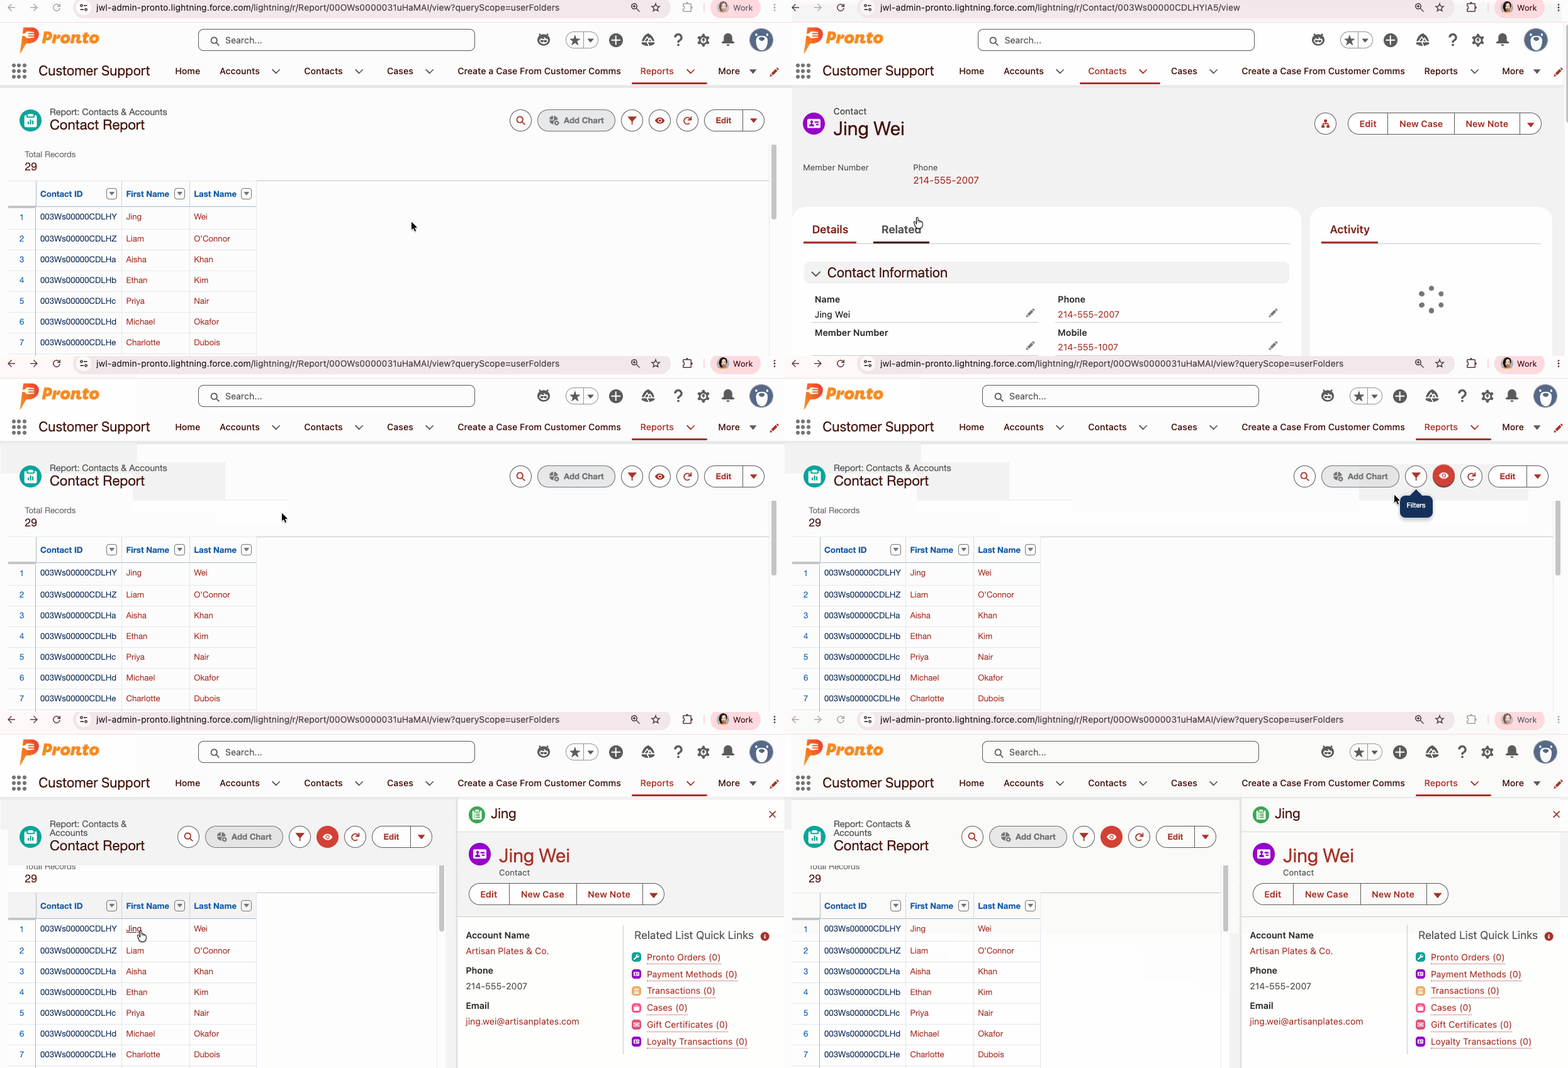
How many times have you clicked a record link in a report, ended up on the record detail page, and then had to navigate all the way back to your filtered, sorted report view? Record preview in Lightning Reports solves that. Simply click a record link. It opens in a side panel, keeping your filters, columns, and the full record list right where they were.
To turn it on, go to Setup | Reports and Dashboards Settings and enable Show record previews on Lightning Reports (Beta).
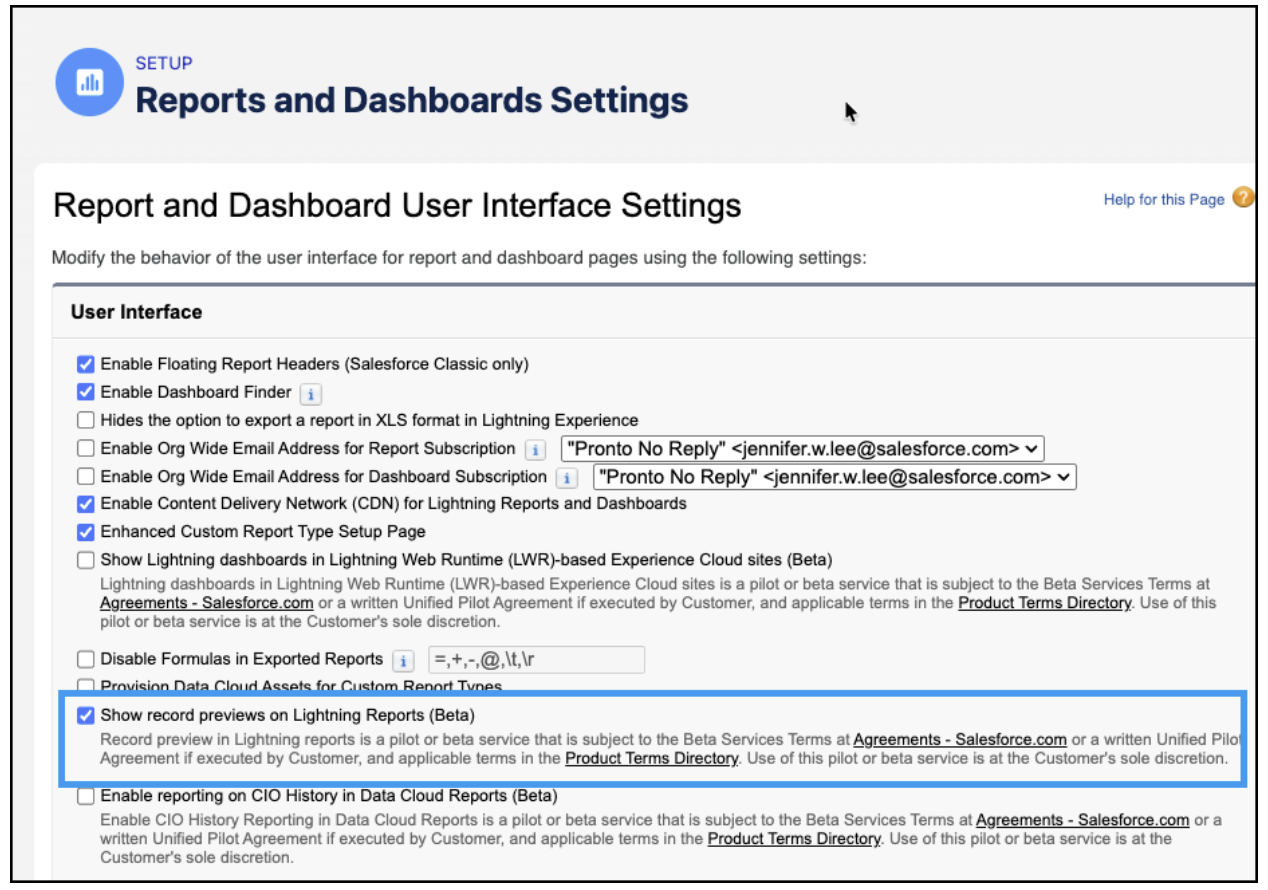
When you’re in report view mode, click the eye icon (Open record links as a preview). Once that’s active, every record link opens in the side panel. Give it a try in a sandbox to see how it fits your team’s reporting habits.
Filter joined reports with Common Rows Only (Beta) to show only the records that actually match
Joined reports got a lot cleaner. With Common Rows Only (Beta), you show only the records that appear across every block in your joined report. If you’re running an Accounts and Opportunities joined report grouped by Account Name, you’ll only see accounts that have active opportunities. No more dealing with rows that exist in one block but not the other.
Contact Salesforce Customer Support to turn on this feature. Once turned on, within the Report Editor, open your joined report, edit a block, toggle on Common Rows Only for the block to show only the records that appear in every report block. Don’t forget to save the report to apply the changes.
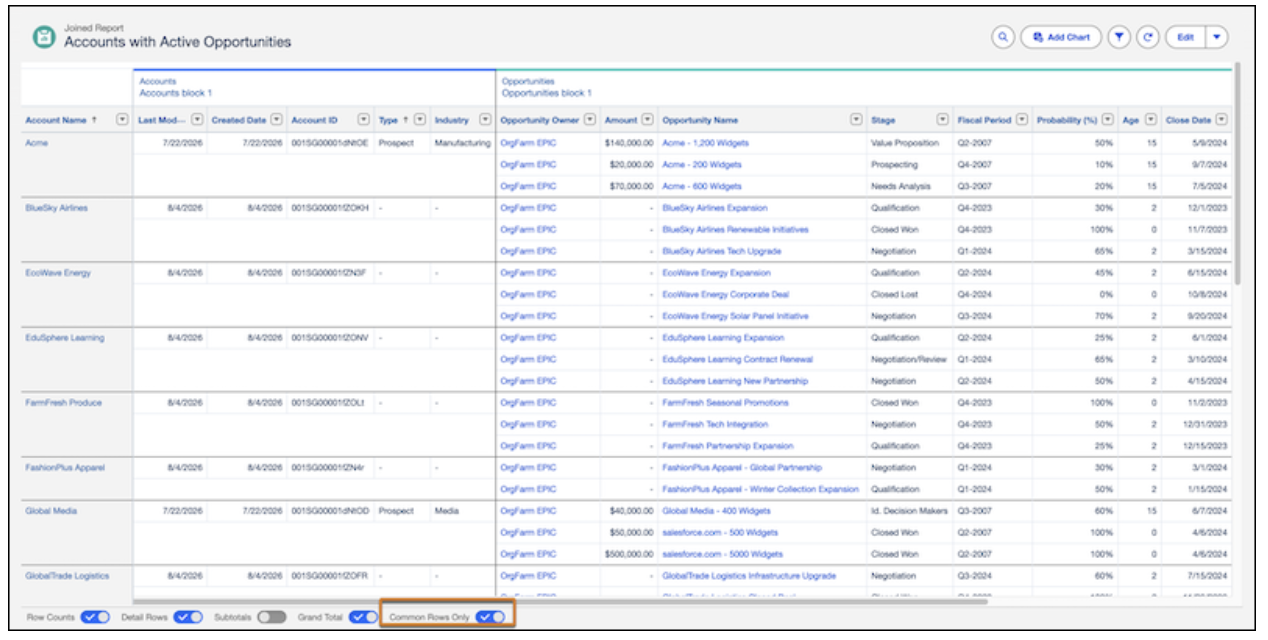
Note: This feature is in Beta so we recommend you test this in a sandbox first so you can see exactly how it changes your report before you share it with your stakeholders.
Embed Lightning Dashboards in your Lightning Web Runtime Experience Cloud Sites (Beta)
The process of embedding Lightning dashboards in your LWR Experience Cloud sites just got simpler. Now your Experience Cloud users can view widgets, update filter values, and refresh individual widgets or the entire dashboard. To enable this, use the Lightning Dashboard component directly in Experience Builder, and your site users can view your dashboard widgets right there in the portal.
In Setup, navigate to Reports and Dashboards Settings, enable Show Lightning dashboards in Lightning Web Runtime (LWR)-based Experience Cloud sites (Beta). In Experience Builder, drag the Lightning Dashboard component from the Components section onto an LWR page and enter the dashboard ID. Salesforce applies the access controls automatically and your users only see what their permissions allow.
Your LWR Experience Cloud sites can now run Lightning reports natively, no workarounds. Drop in the Lightning Report component onto the page and now your users get the full experience right in the site: building charts and tables, applying conditional formatting, viewing trend reports, collaborating in Chatter, and editing records inline. All of it, without ever leaving the portal.
In Setup, navigate to Reports and Dashboards Settings,enable Show Lightning dashboards in Lightning Web Runtime (LWR)-based Experience Cloud sites (Beta). In Experience Builder, drag the Lightning Report component from the Components section onto an LWR page and enter the report ID. Salesforce applies the access controls automatically and your users only see what their permissions allow.
Flow Builder enhancements
Drill into flow version changes with one click
Flow Version Comparison already gives you a way to see what changed between versions. But now, it’s easier to actually work with those results. Element name labels in the comparison table are now clickable, you can open elements in a resizable side panel with full change details with the full change details.
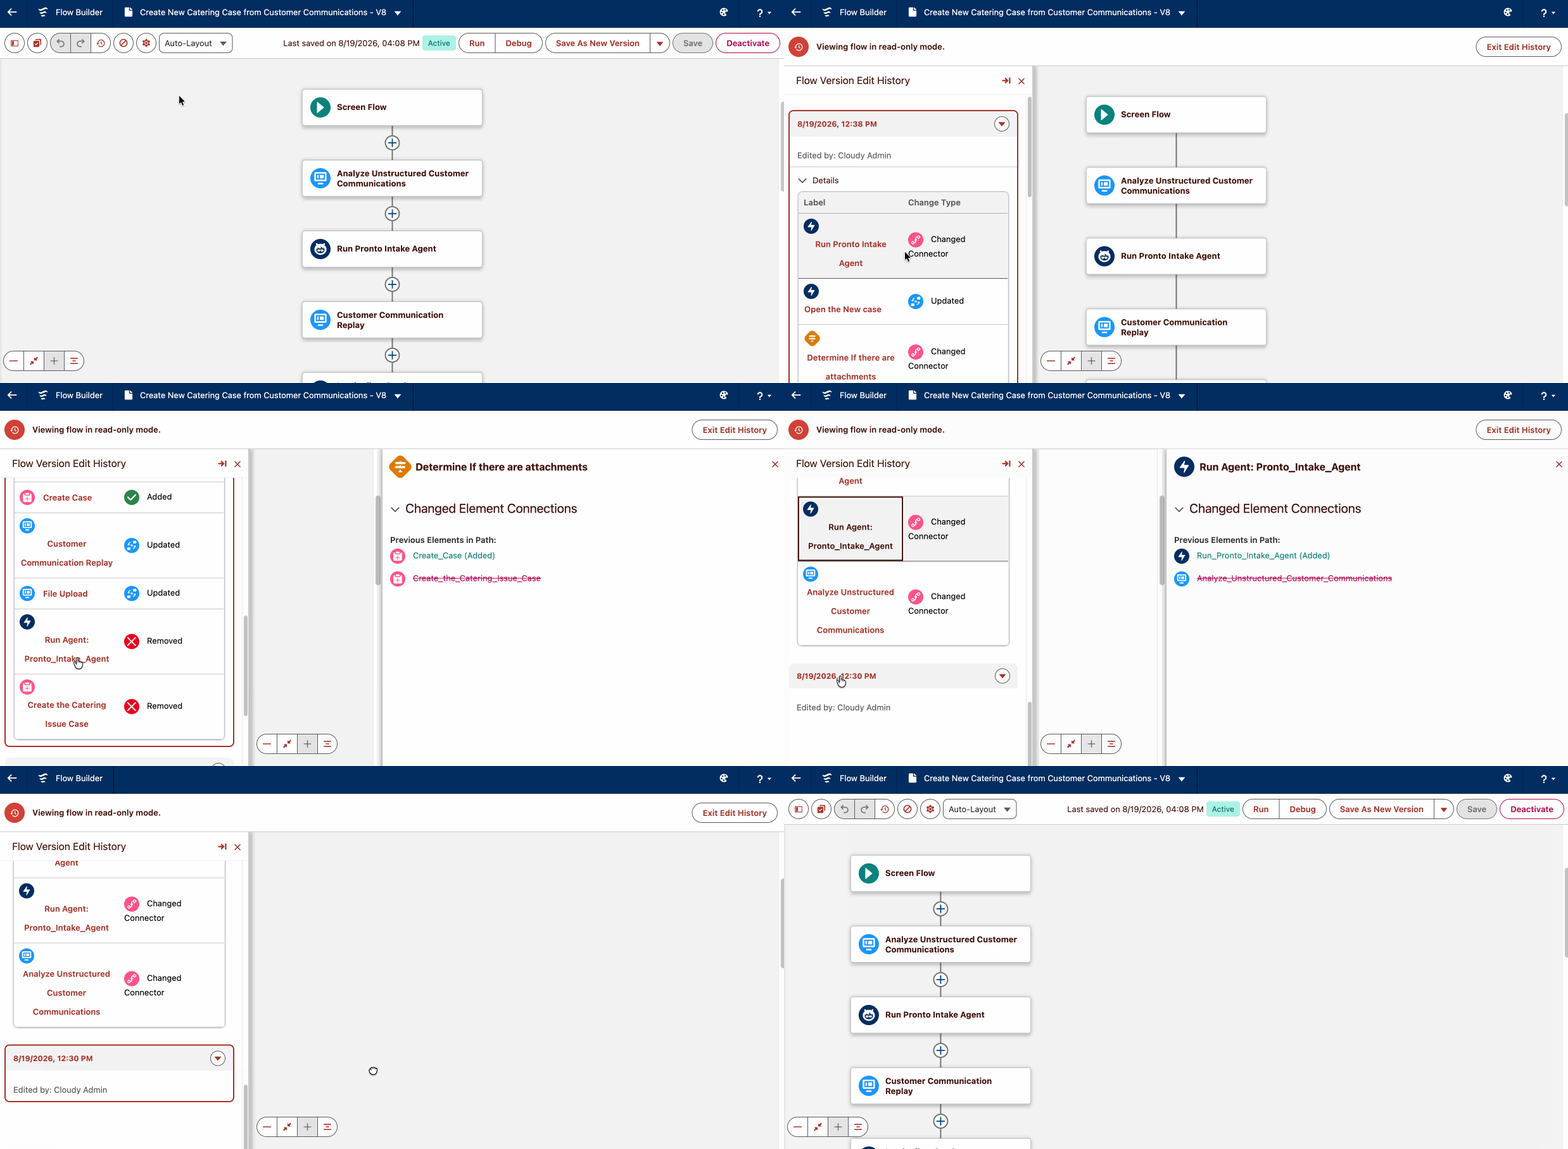
Review, restore, and reuse past flow versions
Edit History is a feature you didn’t know you desperately needed until you’re staring at a broken flow, trying to figure out what changed. For no-trigger autolaunched flows, record-triggered flows, scheduled triggered flows, and platform event triggered flows, you can now open the Edit History panel and see a full timeline of every save. Drill into element-level details, preview what the flow looked like at any past point, and see exactly which elements changed and how.
Once you’ve found a version that worked, you can save it as a new flow version to restore it. Want to reuse the logic somewhere else? Copy it into a separate flow. This is the kind of traceability that makes long-term flow maintenance actually manageable.
In Flow Builder, click the clock icon in the menu bar to open the Edit History panel. Here, you will see the saved history for your current flow version. Select a saved instance to preview it. Expand Details to see which elements changed, then click an element name for full change details. Use Save as New Version to restore, or Save as New Flow to copy the logic into a separate flow.
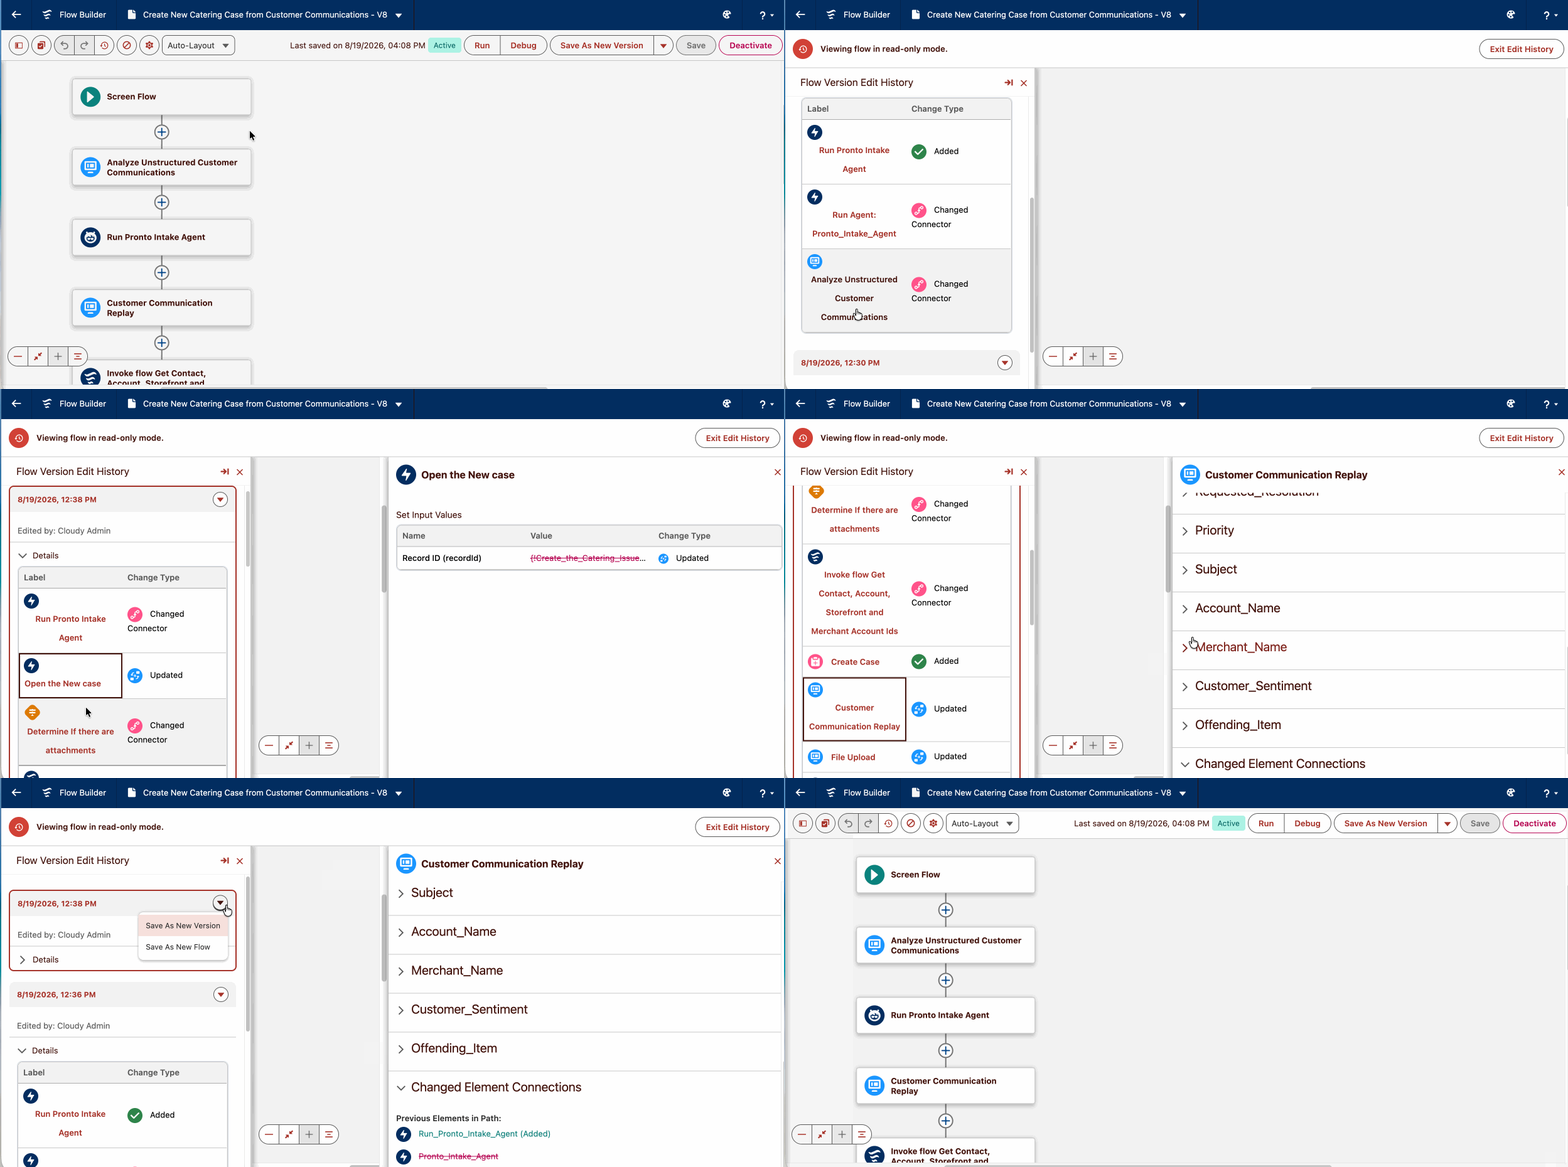
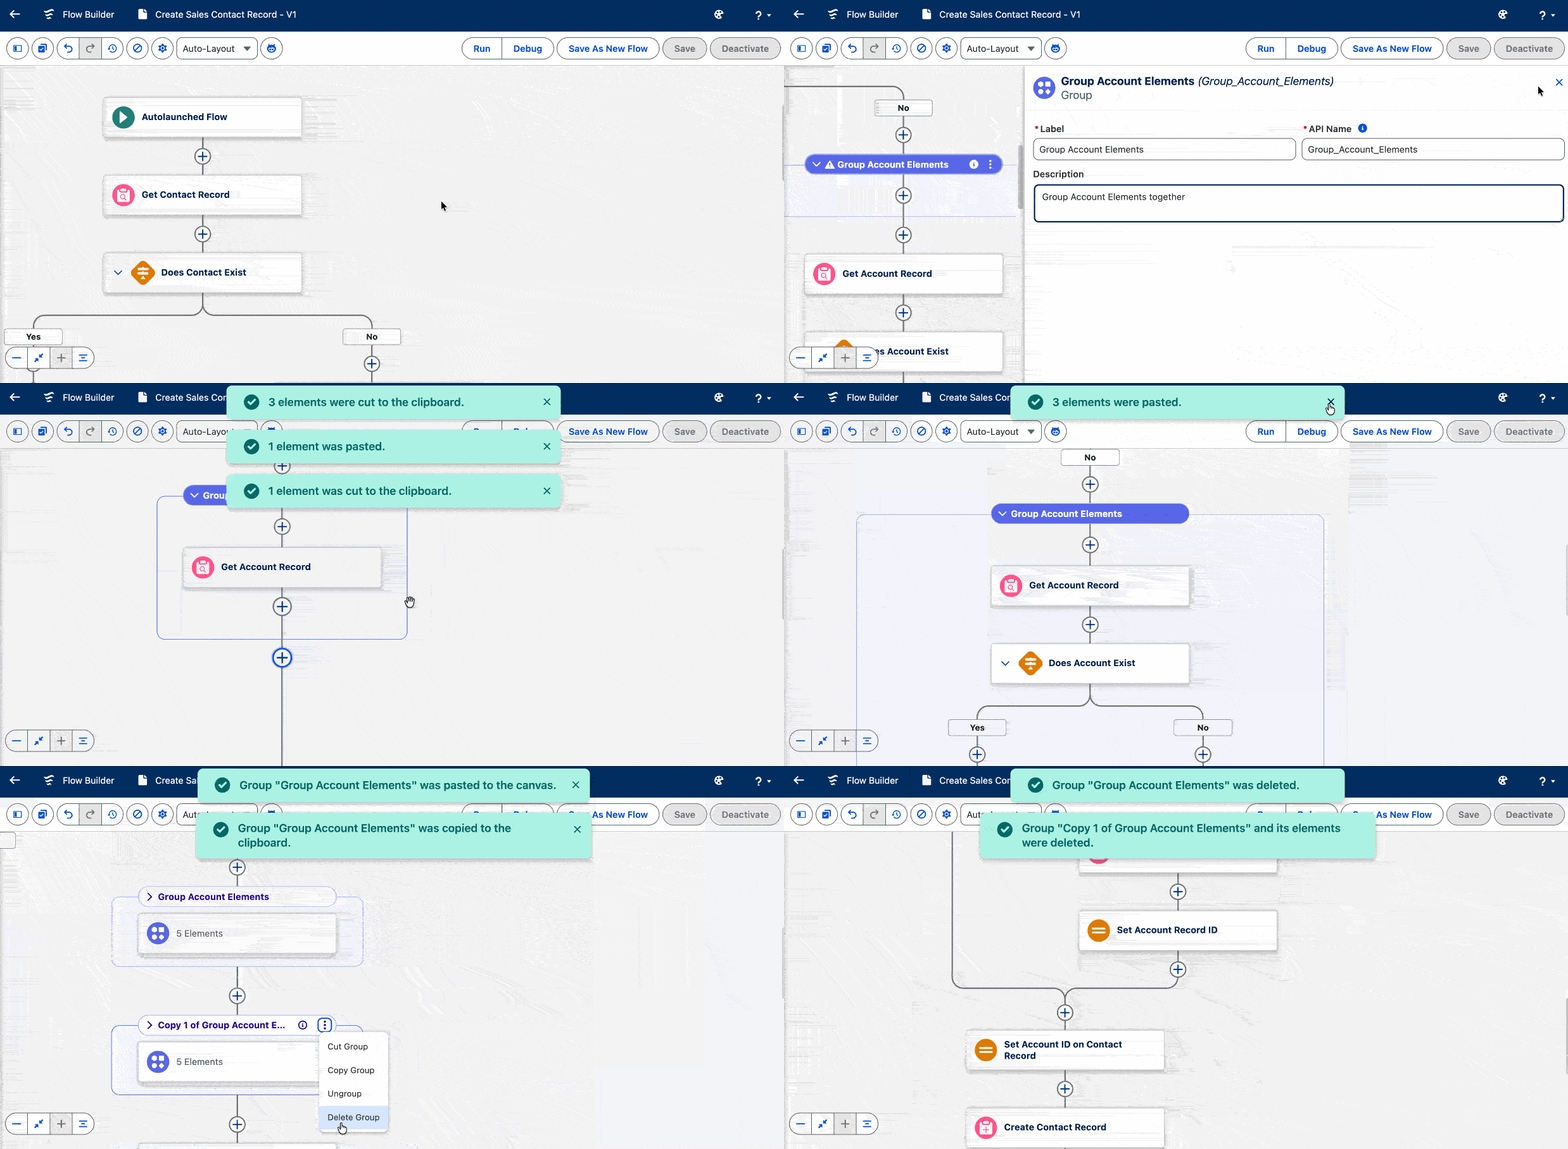
Group elements to organize and simplify flows
Complex flows are a fact of life. But readable, maintainable complex flows? That really takes intentional organization. With element grouping, you can now wrap related elements into a named, collapsible group, think “Send Onboarding Emails,” “Check Eligibility,” or “Update Related Records”, so collaborators and future-you can immediately see the logical sections without needing to parse every individual element on the canvas.
Collapse the groups you’re not actively working on to reduce visual noise and focus on the section you need. This one’s really useful when you’re handing a flow off or onboarding a teammate who didn’t build it from scratch.
In auto-layout mode, select Add to Flow, then select Group. Enter a name and description, then add elements to the canvas within the group. Use the collapse icon in the group header to show or hide contents.
Note: This functionality is available on a rolling basis starting in Winter ’27.
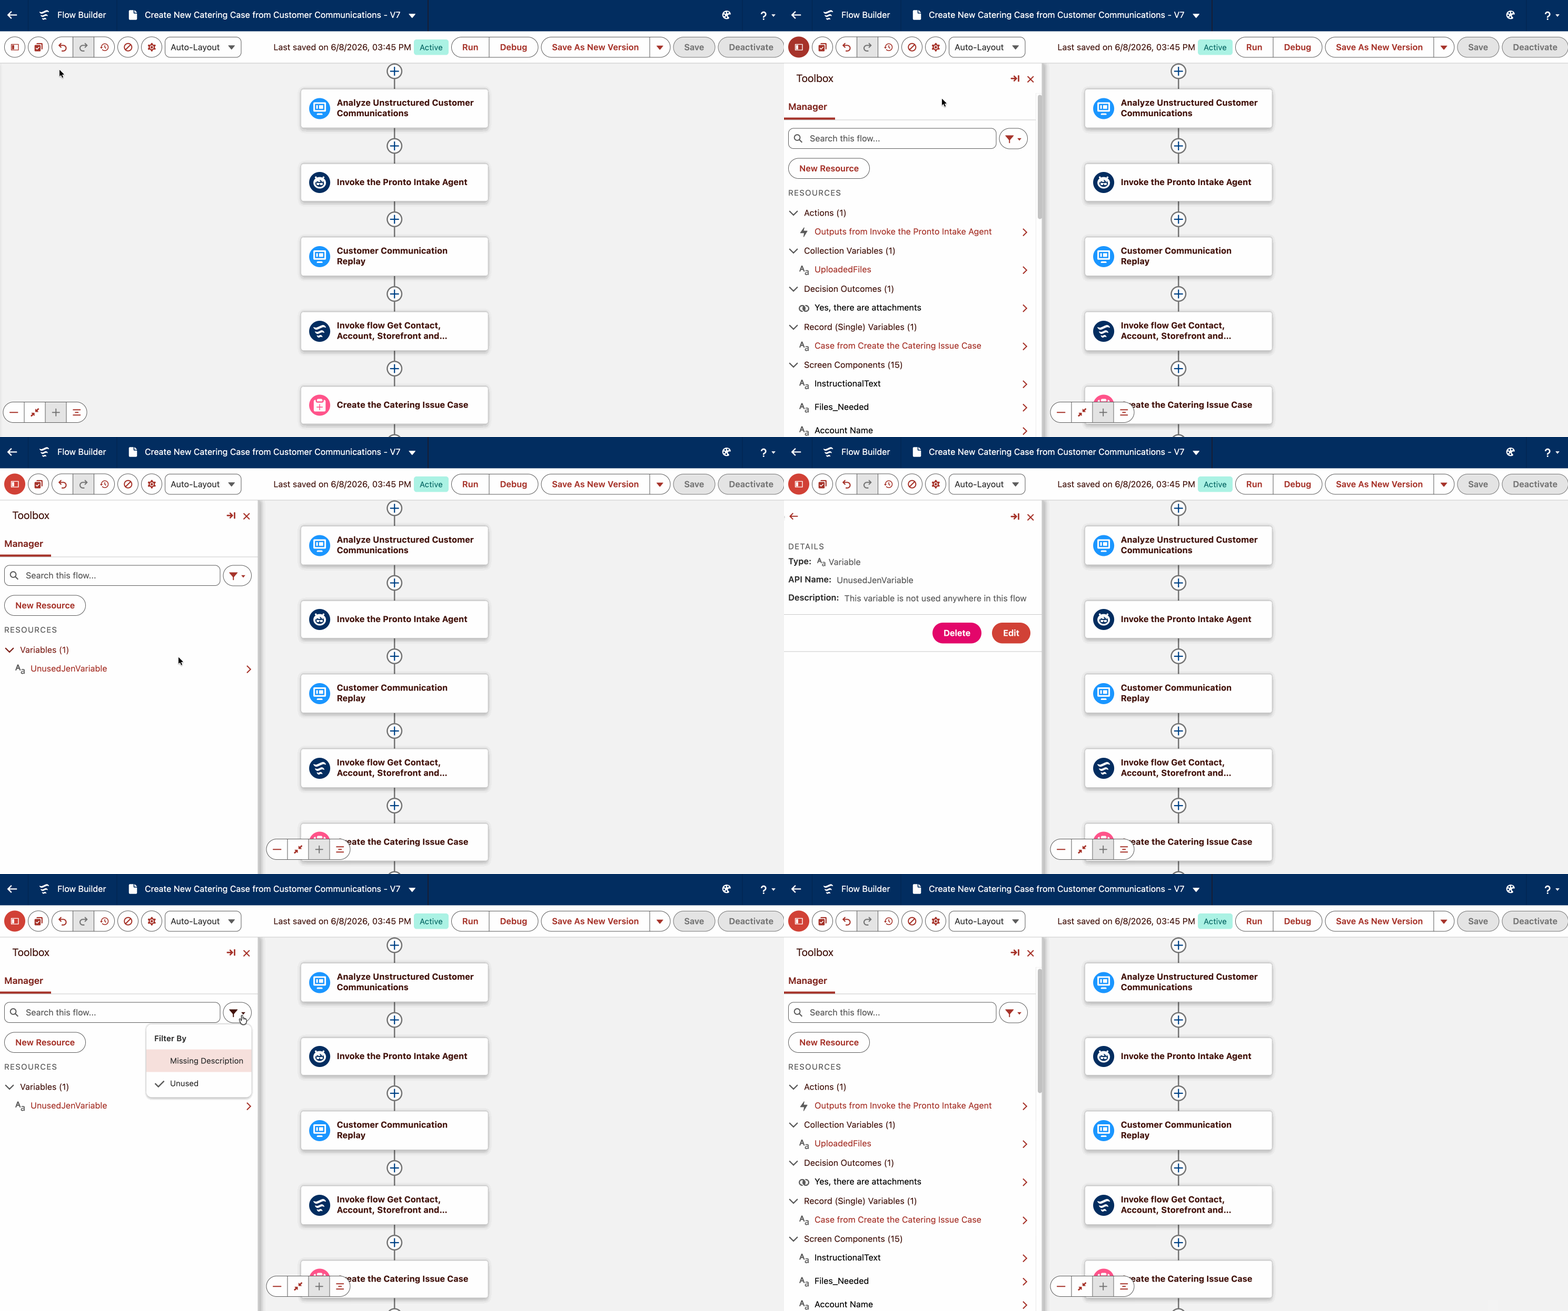
Find and remove orphaned flow resources fast
You refactor a complex flow, move logic around, and three months later there’s a collection variable sitting in the Toolbox that nothing references anymore. In auto-layout flows, the new Unused filter in the Flow Builder Toolbox makes it easy to surface all of those: click Filter, select Unused, and the Toolbox shows you only the resources with no recorded usage. To see the complete list of Resources, click again on the Unused filter.
It’s a great way to audit your flow before a release or after a major rebuild. Get rid of those old obsolete resources for a cleaner flow and fewer “wait, what was this for?” moments when you revisit it six months down the road.
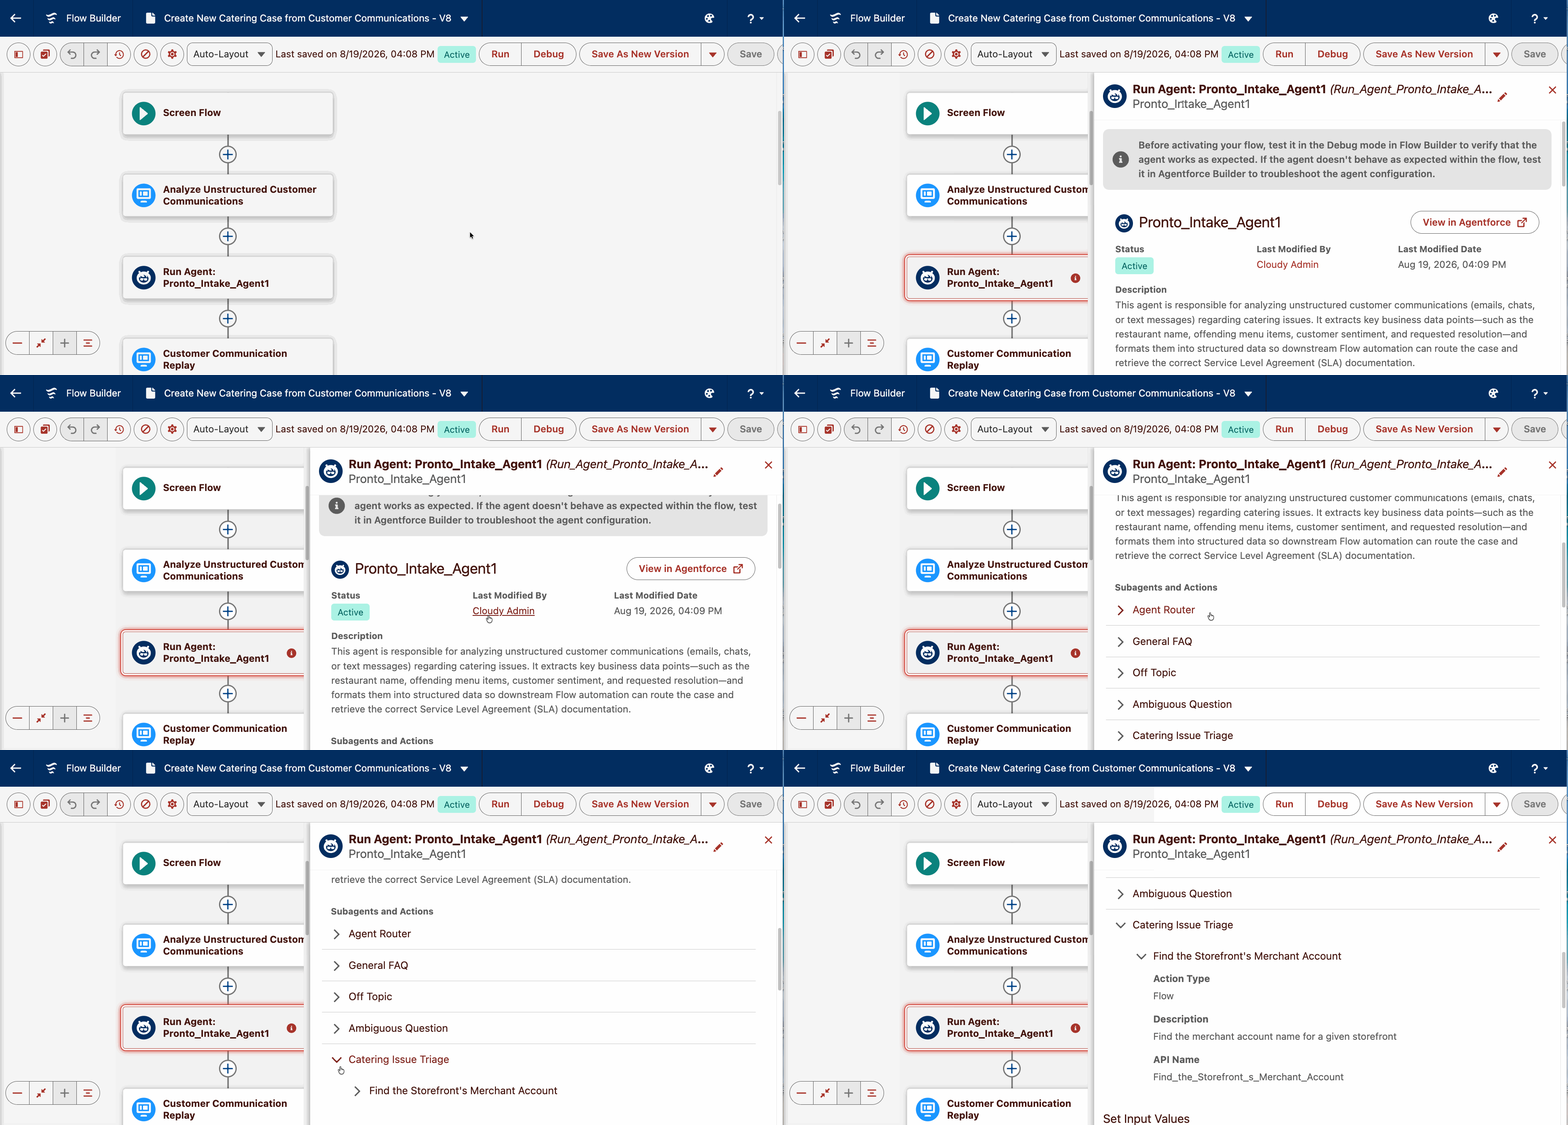
See Agent Actions right within Flow Builder
When we’re building complex flows that interface with AI agents, having to open a separate tab to check what an agent can do is one tab too many. You can now view your Agent Action’s information panel directly inside the Flow Builder. You can see key agent metadata, including action names, types, and brief descriptions, without clicking away to the Agentforce Builder.
This is especially useful when you’re inheriting flows built by another admin. Instead of opening the agent in Agentforce Builder to figure out its capabilities, you can assess right there in context. The panel reflects the agent’s current state wherever it was last configured.
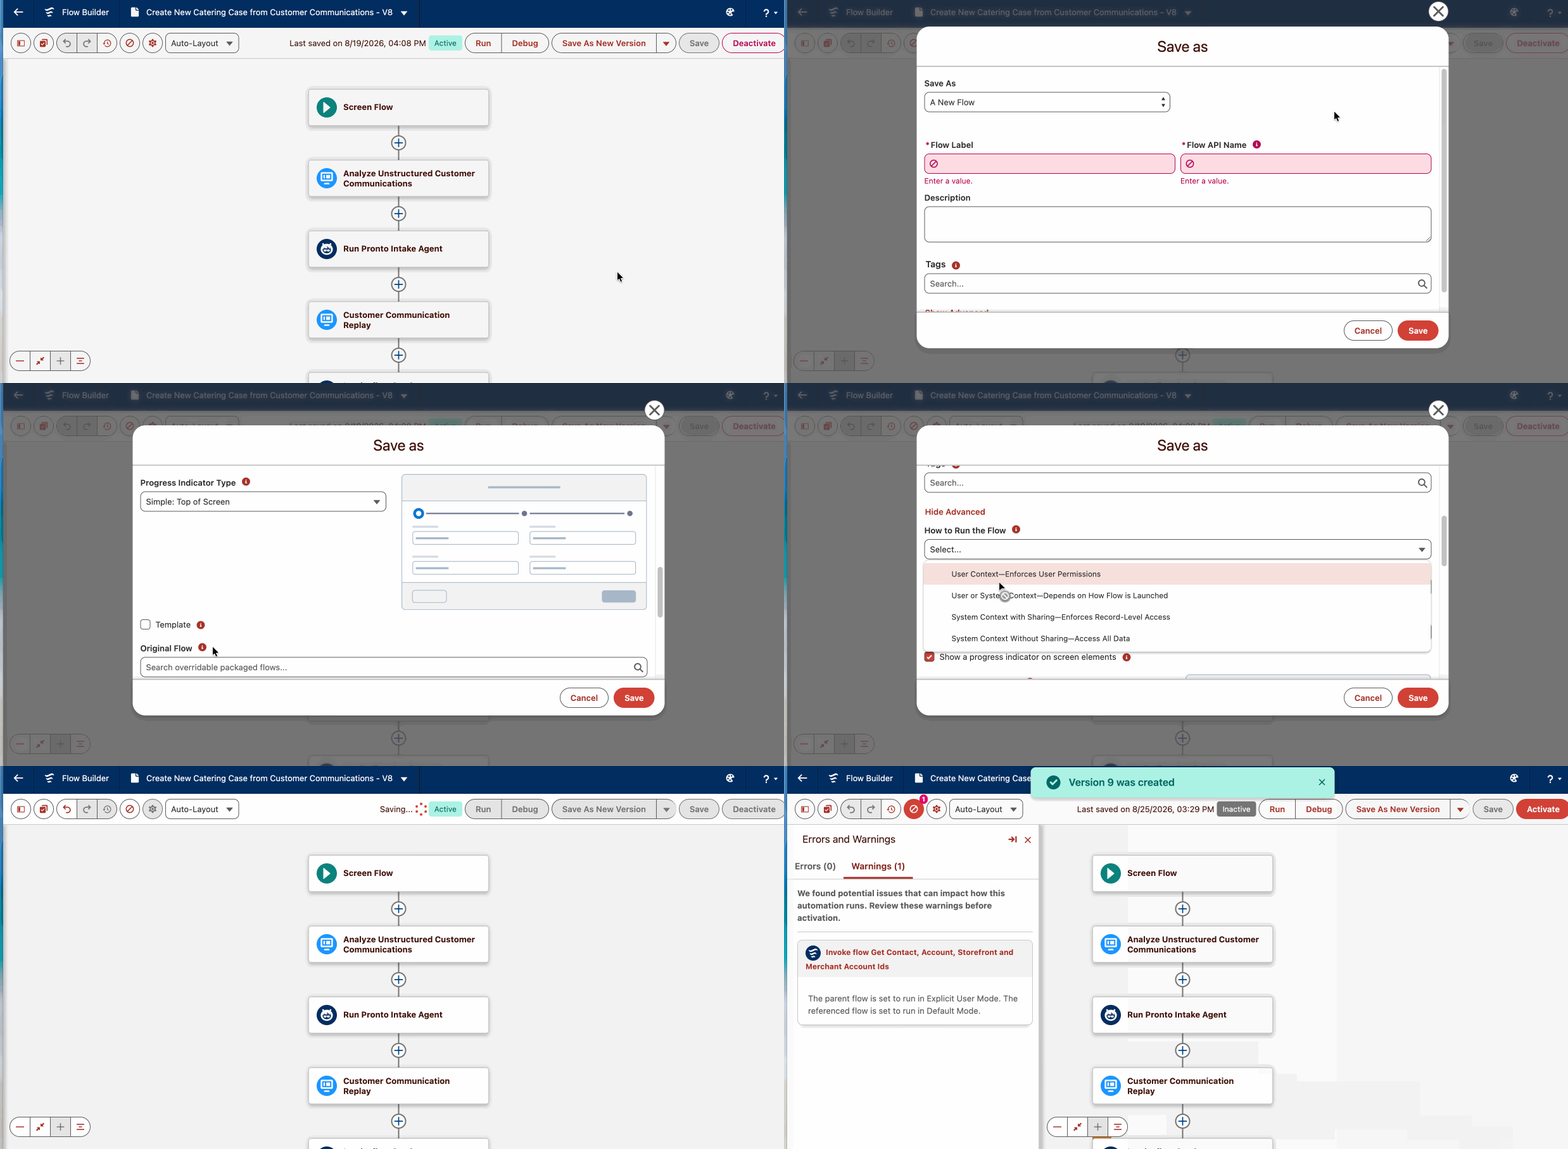
Enforce user permissions regardless how a Flow runs
Staring at a screen flow and wondering if it’s going to run in system context and expose private data is a major security headache. Previously, user-context flows could inherit elevated system permissions from an Apex or flow caller that triggered them. In Winter ’27, with a Flow API version 68.0 or later, there is a new run context option: User Context—Enforces User Permissions for screen flows and autolaunched flows. This guarantees that the flow always runs strictly with the running user’s object-level access and sharing rules, preventing security leaks.
Previously, flows configured to run in user context inherited elevated system-level permissions from its caller, which would be another flow, Apex, or another automation. When a caller running in system context runs a flow configured for user context, the flow inherits the caller’s elevated permissions. Check out my blog ‘Your Guide to Determining the Flow Running User and Its Execution Context’ for more on the behavior.
To use this feature, save your flow as API version 68.0 or later, click the properties gear icon, under the ‘How to Run the Flow’ setting, select User Context—Enforces User Permissions from the dropdown list and save the flow.
Work with Decision elements without the extra clicks
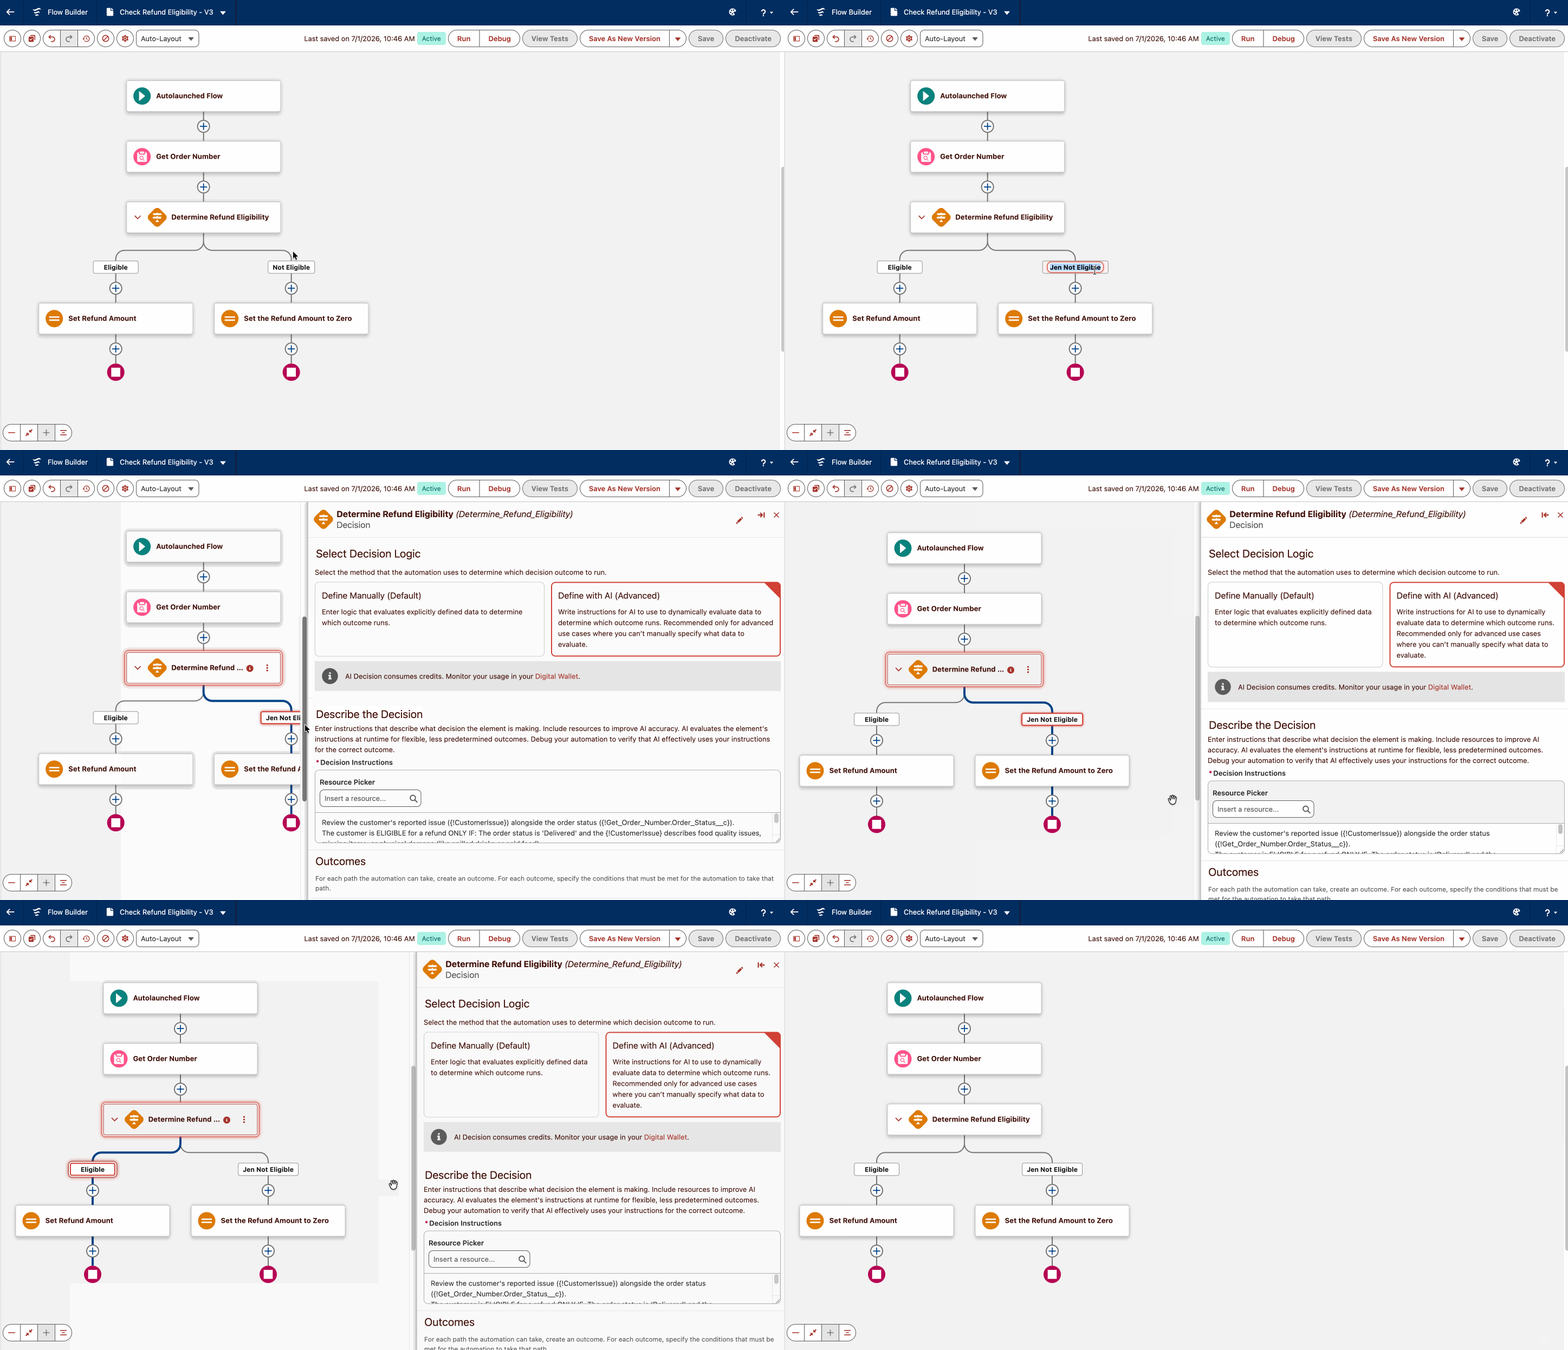
Decision elements get complicated fast with multiple outcomes, long condition lists, paths that branch and re-merge. We’re introducing a few new enhancements to make working with Decision elements more easily: click a canvas path to jump directly to its conditions in the property panel, drag the panel edge to resize it when you need to see more detail, and double-click a path name on the canvas to rename it inline without opening the panel at all.
Let Flow Builder name your elements for you
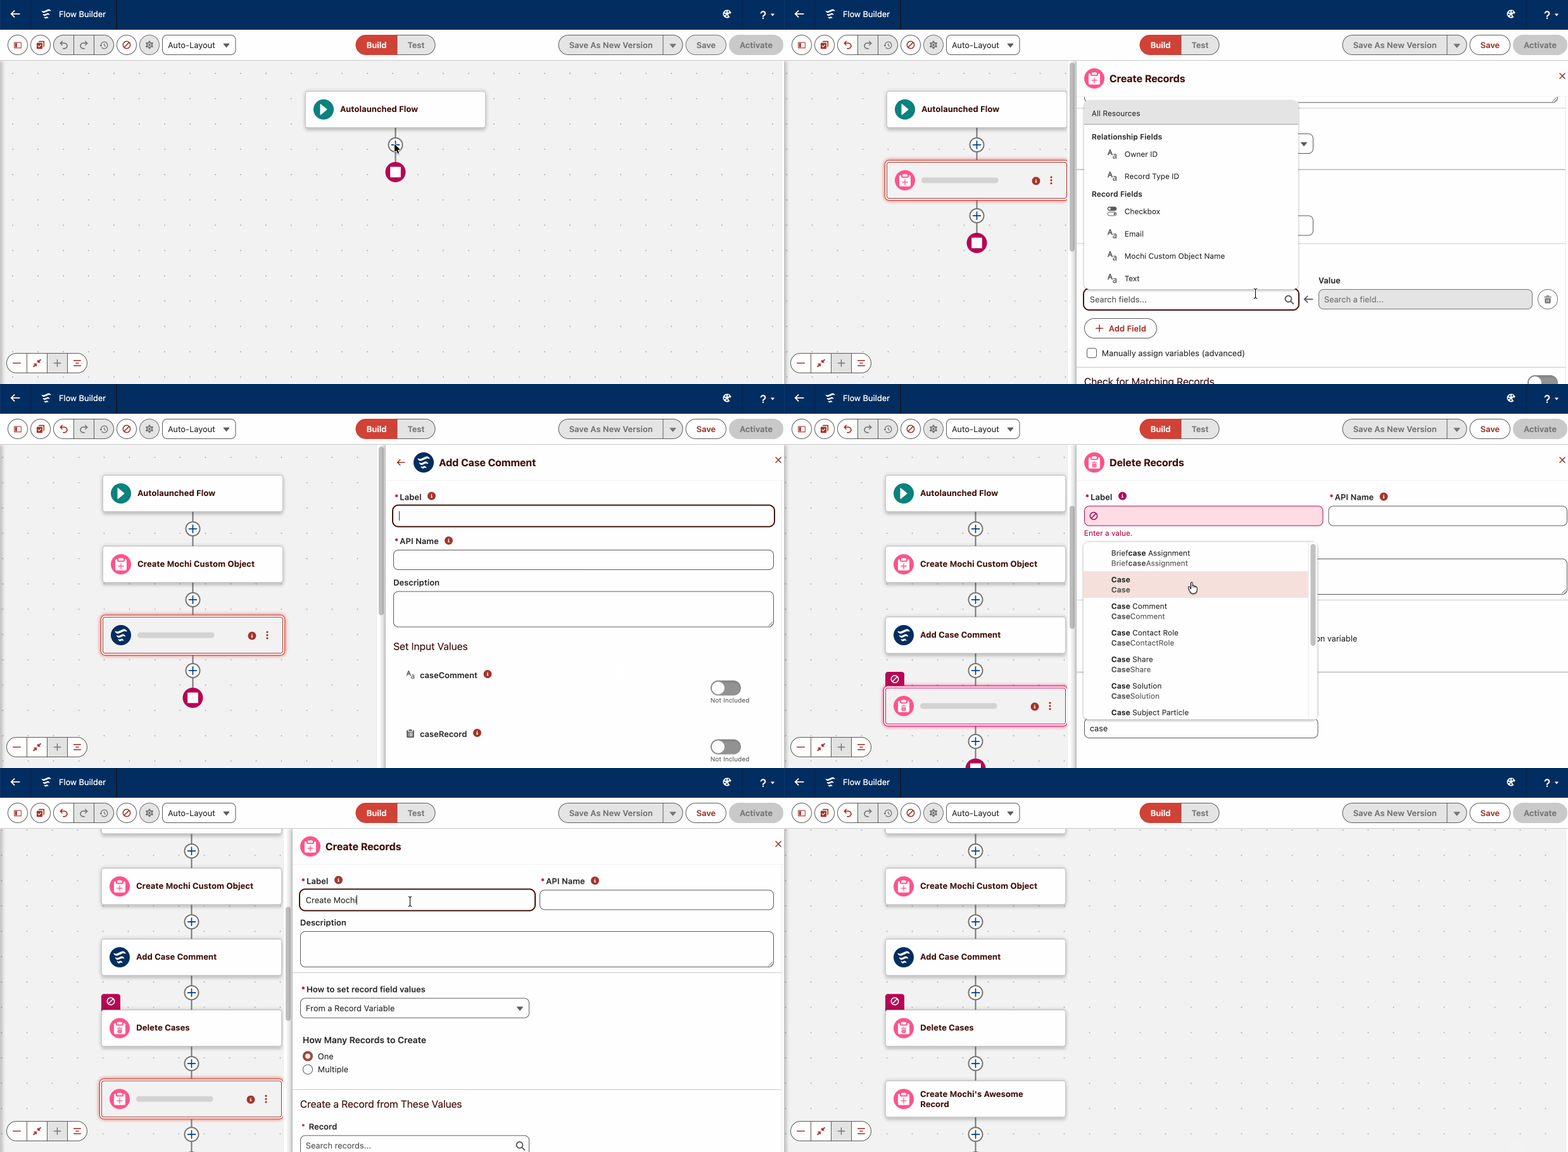
Flow Builder now automatically generates element labels (with the exception of the Decision element) based on the properties you configure, so once you set up an Assignment element to update an Account field and close the element, the ‘Assignment’ label updates to reflect that. Labels adjust automatically as you build, and if you manually edit one, Flow Builder preserves your customization without overwriting it.
Keep end elements where you put them
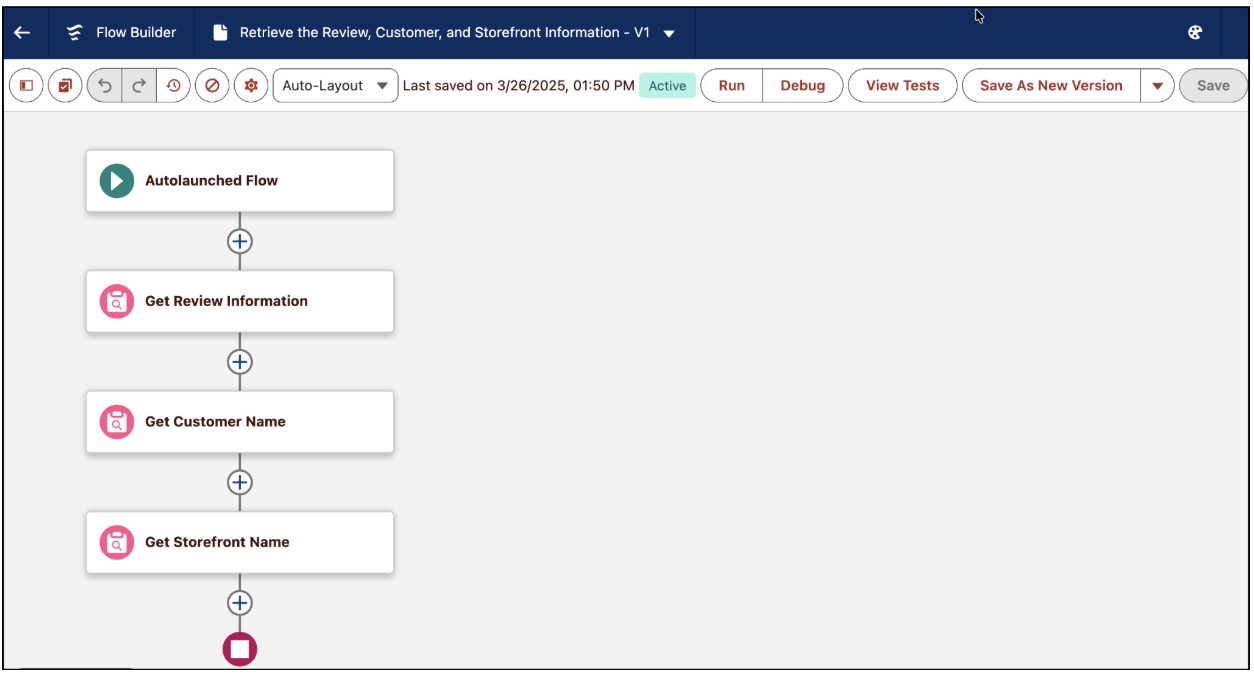
If you’ve ever carefully arranged a complex multi-branch flow in auto-layout, saved it, reopened it, and found your end elements reshuffled to wherever Flow Builder decided to put them, rest assured, that behavior is a thing of the past. End elements are now saved directly to your flow’s metadata, so your canvas layout persists exactly as you designed it across saves and reloads.
Previously, end elements weren’t stored in flow metadata, which meant Flow Builder was recreating them fresh each time you opened the flow. Salesforce saves the end elements directly to the flow’s XML metadata so they stay anchored where you put them, and external metadata-reading tools have full visibility into all flow termination points. Your existing flows get explicit end elements added to their metadata the next time you save them. This may sound like a small quality-of-life fix, but if you manage flows with a lot of branches and carefully-placed end points, you’ll appreciate this one immediately.
See your entire flow without constant zooming
You now get more flow visible on screen at once, which makes a real difference when you’re debugging a 40-element record-triggered flow and need to hold the whole picture in your head.
This is a true quality-of-life improvement. The element type label moves to a hover tooltip so the cards stay clean, and the End element is now a small icon rather than a full card.
Move through your flow using keyboard shortcuts
Use arrow key navigation on the auto-layout canvas to move from element to element, including across fault paths and other branching paths. Use your OS’s standard keyboard shortcuts to cut, copy, paste, and delete elements.
- When you’re focused on an element, use Cmd/Ctrl + C to copy, Cmd/Ctrl + X to cut, Delete/Backspace to delete.
- When you’re focused on a connector Paste Icon, use Cmd/Ctrl + V to Paste.
- Use Cmd/Ctrl + K to open and search for elements in the Toolbox panel.
Flow Builder gets a glow-up: Salesforce Cosmos Theme
Salesforce’s Cosmos theme rollout has now made its way to Flow Builder. The updated look brings increased spacing, a refreshed color palette, and visual consistency. There’s nothing to configure. Flow Builder automatically picks up your org’s active theme.
Note: Flow Builder doesn’t support SLDS 2 Dark Mode.
Flow error handling enhancements
Find missing required fields before you save a flow
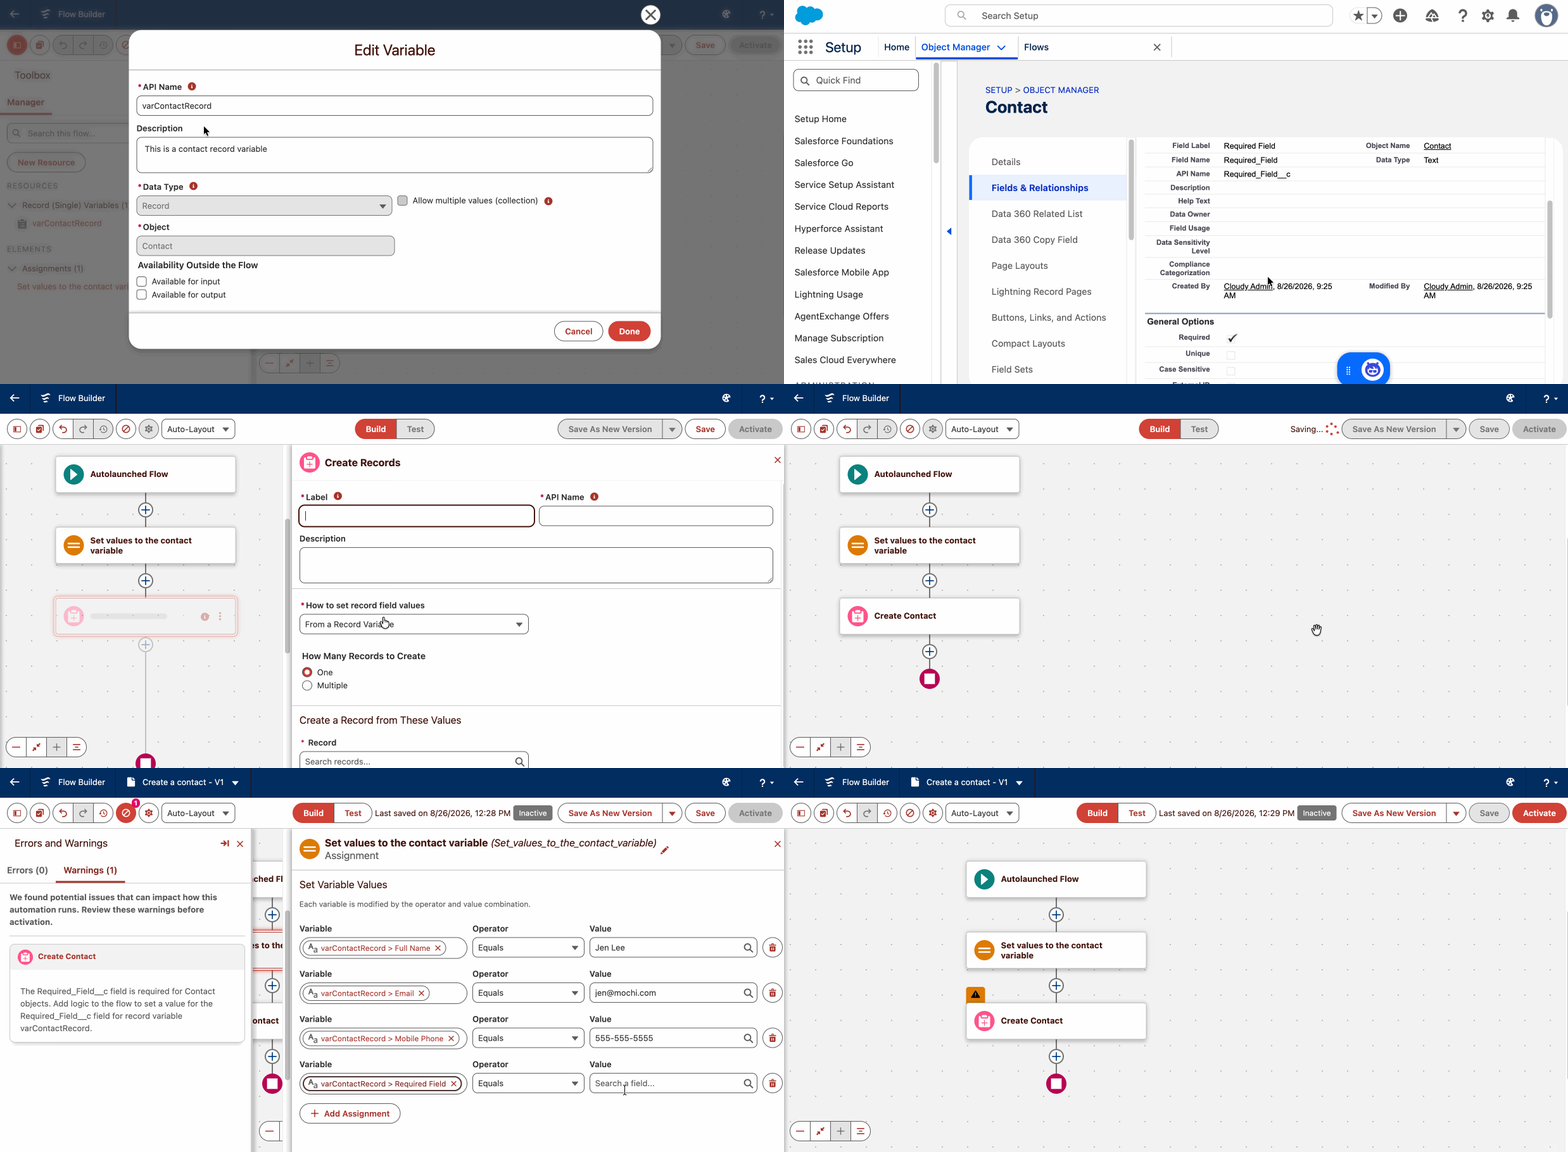
You configured a Create Records element in Flow Builder and it looks complete, but fails at runtime because a required field wasn’t mapped. Flow Builder now catches missed mapping of required fields at save time. When a Create Records element using a record variable is missing an assignment for a required field, you’ll see a warning in the validation panel, before your users run into this issue themselves. Previously, you only learned about missing fields when the flow ran and failed.
One important note. This only checks assignments it can determine at design time. If your Flow populates a required field using a subflow or input variable, the validation won’t be able to determine its value until the flow runs.
Required fields are required for a reason, and surfacing the gap during design is dramatically better than discovering it through a support ticket or your favorite Flow fault emails.
Catch field length errors before they reach users
You set a text field in an Assignment element to a value that’s too long, and you don’t find out until a user runs the flow and it crashes. Flow Builder now catches field length errors at save time and surfaces a warning in the validation panel, telling you exactly which field and which value exceeds the limit.
Note: Flow Builder still saves the flow though (it’s a warning, not a blocker), but if you don’t address it, your flow will fail at runtime.
Flows now retry automatically on record lock errors
If you’ve ever watched a flow fail with UNABLE_TO_LOCK_ROW because two processes tried to update the same record at exactly the wrong moment, you’d appreciate this new feature. Flows now automatically retry when they hit a record lock error during transaction initialization. The flow will wait 10 seconds and try again, giving the lock time to release.
Screen flow enhancements
Process multiple records with Screen Flows from List Views and Related Lists
Ok, Flownatics know that this one is a big deal! We’ve not been able to neatly handle bulk updates from a list view or related list, until now. Starting in Winter ’27, you can now configure a mass quick action on a list view or related list that triggers a screen flow, which receives all selected record IDs. Select 10 records, run the action, and your flow handles them. The Screen Flow will open up in a new modal.
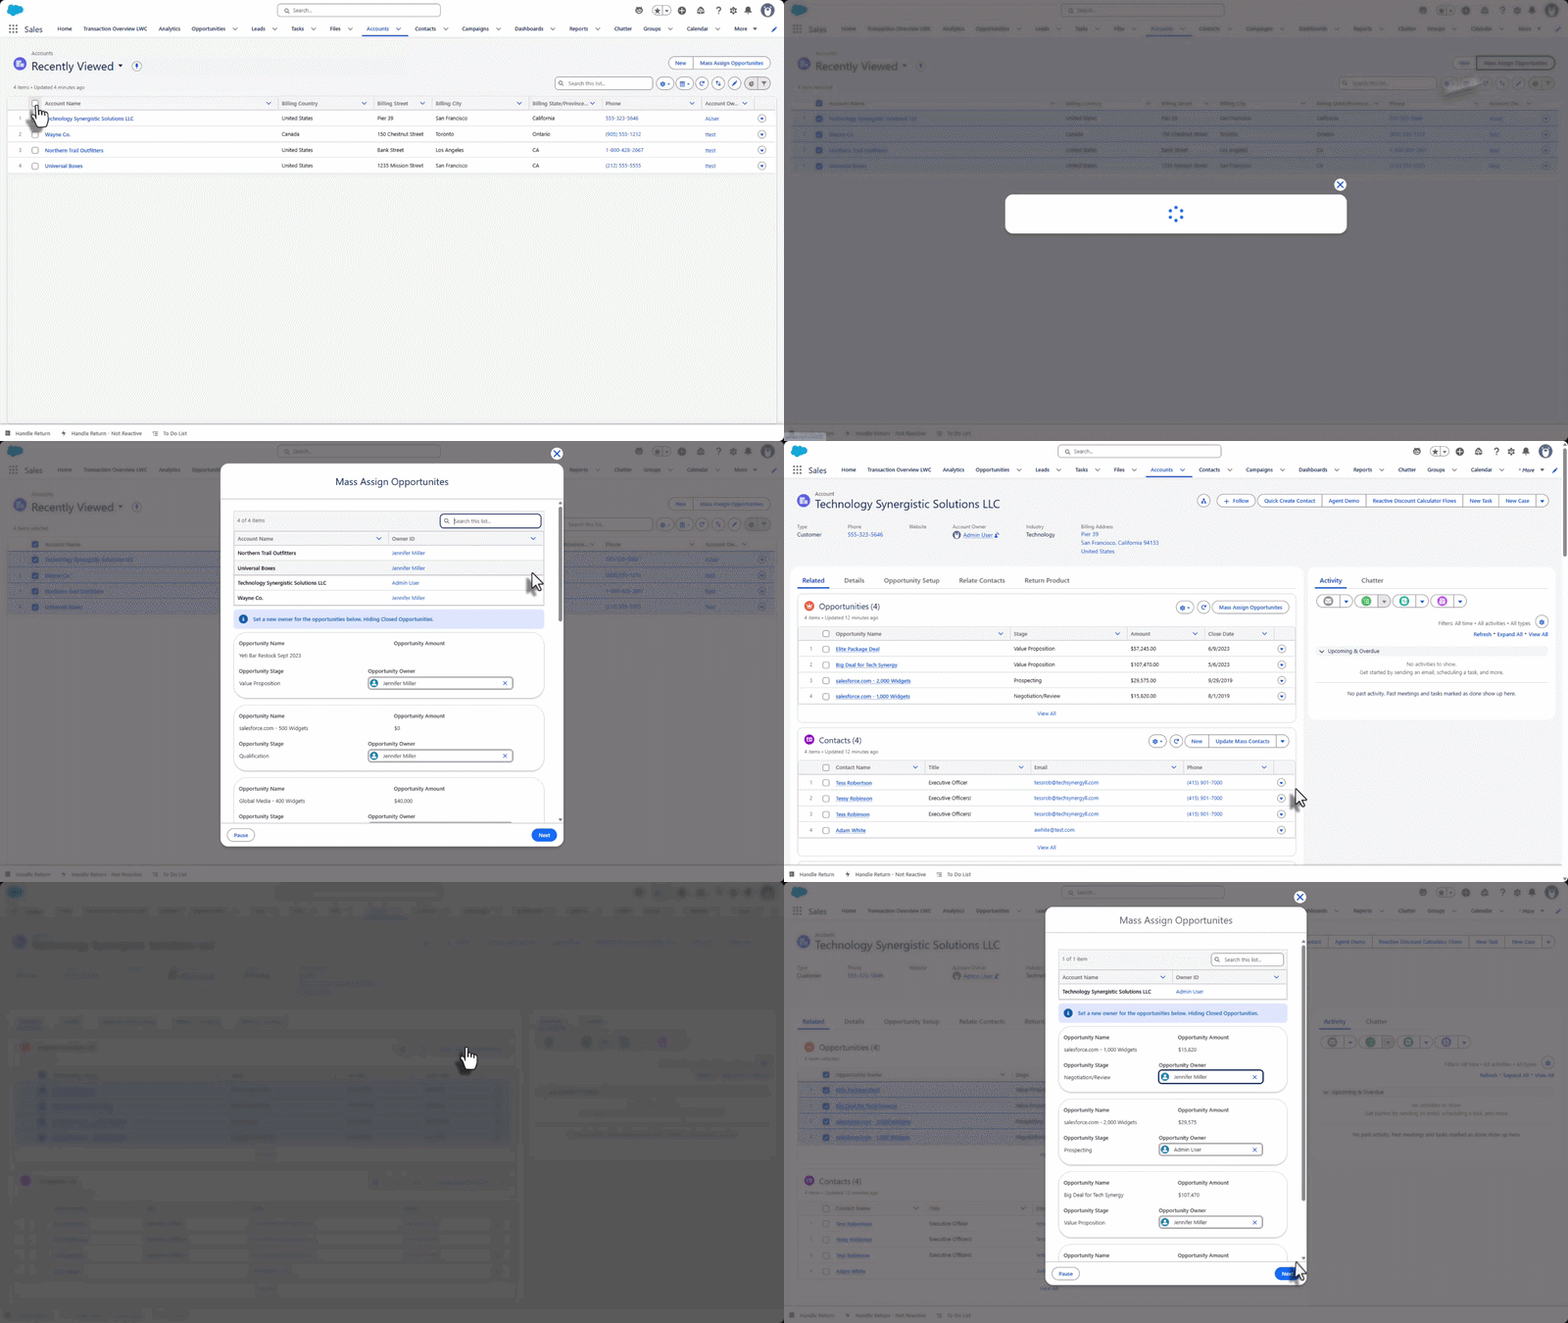
Here’s what you need to do to set this up.
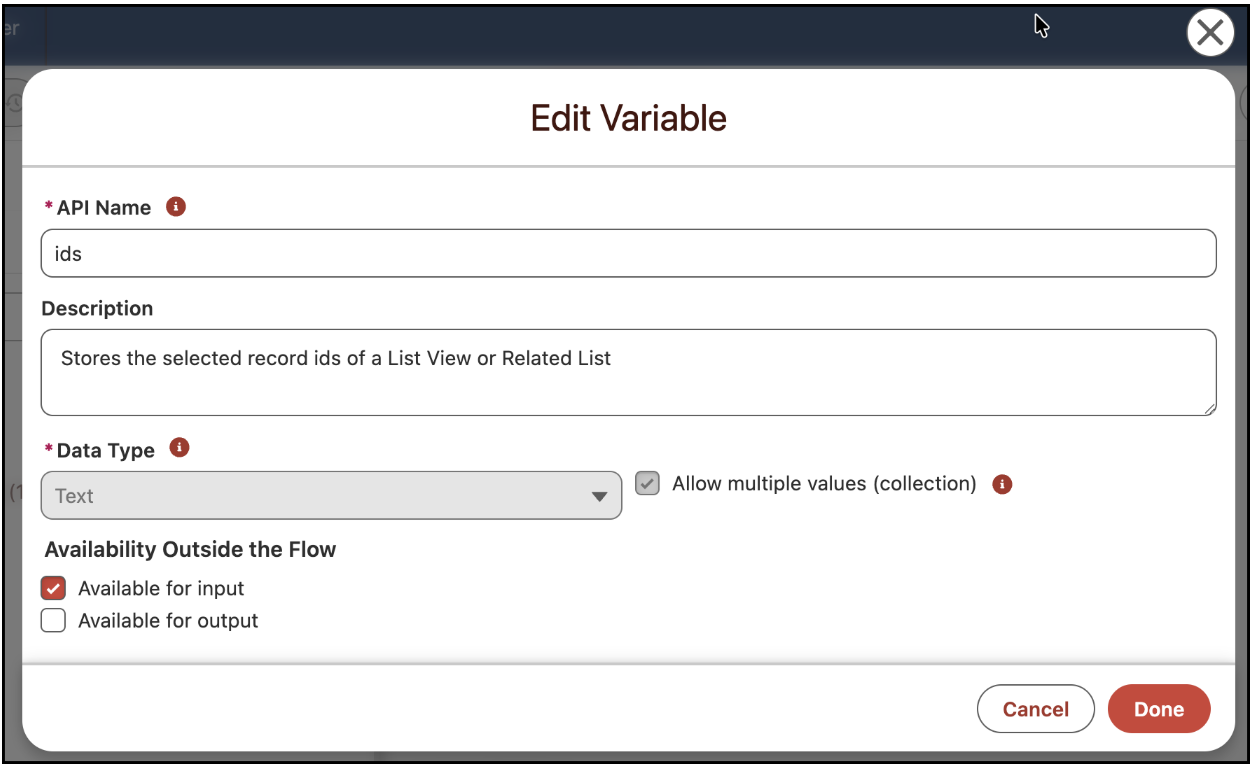
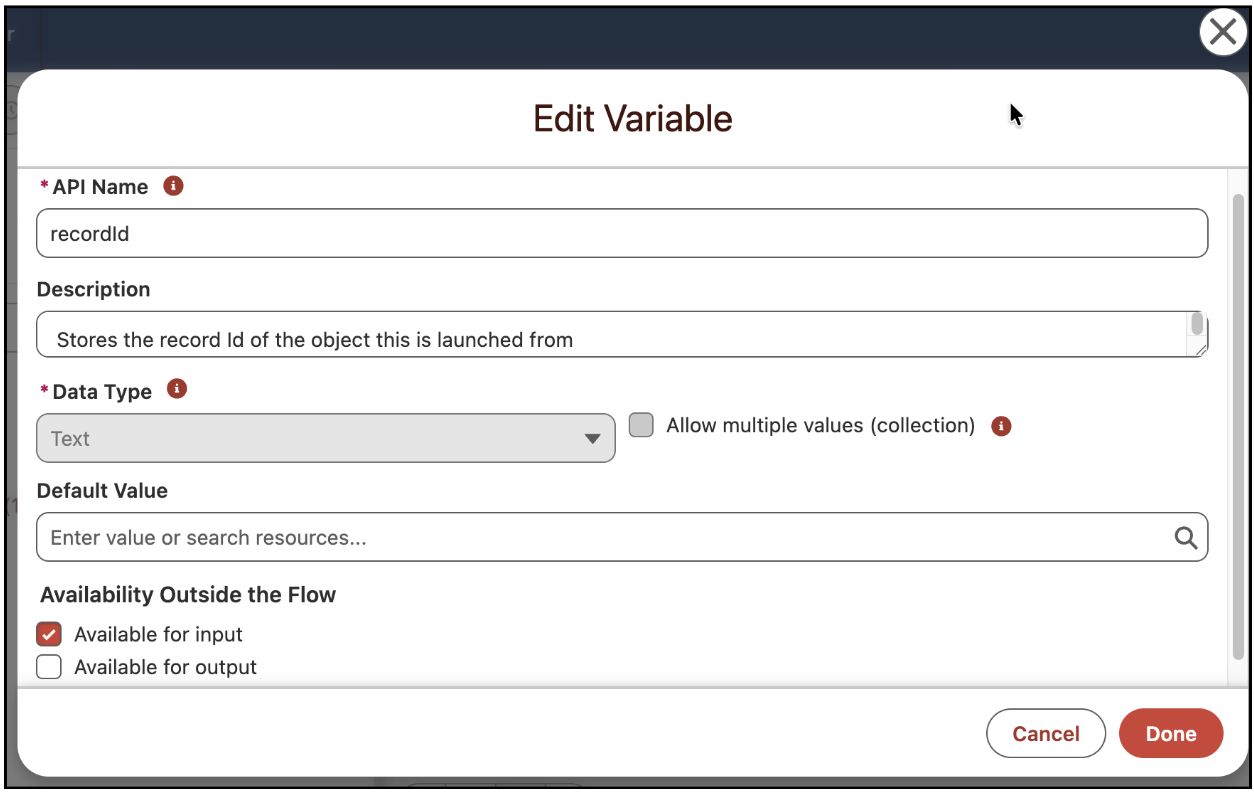
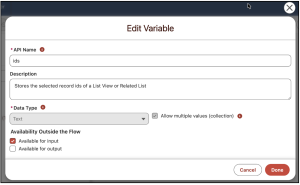
In your Screen Flow, there are two special ingredients you need to create to make this work:
ids text collection variable, as an input variable. This stores the selected ids from the List View or Related List. Note: the API name must be in this format: ids
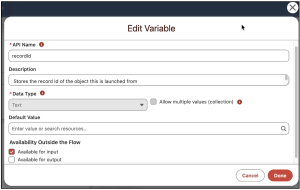
recordId text variable. This is important when launching from a Related List as it stores the parent id. Note: the API name must be in this format: recordId
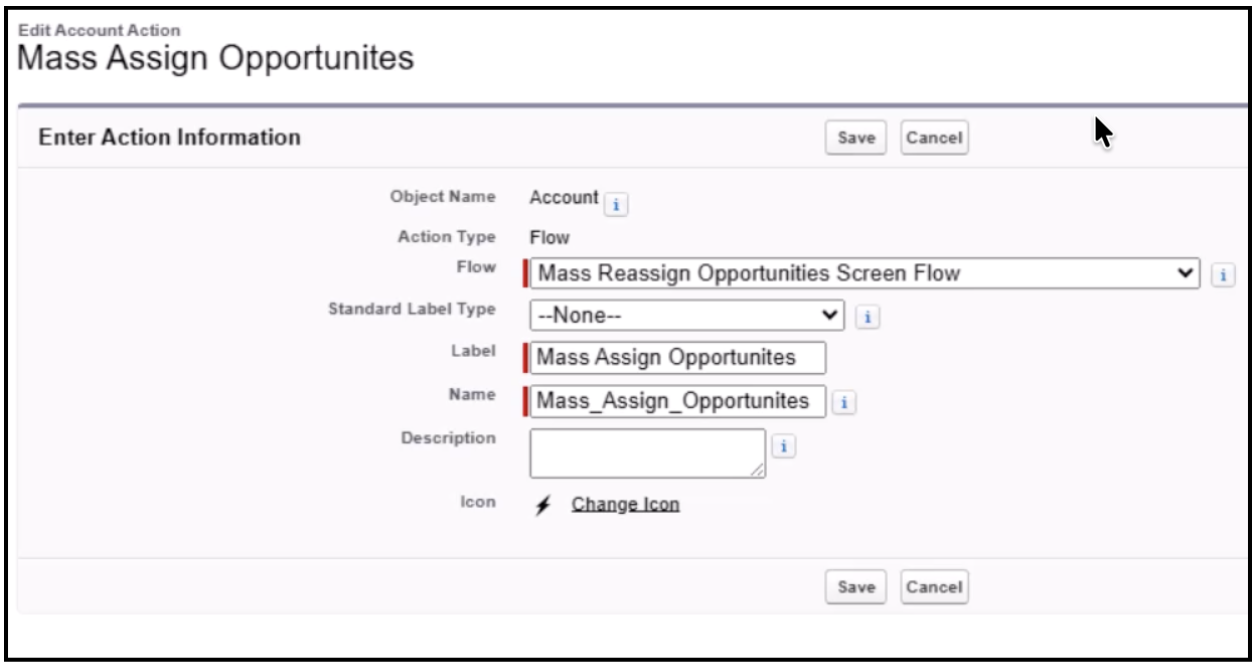
Create the Quick Action. Go to Setup | Object Manager | <Object>, under Buttons, Links, and Actions, create a new quick action with Flow as the Action Type and select your Screen Flow.
For your Related List, in Lightning App Builder, add a Dynamic List – Single Component to the Record page. In the panel, add a new Action.
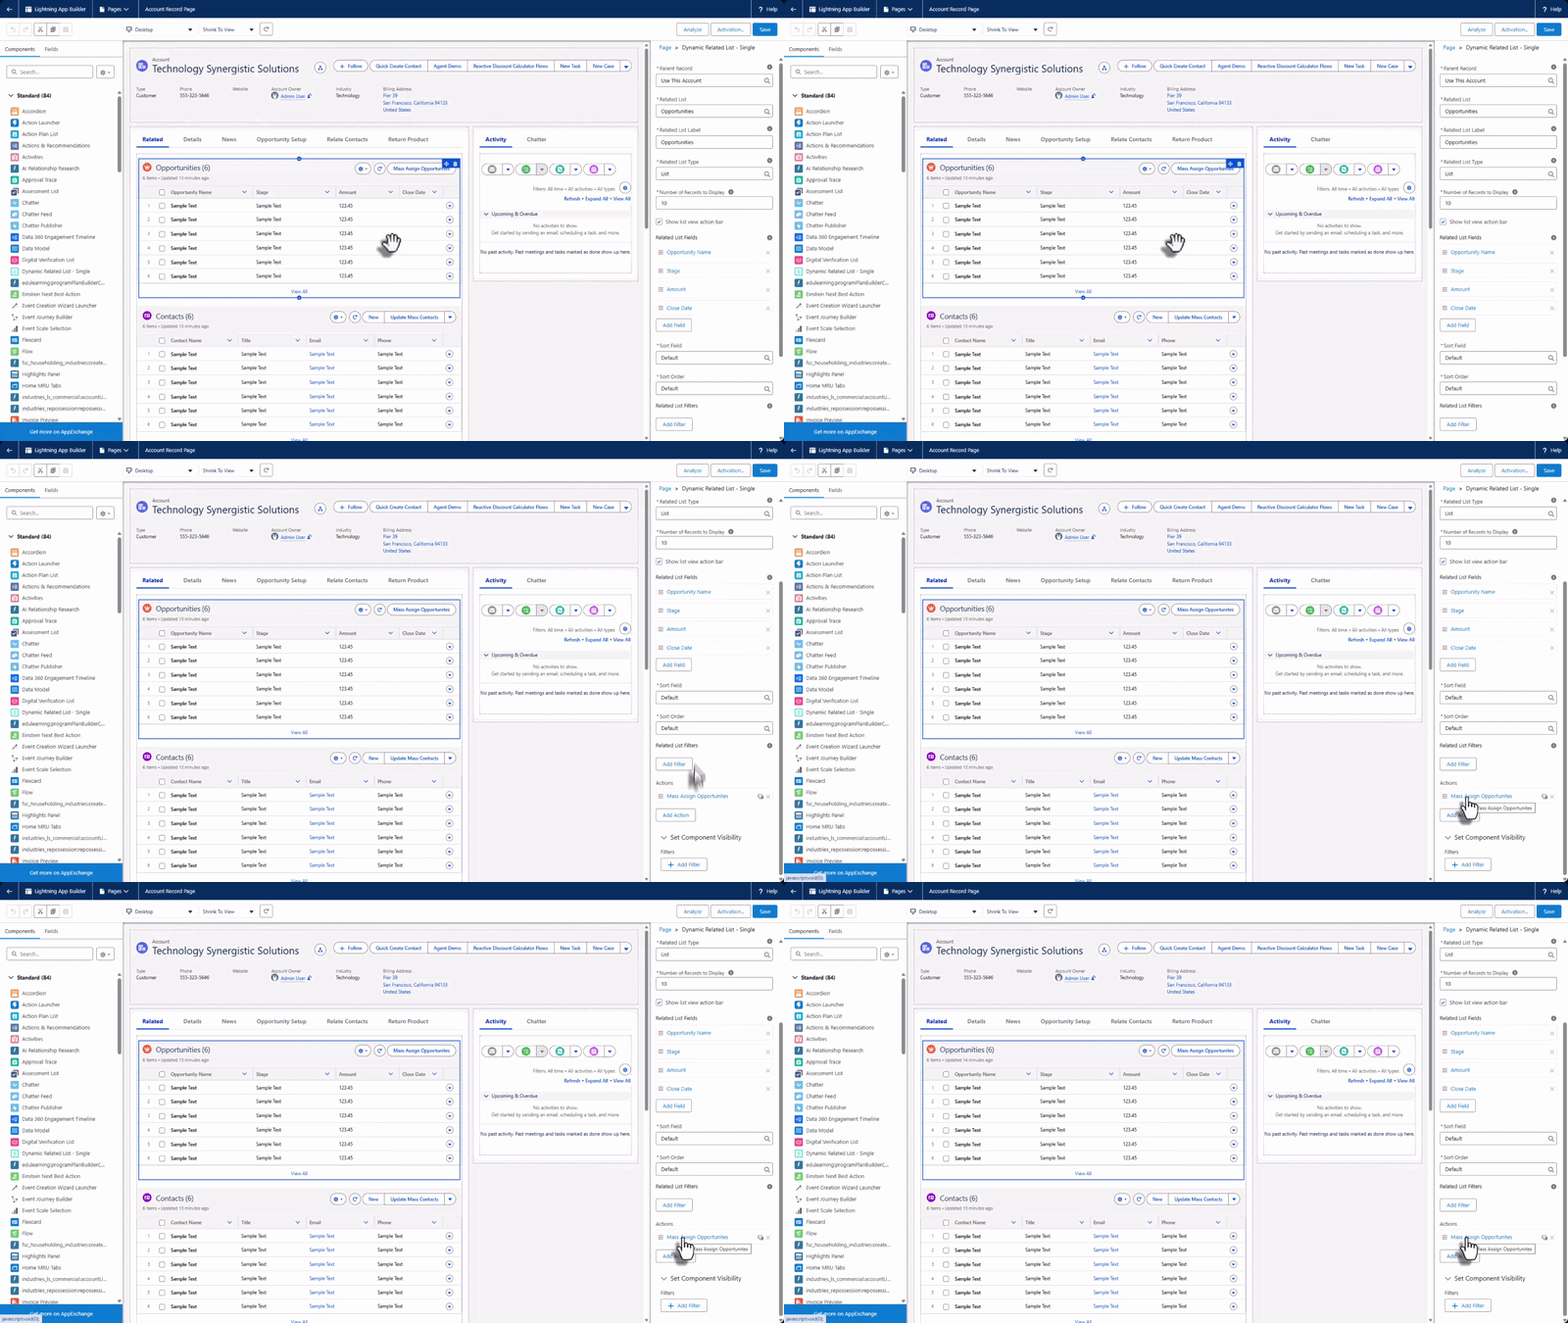
To add it to a List View, go to the List View Button Layout in Setup | Object Manager | <Object>, edit the List View, go to the section called List View Actions in Lightning Experience, and add your quick action.
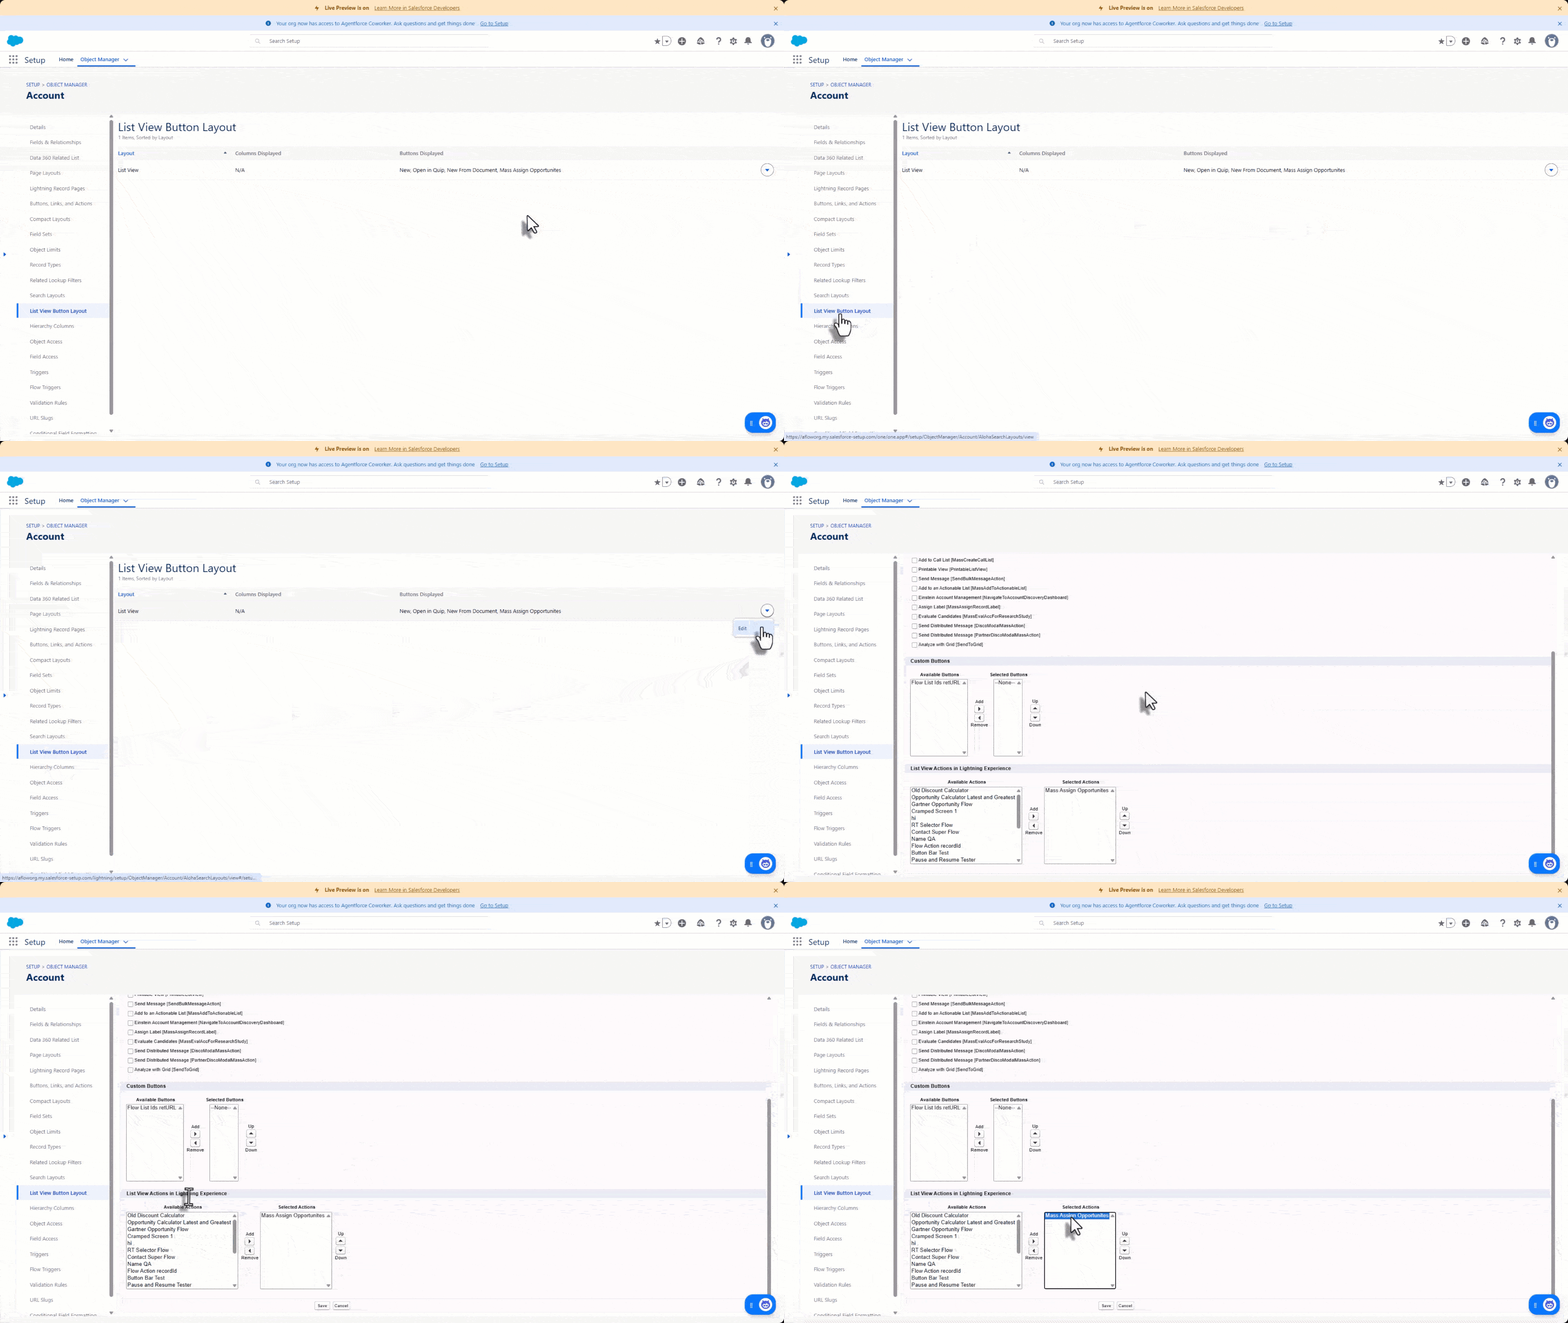
Your users will now have a clean, guided bulk-action experience right in the list view they’re already working in.
Use the native Time Component to your screen flows to capture time values
Screen flows have needed a native time input component for a while now. And the time has come. (See what I did there?) The new Time component in screen flows allows your users to enter a time value directly. You can also set minimum and maximum time constraints so users can only select values within an allowed range.
To use this, in a Screen Flow, simply add the Time component to a screen element. Configure the label, default value, optional placeholder text, and minimum/maximum time constraints in the properties panel.
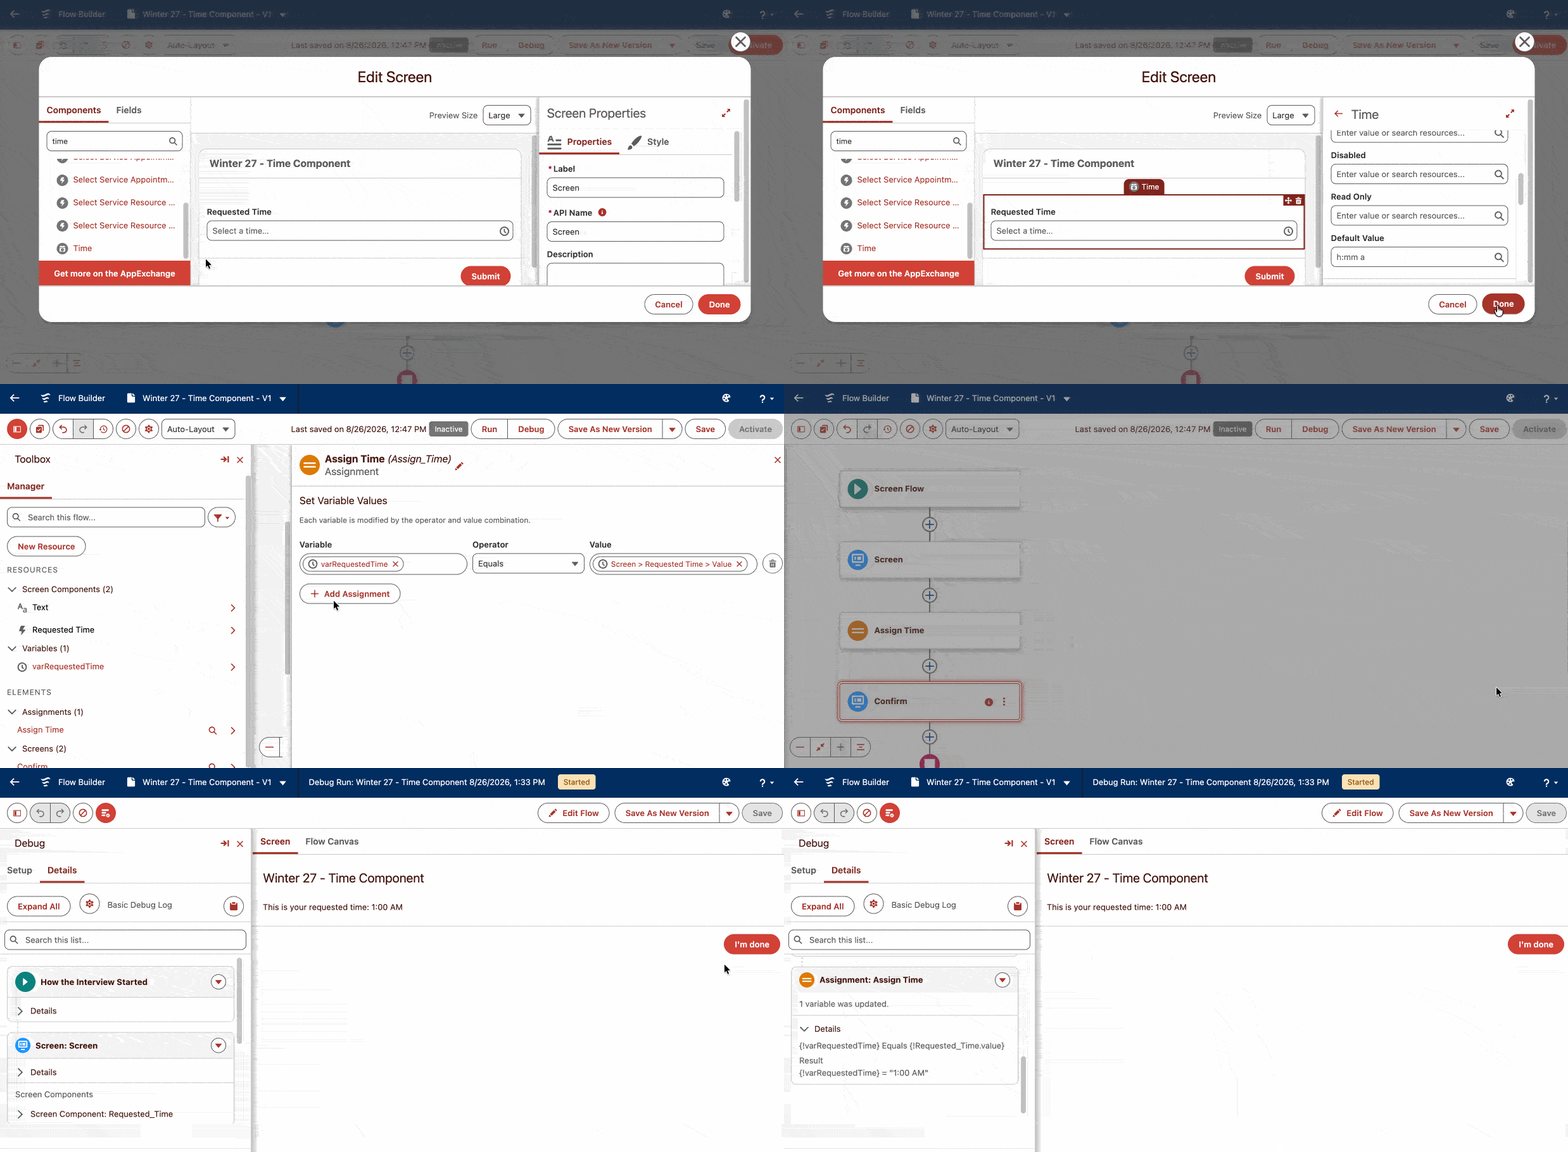
Flow testing and debugging enhancements
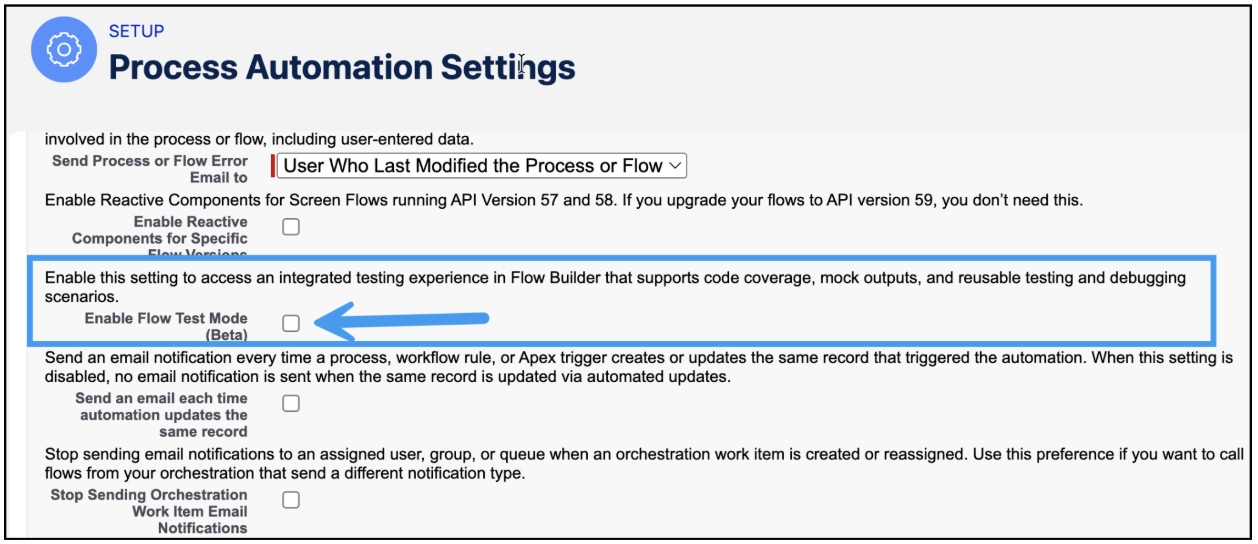
Debug and test flows from one place with Test Mode (Beta)
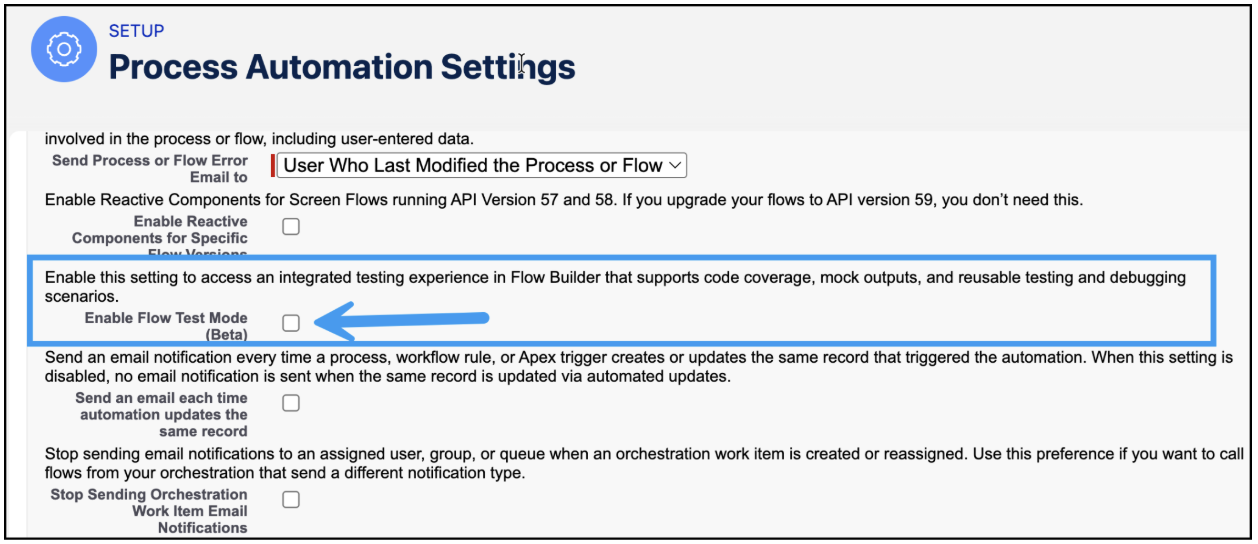
If you’ve been jumping between debug mode and flow testing in Flow Builder, and are tired of losing your place in where you were building, Test Mode is the answer. For record-triggered and autolaunched flows, it’s a unified space where you can run a one-off test scenario to track down an issue, then save that same setup so you can run it again later without re-entering inputs every time. Enable it, click Test, and the canvas shifts to a test view where you can create test scenarios, define expected results, and run tests right there without switching to a separate tool. You can add assertions (these are conditions that define the expected results) to a saved test scenario, and it reports pass or fail when you run it.
Test Mode (Beta) is for teams that test flows regularly, or anyone who has wished their debug sessions were reusable. The ability to build repeatable regression tests for complex flows right inside Flow Builder is something admins have been wanting for a long time.
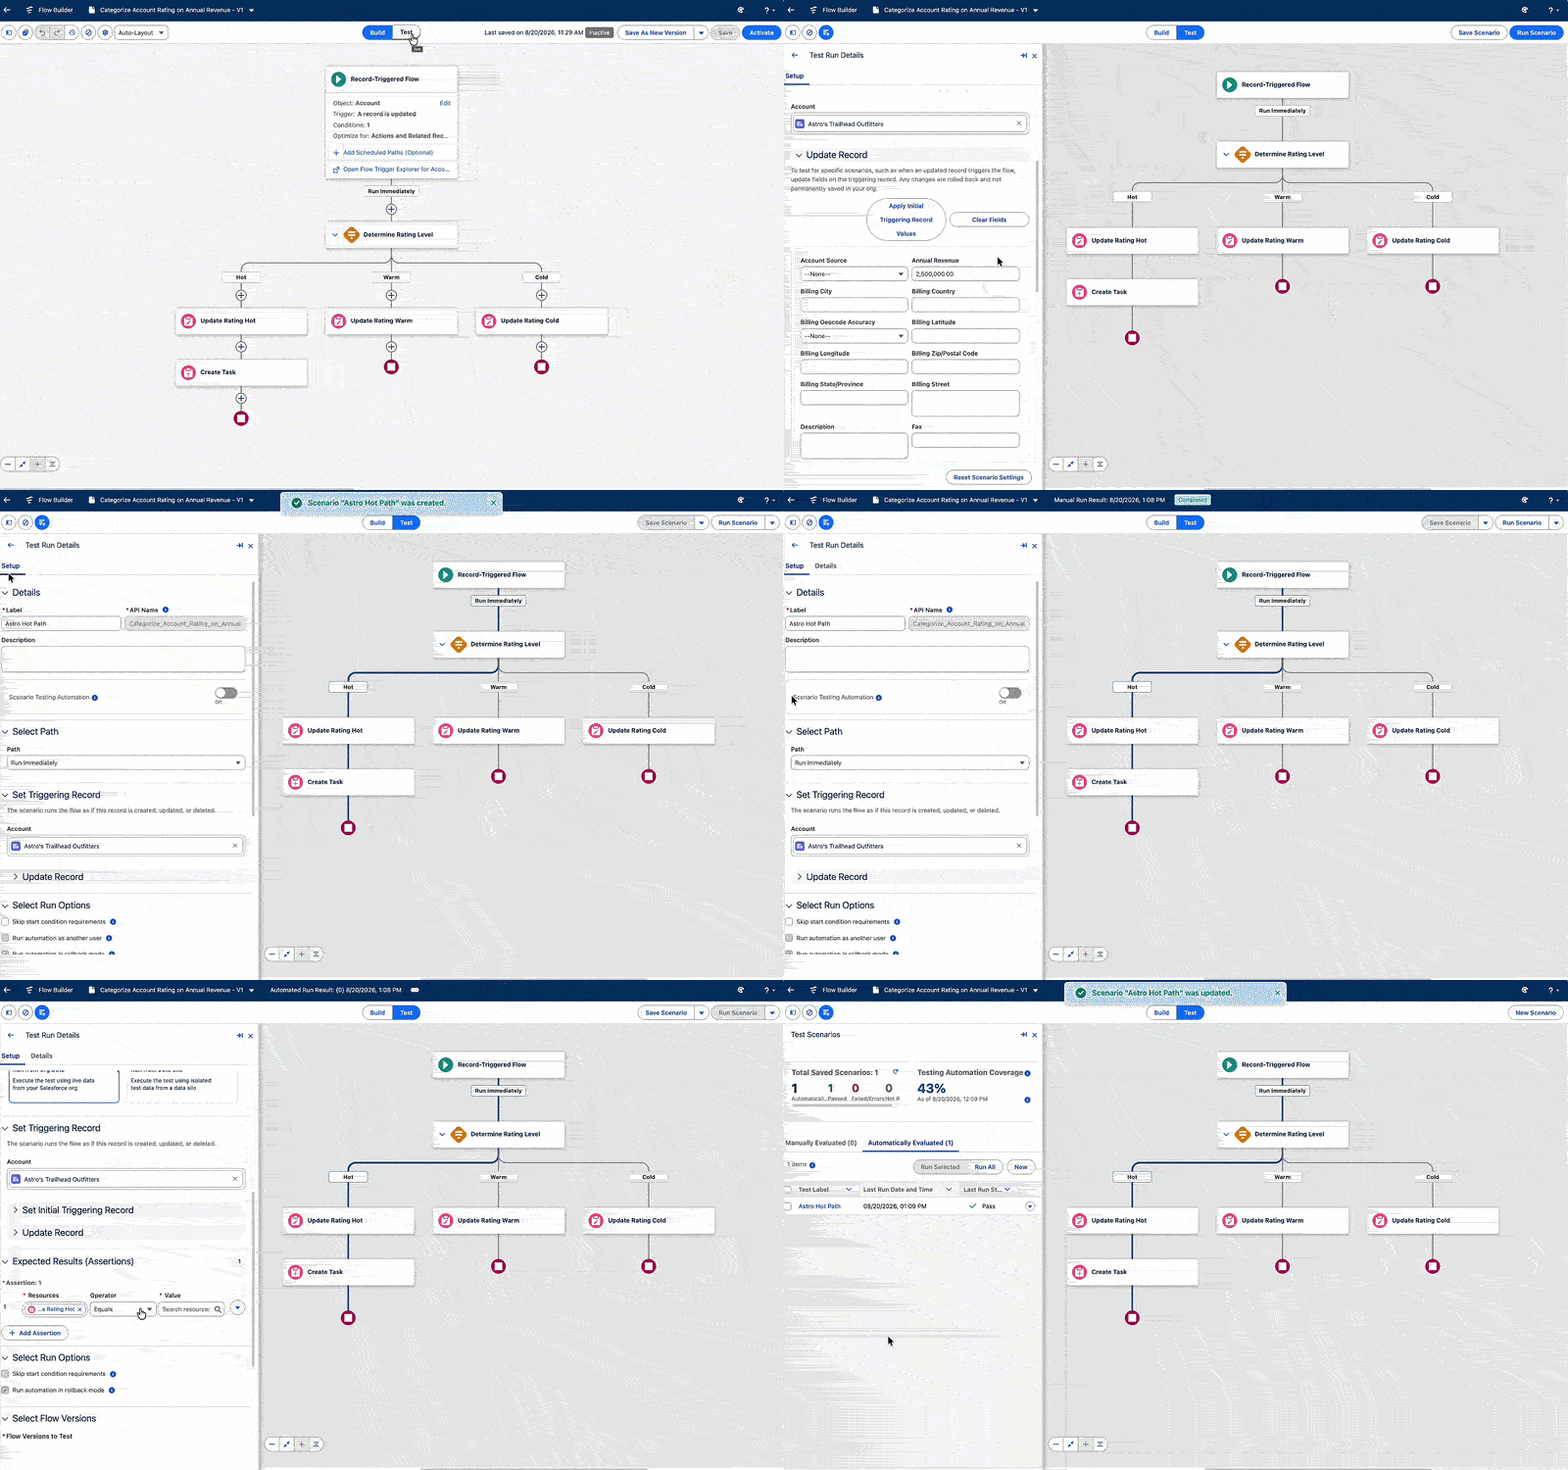
Test Mode (Beta) keeps you in the Flow Builder experience for the whole thing.
To enable, in Setup | Process Automation Settings, select Enable Flow Test Mode (Beta). Then, when you are In Flow Builder, click Test to open Test Mode.
Test any flow record by entering its ID within Test Mode
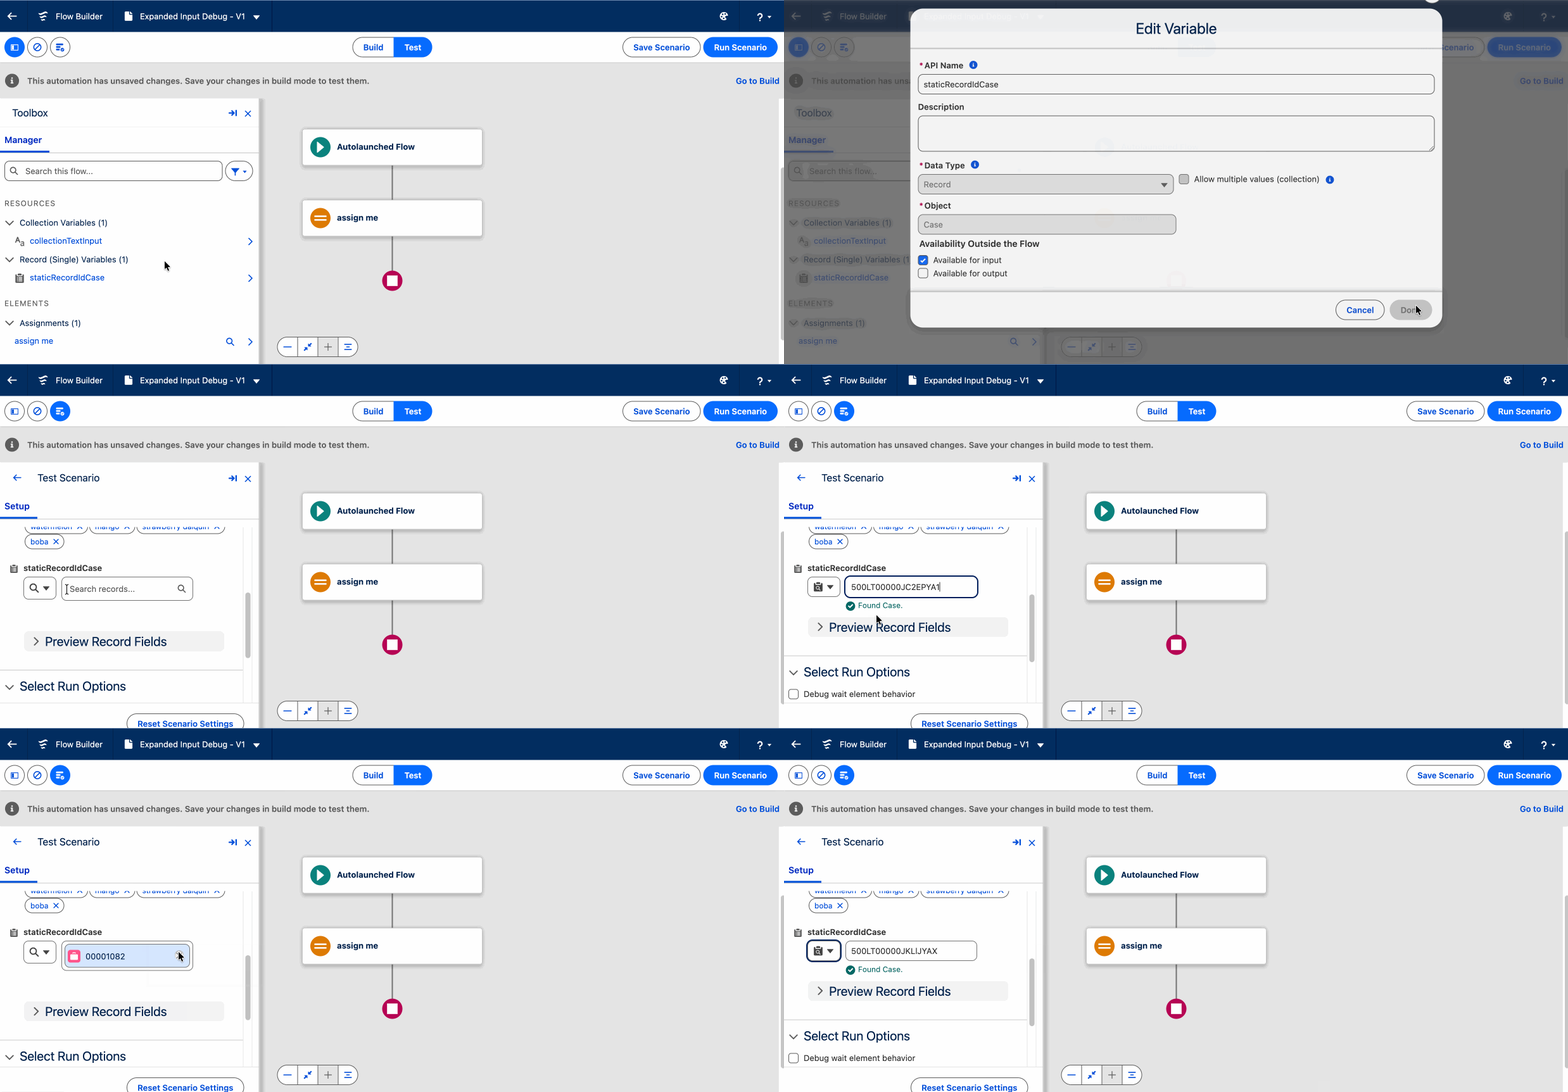
Some objects are harder to search for in the Flow debugger, such as Cases, Campaign Members, anything where the record list isn’t easily browsable. You can now enter a static 15- or 18-character record ID directly in the Flow debug panel to test your flow against a specific record, no search required. This may seem like a simple change, but it removes a real barrier to testing flows that handle records from less-searchable objects.
Pass primitive collections into the flow debugger for testing within Test Mode
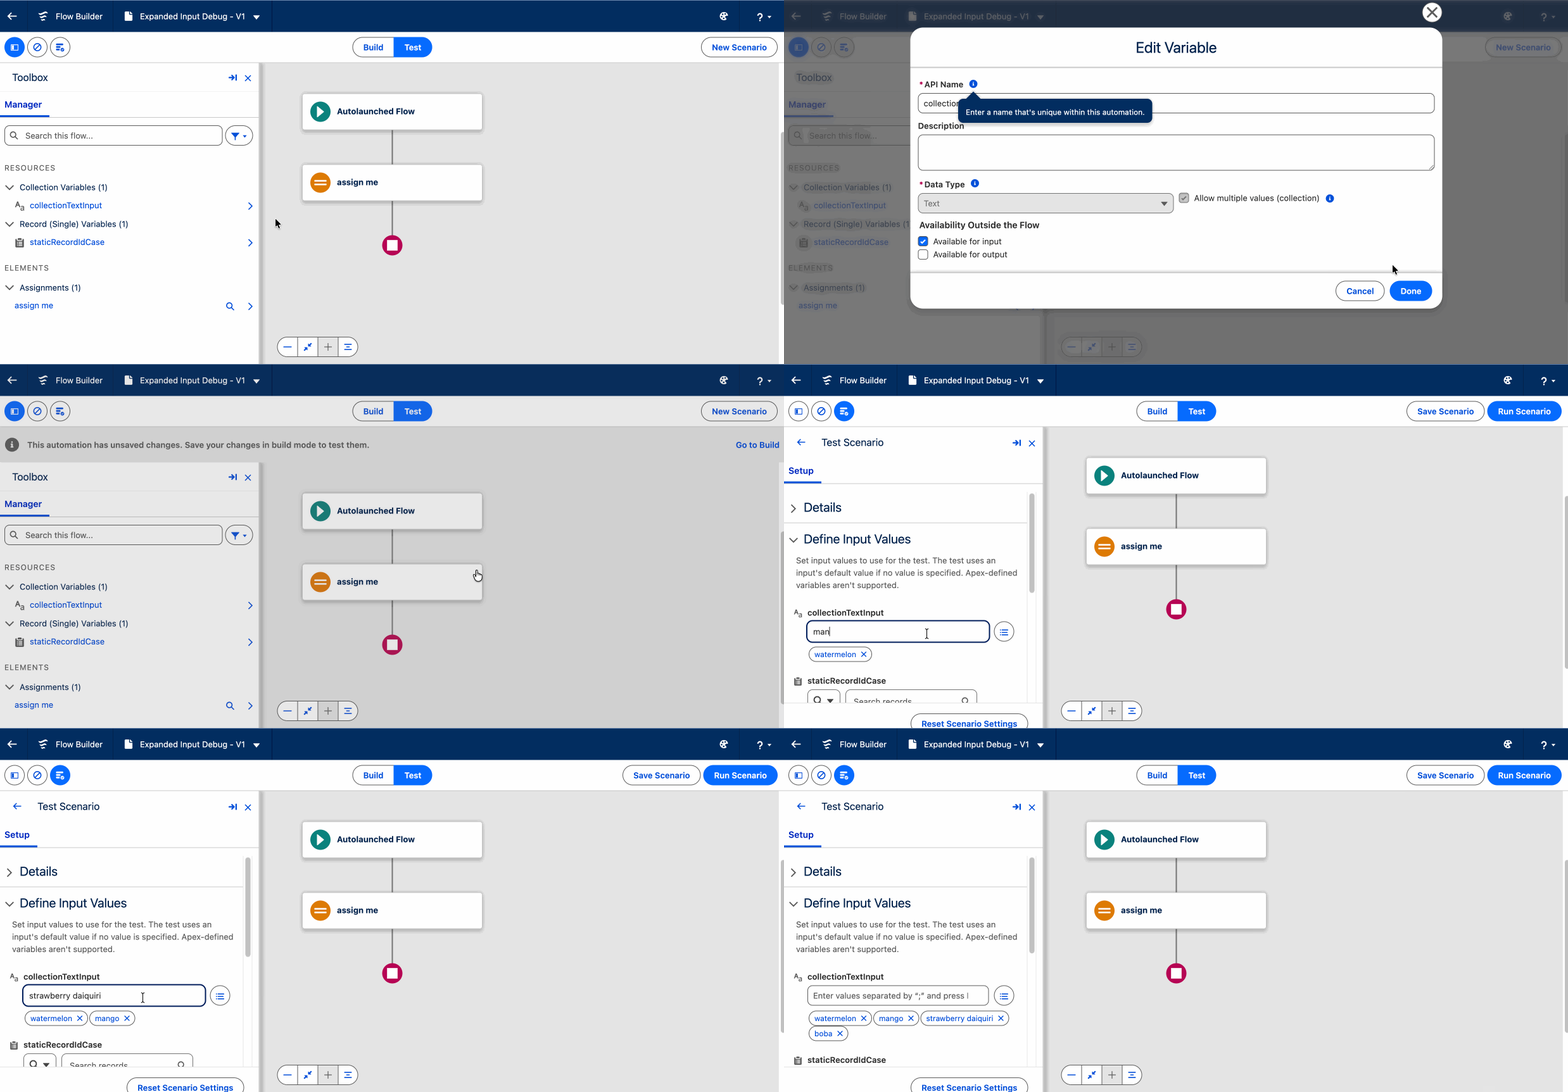
For anyone building flows that process multiple values in bulk, this feature closes a meaningful debugging hole. If your flow takes a collection of primitive values (a container that holds multiple simple data values of the exact same type, such as a list of text strings, numbers, or dates) as inputs, you can now test those inputs from the debugger in Test Mode. Previously, the debug panel only handled single input values, which meant flows using collections had a significant testing gap. Now you can populate record and primitive collection variables directly in the debug panel and see how your flow handles the real input shape.
In your flow, create a primitive collection variable, for example, a variable that is a text data type and allows for multiple values. Then, in Test Mode, you can provide multiple values for that collection to use for testing.
Test Flows in isolation with mock outputs for Action and Subflow Elements (Beta)
If you’ve ever tried to test a flow that calls an external API or kicks off a subflow, and had the test fail because the external service was down, rate-limited, or just returned something unexpected, you will be excited for this feature. Mock outputs let you define exactly what an Action or Subflow element returns during a test run, so you’re validating your flow’s logic, not the reliability of whatever’s on the other end of the callout. The actual HTTP request never goes out. The subflow never executes. Your predefined response gets used instead, every time.
This is useful for testing fault paths, which are notoriously hard to trigger with live data. You can now force the failure scenario, verify your flow handles it correctly, and save that scenario for regression testing.
While in Test Mode, you select the Action or Subflow element, select the Scenario Output tab, specify your expected JSON result, and click the Run Scenario button to run the test with your mock outputs.
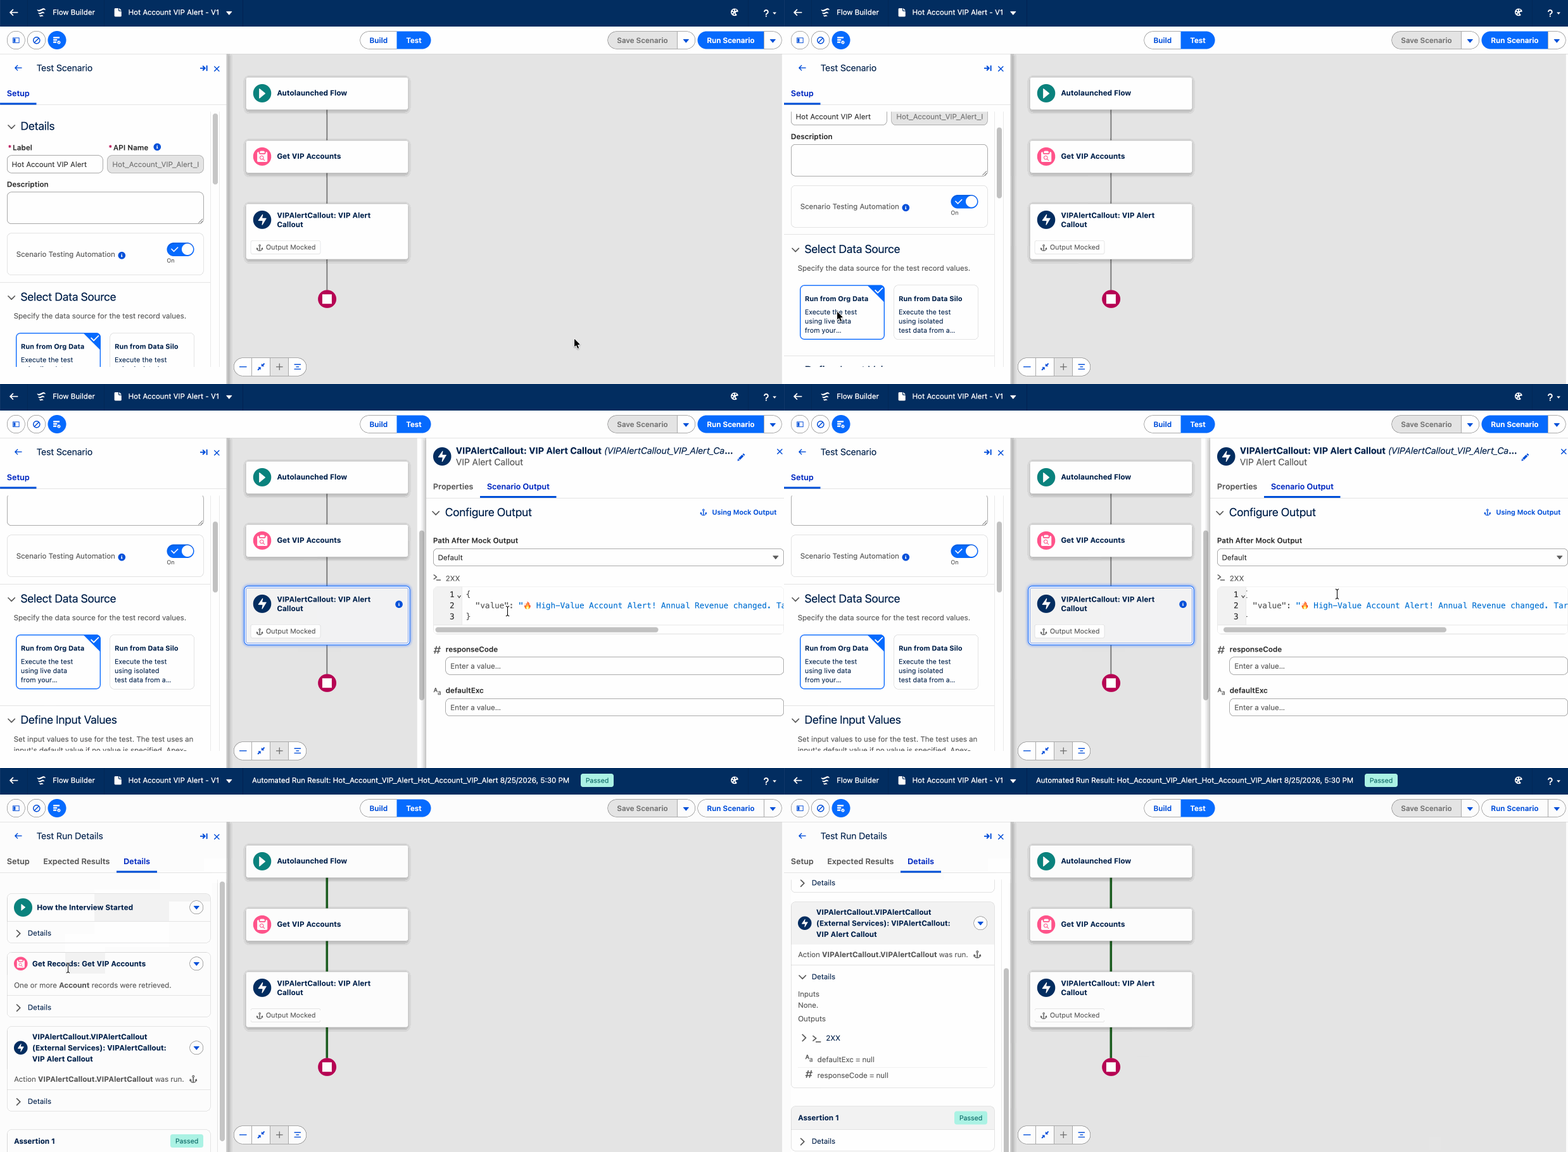
To enable this, go to Setup | Process Automation Settings, select Flow Test Mode (Beta). In Flow Builder, click Test to open Test Mode, click the Action or Subflow element you want to mock, and select Scenario Output > Use Mock Output.
Let Agentforce for Flow write your flow test scenarios from the terminal
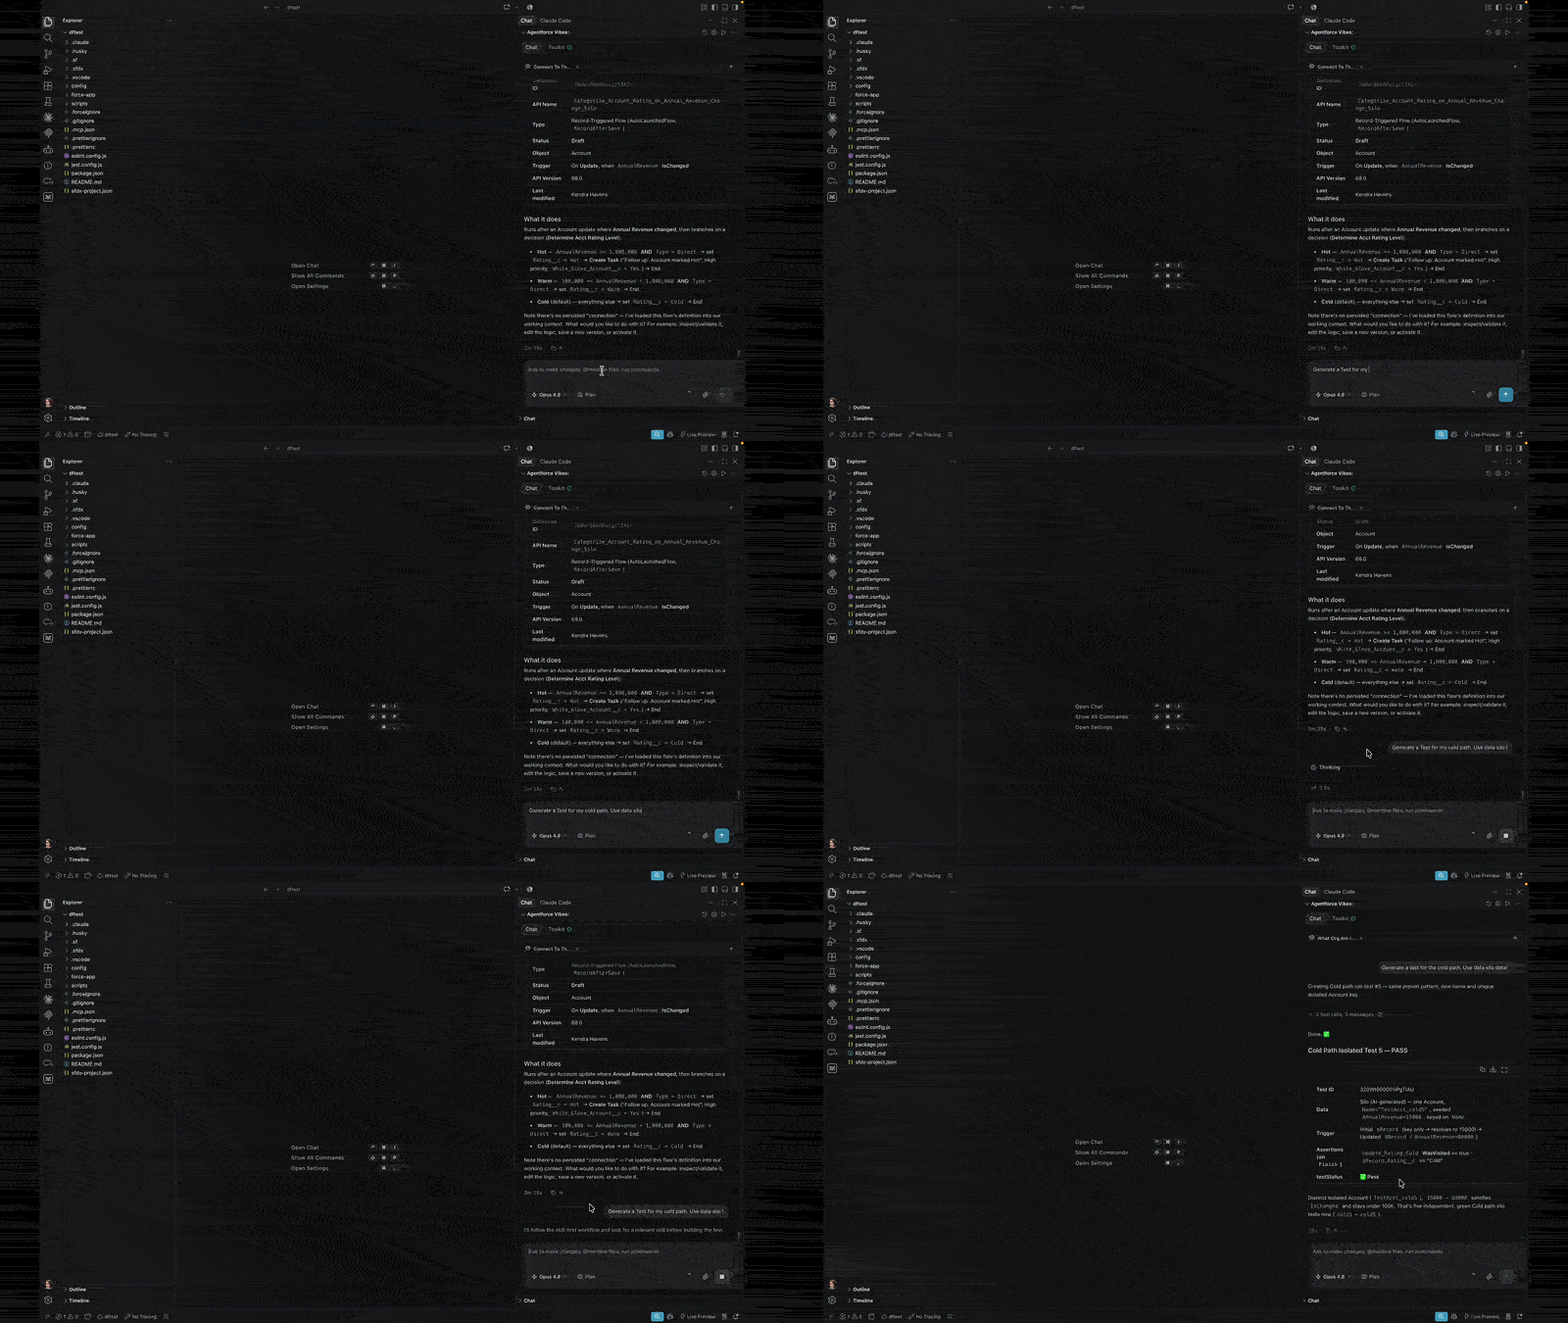
Writing test scenarios for complex flows is one of those tasks that’s easy to skip because it takes forever to do manually, especially when you’re dealing with multiple decision outcomes, fault paths, and edge cases. Let Headless Agentforce for Flow do the heavy lifting for you. From your terminal, you type a single prompt, and it analyzes your flow’s structure, logic branches, and required fields to generate a full set of proposed test scenarios covering success, fault, and edge-case paths. You review and approve, it builds and runs them, and then hands you a URL to open everything in Flow Builder.
To use Agentforce for Flow Headless in Agentforce Vibes, you need the Agentforce Platform Developer and Admin permission set license (PSL) and the Agentforce Developer and Admin Tools permission set assigned to your user.
If you’re already working in a CI/CD pipeline or want to get serious about flow test coverage without spending hours writing scenarios by hand, it’s worth exploring.
Connect your AI terminal to your Salesforce org. Navigate to the flow you want to test, and enter the prompt:
create flow tests
Agentforce for Flow Headless analyzes your flow definition and logic branches to return a structured list of proposed test scenarios. After you approve, it builds the test scenarios, adds them to your flow, validates them, and runs them. The terminal provides a URL to open the test scenarios in Flow Builder for review. If you have Test Mode (Beta) enabled in Process Automation Settings, you can also enter this prompt:
use isolated data for my flow tests
Flow approval process enhancements
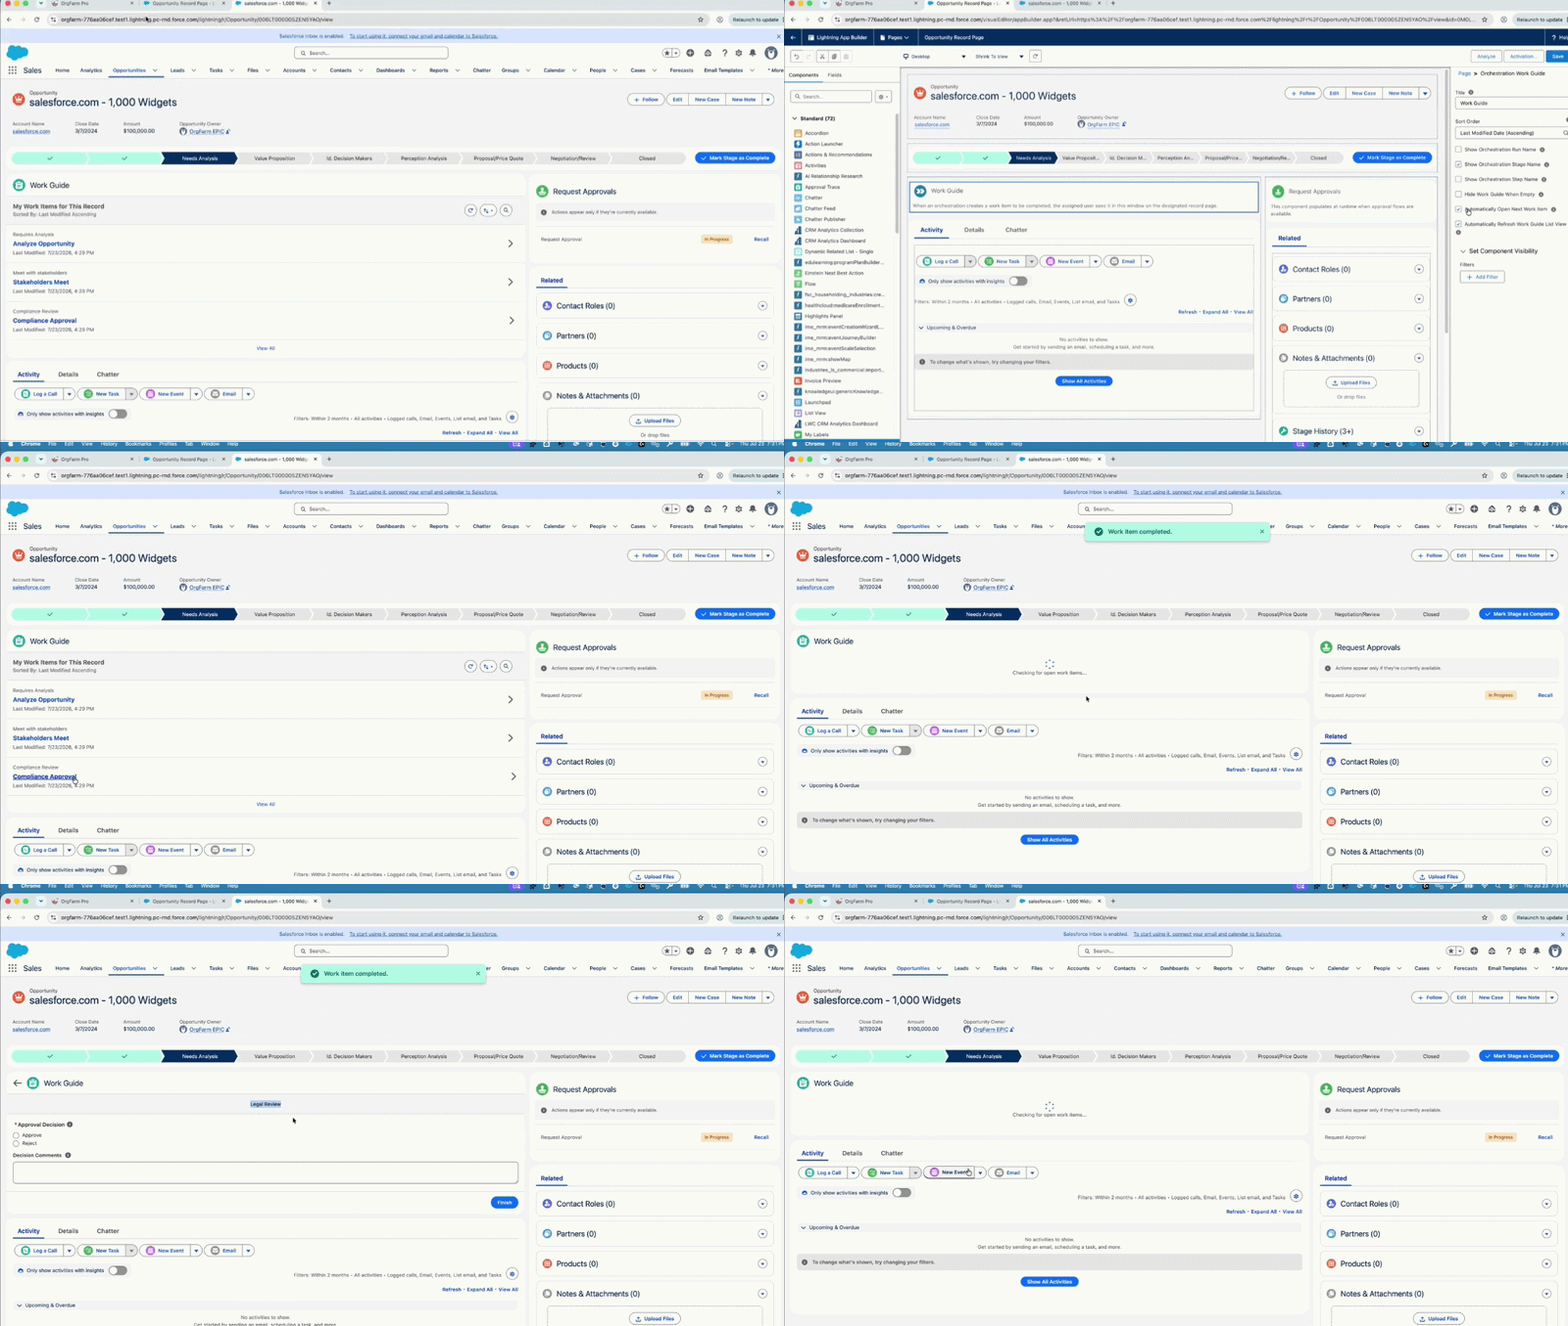
Add multiple flow approvals to one record page
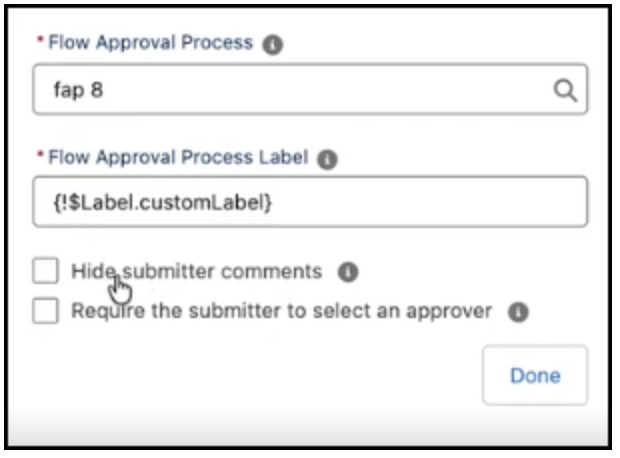
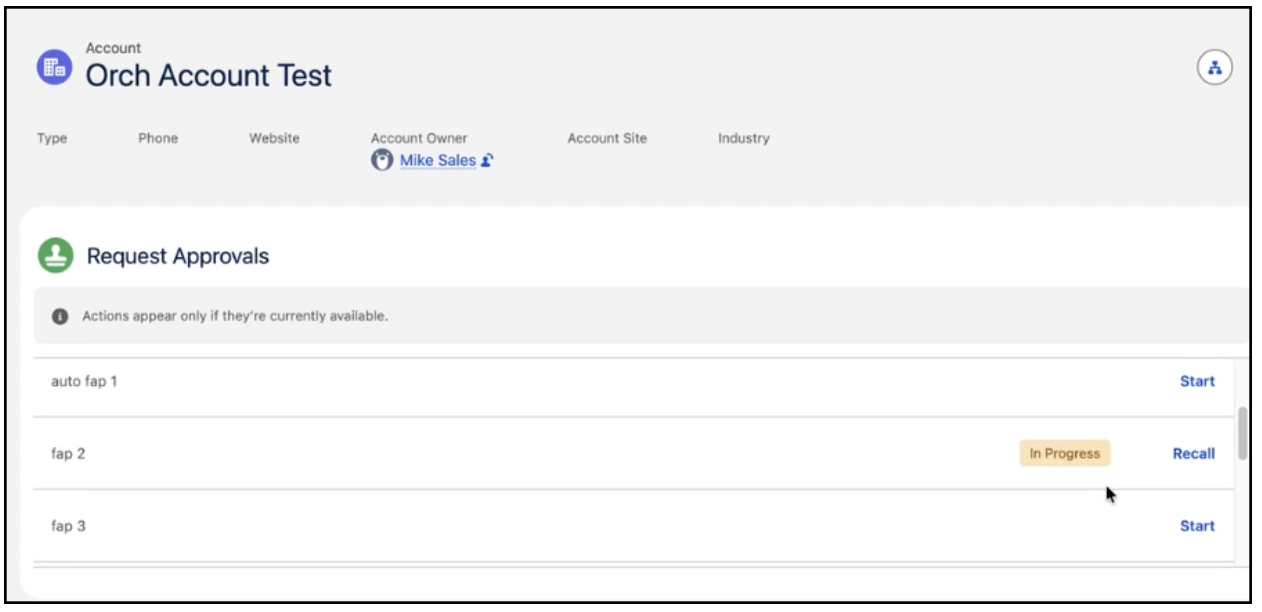
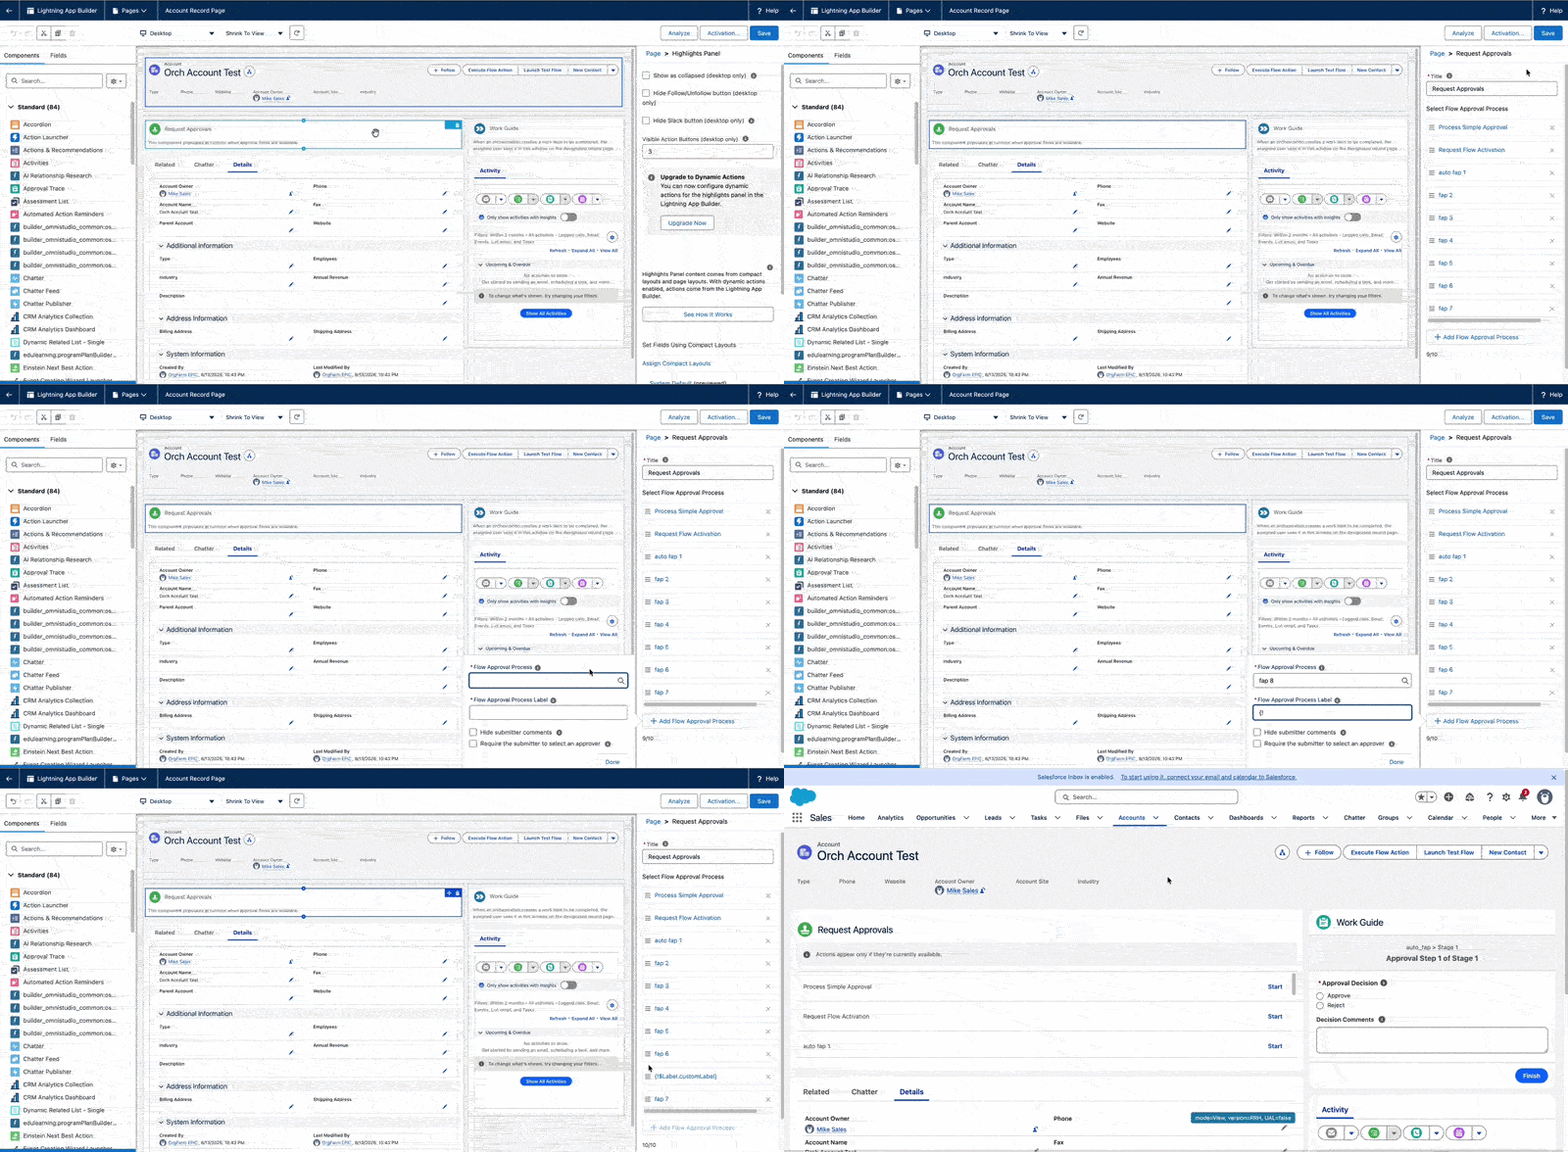
The Request Approvals component now supports up to 10 autolaunched flow approval processes on a single record page and works in Lightning App Builder. The submitter can now see the options available to them and can pick the right one, rather than having you as the Admin build separate record pages or conditional routing logic to direct them to the right process.
You can configure per-process whether submitters can add comments and whether they’re required to select an approver. These are both common requirements that previously needed custom workarounds.
To configure this, In Lightning App Builder, add the Request Approvals component to a record page layout. In the properties panel, click + Add Flow Approval Process for each approval process. Configure the label, comment settings, and approver selection requirements, then save.
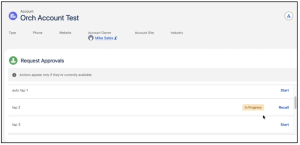
The list of Request Approvals will be available in the component. To initiate a request approval, click the ‘Start’ link. Once a request approval is in progress, you can also recall it.
Auto-advance approvers to their next pending work item
When a user completes a work item in the Orchestration Work Guide, it now automatically opens the next work item from the same running flow approval process. This change eliminates the need to navigate back to a queue or hunt for what’s next. Who has time for that? If they have no remaining work items, they see their updated list instead.
To configure, in Lightning App Builder, add the Orchestration Work Guide component to a record page layout. In the properties panel, select Automatically Open Next Work Item.
Cut latency in flow approvals with synchronous steps
Background steps in flow approval processes that call synchronous actions now run synchronously when you update the flow’s API version. This helps reduce end-to-end latency for your running flow approval processes. This is a targeted performance improvement rather than an automatic behavior change. You opt in by updating the API version on existing flow approval processes to 68.0 or later. If you have flow approval processes with background steps that feel sluggish, this is worth testing in a sandbox before rolling out to production.
Delete approval records to satisfy GDPR data compliance requests
GDPR and other data compliance requests sometimes require deleting all records associated with a specific person, including their approval history. When you delete a parent record, Salesforce now automatically cancels related in-progress approval submissions and their in-progress child records. This feature removes a real blocker for compliance teams that previously had no clean way to fully purge approval data during deletion requests.
Agentforce enhancements
Gemini 2.5 Pro, Flash, and Flash-Lite requests reroute in late October
On October 20, 2026, Gemini 2.5 Pro, Flash, and Flash-Lite model requests will automatically reroute to Gemini 3.5 Pro, Flash, and Flash-Lite. The expected responses can change when a new model comes in so don’t wait until October to find out.
What’s the difference between the three?
- Gemini 3.5 Flash-Lite: The fastest and most cost-effective model, built for high-throughput, simple tasks.
- Gemini 3.5 Flash: The workhorse. It balances high intelligence with speed and efficiency.
- Gemini 3.5 Pro (Upcoming): The most capable reasoning engine, designed for deep analysis and complex logic, but it is slower and more expensive to run.
Choose the model based on the complexity of the prompt template you’re building.
- Select Gemini 3.5 Flash-Lite for simple, high-volume automation where absolute reasoning is not needed, and you want to keep API costs down, such as standardizing text formatting across thousands of Lead records or extracting simple data points.
- Select Gemini 3.5 Flash for everyday CRM tasks. It is smart and fast, making it ideal for standard generative work, such as quickly summarizing a call transcript or drafting a personalized sales email.
- Select Gemini 3.5 Pro when you have a prompt template requiring heavy logic or deep synthesis, such as analyzing 50 past support tickets and unstructured Account History to diagnose a nuanced technical issue.
I’d highly recommend testing your prompts and applications with the new model in Prompt Builder and Einstein Studio now, while you’ve still got time to adjust.
AIforce enhancements
Keep up with the latest Agentforce Vibes enhancements
Read the weekly release notes for more information about the new, changed, and fixed features in recent weekly releases.
Build Salesforce apps with Claude Code
This one is really in the developer territory, but if you’re an admin who writes code or works with a developer, it’s worth knowing about. The Salesforce Development plugin for Claude Code brings AI-powered app development into your DX workflow through hosted Model Context Protocol (MCP) servers. The plugin detects your Salesforce DX project environment, and provides Salesforce specific skills and context of your org through MCP servers. Build, update, and maintain apps quicker than before.
First, you need to install the prerequisite software on your computer. Then, within Claude Code, run these commands to install and ensure it is activated.
/plugin install salesforce-development@claude-plugins-official

/reload-plugins
Once installed, you get the following:
- 38 skills across areas like: Discovery, Environment setup, Project/Org lifecycle (scaffolding DX projects, scratch orgs), Apex (generate/test/run/debug), Automation (Flow generation), Declarative Metadata (custom objects, fields, apps, tabs, report types, list views, validation rules, FlexiPages), Data (SOQL/SOSL), Deploy & Retrieve (deploy, retrieve, manifests, destructive changes), Security (permission sets, sharing rules/OWD), Code Quality (Code Analyzer, custom rules, architecture review), and Reporting.
- 2 agents: salesforce-dev (the main dev agent, auto-activates when it detects an sfdx-project.json) and architecture-review (a read-only reviewer grading against the Well-Architected Trusted/Easy/Adaptable pillars).
- Slash commands for setup, status, org login/logout, project management, discovery, telemetry, etc.
- 3 MCP servers: salesforce-api-context, salesforce-metadata-experts (both for API/metadata guidance), and salesforce-lsp (spins up Apex/SOQL language servers on demand).
- Hooks that auto-detect org context, gate production deploys, run Apex pre-deploy diagnostics, and suggest other plugins when nothing installed matches your ask.
- Built-in progress tracking through a Connect → Project → Build → Test → Deploy → Observe journey.
Customize Org Health and Usage metrics that matter most to your org health view using Setup with Agentforce
Org Health and Usage dashboard tracks a useful range of signals: your Security Health Check score, login errors, data exposed to guest users, user access health, Apex health, data and file storage utilization, release updates, custom component errors, performance errors, Lightning Experience performance, and user license utilization. That’s a lot of information! Now, you can organize this information based on what’s most relevant to your org. Favorite a metric and it shows up on its own tab. Mark it as Hidden and it’s gone from the main view entirely. All metrics are still sorted by severity, so nothing important to your org disappears.
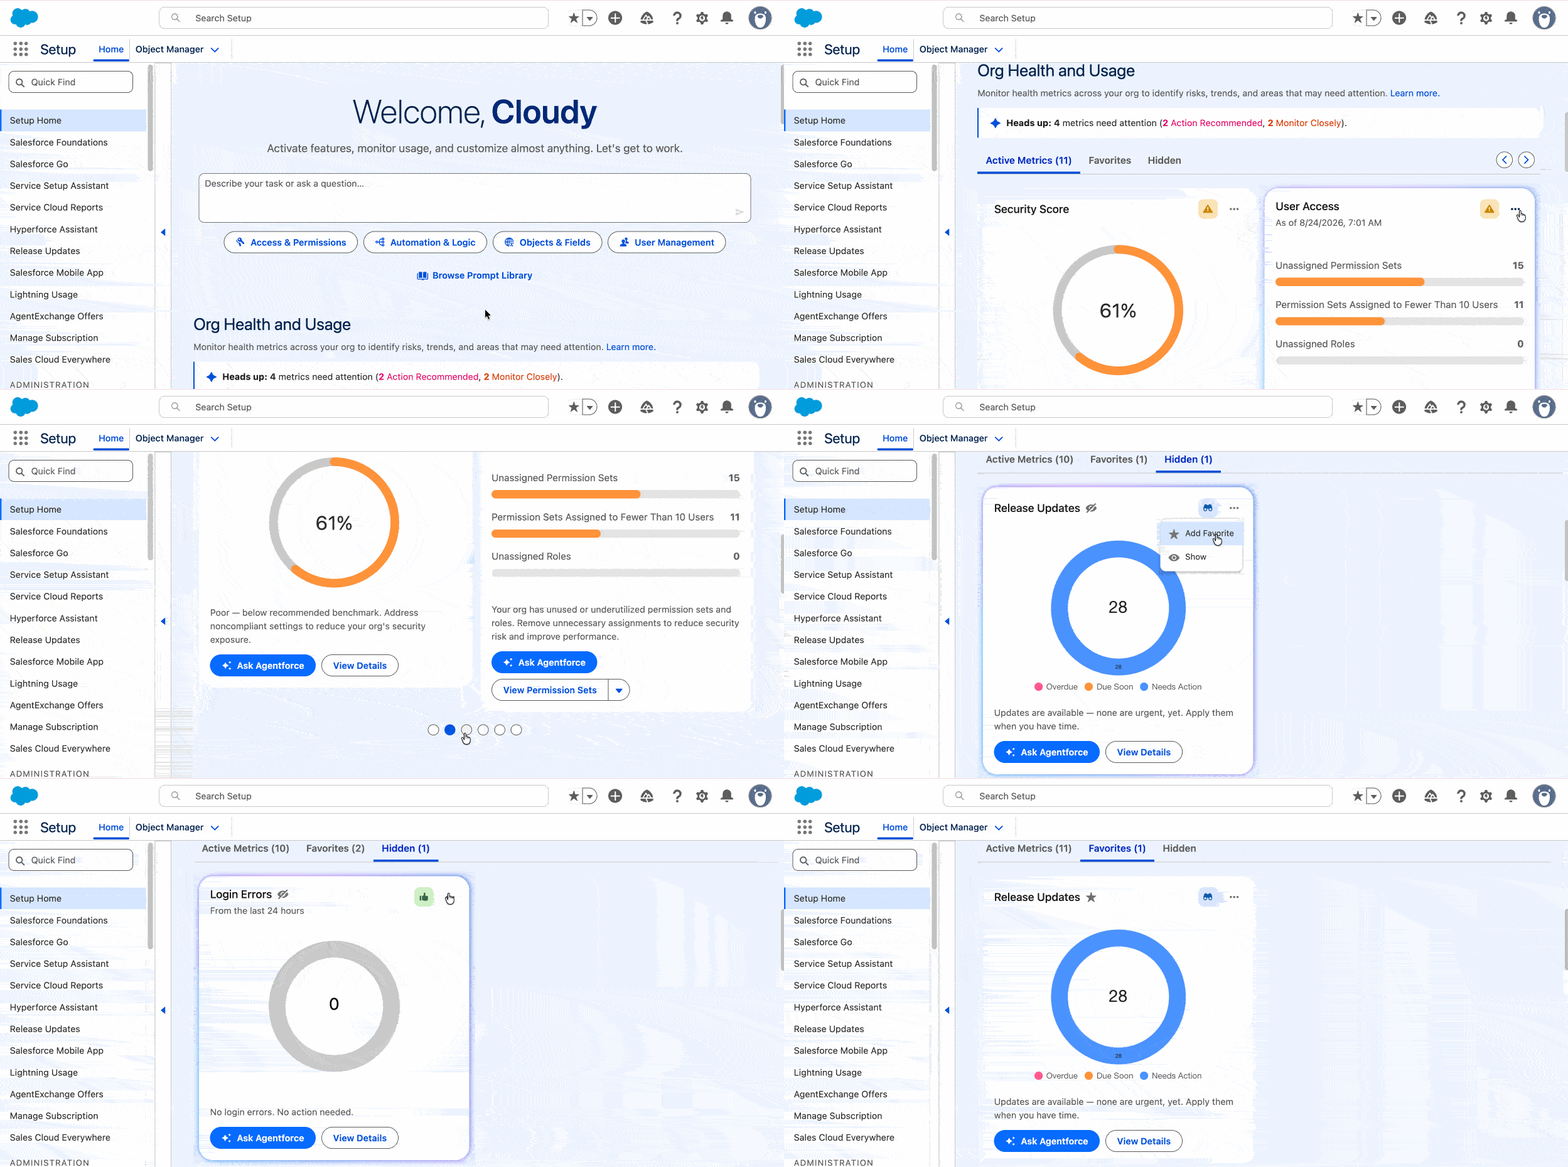
If org health monitoring is part of your regular admin routine, this customization makes the tool easy to work for you.
Note: This feature is available in Lightning Experience in Enterprise, Performance, Unlimited, and Developer editions with Foundations or Agentforce 1.
Case Management enhancements
View your original case attachments inline in a Case record
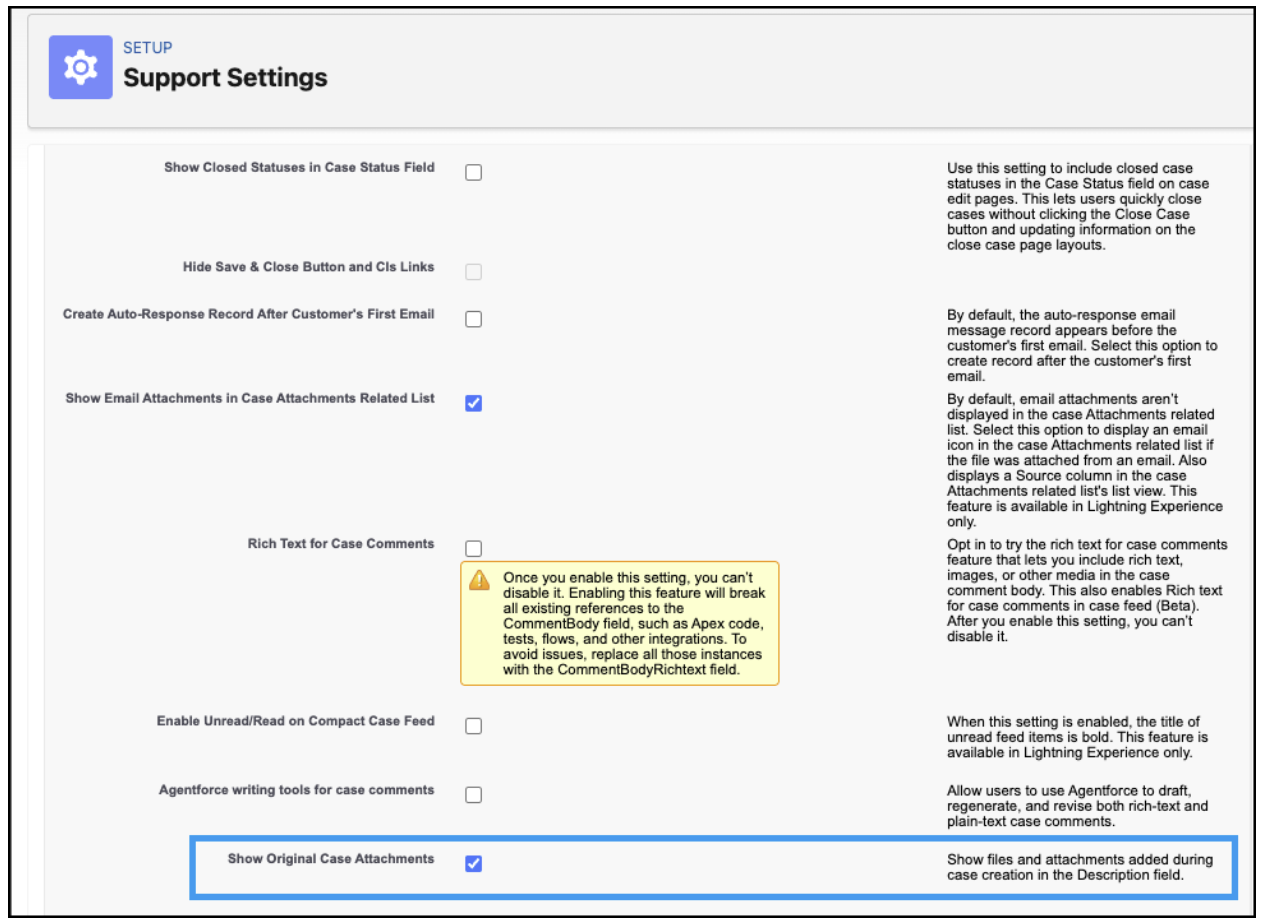
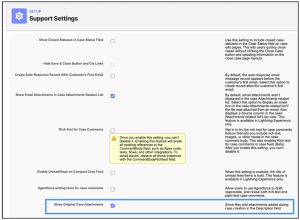
When an email-to-case comes in with attachments, reps usually have to click into the Files related list and wait for previewers to load. Now, the original attachments display as up to three inline visual tiles right under the Case Description field. If there are more than three, an overflow popover link displays up to five files at a time with a scrollbar, saving tons of clicks. There is also a View All Attachments button at the bottom which will take you to the Case Related List or full file history.
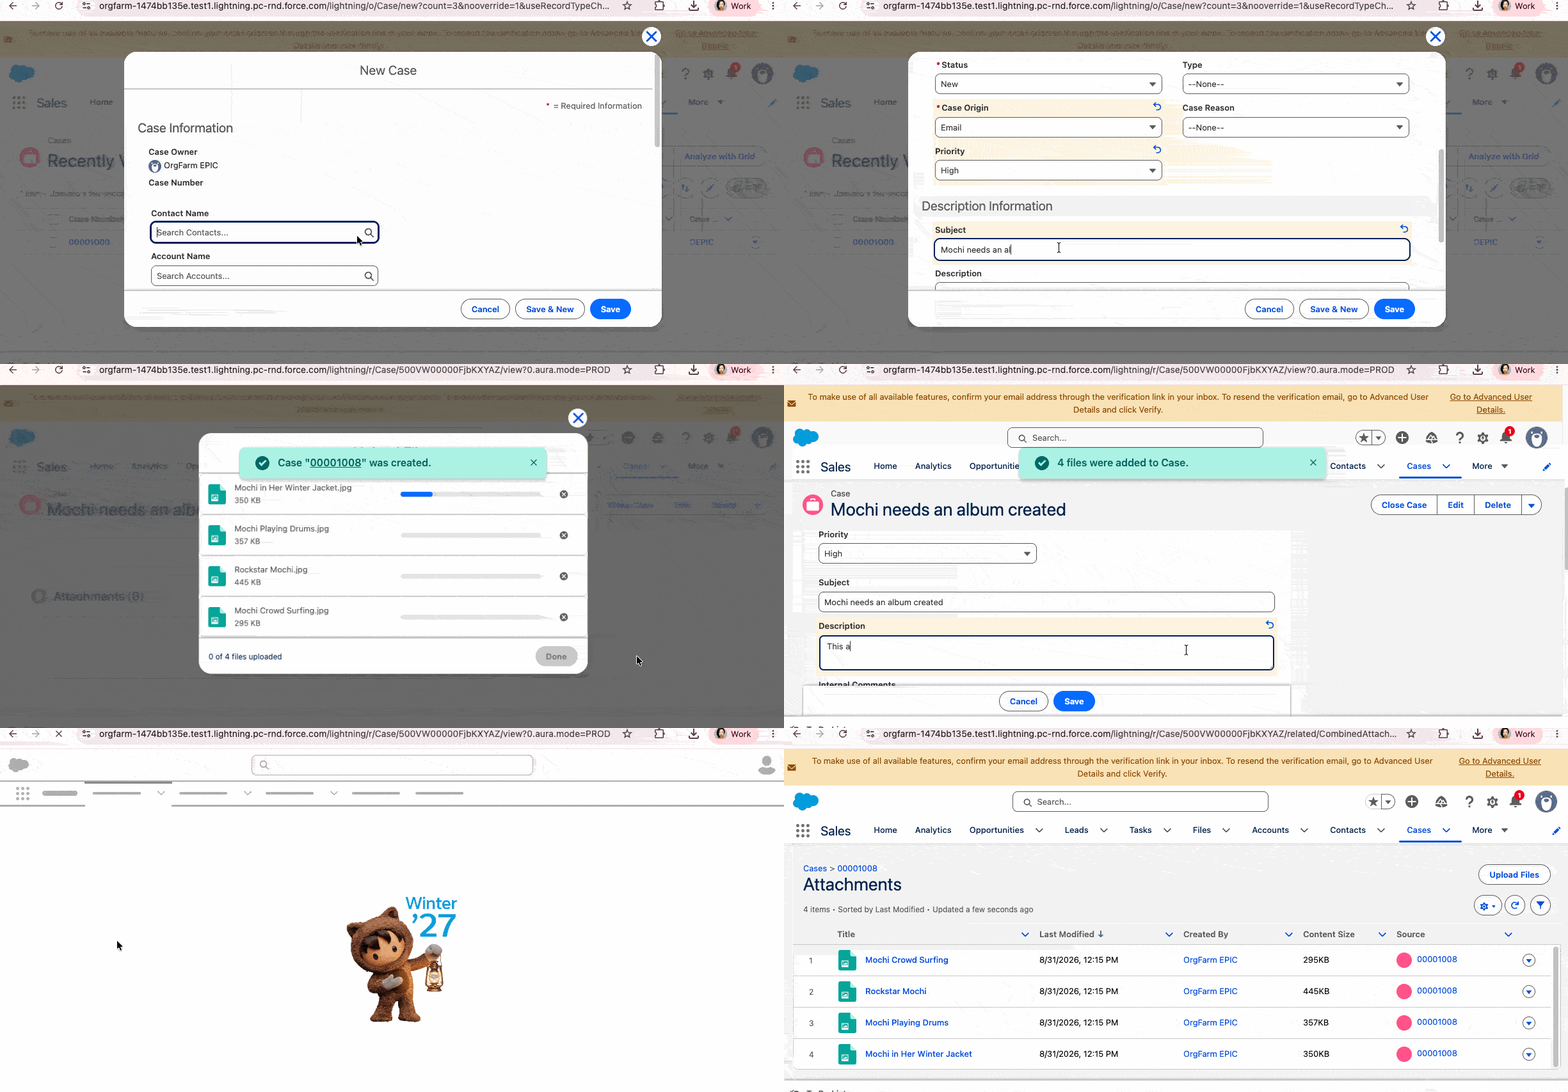
To enable, go to Setup | Support Settings page, then check the Show Original Case Attachments checkbox. Once enabled, original attachments added within the case creation window display automatically beneath the Case Description field.
Refine your case comment drafts with built-in AI tools
Not every support rep is a natural writer, and that’s perfectly fine — they’re experts at solving problems, not crafting prose. But inconsistent tone in case comments can undermine customer Your support reps can now draft their case comments, use the Refine with Instructions button right inside the case comment editor. Tools will either update the entire comment or sections of it.
As an admin, you configure prompt templates to customize the tone options and behavior available in your org, so you’re in control of what reps see and what the tone of your brand.First enable Einstein, configure instructions in the Refine Case Comment prompt template, and select “Agentforce Writing Tools for Case Comments” in Support Settings.
Note: This applies to Enterprise, Performance, Unlimited, and Developer editions with Agentforce for Service and Einstein for Service. Reps will need the Prompt Template user permission set.
Service enhancements
Write it once, update everywhere with Knowledge Blocks
If your knowledge base is basically a copy-paste place for legal disclaimers and company boilerplates, Knowledge Blocks are going to feel like a superpower. Create a block (i.e. a disclaimer, a standard address, a return policy) and add it into any article as a managed, read-only block. When that content changes, you update it in one place. Every article using that block reflects the change automatically, the moment you publish the new version. What a productivity gain.
No more hunting down 200 articles that all contain the same outdated phone number. No more hoping someone finds and updates them all. Knowledge authors get a single source of truth, knowledge managers get an audit trail of every change with full version history, and your knowledge base gets a whole lot more consistent.
To enable this, go to Setup | Enhanced Knowledge Settings, and turn on Knowledge Blocks.
Note: This requires a Salesforce Knowledge add-on license.
Draft Knowledge articles from any record with AI
Writing Knowledge articles is one of those tasks that everyone agrees matters and nobody wants to do. Writing them takes time, requires switching context out of an active case, incident, or work order, and the article quality can vary wildly depending on who’s writing it. Your reps can use Einstein Knowledge Creation as a way to draft articles directly from any record, without starting from a blank page.
In Winter ’27, you can now build multiple custom prompt templates using natural language instructions and merge fields, tailored to a specific record type and scenario. Reps pick the right template and generate a draft right from the record, or conversationally through Agentforce from anywhere in the app.
To enable, go to Setup | Einstein Knowledge Creation, turn on Einstein Knowledge Creation, then turn on Prompt Builder Template. To create a custom prompt template, select the Knowledge Generation template type in Prompt Builder, configure the grounding record and inputs, and activate the template.
Note: This requires a Salesforce Knowledge add-on license.
Experience Cloud enhancements
Spot fields with sensitive data to hide from guest users before it’s a problem
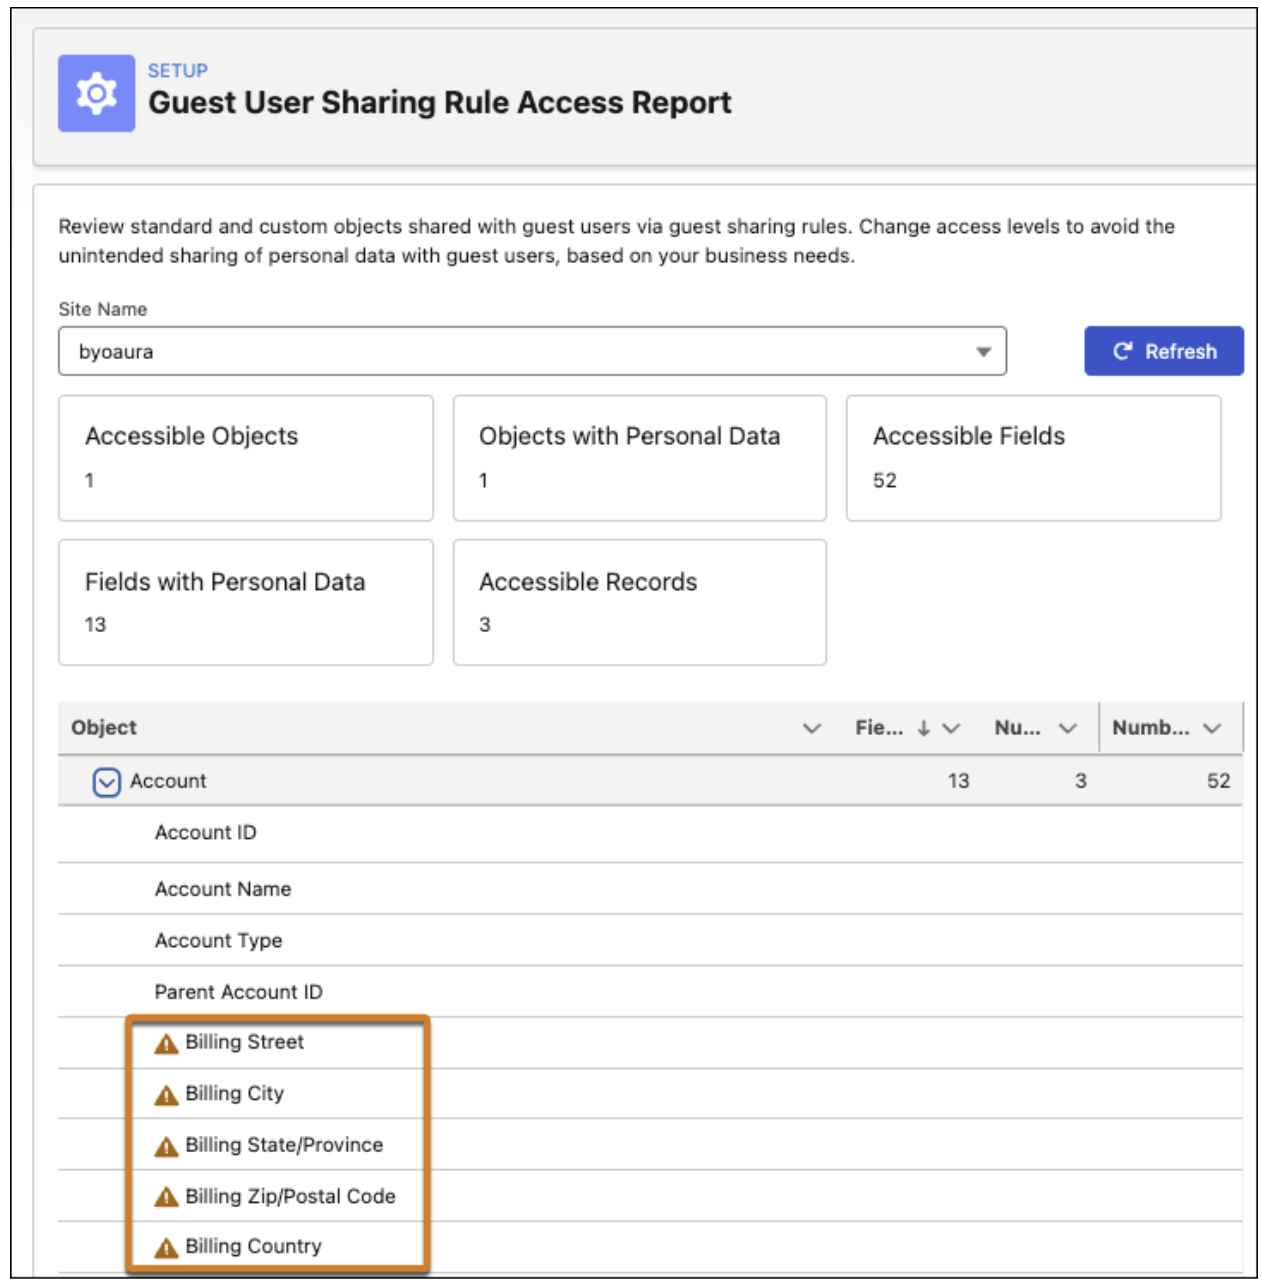
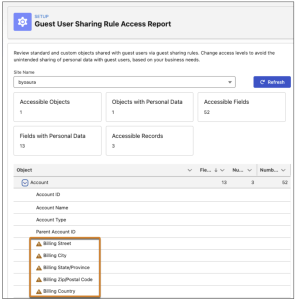
If you manage an Experience Cloud site (Aura or LWR sites) with guest user access, you’ll find comfort to know that there is a new layer of visibility into what those unauthenticated users can see. The Guest User Sharing Rule Access Report flags fields with a warning icon that potentially exposes personal information such as revenue data, address, contact info.
You review the flagged fields and decide whether to update the sharing rules to hide them. It’s a proactive finding tool, not an automatic block. The call is yours. But it gives you a concrete audit starting point rather than hunting through field-by-field manually.
Salesforce Mobile app enhancements
Phishing-resistant MFA for admin logins on mobile
If you’re logging into Salesforce as an admin from the mobile app, there’s now a dedicated Login for Admin option that enables phishing-resistant MFA using advanced browser-based authentication. Tap the Settings icon on the login screen, select Login for Admin. Then it walks you through the registration process or after you provide your credentials, the app prompts you for a passkey or password.
This one’s been available since June 29, 2026, so it may already be live in your environment. If you’re an admin who works from mobile, it’s worth knowing this option exists and using it.
Give your employees hands-free Agentforce Voice in the Salesforce app (Generally Available)
Agentforce Voice for employee agents is now generally available in the Salesforce mobile app. It’s built for field teams who need to prep before a visit or log updates after one, without having to lift a finger. Your users get a voice option in the Salesforce app, with mute and end-call controls designed for driving.
Setup is straightforward. Go into the agent configuration and add voice settings directly there. There is no separate connection setup required. Once it’s on, users see the voice option automatically.
Signature Success Customer Features
Get org risks delivered straight to your notification tray with Advisements (Beta)
If you’re on a Signature Success plan, the detection library now flags up to 21 potential implementation risks (up from 14) with three new categories added: CSP violations (violations that block or track custom Lightning components), outdated API versions (integrations calling Salesforce API versions more than three years old, before Salesforce ends support), and Data Detect (flagging if you have Salesforce Shield provisioned but haven’t run any scans) as part of the Advicements (Beta) feature. Paired in-app notifications in your notification tray whenever an advisement is generated, completed, or needs your attention, and you’ve got an org health monitor that’s actually hard to miss.
To enable this, go to Setup | Advisements Settings, turn on Advisements (Beta) and save. Follow these additional steps in the Help article Set Up Advisements (Beta) to make it visible in App Launcher. Once you receive a notification, you can review, filter, and resolve open advisements from the Advisements (Beta) list view in Setup.
Note: This feature requires a Signature Success plan.
Release updates
As part of your release preparation activities, you should review the release updates to ensure you’re aware of upcoming updates that can impact your org.
To learn more, go to Release Updates in Setup. Give yourself plenty of time before an update is enforced to enable it in a sandbox, do proper testing, and make any necessary changes to code and configuration to ensure all still works post update.
I’m calling out a few of the release updates here. I recommend reviewing the comprehensive list of release updates for those that apply to your org.
View Setup Audit Trail Permission to Access Setup Audit Trail (Release Update)
Giving a junior admin or auditor access to the Setup Audit Trail used to require giving them the broad, powerful View Setup permission, which violates the principle of least privilege. This release update introduces a dedicated View Setup Audit Trail user permission, so you can share the audit trail without exposing granting access to your entire Setup menu. Salesforce will enforce this automatically in Spring ’27. At that time, Salesforce will automatically enable View Setup Audit Trail permission on every profile and permission set that already has the View Setup permission. For new profiles, permission sets, or users, you will enable View Setup Audit Trail explicitly. Note: Salesforce admins aren’t affected.
You get a detailed log of every change: old value, new value, timestamp, and who made the update. Doesn’t matter if the change came through the UI, a bulk operation, Apex, or the API. It’s all captured. And here’s the part that’ll make you want to do a little happy dance: you can report on this data. So the next time someone asks “when did this user’s profile change and who changed it?”, you’ve got the answer, no manual audit log digging required.
Maintain Your Email Verification Exception (Release Update)
Salesforce will enforce this release update on December 1, 2026. If your org previously disabled user email verifications through a Salesforce Customer Support case, you need to act before the enforcement date. When this is enforced, Salesforce will remove existing domain allowlists that disabled email verification. Any users who haven’t verified their email address or return address won’t be able to send email from Salesforce.
To enable this release update, go to Setup | Release Updates | Release Update. If “Maintain Your Email Verification Exception” is present, follow the testing and activation steps. Configure your exception using the Require Address Verification to Send Email field on authorized email domains.
Migrate All Connected Apps to External Client Apps (Release Update)
In Summer ’27, Salesforce is ending support for connected apps, which means no bug fixes, no new integrations, no authorization flow updates. While connected apps will continue to work for a while, you shouldn’t run unsupported infrastructure that your org depends on. Instead, you should move to External Client Apps. This Release Update allows you to migrate at your own pace rather than under pressure.
The nice thing about this Release Update is the migration from Connected App to External Client App is built right into App Manager. Open the connected app, click Migrate to External Client App, and a migration you go. We recommend you start with the apps your most critical integrations rely on, and build from there.
Conceal personal information fields from Guest users (Release Update)
Salesforce will enforce this release update in Spring ’27. Independent Guest Field Masking separates how Personally Identifying Information (or PII) is hidden from unauthenticated guest users versus authenticated portal users. Up until now, both shared the same PersonalInfo_EPIM field set. This meant a change to protect guest users could inadvertently affect what your logged-in portal users see.
With the Release Update, guest users get their own Guest_PersonalInfo_EPIM field set. That gives you precise control to lock down guest access without impacting what your community members can view.
To test and activate, go to Release Updates in Setup, find Conceal Personal Information Fields from Guest Users, and follow the steps there.
Enable Profile Filtering (Release Update)
Salesforce is enforcing Profile filtering in Winter ’27. With this setting turned on, users can only see their own profile name. They cannot browse or query other profiles in the org, unless they are assigned the View All Profiles permission. It’s a security improvement that reduces information exposure.
If you have any Apex code, flows, or integrations that query or display profile names for users other than the running user, test those before your instance updates with this Release Update. In Setup, navigate to Release Updates, find Enable Profile Filtering, and walk through the activation steps.
Access interactive security health reports within Setup
For our Signature Success customers, the new Security Health Review replaces the PDF experience with an interactive report viewer embedded directly inside Setup. You get severity tiles, a remediation progress bar, and disposition workflows like Accept Risk or Mitigated to manage security findings with a full user activity log for audit compliance.
Note: The Health Assessments Agent requires the Salesforce Foundations add-on. Users with the Customize Application or Modify All Data permission have access by default. To grant access to additional users, assign the View Health Assessments or Manage Health Assessments permission. Review the Release Notes for details on its new capabilities.
Now it’s your turn to Be Release Ready
Now that you’ve read the summarized list of features, go to your Winter ’27 sandbox and try them out yourself. You can also get hands-on in a Winter ’27 pre-release org (Developer | Enterprise | Professional). Check the Maintenance Calendar for exactly when your Salesforce org will get the Winter ’27 features. Scroll through the list and check your Salesforce instance (NA__, EMEA__) against the release dates listed in the calendar.
Resources
Each release brings tons of amazing, new functionality, and it can be a lot to digest. To help you make the most of Winter ’27, be sure to explore our Be Release Ready page, where you’ll find valuable resources for Salesforce Admins. Bookmark the page and check back for any updates as we continue to provide helpful insights!