If you’re one of my routine release readers, you know that out of the three release seasons, summer is my favorite time of year. Sure, it can be hot, but I’d rather have it hot than the cool 50-60° spring-like weather we get in Boston, or winter (I don’t like the cold). To me, summer equates to pool time, swim time for Mochi, being outdoors, and fun activities. And yes, it’s that time of year to chat about release highlights! I’ve curated the list of features below that I think may be of interest to admins or your users.
After you read the summarized list of features below, go to your Summer ’26 sandbox and try them out yourself. You can also get hands-on in a Summer ’26 pre-release org. Check the Maintenance Calendar for exactly when your Salesforce org will get the Summer ’26 features. Scroll through the list and check your Salesforce instance (NA__, EMEA__) against the release dates listed in the calendar.
Releases include pilot, beta, and generally available (GA) features.
- Pilot: Usually the first phase of public testing, pilots normally include a small subset of participant companies. These companies must request to opt in to a pilot and then be nominated for participation.
- Beta: This phase involves rolling out a feature publicly for testing. Beta features are normally given limited support as they are not yet fully functional or finished, so we recommend getting hands-on with these features in a sandbox.
- GA: Once a feature has passed the pilot and beta testing phases, it will be formally included in a Salesforce Release. GA features are considered fully functional and, in most cases, fully supported.
By no means is this meant to be a comprehensive list but rather just a few of the enhancements and new features in Summer ’26. As always, I highly recommend browsing the release notes for features of interest to your company and industry.
Agentforce enhancements
Take your Salesforce configuration beyond the Salesforce user interface
As admins, you put serious hours into building automation, validation rules, and security models declaratively. Salesforce Headless 360 lets all of that work run independently and securely, outside the Salesforce interface.
By decoupling the front end from the back end, Salesforce APIs and MCP (Model Context Protocol, think of it as APIs for Agents) give external systems, apps, and agents access to your configuration. Your Salesforce data model, automation, and guardrails remain the single source of truth without duplicating logic, or rebuilding rules elsewhere. MCP takes it a step further, connecting your org’s context directly to an External agent’s LLM so agents understand your data, your processes, and your business rules and can use it together with the generative possibilities, all within the Salesforce trust boundary.
Check out the Introduction to Headless 360 for Admins blog post to learn how Headless 360 works.
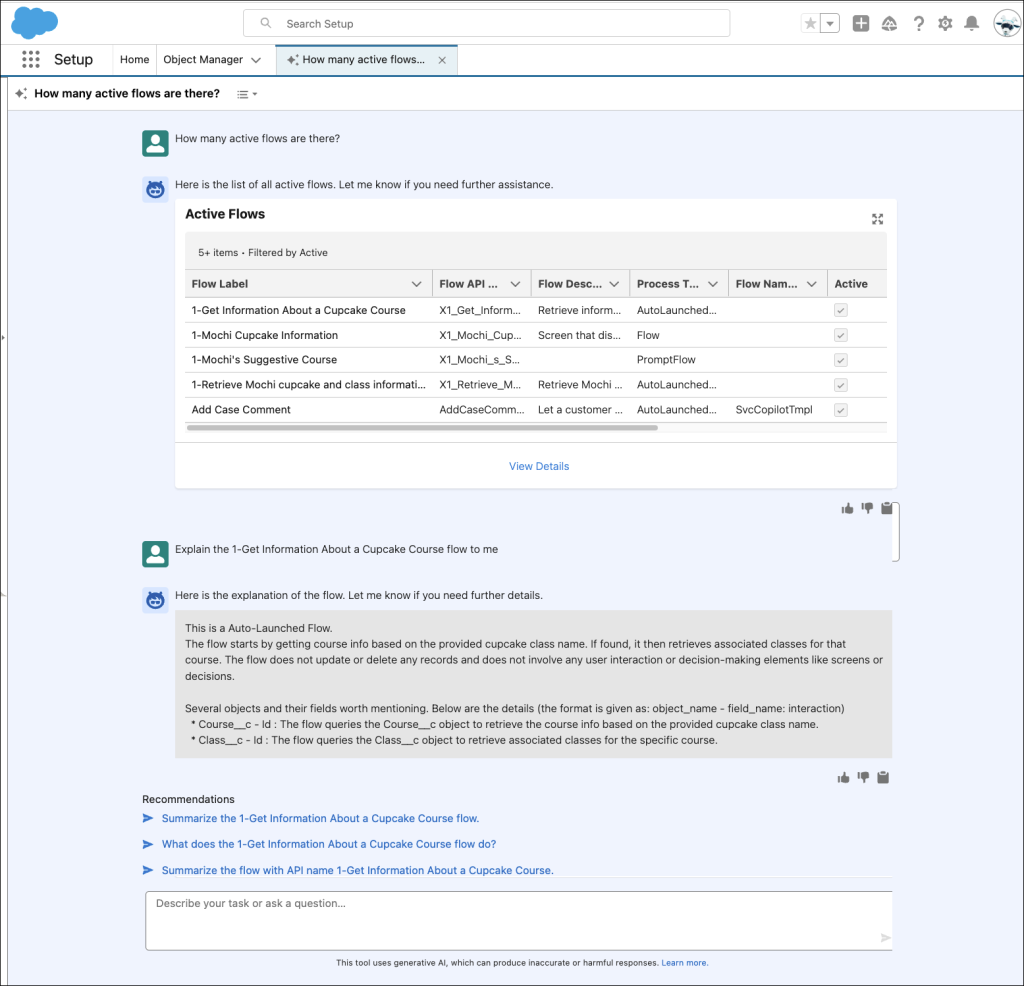
Setup with Agentforce (now GA)
In case you missed the announcement in late May, Setup with Agentforce, a tool built for admins to simplify Setup and configuration tasks, is now GA. This product was built with admin feedback at the center. The great part is that you can start experimenting and using Setup with Agentforce without unexpected consumption. Today, all Setup actions remain non-billable and do not consume Agentforce credits.
Note: We’re currently consuming only a minimal amount of Data 360 credits for our Help and Navigation action. We plan to move this action to a different framework around Dreamforce 2026 where it will no longer consume Data 360 credits.
Check out the announcement blog for more details.
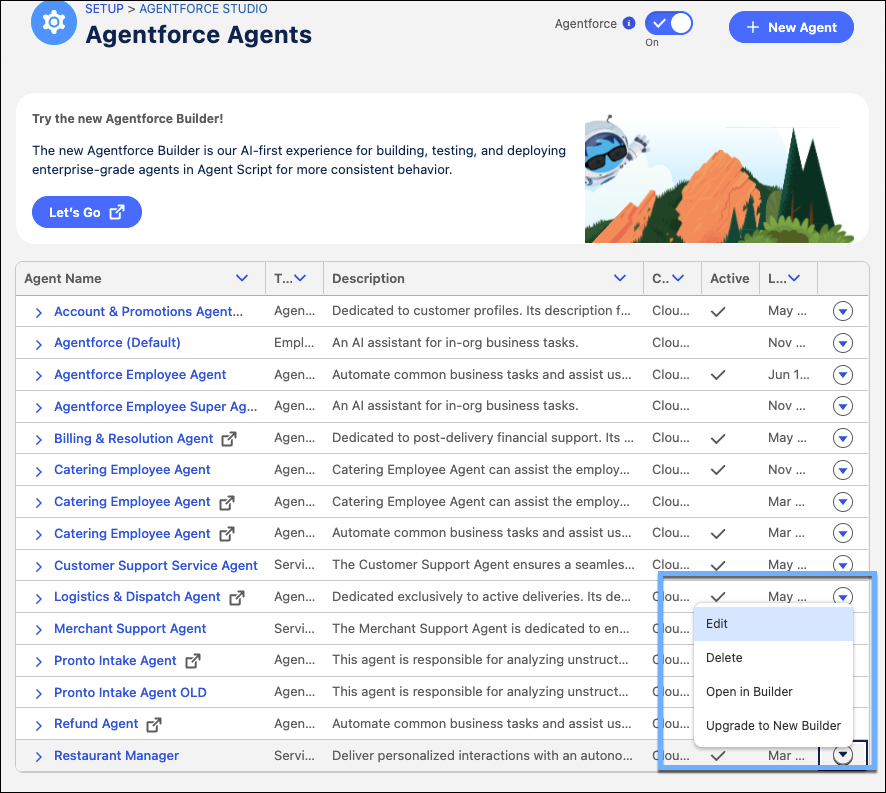
Upgrade legacy agents to the new Agentforce Builder
We’ve all made that collective groan when a new builder drops and we realize we have to manually recreate our existing masterpieces. Not this time! Now, you can upgrade your legacy agents to the new Agentforce Builder inside Agentforce Studio with just a few clicks. All of your hard work building the agent, from subagents and actions to system messages and connections, will seamlessly move over and automatically convert to Agent Script. I hear you all rejoicing! This is such a time-saver, helping you immediately take advantage of the newest AI capabilities without the dreaded rebuild phase.
To migrate your legacy agents, go to Agentforce Agents in Setup. Select the dropdown menu next to your target agent, and select the upgrade option. Don’t worry, your original agent stays put in the legacy builder. Once your new version of the agent is created in Agent Script, run the built-in optimization tool. Agentforce will automatically review your natural language instructions and add deterministic controls to drastically boost performance and reliability. How’s that for service?
Note: To upgrade an agent, you need Manage AI Agents AND the required permissions for your agent type.
Unite your AI with Multi-Agent Orchestration (beta)
Give your users one single agent point of content, backed up and connected by subagents to collaborate seamlessly on complex tasks, and eliminate multiple disconnected AI sessions with the new Multi-Agent Orchestration (beta). By designating a primary “orchestrator” agent, your users get a single point of contact while your specialized subagents handle the heavy lifting behind the scenes.
Get started by going into Agent Builder. Within the Explorer panel, select the + icon and select Connect Agent as Subagent (Beta). Once added, you can customize each subagent’s description to strictly govern its behavior. If your orchestrator uses Agent Router, manually add the subagents under Actions Available for Reasoning on the Canvas view, and use the @ symbol in your Instructions to map out the routing logic.
Bring real-time web search to your agents with the OpenAI provider (GA)
AI agents are incredibly smart, but sometimes they need to step outside of our org’s data and browse the web for the absolute latest information. The ‘Search the Web agent’ action just got a glow-up. The OpenAI Search Provider is officially GA, bringing a newly updated underlying model to deliver real-time, highly relevant web search results directly within your agents.
Increase trust with citations in Bring Your Own Channel
We all know that rolling out an AI agent can feel a bit daunting if your customers don’t know where the answers are coming from. Could it be hallucinating? To really drive adoption, your AI needs to show its work. Your Agentforce Service Agent can now include direct source references in your custom Bring Your Own Channel interfaces. This means your end users can instantly verify generated answers against your curated knowledge base, turning what used to feel like a black box into a highly transparent, trustworthy conversation.
Delivering this verifiable experience happens right in the outbound message payload. The system now automatically passes along the specific source links and exact character offsets in the outbound message payload. You use these data points to render sleek inline markers or build a dedicated “Sources” section directly inside your custom UI.
Build a fully functional Agent Script agent with the updated implementation guide
Building an AI agent from scratch can feel overwhelming. The Agentforce Implementation Guide is your ultimate hands-on playbook for building a highly deterministic, customer-facing agent powered by the new Agent Script and hybrid reasoning, new Testing Center capabilities, and an updated Observability guide.
By following along with the fictional Makana Medical Devices use case, you’ll construct a fully functional agent that can answer FAQs, manage cases, and seamlessly escalate to a human rep.
Customize managed prompt templates without losing future updates
You’ve installed a managed package a prompt template that requires a small tweak to meet your business needs. So you clone the template, but now your prompt template is disconnected from any future updates the publisher pushes.
Now, you can create and manage a local copy of the packaged prompt template while keeping the original packaged version fully intact. Open the overridable managed template in Prompt Builder, create a new version, and activate it.
Take control of your AI’s response languages in Prompt Builder
No more wondering what language your AI will use. You can now tightly govern your generated content with both automatic and manual language controls right inside Prompt Builder. Whether you want to lock down responses to specific Allowed Languages or let your prompt instructions dictate the output on the fly, you are fully in the driver’s seat to maintain perfect compliance and brand consistency.
This is managed one of two ways.
1. Automatic Language Mode: Prompt Builder will automatically manage language settings on your behalf using the Automatic toggle in the Response Language section of Template Settings. By default, Prompt Builder will smartly determine the correct response language by checking any explicit runtime parameters, then the user’s personal language settings, and finally your org defaults before ever falling back to English.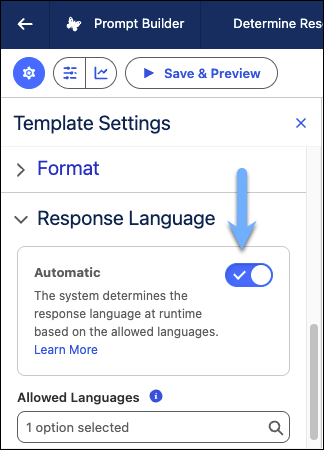
2. Open Response Language Mode: You can use the Open Response Language Mode where you use natural language in your prompt instructions for advanced use cases to determine the response language. To use this, you need to disable the Automatic toggle under the Response Language section of the Template Setting and use a resource to pull in a user’s language, for example, or note in the instructions to respond in a specific language.
What you see is an example of the Automatic Language Mode using the running user’s specified language (parlez-vous français?) for the response, and one where the prompt template is using the Open Response Language Mode and the selected user’s language (Japanese) for the response.
We recommend reviewing all language changes and assessing their impact with the activation workflow before you deploy new versions. Check out this informative Help article for more on this feature.
Stay up to date with Salesforce My Trust Center (GA)
Admins wear a ton of hats, and sifting through the notification noise on the public Trust site just to figure out if an incident actually impacts your org shouldn’t be one of them. Now GA, Salesforce My Trust Center offers a personalized, authenticated portal that completely cuts through the clutter. Instead of searching through hundreds of instances, you get a single pane of glass showing color-coded incidents, major releases, and maintenance updates that are directly tied to your specific tenants.
Tailor your Salesforce Trust Center experience by going to either Trust.salesforce.com or Status.salesforce.com, and log in with your Trailblazer account credentials. Once there, you can directly subscribe to patch release notifications for specific products so you’re never caught off guard. If you support global teams, then the new localized labels, 24-hour time notation, and handy language picker ensure everyone across your organization stays on the exact same page.
Enable Chatter manually in new Salesforce orgs
Cha-cha-changes! If you’re spinning up a brand spanking new Salesforce org, you might notice a familiar friend is missing from your layouts: Chatter is now turned off by default. As we continue to embrace Slack as our primary hub for internal collaboration, Salesforce channels are naturally taking center stage. But don’t panic! Chatter hasn’t disappeared completely. If you still rely on it for your external use cases or aren’t quite ready to fully migrate your team’s communication strategy, you’re still entirely in control of the switch.
To bring the feed back to life for features like Case Feed or your Experience Cloud sites, go to Chatter Settings in Setup and select Enable. Then, go to the Feed Tracking page to explicitly choose which objects should display the Chatter feed. It’s all about being incredibly intentional with your org’s communication using Slack for internal team swarming while keeping Chatter perfectly tailored for your customer-facing portals!
Permissions enhancements
Secure your org with default profile filtering (Release Update)
Security is a team sport, and this latest release update is all about tightening the perimeter around your org’s metadata. By enabling Profile Filtering by default, Salesforce is ensuring that users can only see their own profile name unless you’ve explicitly given them a reason to see others. This prevents curious eyes from browsing your entire profile list, which is a key step in maintaining a “need-to-know” security posture.
Before this update is enforced, do yourself a huge favor and audit your power users or delegated admins who might need to see other profiles for their daily tasks. For those specific users, you’ll need to assign the View All Profiles permission using a permission set before the enforcement date. Otherwise, those users might find themselves unable to select or view profiles in lookups or reports. Do this now to save yourself from a flurry of “I can’t see the profile” tickets later.
Note: This update is available starting Summer ’26 and is scheduled to be enforced in Winter ’27.
Track permission dependencies directly in the Enhanced Profile User Interface
Have you ever tweaked a profile and wondered what other permissions just cascaded behind the scenes? In the past, those dependent permission updates happened silently in the background, forcing you to go digging through the Setup Audit Trail and play the role of a detective. The enhanced profile UI how shows you those dependencies, giving you full visibility into the exact domino effect of your security and access changes.
Update user permissions, object permissions, or assigned apps as you normally would in the enhanced profile UI. The moment you hit save, you’ll immediately see a prompt reviewing any additional changes required to keep those dependent permissions perfectly aligned. You know exactly what you’re going to get. No more detective work needed.
If you don’t have the enhanced profile UI enabled, you can do so by going to the User Management Settings page and toggling on Enhanced Profile User Interface.
Audit Field Access from a single view in Object Manager
We’ve all played the click-heavy game of hide-and-seek, opening a dozen different profiles and permission sets just to figure out who has edit access to one highly sensitive field. Kiss those days goodbye! You can now view the complete field-level security (FLS) landscape for any specific field from one place. This massive time-saver perfectly aligns with maintaining a clean, easily auditable security model and keeping those clicks to a minimum.
Check out this new FLS command center called Field Access for your targeted object in Object Manager. Choose the field you want to investigate, and you’ll instantly see a summary of how its access is configured across every single profile, permission set, and permission set group.
Sharing enhancements
Control list view sharing with granular permissions
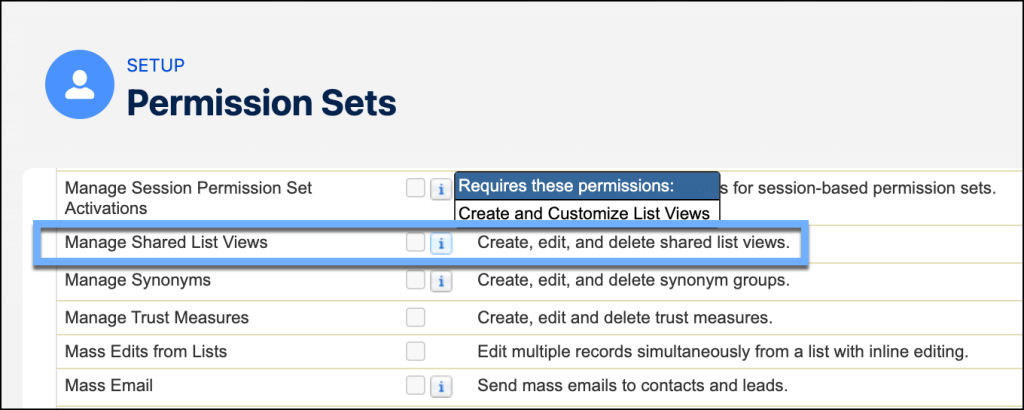
We’ve all had those “oops” moments where a well-meaning user accidentally edited or deleted a critical public list view because they had the broad Manage Public List Views permission. It’s always been a bit of an all-or-nothing game — until now. With the new Manage Shared List Views permission, you can finally empower your users to share their own personal list views with their specific roles, groups, or territories without giving them the “keys to the kingdom” to modify every public view in the org.
Add the Manage Shared List Views permission to your targeted permission sets. You can take it a step further and let users edit the filters or names of list views shared with them, even if they don’t have the full management permission, by enabling the “Shared list view editing feature” on the User Interface Settings page in Setup. It’s the perfect way to practice the principle of least privilege while still giving your power users the flexibility they need to collaborate effectively.
Accelerate organization-wide default updates with parallel recalculation
If you’ve ever sat through a long “processing” screen after updating your organization-wide defaults (OWD), you know the struggle of waiting for sharing rules to catch up. For large orgs with complex sharing models, this used to be a sequential bottleneck that felt like a lifetime. Now, Salesforce is recalculating criteria-based sharing rules in parallel. Instead of waiting in a single-file line, these updates now process simultaneously, getting your security changes live much faster and with way more reliability.
Go to the Background Jobs page in Setup to monitor the progress in real time.
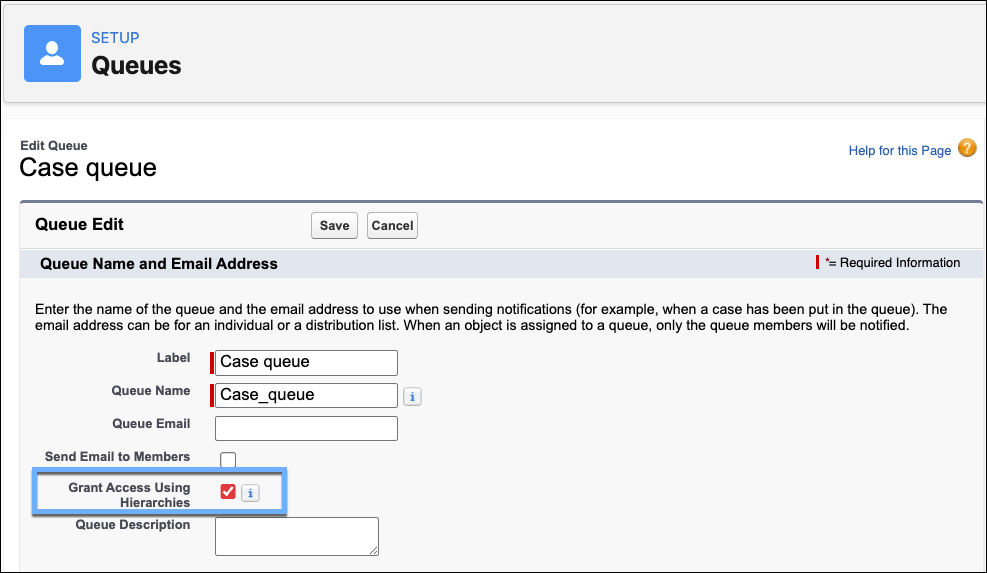
Restrict queue record sharing by bypassing role hierarchies
For the longest time, sharing a record with a queue meant you were also sharing it with every manager and executive sitting above those queue members in the role hierarchy. While that’s great for visibility, it can also lead to cluttered list views and a mountain of unnecessary email notifications for leadership. A new toggle at the queue level allows us to keep record access locked down strictly to the people actually doing the work in that queue.
🏆 Thank you for your votes on this 2.7k+ idea and duplicate idea.
In Setup, go to the Queues page and enable Grant Access Using Hierarchies for each individual queue records. It’s important to note that this is enabled by default for your existing queues to maintain your current sharing model, but it’s disabled for any new ones you create.
Security enhancements
Harden your Salesforce defenses against evolving threats
The rapid rise of AI has completely shifted the cyber risk landscape, enabling bad actors to scale flawless phishing campaigns and target bulk data at unprecedented speeds. To protect our customers from these threats, Salesforce is rolling out proactive platform protections and tighter built-in controls — including expanded multi-factor authentication (MFA) requirements, phishing-resistant protocols for privileged accounts, and automated step-up authentication to flag anomalous user behavior.
As next-gen admins, we’re the frontline defenders of our orgs. These updates empower us to leverage native tools to continuously audit permissions, enforce least-privilege access, and block data exfiltration attempts before they can impact data integrity. For a full breakdown of these upcoming protections and what they mean for your org’s security posture, check out the complete article.
Lightning Reports and Dashboards enhancements
Ensure consistent branding across your reports and dashboards
Manually updating chart colors for every report and dashboard to match your company’s style guide is time consuming. Starting in Summer ’26, using Themes and Branding, you can configure your brand palette once in your theme settings, and apply them instantly to your data reports and dashboards. How’s that for productivity?!
Setup is easy. Go to Themes and Branding in Setup, create a new theme or edit an existing one to define your official company colors, and activate it. To apply the branding, simply open your report chart properties and select Brand, or go into your dashboard properties and choose Branding in the palette options.
Expand reporting capabilities with up to two row-level formulas
Ever need to build a report needing multiple metrics only to hit the single-formula limit in reports, forcing you to get creative and create one-off custom fields on the object just to get the analytics you need? Yes, we’ve all been there.
Great news! Salesforce has officially doubled the limit, so you can include up to two row-level formulas directly in a single report. Now, you can calculate multiple metrics without ever touching the Object Manager.
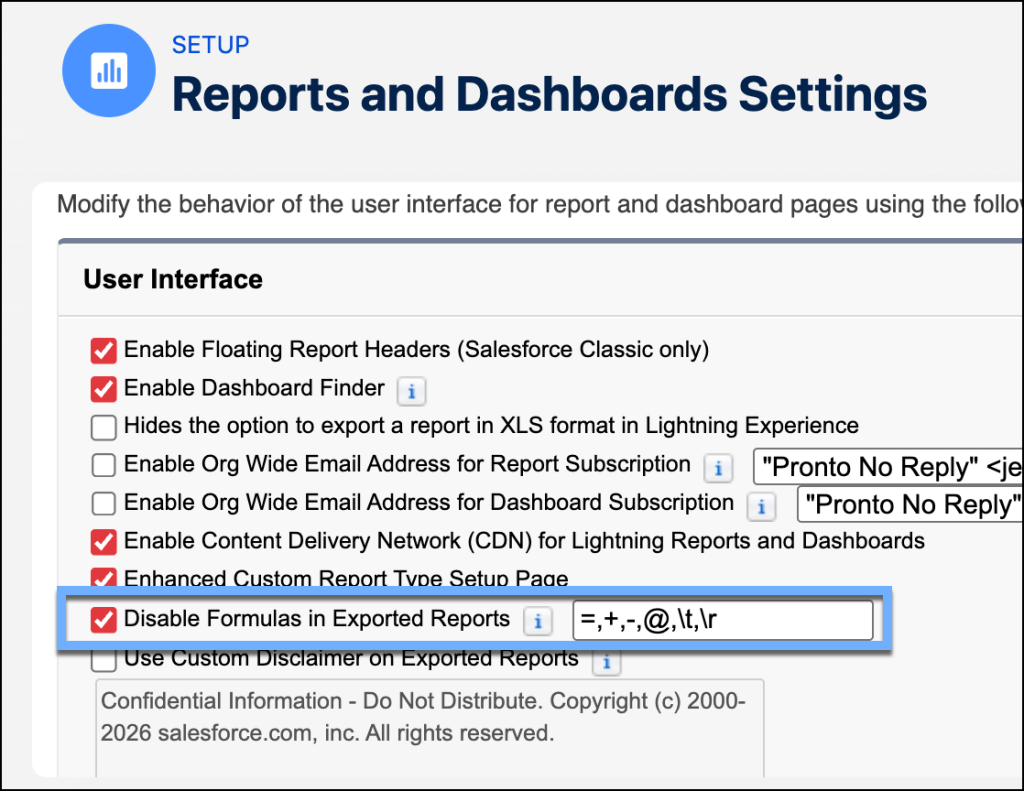
Secure your Excel exports by disabling formulas
We all know the hidden dangers of “formula injection” when users export reports, and characters like = or + at the start of a field can accidentally trigger unintended code execution or data manipulation in spreadsheet programs. Previously, this feature was supported only for CSV exports.
To lock things down, go to Reports and Dashboards Settings in Setup and check ‘Disable Formulas in Exported Reports’. Salesforce will automatically prepend a straight apostrophe (') to field values starting with triggering characters, instantly converting them to safe, plain text.
Flow Builder enhancements
Use native date operators in Decision logic
Using recent date references or milestone logic in Flow meant creating clunky custom formula resources just to figure out if a date was “Today” or fell within the “Last 30 Days”. That’s a thing of the past. Flow Builder now natively supports expanded date operators right inside Decision elements. When evaluating a Date data type, you can select new operators like Is Today, Is Anniversary of Today, and Last Number of Days.
In the example, I’m referencing a custom Close Date field on the Case object to unlock the additional Date data type operators.
Note: This only applies to fields with the Date data type, not the Date/Time data type.
Find and select resources faster in the Add Prompt Instructions element
Hunting down the exact resource you need in the Add Prompt Instructions element used to feel like searching for a needle in a haystack. We’ve revamped the resource picker in template-triggered prompt flows. Resources are now smartly grouped together with clickable breadcrumbs, displayed with clear labels, and with hover tooltips and intuitive icons, making it easy to find exactly what you’re looking for.
Declutter your canvas by collapsing flow fault paths and all elements
While adding fault paths to your flows is a fundamental best practice, those fault paths can quickly turn a beautiful flow canvas into a cluttered, overwhelming spiderweb. Keep your flow canvas pristine by collapsing your fault paths. Hide the error-handling logic out of sight so you can focus entirely on your main “happy path.” Expand when you’re ready to review or edit the error steps. Your collapsed and expanded layout states are saved in memory, locally to your browser so it doesn’t impact other admins working in the same org.
As an added bonus, a little PM birdie told me that the team also released a Collapse/Expand All function that collapses everything on the canvas. This includes branching nodes (find the collapse/expand button in the lower left side by the zoom out and fit to canvas buttons), such as your Decision and Fault paths, so users can progressively reveal what they want. AMAZING!

Stop breaking Send Email actions during flow deployments
You successfully deploy a flow to production, only to realize the Send Email action is completely broken because the hard-coded Email Template ID changed between environments. Doh! Now you’re doing the post-deployment scramble to manually find and update those IDs. No more worries. Use the Send Email action to select the email template name from a dropdown, eliminating the need to rely on the email template ID. This creates a persistent reference across all of your deployment environments.
To take advantage of this new feature, ensure your Send Email action’s active version is set to 3.0.1 and select your email template name.
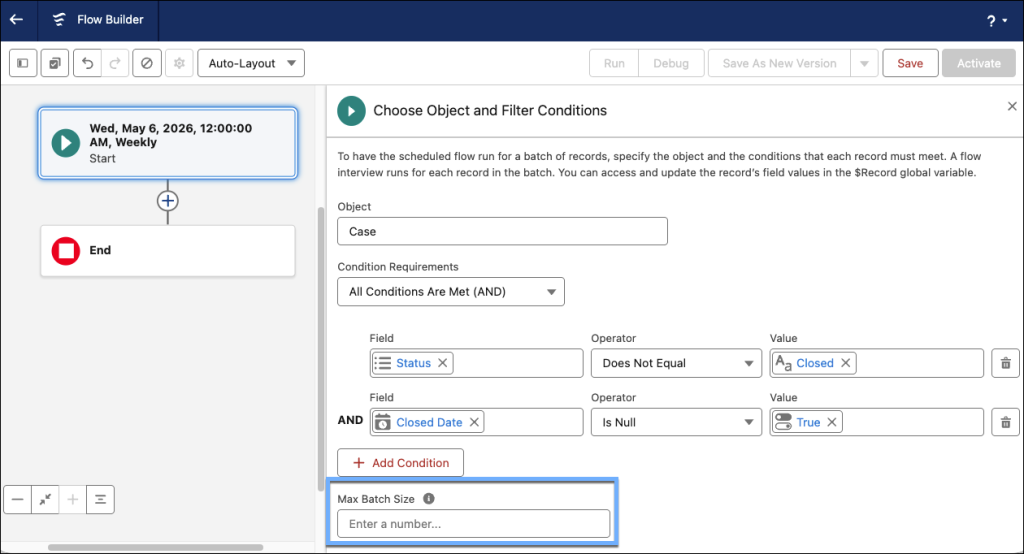
Improve performance with custom batching for scheduled flows
Starting in this release, you can now explicitly control your scheduled flow execution by setting a custom batch size, from 1 to 200, directly from the canvas, rather than defaulting to the 200 record batch size. By partitioning your flow interviews into smaller, manageable chunks, this ensures that your more complex automations process safely without timing out. To use this feature, make sure your flow is running on runtime version 63.0 or later. Go into the Start element, select your object, and specify the maximum batch size.
Screen flow enhancements
Show native Toast Messages in your screen flow
We’ve all relied on custom code or third-party packages just to pop up a simple success message between flow screens. Great news: You can officially retire those workarounds. Native Toast Message in screen flow is finally here, complete with a user-friendly configuration panel that takes all the guesswork out of your setup.
Configuring your toast alert is simple:
- Set the basics: Simply choose your style, dismiss method, title, and body text, and you’re good to go.
- Add intuitive hyperlinks: Want to make a specific word clickable? Just wrap your key phrase in
{brackets} within the body text, and a new section will instantly appear allowing you to configure the hyperlink URL. Note: For the URL, you’ll use a formula resource to configure a dynamically generated URL.
Example formula syntax for the Case record URL:
LEFT({!$Api.Partner_Server_URL_630}, FIND("/services", {!$Api.Partner_Server_URL_630})) & "lightning/r/Case/" & {!Create_the_Catering_Issue_Case.Id} & "/view"
Open pages in a screen flow seamlessly
Forget the days of hacking together complex formulas or custom link buttons just to get your users to the right place. The new Open a Page feature in screen flows brings a much-needed level of polish to the user experience by helping you direct users to specific records in View or Edit mode in a new browser tab, browser window, or Lightning console tab between screens. Let’s reduce the “where am I?” friction and keep your users focused on the task at hand rather than navigating the interface.
Save screen space with Radio Button Groups in screen flows
Your flow screens look a bit cluttered. And yet, you’re trying to squeeze in just one more picklist or an endless vertical list of traditional radio buttons, accidentally forcing our users into the dreaded endless scroll. Give your UI a sleek, modern upgrade with the new Radio Button Group screen component. This component functions just like a traditional radio button, but it stacks your choices horizontally on desktop and vertically on mobile devices. It completely maximizes your screen real estate, making your options incredibly compact and much easier for users to scan.
Just drag the Radio Button Group component onto your Screen element. It’s pretty simple to configure your choices, and you can set one as your default. (And yes, these are all my favorite summer fruits.)

Manage static resource images directly inside Flow Builder (GA)
We’ve all experienced the ‘Setup shuffle’ when trying to build a beautiful screen flow: leaving Flow Builder, navigating to Static Resources in Setup, copying the exact name of an image, and jumping back to paste it into the Display Text component. Now, we can add static resource images directly from the Display Text component, giving us a perfectly streamlined, two-step process to search, upload, and configure images without ever leaving the flow canvas.
In your Display Text component, select the image icon, and select Add Image from Static Resources. Then, search your existing repository or upload a brand new image directly (up to 2.5 MB). You can add image alt text or mark the image as decorative right in the same window. Since static resources are fully packageable and persistent, you can deploy your flows across different orgs or Experience Cloud sites knowing your images will reliably load every single time.
Style even more Screen Flow components directly on the canvas
Are your flow screens feeling a little disconnected from your company’s branding? You can now customize the look and feel of an expanded roster of Screen Flow components right from the canvas. The styling override capabilities have been officially extended to include the Action Button, Address, Choice Lookup, Dependent Picklists, Email, Lookup, Name, Phone, Slider, Toggle, and URL components.
To start tailoring your UI, add one of these components to a Screen element and click over to the Style tab. Apply any styling tweaks, and it will automatically override your org or Experience Cloud site’s default theme. You can now elevate your screen flows and deliver polished, custom, branded user experiences.
Display human-readable related record names in Data Tables
Say goodbye to ugly 18-character Salesforce IDs cluttering your screen flow Data Tables when using lookup fields and the complex workarounds using Get Records or formula fields to hide them.
Data Table lookup columns now natively display the user-friendly related record name instead of a clunky ID. Want to take it a step further? You can make that name a clickable hyperlink that opens the record directly in a new tab. When you configure a lookup column in a Data Table, the ‘Show record name’ and ‘Link to record’ options are toggled on by default.
In the GIF, I configured two data tables using the Contact lookup field on Case. The first one only shows the Salesforce ID, and the second table shows the record name and links to the record in the second table for the Contact value. Ditch those formula field workarounds to show the record name and link to the record!
Update screen flows with natural language prompts
You just built a massive screen flow. Now, your stakeholders are requesting a complete reshuffling of the screens and actions. As flow builders, we know that manually rewiring flow elements can be tedious and result in configuration errors. You can now tap into generative AI magic and use natural language to have Agentforce help you add, remove, or change Screen and Action elements, speeding up iteration and reducing manual busywork.
To enable your new screen flow sidekick, ensure Data 360 and Einstein generative AI are enabled in your org. Open any flow and select Migrate to Agentforce in the side panel. Open your screen flow, launch the panel, and describe the modifications you want to make. The canvas will safely lock while Agentforce works its magic to prevent any manual conflicts. If AI’s updates aren’t exactly what you’re looking for, just revert the most recent change.
Flow testing and debugging enhancements
Squash flow errors and warnings with the redesigned validation panel
We’ve all experienced that minor moment of panic when opening a work-in-progress flow, only to be immediately bombarded by a wall of red validation errors before we’ve even clicked anything.
Build in peace without those constant interruptions. The redesigned validation panel stays neatly tucked away when you open a draft, helping you focus on your logic and review warnings only when you’re ready. It’s all about creating a less stressful, more intentional flow-building experience for our flow builders.
Troubleshoot and auto-fix flow errors with Agentforce (beta)
Raise of hands: Have you ever blankly stared at a cryptic flow error message, wondering exactly which flow element broke your automation, and had no idea where to start investigating? Yup, I believe we’ve all been there. Wish you had an assistant to help you with the detective work? Well, we’re going to give you an AI assistant to help. With Agentforce in Flow Builder, you can use gen AI to instantly diagnose both design-time issues and run-time failures. Agentforce translates complex root causes into natural language and can fix the flow for you with a single click of the Fix issue button. It’s like having a seasoned flow builder partner, looking over your shoulder to ensure your flows are flawless.
To get this AI-powered sidekick up and running, you need to have Data 360, Agentforce, and Einstein generative AI all turned on in Setup. (Pro-tip: Deactivate and delete any legacy Flow Automation Agents first). Then, open any flow, select Migrate to Agentforce in the Einstein side panel, and run a debug. Next, toggle on Ask Agentforce (Beta) from the debug details to get your agent’s root cause analysis. Use the Fix issue button to automatically fix the problem right then and there, or follow the provided manual steps if an auto-fix isn’t available. You can also run the debug again. For record-triggered flows, optionally select Convert to Test to convert the debug run to a test and add assertions to prevent future failures. Let’s make debugging easier than ever with Agentforce.
Trace your flow’s exact path directly on the canvas when testing a screen flow
When you manually test a screen flow, Flow Builder highlights the precise trail your screen flow took right on the canvas, giving you immediate, crystal-clear context on how your logic executed. This beautiful visual mapping kicks in the moment your flow test reaches a Completed, Paused, Waiting, or Error state. The absolute best part? The path highlights every single element touched during the run, including any loops or dead ends, even if they ultimately weren’t part of the final completed path. This is a real game-changer for flow debugging, taking the guesswork out of complex, multi-branch automations and helping you validate your routing at a single glance.
Flow Management enhancements
Compare flow versions visually on the canvas
We’ve all played that stressful game of “spot the difference,” trying to figure out exactly what was tweaked between two flow versions. Ditch those messy XML files. Flow Builder gives us a detailed, visual comparison tool right on the canvas. You can instantly identify added, modified, or missing elements, drastically reducing the risk of deployment errors and giving you total peace of mind before moving your latest automation masterpiece to production.
To see this magic in action, open the flow, select the version dropdown, and select Compare Versions. From there, you can effortlessly switch between a standard table or the new visual view, and select any highlighted element to dig into the granular configuration changes.
Track Transform element changes across flow versions
Data transformations can get incredibly complex, and keeping track of mapping changes between flow versions used to feel like searching for a needle in a haystack. With the latest update to the Flow Version Comparison tool, you get crystal-clear visibility into your Transform elements right on the canvas. It breaks down every single mapping, join, and formula so you can easily spot exactly what was added, tweaked, or removed. Whew!
Flow approval enhancements
Empower your approval designers to view flow dependencies in the Approvals app
We love empowering our delegated builders, but having them design approval processes without seeing how those processes connect to the rest of the org is like asking them to assemble a puzzle in the dark. In the past, shedding light on those dependencies meant handing over the overly broad Manage Flow permission. You can now safely grant metadata visibility to the people designing your approvals without giving away the keys to the automation kingdom.
Simply assign your approval designers the Approval Designer permission using a permission set (that’s best practice!). They can view the exact flow dependencies for their approval processes on their own using the Approvals app.
Require unanimous approval for group approval steps
We’ve all faced those strict compliance rules where every single stakeholder in a group must give the green light. Previously, that meant building a clunky approval process with a separate approval step for every person. Now, you can handle multi-stakeholder reviews in one streamlined step. If everyone approves, the record proceeds. If just one person rejects it, the entire step fails and pending items are instantly withdrawn. It’s a massive win for keeping our complex automations clean.
Configuring this is easy. Select Require unanimous approval in your approval step. The orchestration automatically generates individual work items and personalized emails for each group member, while you monitor the overall progress via the parent work item. Note: You can’t reassign work items for steps requiring unanimous consent, so make sure those groups are properly maintained.
Flow Orchestration enhancements
Build without limits using standard Flow Orchestration
If you missed the massive news back in February, let me catch you up. Flow Orchestration is officially a standard feature. It’s time to stop counting entitlements and start building those seamless, cross-departmental workflows we’ve been dreaming up — without ever hitting an invisible ceiling.
To create orchestrations, open up Flow Builder, select an orchestration type, and start building. If you want all the juicy details on this change, be sure to read Flow Orchestration Is Now a Standard Flow Type: No Add-On Required in case you missed the February announcement.
Case Management enhancements
Identify the best case experts with the Find Case Expert Agentforce action
Stop the “who knows how to fix this?” guessing game! With the Find Case Expert Agentforce action, you empower your service reps to instantly find the perfect expert for those tricky, complex cases. By using natural language processing to scan case subjects and descriptions, this action analyzes historical success patterns and real-time availability to rank the top three to five experts. It’s like giving every rep a direct line to the most qualified person for the job, complete with a clear explanation of why they were chosen.
Swarming and collaboration are the secrets to a high-performing service org, but managing that manually is a headache. This feature is a massive win for admins because it automates the expertise-matching logic that used to live in people’s heads. You’re not just setting up a tool; you’re building a smarter, faster resolution engine that reduces “wrong-way” routing and helps your team crush their KPIs while you stay focused on higher-level strategy!
When your users invoke the action from the case record, the Find Case Expert Agentforce action will, in turn:
- Look for similar cases in the past that were closed.
- Look for service reps who solved those cases.
- Match their expertise, skills, and CSAT scores.
- Weigh them on all of the above and rank the top service reps as expertise.
Configure the Find Case Expert Agentforce action to kickstart the matching engine and ranking algorithm. Once it’s deployed in production, your reps can trigger the action right from a Case record to see their expert recommendations. From there, they can take immediate action — whether that’s shooting over a Slack message, adding the expert to a Case Team, or reassigning the record entirely.
Draft contextual Case Comments with Agentforce
Your service reps can say goodbye to the “copy-paste” shuffle and instead create professional, high-quality contextual comments using the power of natural language. These aren’t just generic responses; they’re grounded in the actual case history, customer interactions, and your specific Knowledge articles. It’s the perfect way to keep your communication consistent and polished without your reps having to spend half their day typing.
We’re always looking for ways to reduce clicks and mental load for our users. This is a huge win because it standardizes how your team communicates, ensuring one voice across the board. By automating the heavy lifting of drafting, you help your reps focus on solving problems rather than worrying about grammar, all while maintaining a clean, searchable, and professional case history!
Deploy the Case Comment Generation template and make sure the action is set up to receive the Case ID as an input variable. You can even get fancy by customizing these templates for different case types or setting specific logic to determine if a comment should be public-facing or kept for internal eyes only. Note: Your Agentforce Agent users must have the Create permission on the Case Comment object and access to the specific case records to use this feature.
Experience Cloud enhancements
Route Experience Cloud traffic with Agentforce Orchestrator
Give your Experience Cloud site the brain it deserves! With Agentforce Orchestrator, you can move beyond basic chatbots and into the world of intelligent, AI-driven self-service. Define exactly how site interactions flow by mapping specific topics to the right AI agents and backend service workflows. It’s all about creating that seamless “wow” experience for your customers where they get exactly what they need without the runaround.
Access Agentforce Orchestrator in Setup to build your configuration. Assign agents to specific topics and layer in personalization signals to keep the conversation relevant. Once you’ve dialed in your settings, the system generates a Configuration ID; just drop that into your Messaging Settings, and you’ve successfully wired your site’s interface to your sophisticated AI routing logic.
As admins, we’re the architects of the customer journey. This feature is a game-changer because it puts the power of Omni-Channel routing and AI logic directly in our hands without needing a developer to hard code the paths. You get to be the strategist who ensures every customer click or question is met with the most helpful automation or agent, making your self-service site more efficient and your users much happier!
Note: This is available for Enterprise and Unlimited Editions for an additional cost.
Email Configuration enhancements
Verify your email domains for reliable delivery
We’ve all been there: A user reaches out saying a customer “never got the email,” and the investigation begins. Salesforce is stepping up security by only sending emails from verified domains, so taking a moment to check your status is the best way to keep your Sent folder meaningful and your customers informed. By verifying your domains, you’re not just checking a box; you’re protecting your company’s sender reputation and ensuring that the hard work your team puts into their outreach actually reaches its destination.
Checking your status is a quick win you can tackle right now in Setup. Go to the Deliverability page and look for the Domain Verification section. Enter your email-sending domain (like yourcompany.com) and select Check Verification. It’s a simple health check that ensures your org stays compliant with modern email standards and keeps your messages landing exactly where they should — in the inbox.

Alert users about unverified email domains
Salesforce sends automated email notifications to any user trying to send mail from an unverified domain. These alerts trigger if an email fails to deliver or if a user is blocked from sending altogether due to domain enforcement. It’s a proactive way to make sure your team knows exactly why their outreach might be hitting a snag, directing them to chat with you to get things sorted.
As admins, we’re the first line of defense when email isn’t working. This feature provides immediate feedback to the user, explaining the why behind a delivery failure so you don’t have to play detective. By configuring Deliverability settings, you can proactively manage user expectations and ensure that your org’s transition to stricter domain verification is a smooth, no-surprises experience for everyone.
You have total control over how these notifications land. Go to the Deliverability page in Setup. You can opt to Use a substitute email address for unverified domains to keep mail moving, or if you’re using a temporary allowlist, you can toggle the Turn off user emails for temporarily allowlisted email domains setting to quiet the second round of alerts.
Maintain email continuity for unverified domains with substitute domains
Keep the conversation going and your business processes rock solid, even when you can’t verify every domain in your network. We know consultants, site users, and partners using public addresses like Gmail or Yahoo are vital to your ecosystem, but you can’t verify domains you don’t own. For those situations, enable a substitute email address; you can bypass hit-or-miss delivery and complex technical workarounds. This one-click solution ensures these users can continue sending from Salesforce without a hitch. Their display name stays exactly the same, while Salesforce handles the technical From address to meet modern security standards and guarantee delivery.
Setting this up is a total quick win that eliminates the “it didn’t arrive” headache for password resets and consultant outreach. Go to the Deliverability page in Setup, and enable Use a substitute email address for unverified domains. From there, Salesforce takes over the heavy lifting for system-generated emails and shared accounts, mapping them to a unique ID based on your Org or Experience Cloud site. It’s the ultimate relief for managing external partners; you stay the fixer who keeps everything flowing smoothly without needing to own every corner of the internet.
Development environment enhancements
Opt in to non-preview sandboxes for release validation
We all know the sandbox dance that happens three times a year during major releases. While we love getting our hands on new features early in preview orgs, sometimes you just need an environment that’s a mirror image of production to troubleshoot a critical bug, make updates in a sandbox to push to product, or validate a deployment without the new release code interference. What if I told you that you have the power to explicitly choose a non-preview instance during that transition window? I see you rejoicing at the possibility. This gives you a stable, same-version environment exactly when you need it most, without having to contact Salesforce Support to do it for you.
To get your hands on this feature, you do need Salesforce Customer Support to enable the feature for your org. Once it’s active, you’ll see a Request Non-Preview option whenever you create or refresh a sandbox during a release cycle.
Note: this only applies to Lightning Experience in Developer, Developer Pro, Partial Copy, and Full sandboxes. The ability to opt into a non-preview sandbox is available after the rollout of the Summer ’26 major release is complete.
Salesforce mobile app enhancements
Add buttons to your custom push notifications
We’re all about meeting our users where they work, and sometimes that isn’t even inside the Salesforce mobile app. With actionable notifications now GA, you can turn a simple alert into a productivity powerhouse by adding buttons directly to the mobile lock screen. Whether it’s letting a rep accept a lead on the fly or snooze a task for later, these one-tap wins reduce friction and keep your business moving without requiring a single app switch.
Go to Notification Builder in Setup, and define up to three distinct action groups to fit your specific business processes. For my fellow automation lovers, the best part is the added flexibility. You can trigger these smart alerts using Flow, REST API, or even Apex. Plus, if you’re managing multiple orgs or building for AppExchange, you can package these configurations into 1GP or 2GP managed packages to ensure a consistent, read-only experience for your end users upon installation.
Simplify mobile login with email authentication
We’ve all been there. You’re trying to log in to the mobile app while running between meetings, only to get stuck because we can’t remember if our username ends in .prod, .com, or some other custom suffix. By defaulting to email-based authentication, we strip away that login friction and make life so much easier for our users. It’s a huge win for administrative overhead, too, since it means fewer “I’m locked out” tickets hitting your queue just because a username was mistyped on a tiny keyboard.
This change is automatic for Production orgs, prioritizing the email address associated with the user record over the traditional Salesforce username. There’s no complex configuration required on your part. The mobile app simply streamlines the handshake between the user and their data. It’s all about making the entry point to Salesforce as seamless as possible.
Release updates
As part of your release preparation activities, you should review the release updates to ensure you’re aware of upcoming updates that can impact your org. Give yourself and your team ample time to test and activate the updates before Salesforce enforces them in your org. Nothing good ever comes from scrambling at the last minute.
To learn more, go to Release Updates in Setup. Give yourself plenty of time before an update is enforced to enable it in a sandbox, do proper testing, and make any necessary changes to code and configuration to ensure all still works post update.
I’m calling out a few of the release updates here. I recommend reviewing the comprehensive list of release updates for those that apply to your org.
Adopt authorized email domains to simplify user onboarding (Release Update)
Tired of jumping through hoops and logging support tickets with Salesforce just to disable email change verifications? The previous manual exemption process is officially retiring. In its place, you can now set up authorized email domains to automatically bypass email verification for any user with an email address on a domain you already trust. This change will really simplify your onboarding process while mitigating risk.
This update will be enforced in Winter ’27. To test and enable this before the enforcement date, go to Release Updates in Setup, search for the “Adopt Authorized Email Domains” update and follow the guided testing and activation steps. Note: This update only affects the verification of email addresses stored in Salesforce and the ability to send emails from the platform; it doesn’t change your core account access verification.
Prepare for the retirement of the OAuth 2.0 username-password flow (Release Update)
Starting in Winter ’27, Salesforce will no longer support the OAuth 2.0 username-password flow for connected apps. This change improves security risks and protects access to your data. Any integrations still relying on this outdated method will break when this update is enforced. Upgrade your integrations to use modern, secure standards like the OAuth 2.0 web-server flow or the client credentials flow.
To get ahead of this breaking change, go to Release Updates in Setup, find the “Retirement of OAuth 2.0 Username-Password Flow for Connected Apps” update, and follow the testing steps. You’ll need to work with your developers or app vendors to update end-user logins to the web-server flow with PKCE, and shift your server-to-server setups to the client credentials flow.
Enable accessibility enhancements for page headers and modal windows when zoom is greater than 200% (Release Update)
User accessibility is no longer just a “nice-to-have” feature; it’s becoming a core platform requirement. We’re beginning a multi-release journey to comply with WCAG 2.2 (Web Content Accessibility Guidelines), specifically focusing on Resize and Reflow, with enforcement in Summer ’26.
Previously, users with visual impairments who zoomed in past 200% often faced a “broken” UI. Fixed headers would block the content they tried to read, and modal windows (pop-ups) would bleed off the edge of the screen, requiring frustrating horizontal scrolling. This update fixes those “magnification traps,” ensuring your org remains usable for everyone, no matter their visual needs. When your users zoom 300% to 400%, the page header still scrolls with the page and doesn’t block the content. In modal windows, the buttons and content will still display within the viewport and the window is fully functional.
Enable accessibility enhancements for date pickers, popovers, bottom utility bars, record headers (Release Update)
Building on the “page headers and modals” release update, we’re expanding our commitment to WCAG 2.2 Resize and Reflow compliance. This second phase focuses on the “interactive” layers of the UI; specifically, the tools users interact with most frequently, like date pickers and bottom navigation bars. Salesforce enforces this update in Summer ’26.
Without this update, high magnification (200%–400%) can cause these elements to overlap or truncate data in a way that makes them unusable. By enabling this, you ensure that every part of the record page, even the small utility pop-ups, remains functional and clear for users with visual impairments. Note: This update has a technical dependency. You must enable the first accessibility update before this one will function correctly.
- First: Enable Accessibility Enhancements for Page Headers and Modal Windows.
- Second: Enable Accessibility Enhancements for Date Pickers, Popovers, Bottom Utility Bars, and Record Headers.
Resources
Each release brings tons of amazing, new functionality, and it can be a lot to digest. To help you make the most of Summer ’26, be sure to explore our Be Release Ready page, where you’ll find valuable resources for Salesforce Admins. Bookmark the page and check back for any updates as we continue to provide helpful insights!