Are you tired of waiting for IT resources to build out an integration to your supplier? Are you frustrated that your payroll system lacks reliable application programming interface (API) documentation, leaving your IT team to weed through JSON and just hoping it’ll work? Then Flow HTTP Callout is for you! This feature does the hard work for you, empowering admins to easily build an integration with clicks, not code. We love IT, but they’re busy folks, and Flow HTTP callouts are so easy to set up that there should be no need to ask IT to do any heavy lifting.
So, what’s an HTTP callout? HTTP callouts connect your automated processes in Flow with external systems. In Summer ’23, the GET method is generally available (GA), which allows you to retrieve external data and bring it into Flow. GET is used for things like checking a credit score, retrieving a currency exchange rate, or getting weather information. The POST method is in beta, which allows you to add data to external systems. POST is used for things like adding an order to a vendor’s system or adding a new contact to your customer master database. Stay tuned—we plan to release more methods in the Winter ’24 Release (#SafeHarbor).
Here’s what makes Flow HTTP Callout unique.
- It requires no code! We know admins want declarative functionality, to reduce reliance on IT and be able to create simple integrations on your own.
- We made it easy, with a guided setup right in Flow Builder.
- HTTP callouts create actions that are reusable across multiple flows and your entire Salesforce org.
If you’re trying to connect to a web-based service API that doesn’t have an Open API specification document in JSON format, it’s time to check out the Flow HTTP Callout action!
HTTP callouts are powered by External Services, so you may be wondering when to create an HTTP callout action within Flow vs. create an external service. Creating an HTTP callout results in one action, whereas creating an external service from the External Services setup requires an open API specification and creates multiple actions all at once. The magic of using Flow HTTP Callout is that you simply provide us a sample response and/or request from the API, and we take it and infer the data structure and data types to make it usable in Flow. No more need for an accurate API specification, and no more weeding through endless JSON!
There are some things to know before you start. We support APIs that respond with content in JSON format only, and be mindful that the POST method has limited support since it’s in beta. Other limits to keep in mind are API requests and external service registrations. Both count toward org-wide limits. Every time you create an HTTP callout action, it autogenerates an external service.
Before you begin, you’ll need a few things.
- The customize application permission in Salesforce
- A sample API request and/or response; if a sample’s not available, you can use a tool like Postman to get it.
- A well-documented API; it’s nice to have just in case, like when field definitions are wrong.
There are four main steps to configure a POST callout. I’m covering POST because it’s a superset of capabilities, as compared to GET.
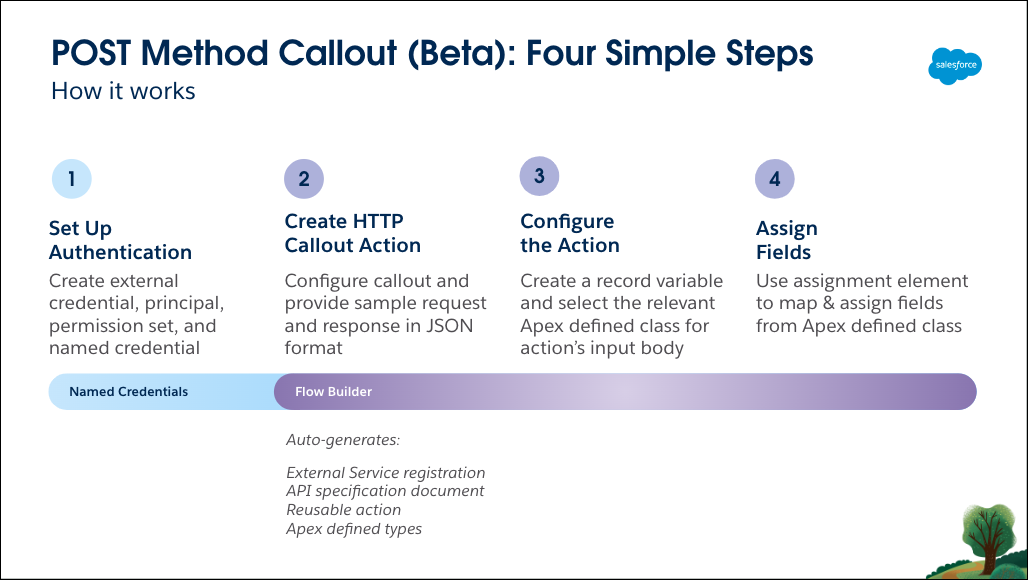
- Set up authentication: This includes the external credential, the principal that was just released as part of external credentials, the permission set, and the named credential.
- Create HTTP callout action: You provide a sample request and sample response, and we parse it to a usable data structure. This step autogenerates an external service, an API specification, an invocable action that’s available for immediate use in Flow, and Apex-defined types.
- Configure the action: Configure the action that you just created for your specific flow. In the Body field, create a manual variable and select the relevant Apex-defined class that was generated in the previous step.
- Assign fields: Create an Assignment element to map and assign fields for the request body that’s sent to the external system.
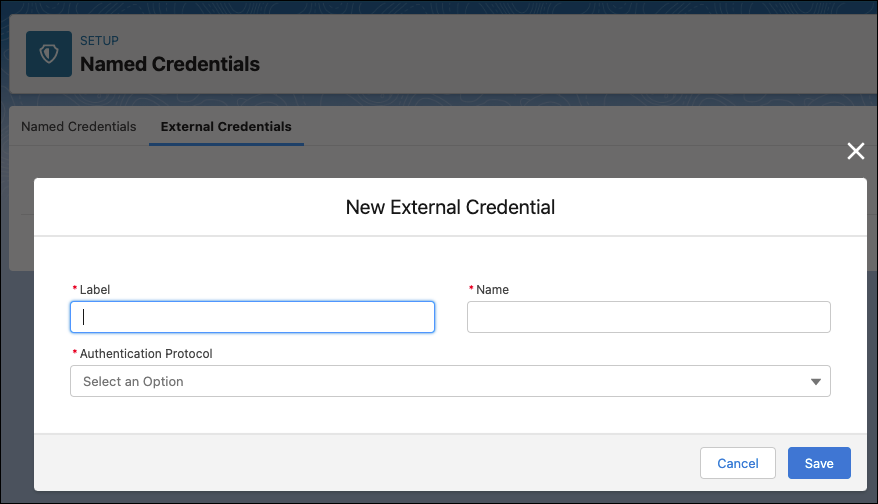
Step 1: Set up authentication
The first step is to set up authentication within Named Credentials.
- Create an External Credential record, which defines the authentication protocol.
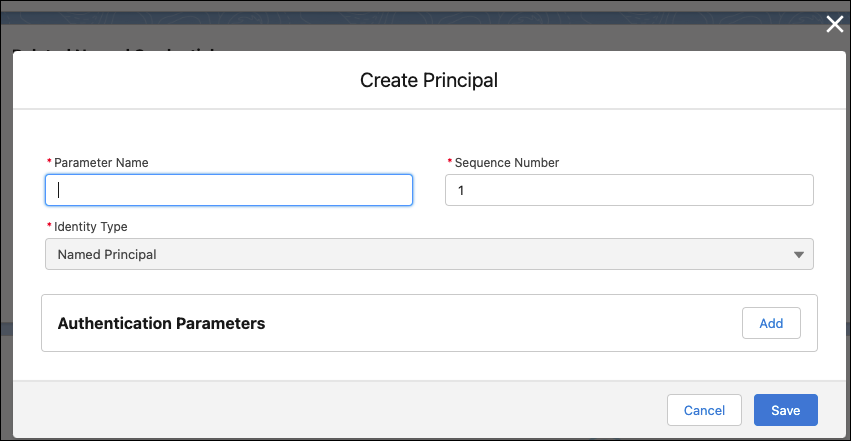
- Add a principal, a recently added section in External Credentials.
- In the desired permission set(s), associate the principal to the permission set.
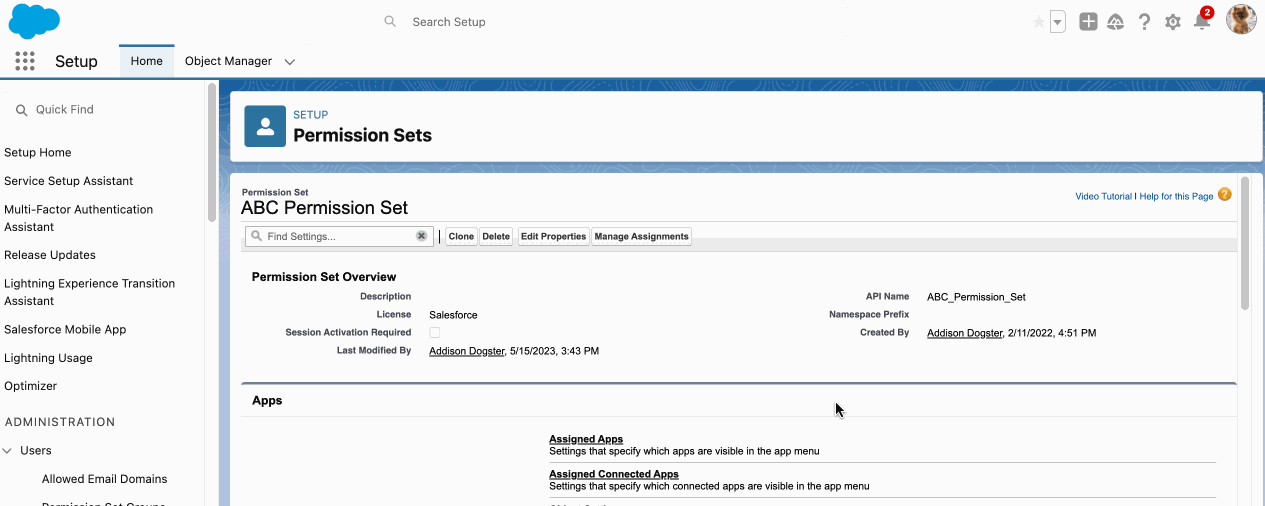
- Make sure that the right users are associated with this permission set.
- Create a named credential to define the endpoint that uses this auth protocol, including the base URL of the endpoint.
- Associate it to the related External Credential record for authentication, as needed.
For more information on setting up authentication credentials, please see this Help topic.
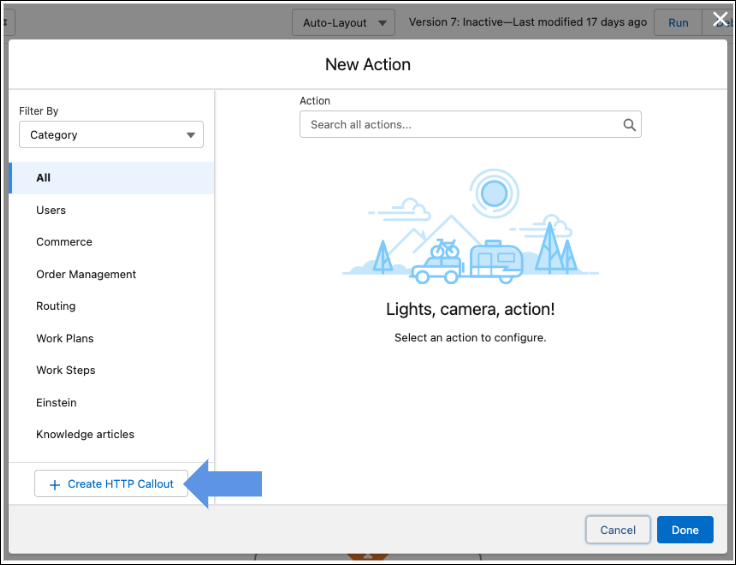
Step 2: Create HTTP callout action
Create an HTTP callout action for use in Flow.
- Add an Action element to your flow. Previously, you could only discover existing actions, and to create a new one, you’d have to write Apex code or leave Flow Builder. But now, you can create a new HTTP callout action directly in Flow, which will be discoverable within this element and usable across Flow.
- Click Create HTTP Callout.
- Input the name of the external service registration that will be autogenerated behind the scenes to establish the connection, as well as a name and description.
- Select the named credential that you previously created for authentication. Click Next. If you have any API documentation, it’s good to have it handy.
- Add a name and select the POST (or GET if you’re configuring a GET), and add a description.
- Add the request URL path.
- In the Provide Sample Request section, click New. (This is the cool part…)
- Paste in the sample JSON and click Review, and Flow will parse it for you.
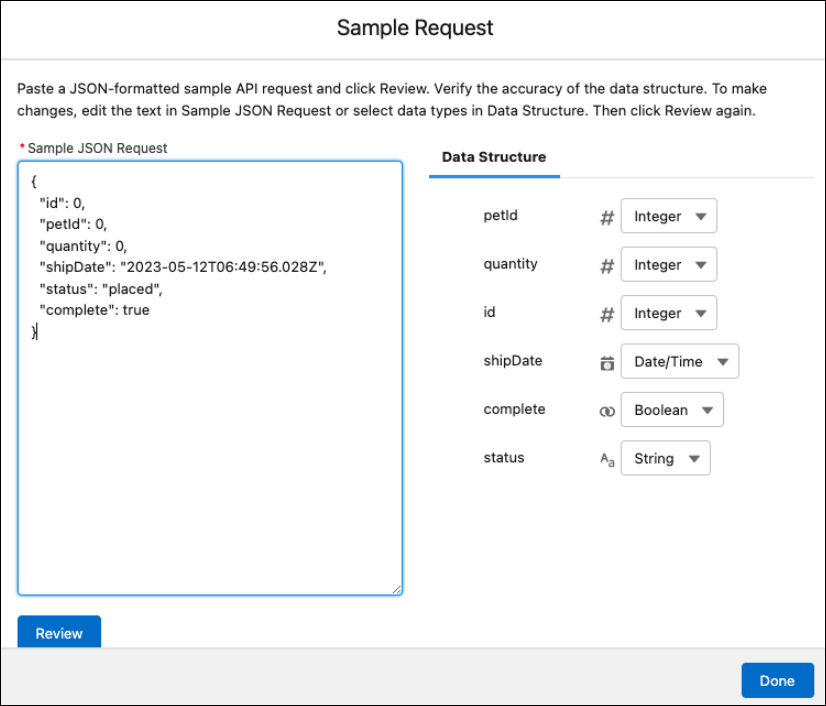
- Based on the sample JSON, it automatically defines the data type on the right.
- If you notice any data type discrepancies based on the API documentation, you can fix them here. Sometimes, for numbers, your API has fields that accept decimals; however, your sample data doesn’t include a decimal, so it will infer it to integer. If this happens, you can edit the sample request and re-review. You can also select the drop-down on the right to change data types.
- When things look right, click Done.
- Follow the same steps for the sample Response.
- When things look right, click Done and then Save.
You’ve configured your new HTTP callout! The external service and reusable action are created for you, and we take you to the Action form to configure the callout for the screen flow.
But first, a pro tip! If you ever need to make edits, do so in External Services. And for the GET method, now GA, we’ve made it easier than ever to update an existing external service.
The new edit capability is only available for external services that were created in Flow, so if you look at the external service you just created, there’s a new field called Creation Source with a value of HTTP Callout in Flow Builder. For any of these external services, notice on the service rows that there’s a new row action called Edit HTTP Callout Action. Here, you’ll find the same declarative interface that you used when you initially set this up in Flow. It’s much easier to make changes here vs. manually editing the JSON like before!
Here, you can edit your query parameters, or go into the sample response and make any required changes, like changing a data type. We plan on making this new declarative edit functionality available for POST and the other write methods in a subsequent release (#SafeHarbor).
Step 3: Configure the action
Next, let’s configure the action.
- Add a name and description.
- For the request body, create a new variable that will handle the data that will be passed into the API.
- The data type should be Apex Defined, as you need to point the action to the Apex-defined class that was autogenerated when you pasted in the sample request. This Apex-defined class stores the structure of the request body.
- In the Apex Class field, look for an Apex class that starts with “External Service” and includes “IN_body”.
- When all looks good, click Done.
Step 4: Assign fields
You’ve made it to the fourth and final step in configuring your new HTTP callout action, where you’ll map data from your flow into your callout request.
- From the flow canvas, above your new HTTP callout action, add an Assignment element.
- On the left, select your Apex-defined variable and select a desired field, then map it to the corresponding field from your flow. Do this for each of the fields that are needed to be populated in the API.
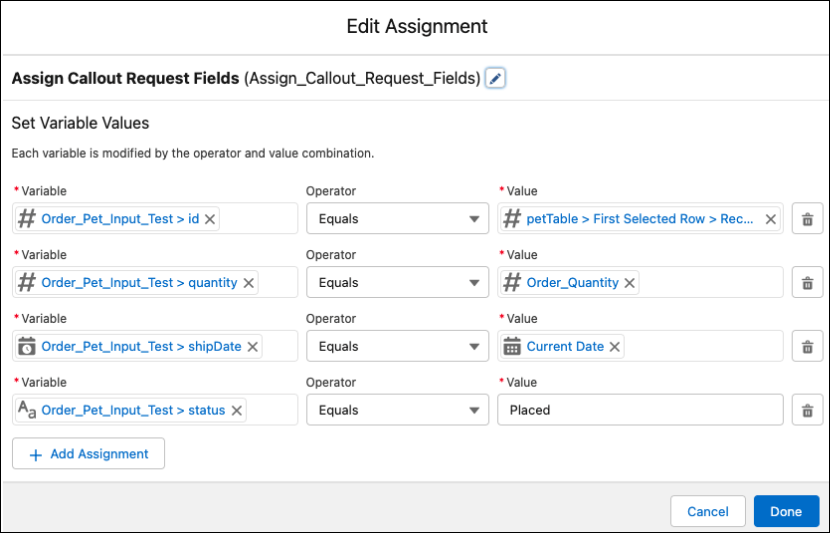
- Double-check your work, then click Done.
Congrats, you’ve configured your first HTTP callout in Flow!
Now, you need to figure out what to do with the API response. The beauty is that the response data is all parsed for you and available as Flow resources. So, whether you’re adding a record, updating a record, or displaying the returned data on a screen, simply look for your action’s output, and you can navigate the data structure of the API response and use those fields in your flow.
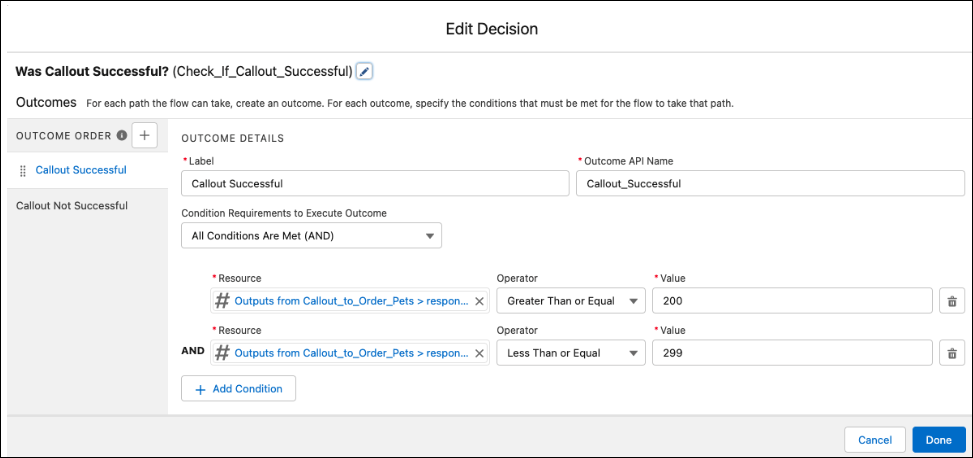
For example, it’s common to add a Decision element after your HTTP callout action to determine if the transaction was successful. If the API response code is in the 200 range, proceed with your flow. If the API response code is anything other than in the 200 range, you can retry the action (just make sure not to create an endless loop if the API continues to fail!). You can see an example of such a Decision in this screenshot:
Assuming that the transaction was successful, your next step largely depends on whether it was a GET or a POST. We just went through a POST method, where we add a record to an external system. So, if the transaction was successful, you might want to simply mark the transaction as successful or potentially update a record status.
For the GET method, where data is returned from the API, you can use the action’s output to do things like create and update records or display the returned data on a screen.
An added bonus of using Flow HTTP Callout is that Flow provides a robust toolset to debug your flow. So, save your flow and run it in debug. In the debug panel on the right, you can see the data flowing into your action as inputs, as well as what data is available from the response as outputs.
It’s easier than ever to build new API-based integrations in Flow! Once you’ve tried it, share your experience and ask questions in the Flow HTTP Callout Trailblazer Community Group. We’d love to hear from you!
Resources