Editor’s note: This post was updated on December 7, 2023, with the latest information and resources.
Managing users is a core Salesforce Admin skill. One component of this skill is ensuring that all users have access to the right data so they can do their jobs. Another component is data security. As admins, we must also protect data that may be confidential, preventing users who don’t need access from viewing, editing, or deleting it.
This responsibility means we need to approach user management by applying the principle of least privilege: Only grant access to the data that each user needs to do his or her job. This principle is why we use permission sets, permission set groups, and profiles (for one-to-one relationships) to control what data users can access across Salesforce.
A permission set and permission set group-led security model is the future
When granting users access, you should always start by assigning your users a minimum access profile and assigning permission sets and permission set groups on top of that based on their job function.
Why? Because you can apply permission sets to users based on what job they do versus their specific role. This practice also saves you from creating hundreds of different profiles and allows maximum reusability, since one permission set can be reused in multiple permission set groups.
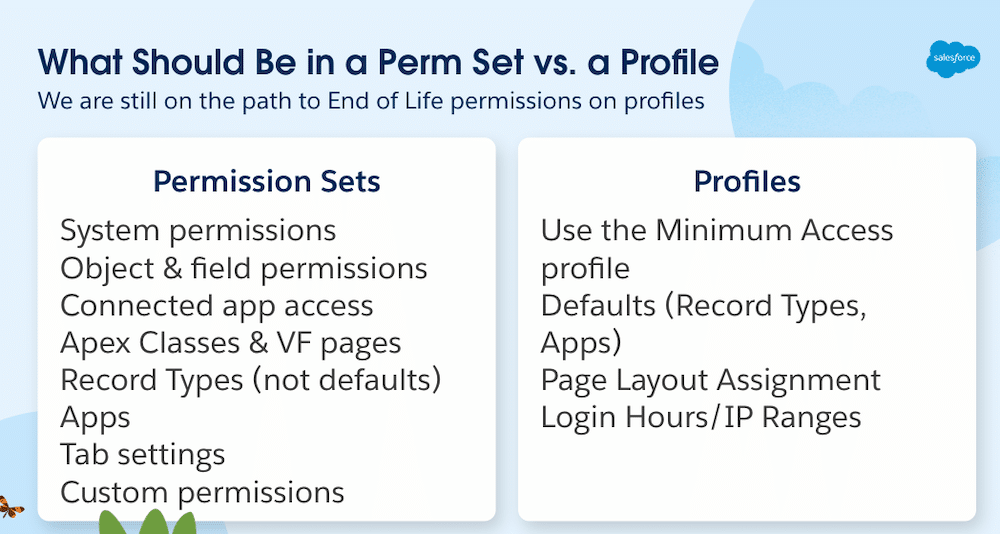
While we’ve decided to pause the enforcement of the End of Life (EOL) of permissions on profiles, we won’t be enhancing profiles and recommend using a permission set-led security model.
Before we jump into some best practices for creating permission sets and permission set groups, here’s what belongs in a profile and what should be in a permission set.
Structuring permission sets and permission set groups
One of the benefits of permission sets is that they’re extremely reusable when used in a permission set-led model. And let’s face it, what are we all looking for in technology? Reusability.
Let’s take an example that will resonate with most Awesome Admins out there: accounts and contacts. Typically, in most organizations, users will have some type of access to the Account and Contact objects. What you want to do is create a wide permission set called something like “Account & Contact Access”. This permission set should contain all the Object CRUD for accounts and contacts—and yes, I mean everything. (We’ll get into later what you’ll do if you don’t want specific sets of users to have a subset of this access.) You’ll also enable all the fields for field-level security (which you can do in one click as of the Winter ’24 Release). Finally, include any apps, record types (not defaults), user permissions, and custom permissions that pertain to accounts and contacts. In the next section, we’ll talk about reusing this permission set across multiple personas.
After you have your permission set, think about the types of users or personas of users that need access to accounts and contacts (pulling from our example above). Let’s say you need your sales reps, sales managers, Customer Service, Finance & Operations, and executives to all have some level of access to accounts and contacts.
| | |
| Read access to all fields | Read, Create, and Edit accounts and contacts (no Delete) |
| Read access to all fields | Read, Create, Edit, Delete, View All, and Modify All accounts and contacts |
| Read access to all fields | Read and View All accounts and contacts (no Create, Edit, or Delete) |
| Read access to all fields | Read and Edit accounts and contacts (no Create, Delete, View All, or Modify All) |
| Read access to all fields | Read, Create, Edit, Delete, View All, and Modify All accounts and contacts |
Some admins think they need to create various versions of the same permission set to handle these varied levels of access, which can get unwieldy. The good news is you don’t need to do that. You can use permission set groups, which have a muting capability, to reuse this same “Account & Contact Access” permission set in multiple permission set groups.
Let’s take the example of sales reps. If you don’t have a permission set group for Sales Reps, go ahead and create one, then add your “Account & Contact Access” permission set to it. Here’s where the magic happens: You can mute out the permissions you don’t want your sales reps to see. In our case, we can mute out the Delete, View All, and Modify All permissions for accounts and contacts.
Making the move from profiles to permission sets and permission set groups
If you’re working in an org that hasn’t embraced a permission set-led security model and you want to start using permission sets and permission set groups, where do you start? Which permission sets and permission set groups should you create? Who should be assigned to them? While we don’t have an exact tool that will help you understand all this, there are a few on the AppExchange that your fellow #AwesomeAdmins recommend that can help you identify similarities where you’d want to create a wide permission set. Check out Elements.cloud and Metazoa Org Security Center .
However, to confirm who actually needs access, this starts with documentation. I would urge you to list out your personas and what jobs they need to do and then map that back to your permission sets.
After you’ve mapped out your personas and created your permission sets and permission set groups, you can use user access policies (currently in beta) to help migrate your users in a single operation. You can identify users with a certain profile or other criteria, and then assign them your newly created permission sets and permission set groups. User access policies can save you time and clicks, and you can even set up user access policies that run automatically whenever user records are created or updated.
A few more permission set and permission set group best practices
Now that you have a framework for how to use permission sets and permission set groups, here are some final tips for how to put this strategy into practice.
- Remember that naming is key. Think about creating a naming structure that makes it clear what each permission set contains.
- Timebox the access to specific permission sets and groups using Assignment Expiration to prevent over-permissioning. See this great blog post for more info.
- Report on permission set and permission set group assignment using our new custom report type.
- Use custom permissions instead of referencing profiles in formulas and validation rules. See this great blog post for more info.
- If you’re comfortable using the dev console, you can query user access control. Here’s an example of a query.
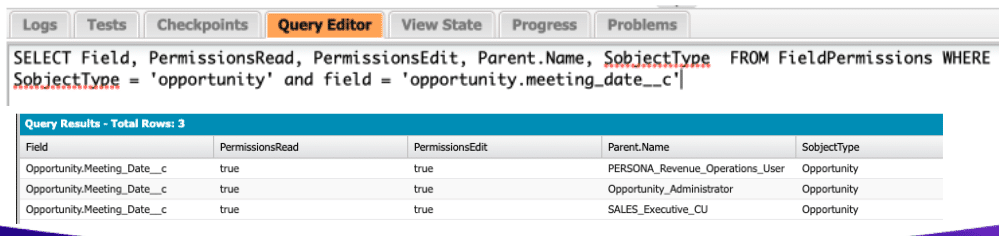
What will the future look like?
We eluded in our update around the EOL of permissions on profiles that we need to have better tools for admins. So, what kind of tools?
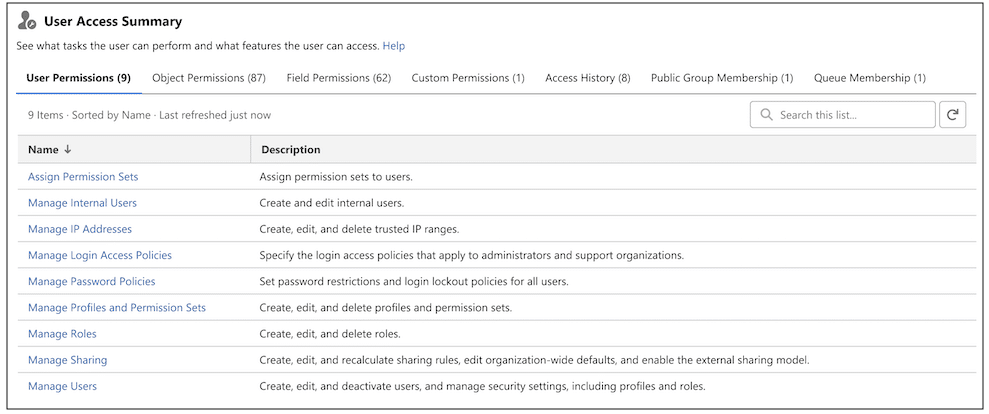
Pretty much every admin I speak with loves the new permission set summary view. I’ve realized that part of the challenge with working with permission sets and permission set groups is that it’s very hard to tell in totality what your user actually has access to. It can be hundreds of clicks to figure this out, and this is one of the many challenges that admins face every day. My proposal is that we create something similar to the permission set summary on the user record to roll up exactly what that particular user has access to. If you like this idea, then vote!
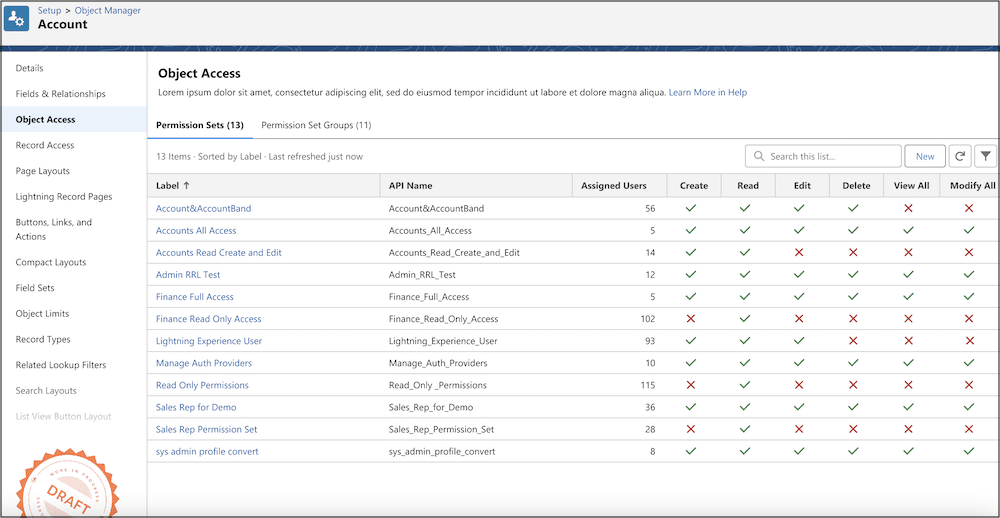
The next area I hear admins complain about is that if you need to find all of the permission sets and permission set groups that grant access to an object, you either must click into every single permission set to determine this or you need to be very comfortable with dev console. What if you had a new tab in Object Manager that allowed you to see right from that object which permission sets and permission set groups were granting access to that object and which level of access? And what if eventually we gave you the ability to update that access right from Object Manager? If you like this idea, vote for it!
I hope you’re starting to sense a theme here about summarizing access. I’m also considering bringing summarization to public groups that would list all the places the public group is used, starting with sharing rules, other public groups, report folders, and list views. If you’d like to see this come to life, see my latest comment with a mockup on this idea and vote!
And finally… troubleshooting. I could write an entire book with all the examples I have from my own experience as an admin and the many stories I’ve heard from you about your struggles. What if we gave you an assistant where you could ask why a user doesn’t have access to do something? Or why they can do something? That is what we’re proposing to solve some of these troubleshooting and insufficient access errors.
What else would you like to see in the future? Give us feedback in the Future of User Management group on the Trailblazer Community.
Resources