Welcome to another “How I Solved It.” In this series, we do a deep dive into a specific business problem and share how one Awesome Admin chose to solve it. Once you learn how they solved their specific problem, you’ll be inspired to try their solution yourself! Watch how Kim Strauss built an automation for non-technical users to mass create and update records with just a few clicks.
Key business problem
The James Beard Foundation is a nonprofit, and like all nonprofits, we have a board of directors who meet several times per year. I built a Salesforce Experience Cloud site as a one-stop shop where board members could log in and access materials they needed for each upcoming board meeting. They requested to see who attended each board meeting. I wanted to make attendance very clear and easy to see in the portal. Similarly, this was a good opportunity to build a solution that would enable my colleague to track RSVPs leading up to the meeting and then confirm attendance afterwards. I decided to create a screen flow using a data table component that would allow the user to see all board member contacts and mark whether they planned on attending the meeting or not, thereby creating multiple related records in one shot.
Here’s how I solved it
We already had a custom object called Board Meeting where each record represented an individual meeting. I created another custom object called Board Attendance which had three fields: a lookup to the Board Meeting, a lookup to the Contact object, and a picklist called RSVP Status.
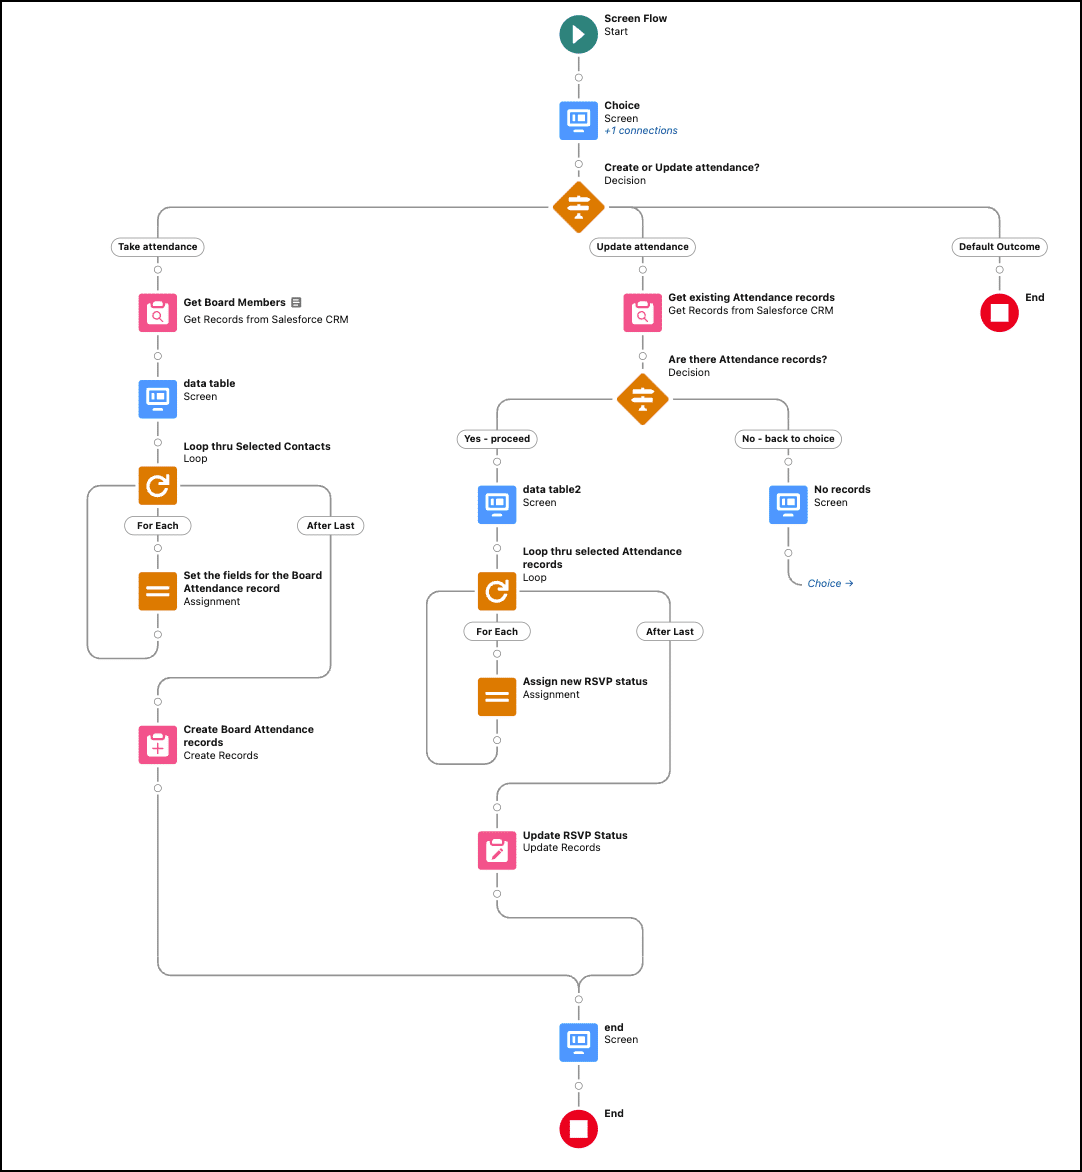
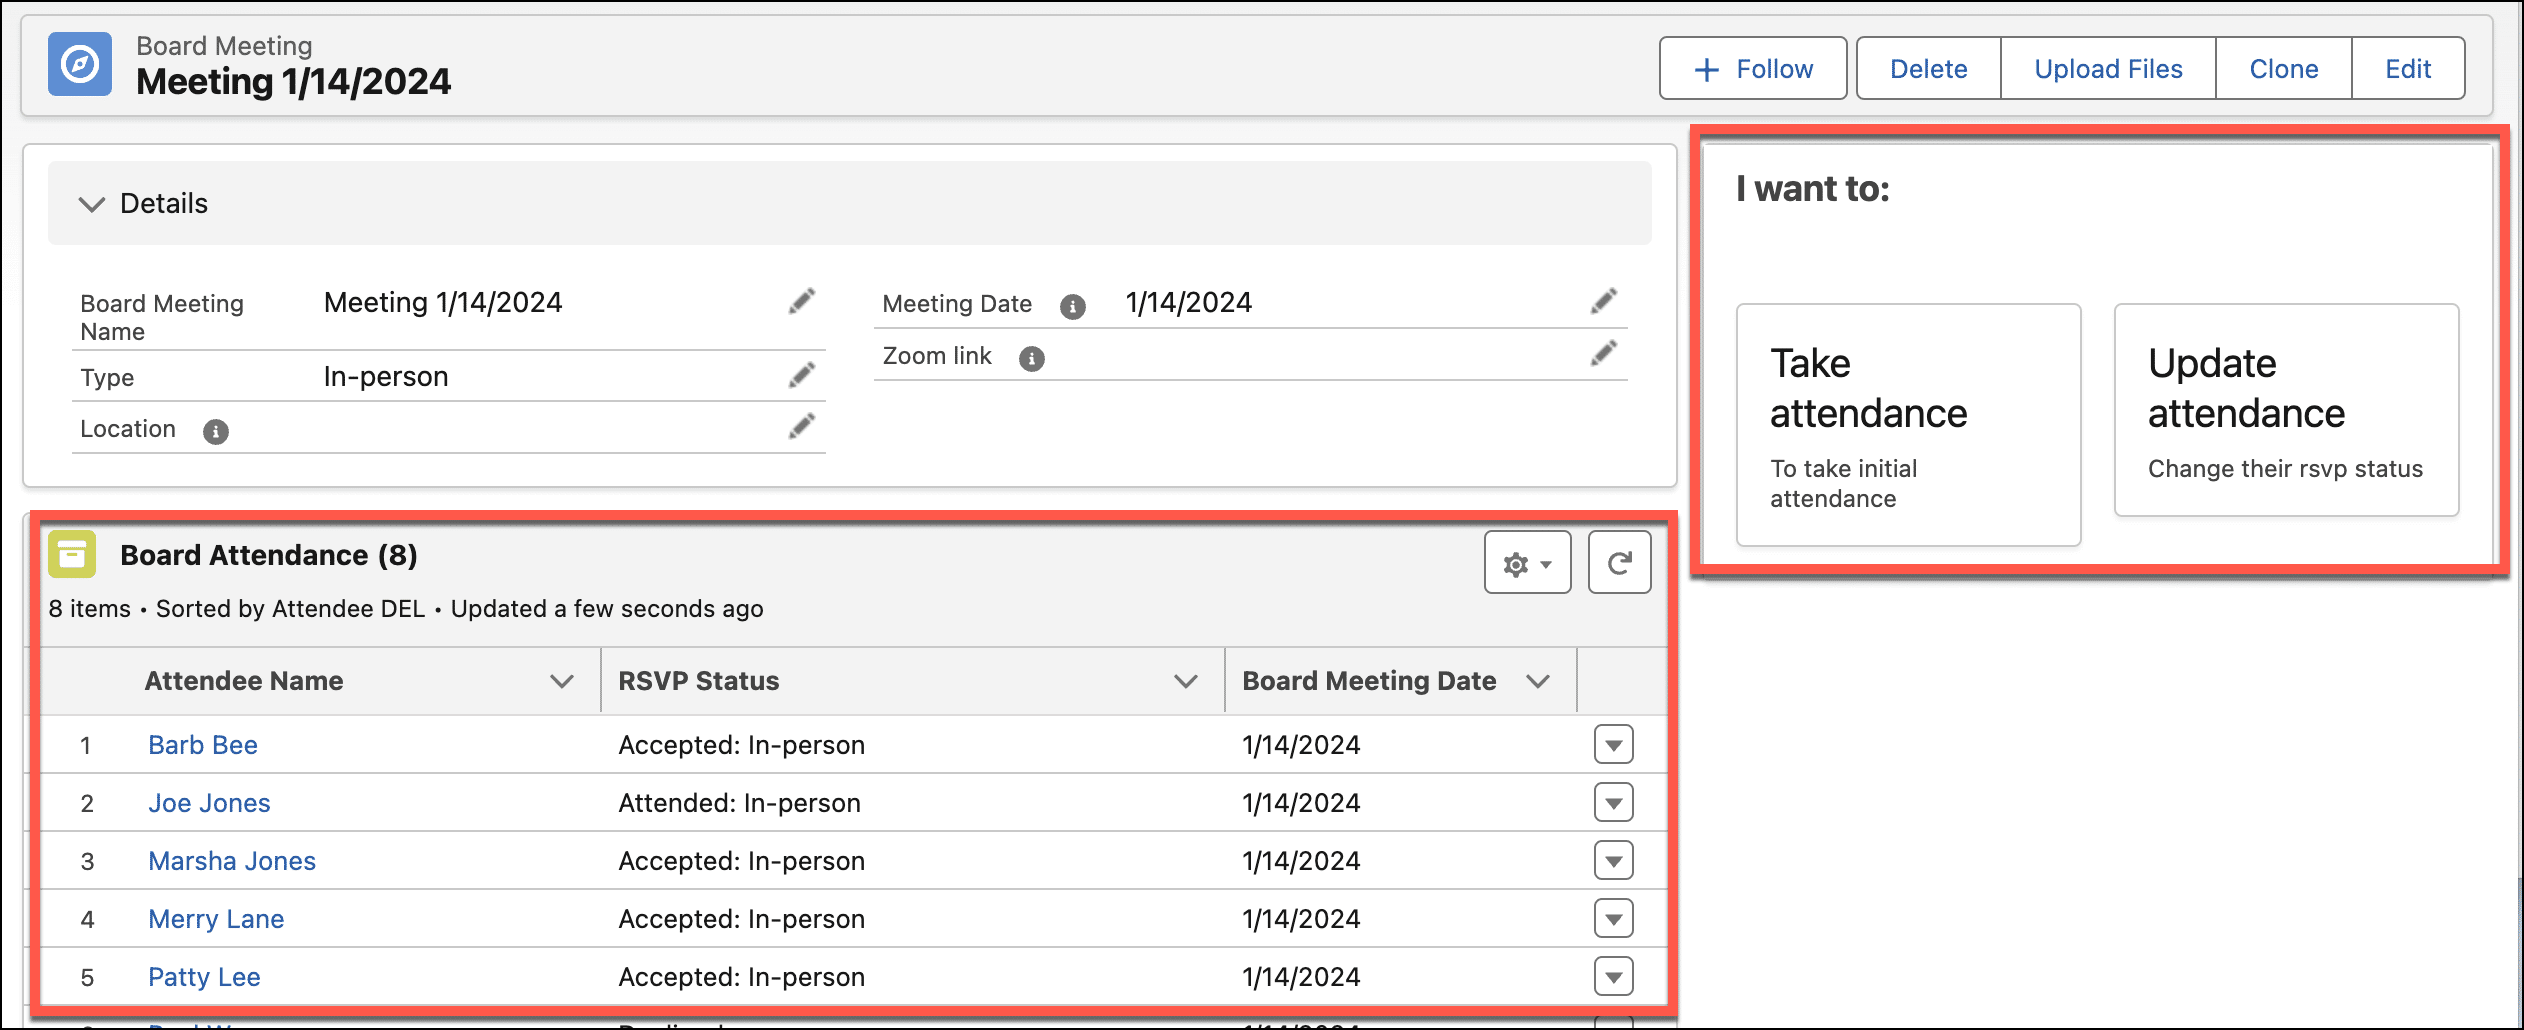
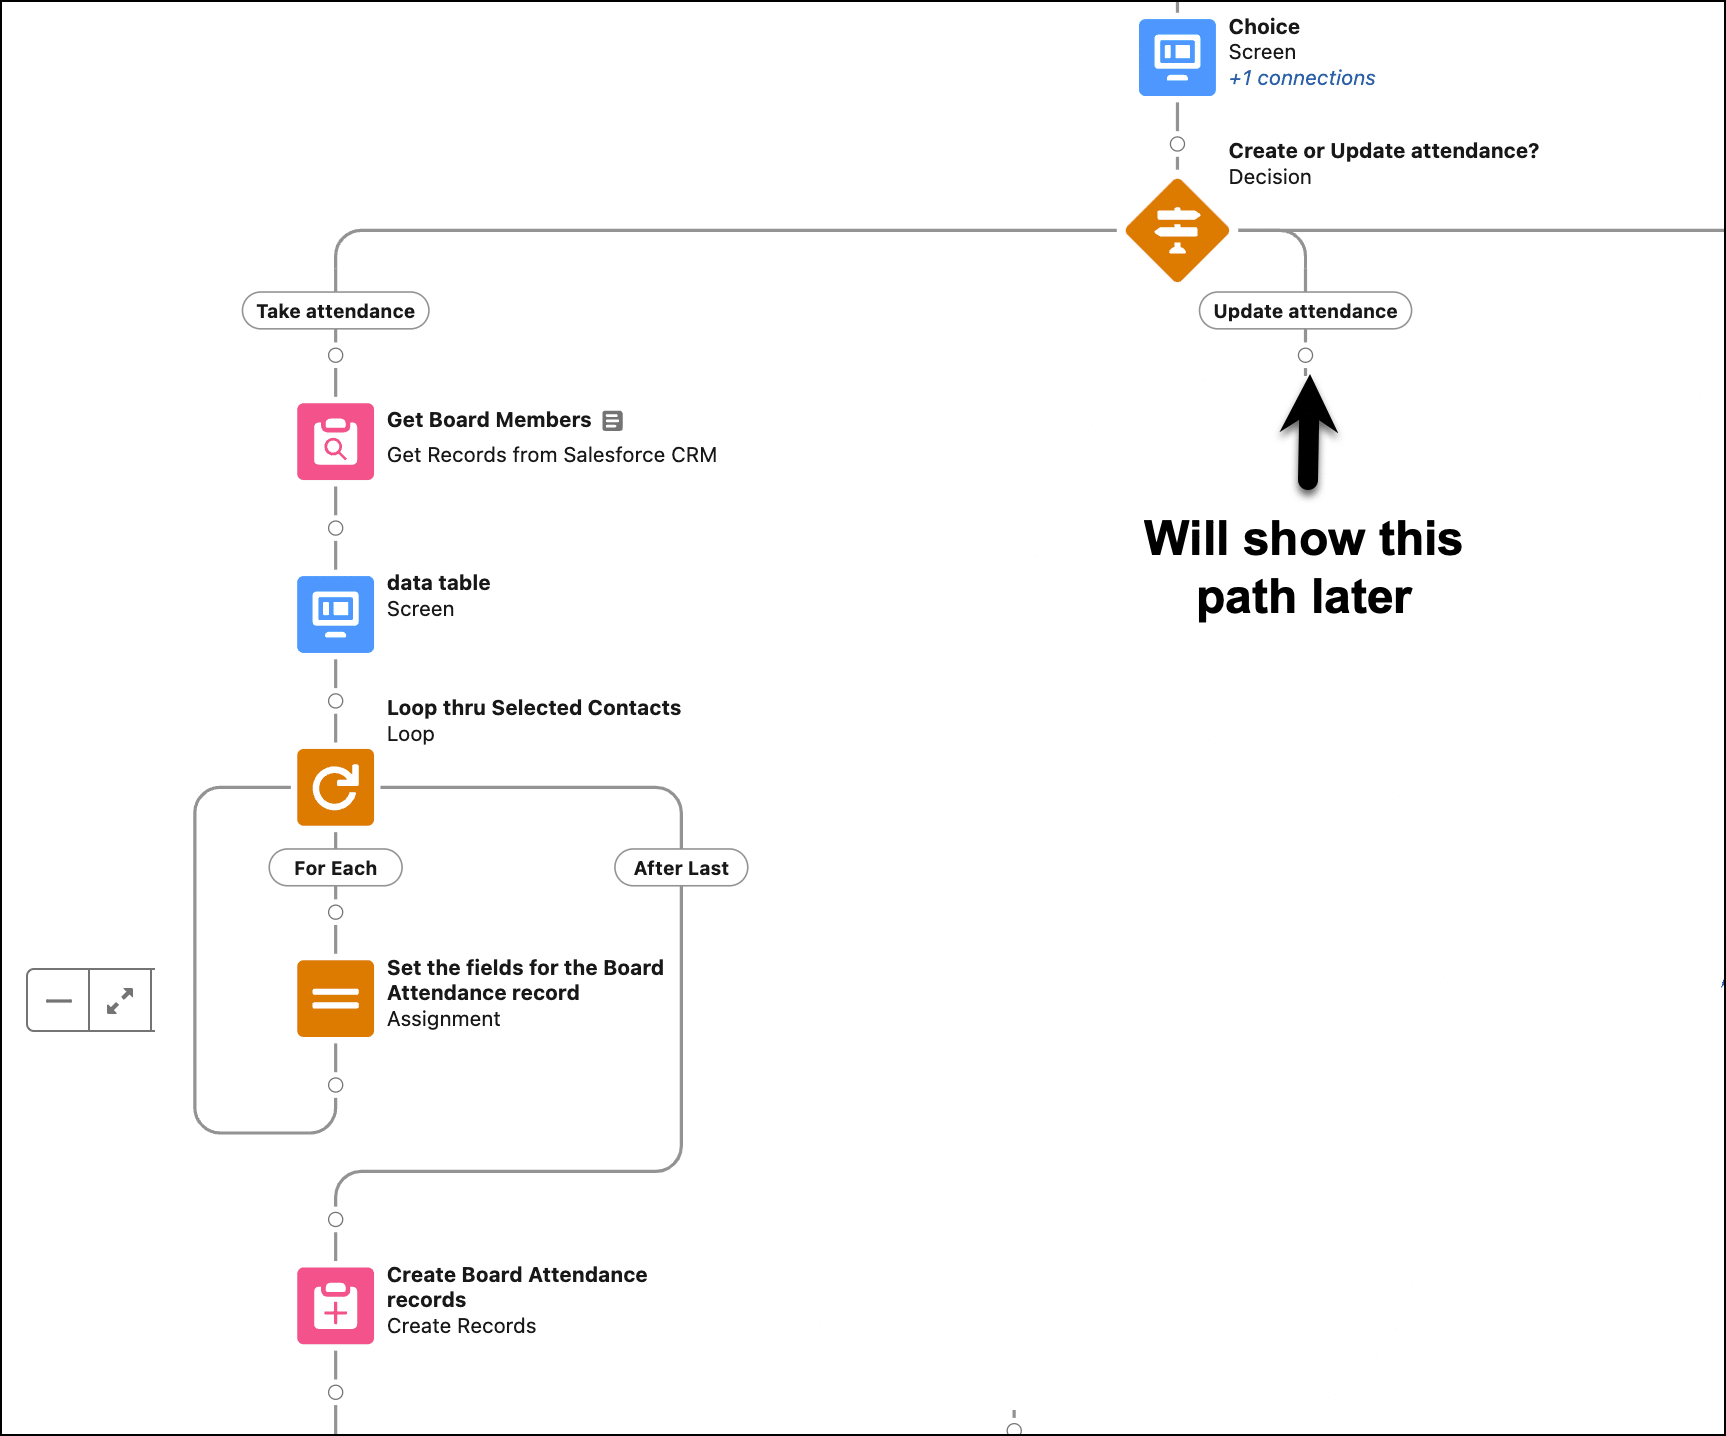
I created a screen flow and embedded it on the Board Meeting record page. It presented two options to the user: “Take Attendance” or “Update Attendance”. The former option would be used to track RSVPs leading up to the meeting and would create Board Attendance related records. The latter option would be used after the board meeting to update the Board Attendance records based on their actual attendance.
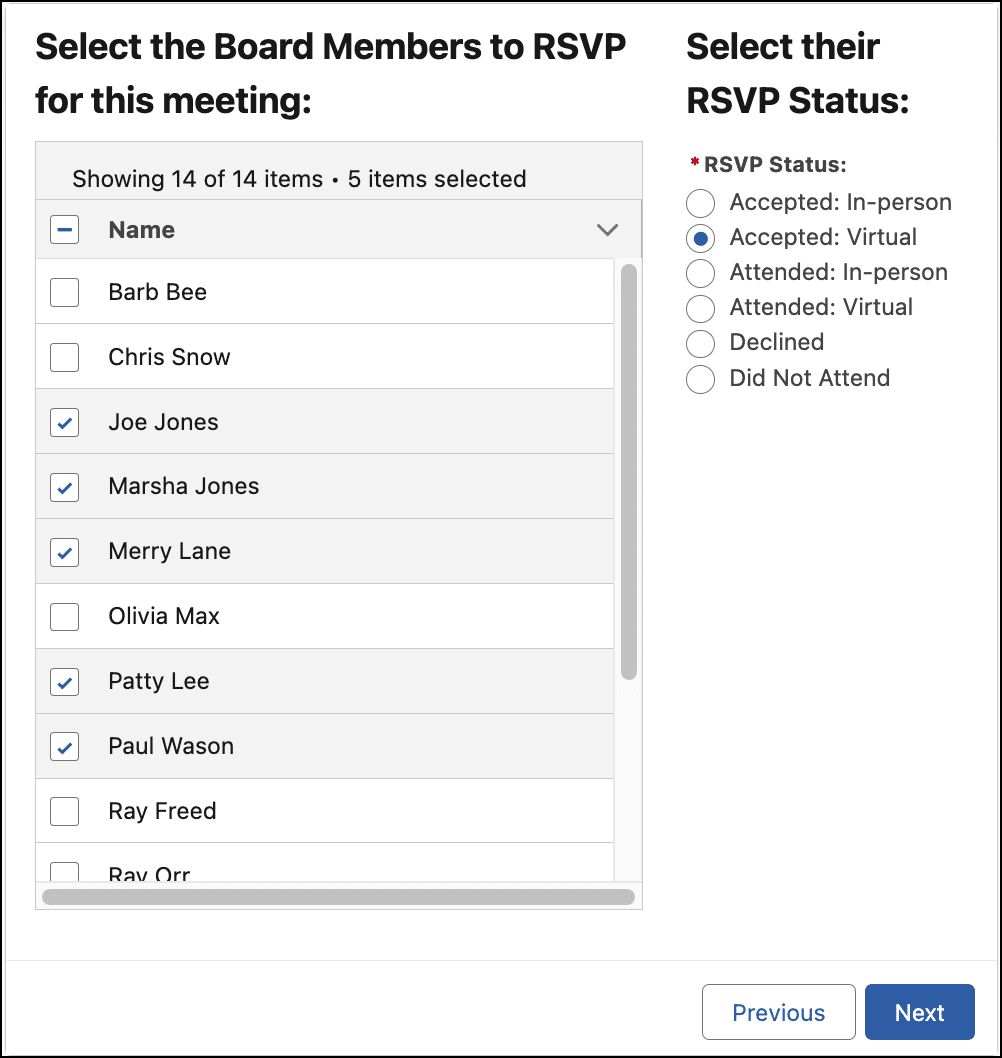
If the “Take Attendance” option was selected, the screen flow shows a data table with all of the contacts marked as Board Members. The user could select multiple contacts and then select an RSVP Status (picklist) to assign to all of the selected contacts. Then, voila! Multiple Board Attendance records would be created in just a few clicks. The user would continue this process of selecting board members from the data table and then assign the relevant RSVP Status.
This is the front end of the screen flow where the user is presented with the two options. Once they go through the steps of the screen flow, multiple Board Attendance records are created.
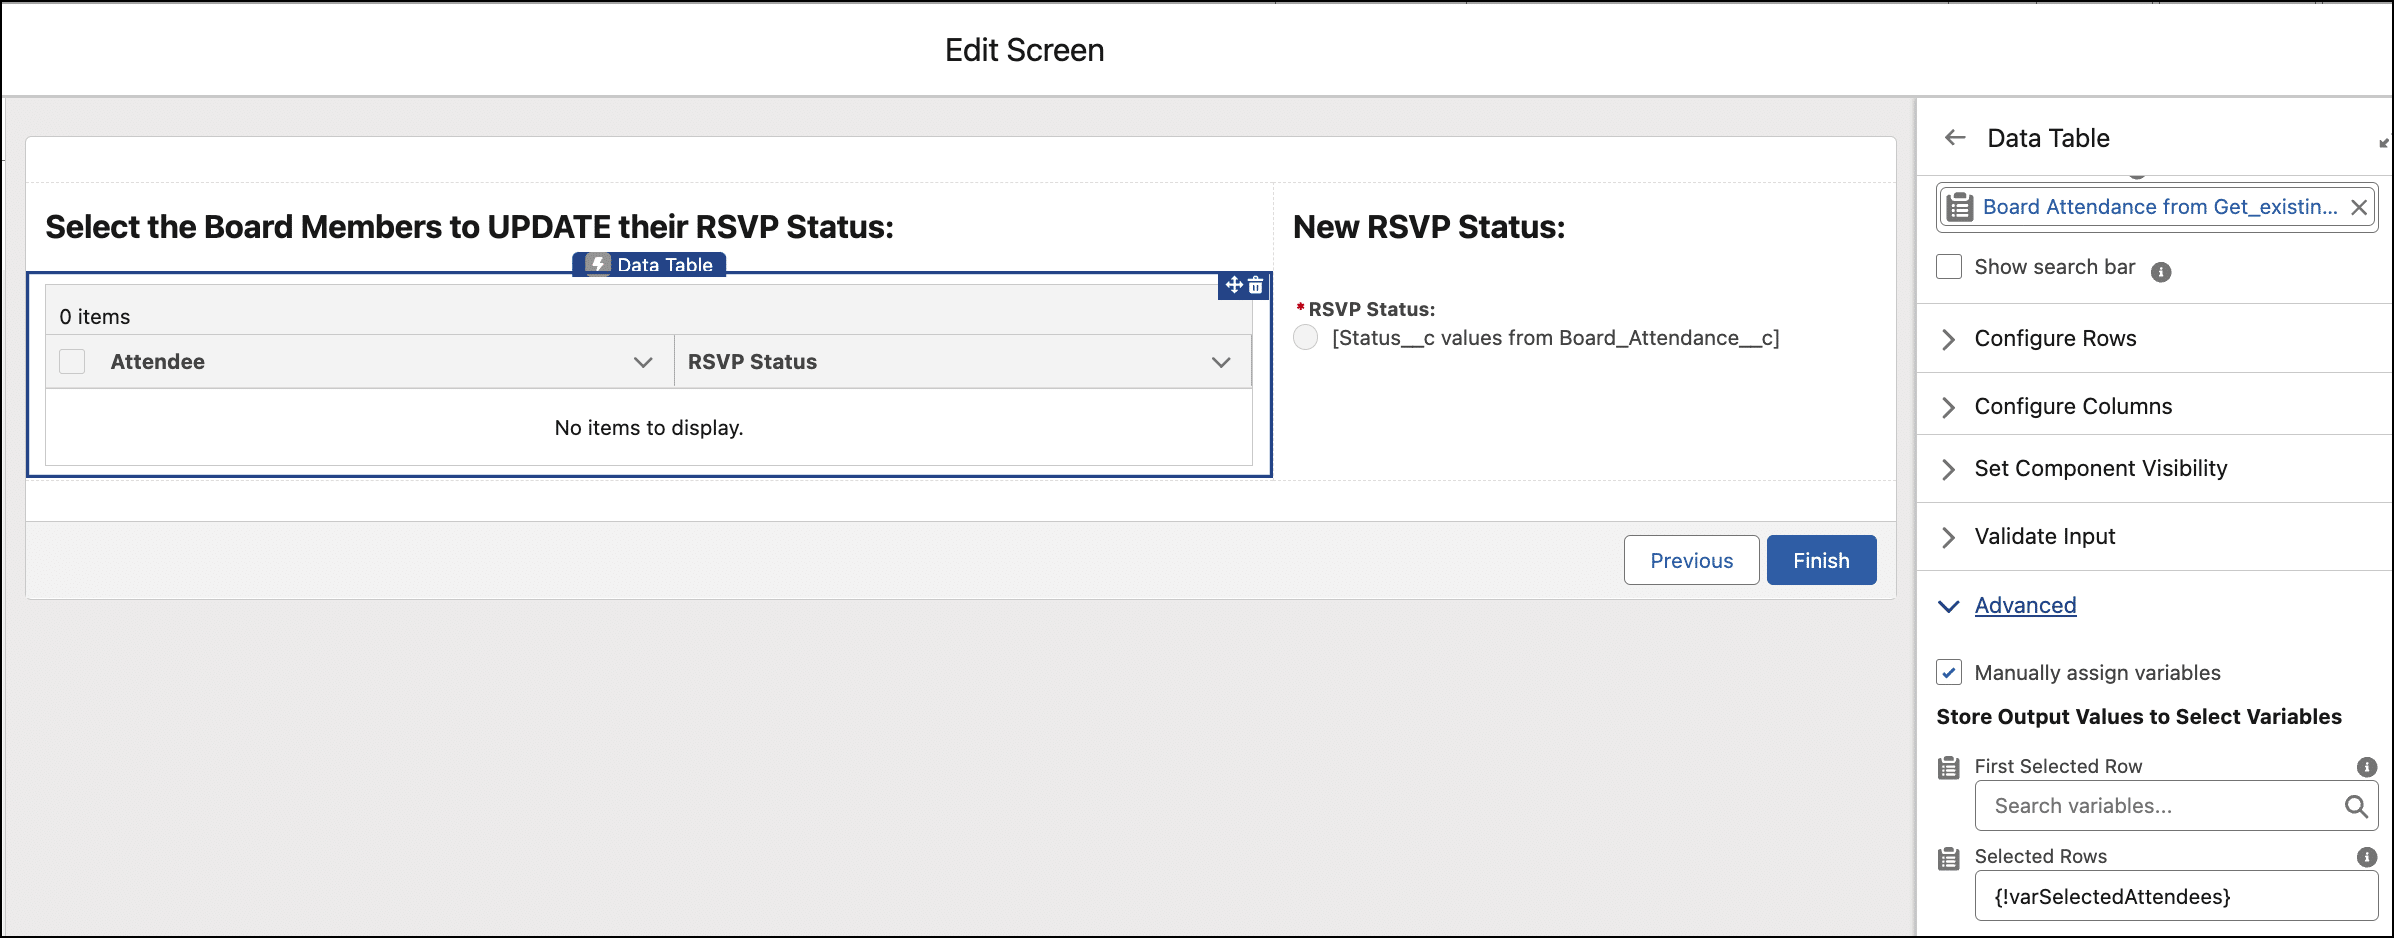
When the user selects the “Take Attendance” option, the data table appears along with the picklist.
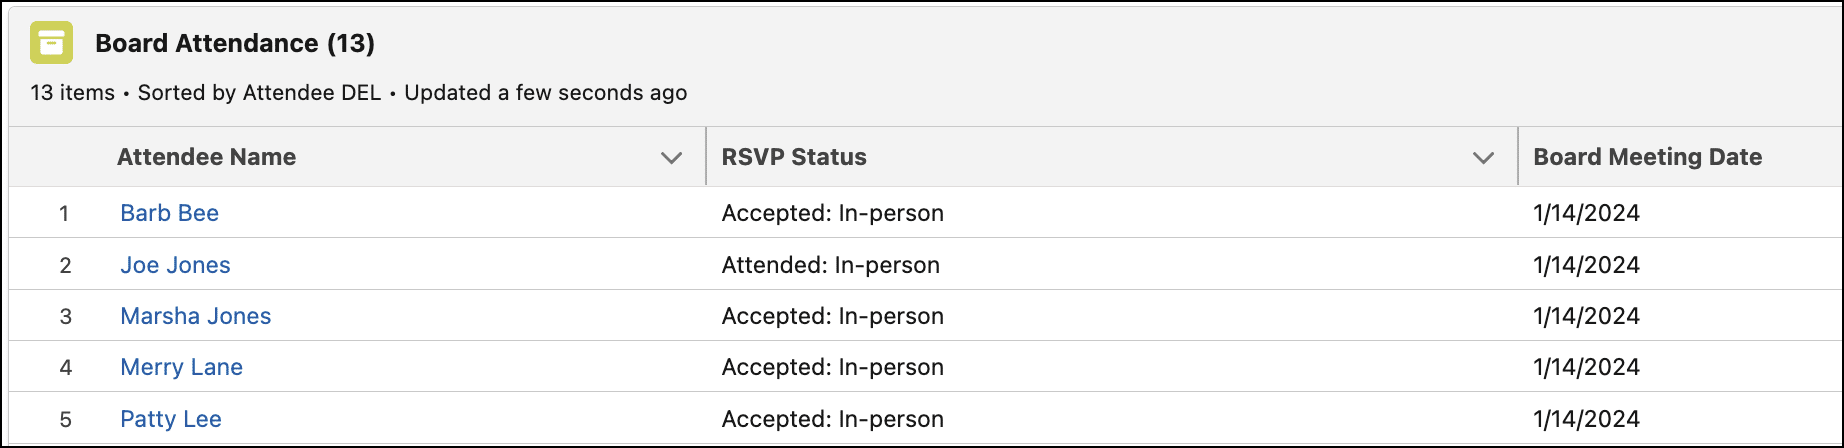
Related Board Attendance records are created without having to do a data import or manually create new records one at a time. This related list is exposed on the Experience Cloud site for board members to quickly see a list of attendees and their status.
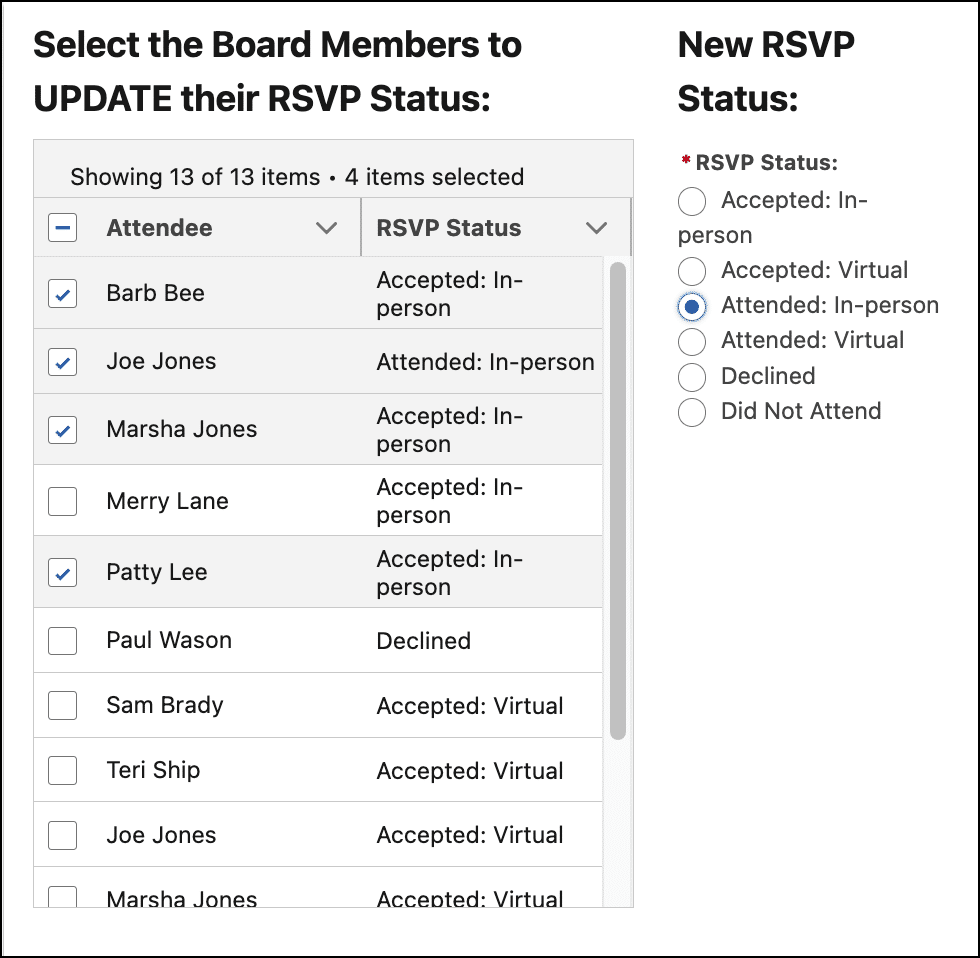
When the user selects the “Update Attendance” option, the flow updates the existing Board Attendance records with the new picklist value.
Take Attendance path
Let’s step through the actions in the Take Attendance path.
Step 1
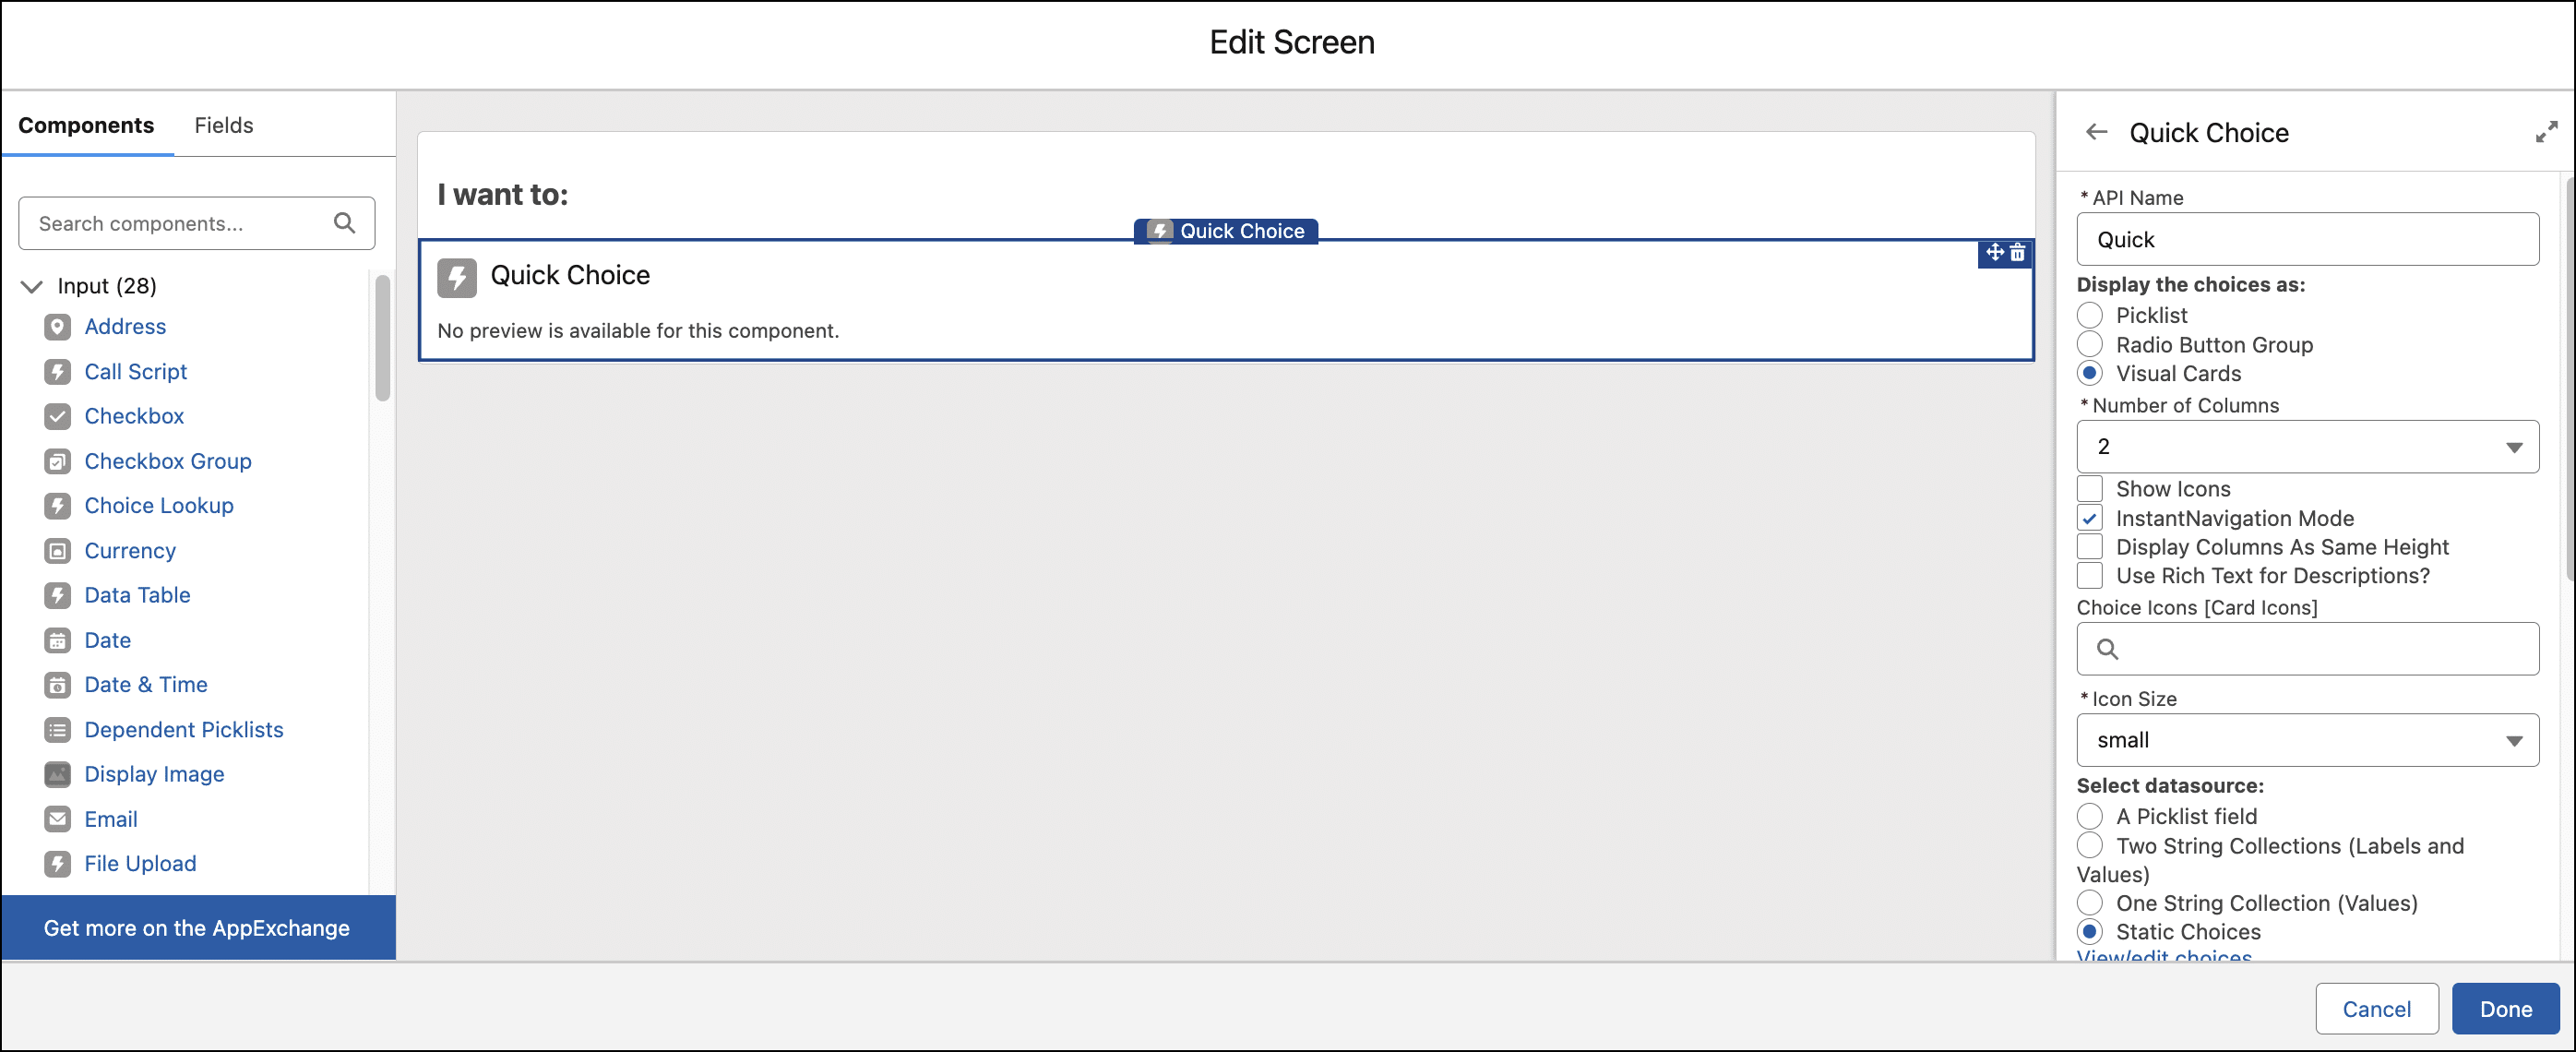
I used a component called Quick Choice from UnofficialSF.com*, but using a radio button component was also an option. I chose Quick Choice because of the visual card interface, and the instant navigation where it proceeds to the next screen without having to press a “next” button.
*Note: Components available on UnofficialSF.com have not gone through Salesforce security review. We recommend you install these components in your sandbox and review the code in these components to ensure they adhere to your company’s coding standards before deploying them into production for use.
Step 2
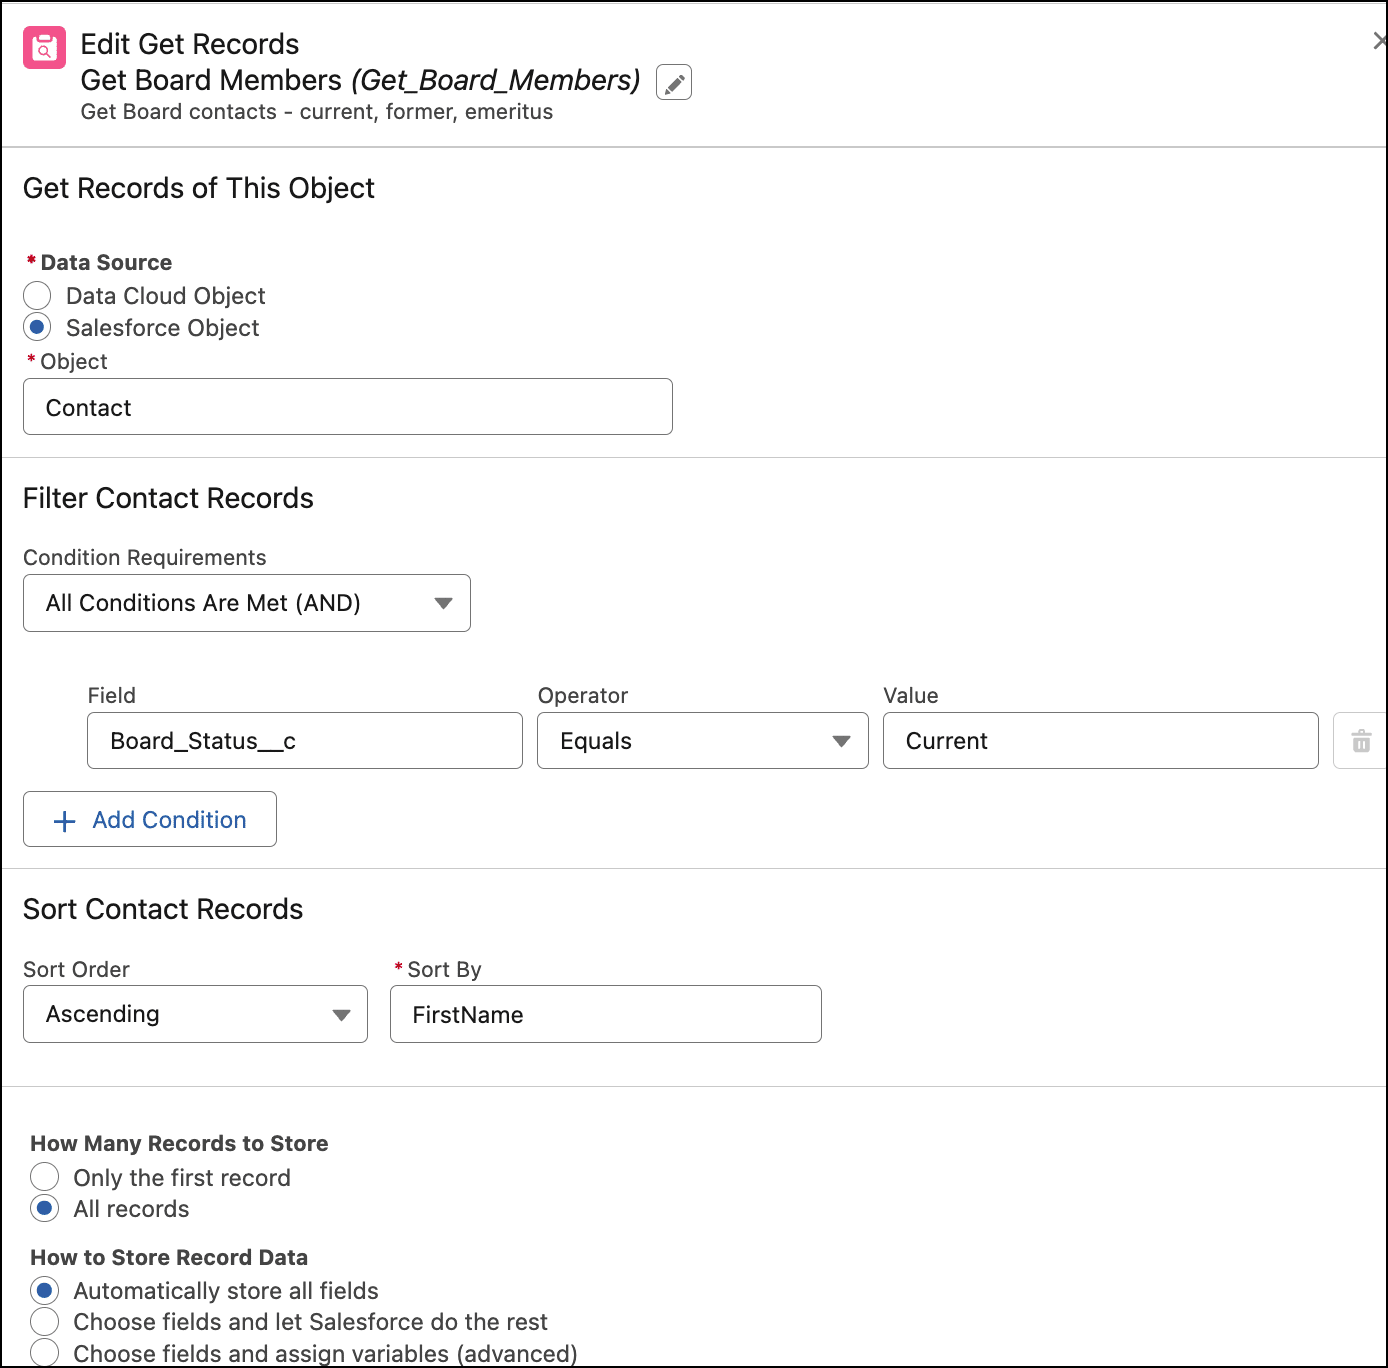
Use a Get Records element to retrieve all contacts that are marked as a current board member. Make sure to store “All records.”
Step 3
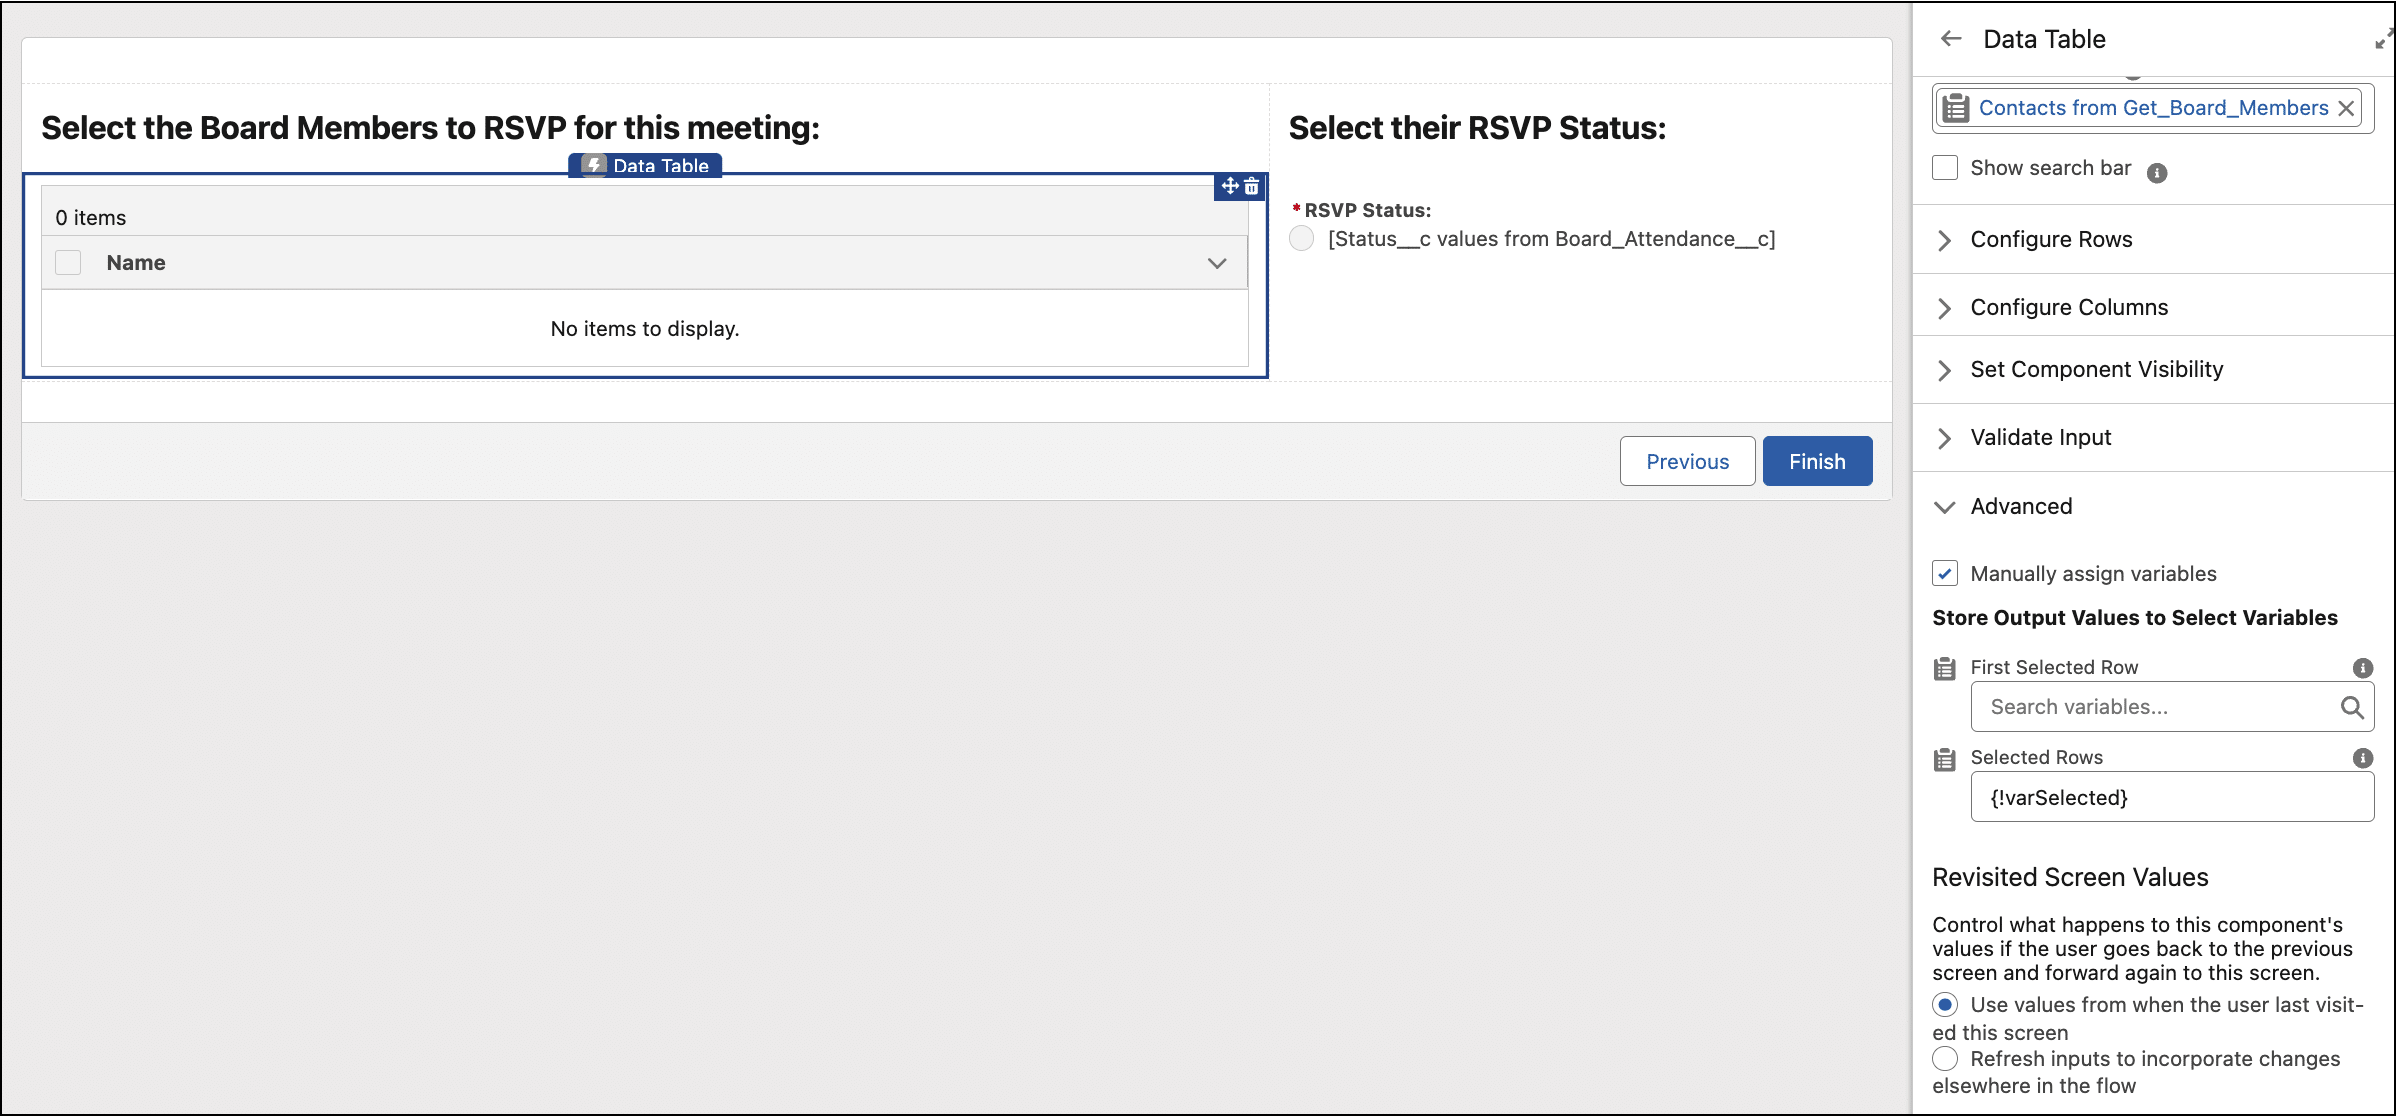
Add a screen flow element and add the data table component. Use the results from the Get Records element in Step 2. This means that the data table will show all contacts that are marked as current board members.
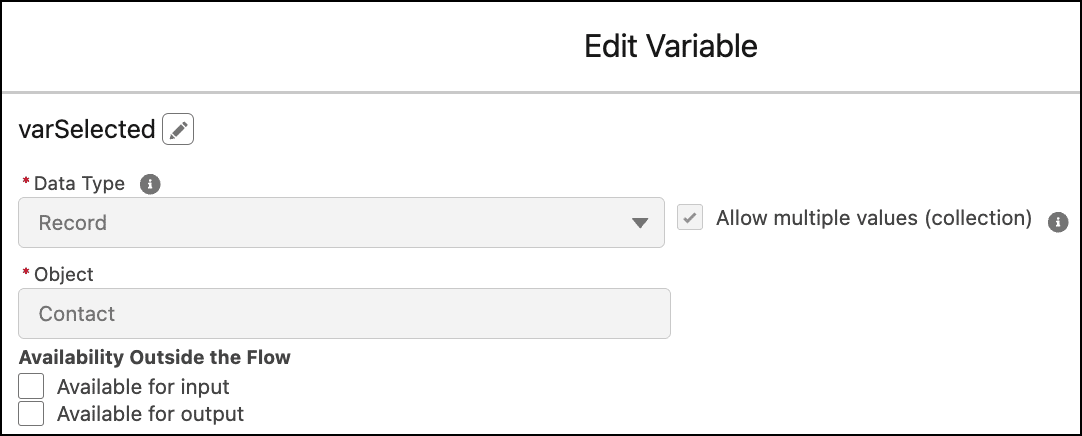
Select the Manually assign variables box. Create a record collection variable called varSelected. This variable will “hold” all of the contacts that the user selects in the data table for later use.
The radio button component uses a Picklist Choice Set which pulls from an existing picklist on the Board Attendance object.
Step 4
Insert a Loop element that loops through the collection variable varSelected.
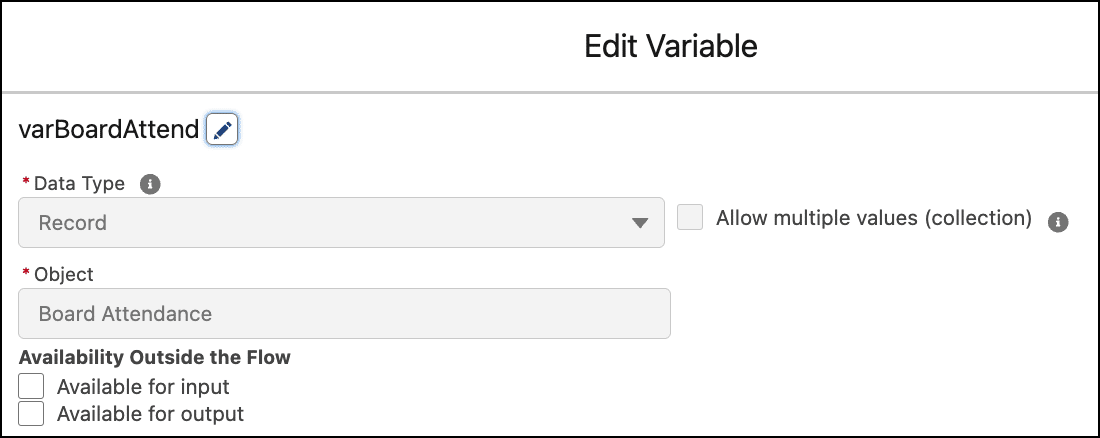
Next, add an Assignment element. Create a single record variable for the Board Attendance object (varBoardAttend). Then, assign the fields to be stamped onto the Board Attendance records along with the values.
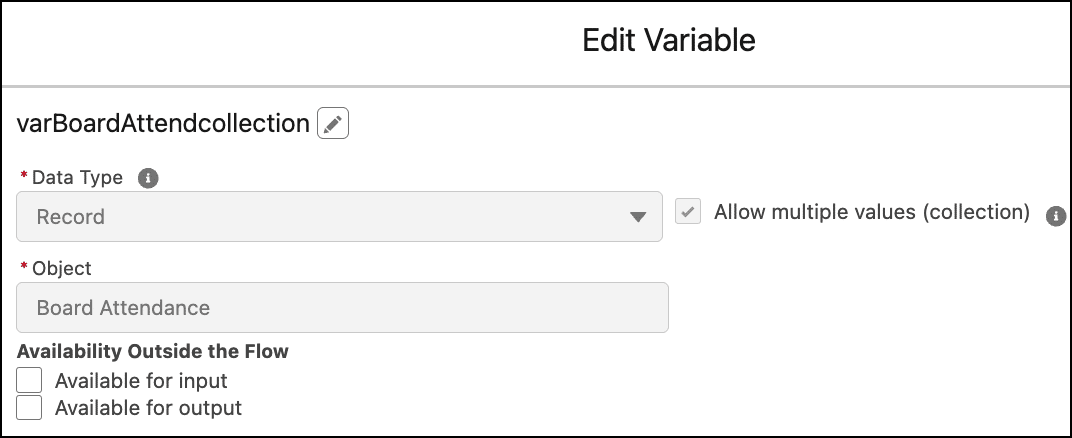
Create a record collection variable varBoardAttendcollection and add the varBoardAttend variable. Note: We will take the records in the varBoardAttendcollection record collection variable later on to create the Board Attendance records.
It’s important to note that recordIdis a text variable that captures the ID of the Board Meeting record. Once the screen flow is added to the Lightning record page, you must check the box that will pass the ID into the recordId variable.
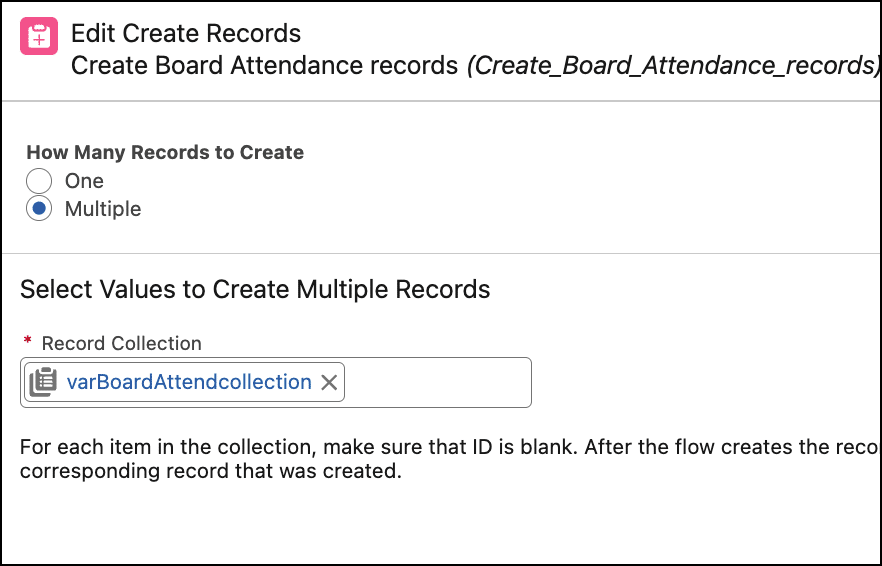
Step 5
Use a Create Records element using the record collection variable varBoardAttendcollection from the Assignment element in Step 4.
The other path of the flow is used after the board meeting has occurred. We want to confirm their actual attendance, thereby updating the related records. This time, the data table shows all of the existing Board Attendance records. The user then selects the records and updates them with a new RSVP status.
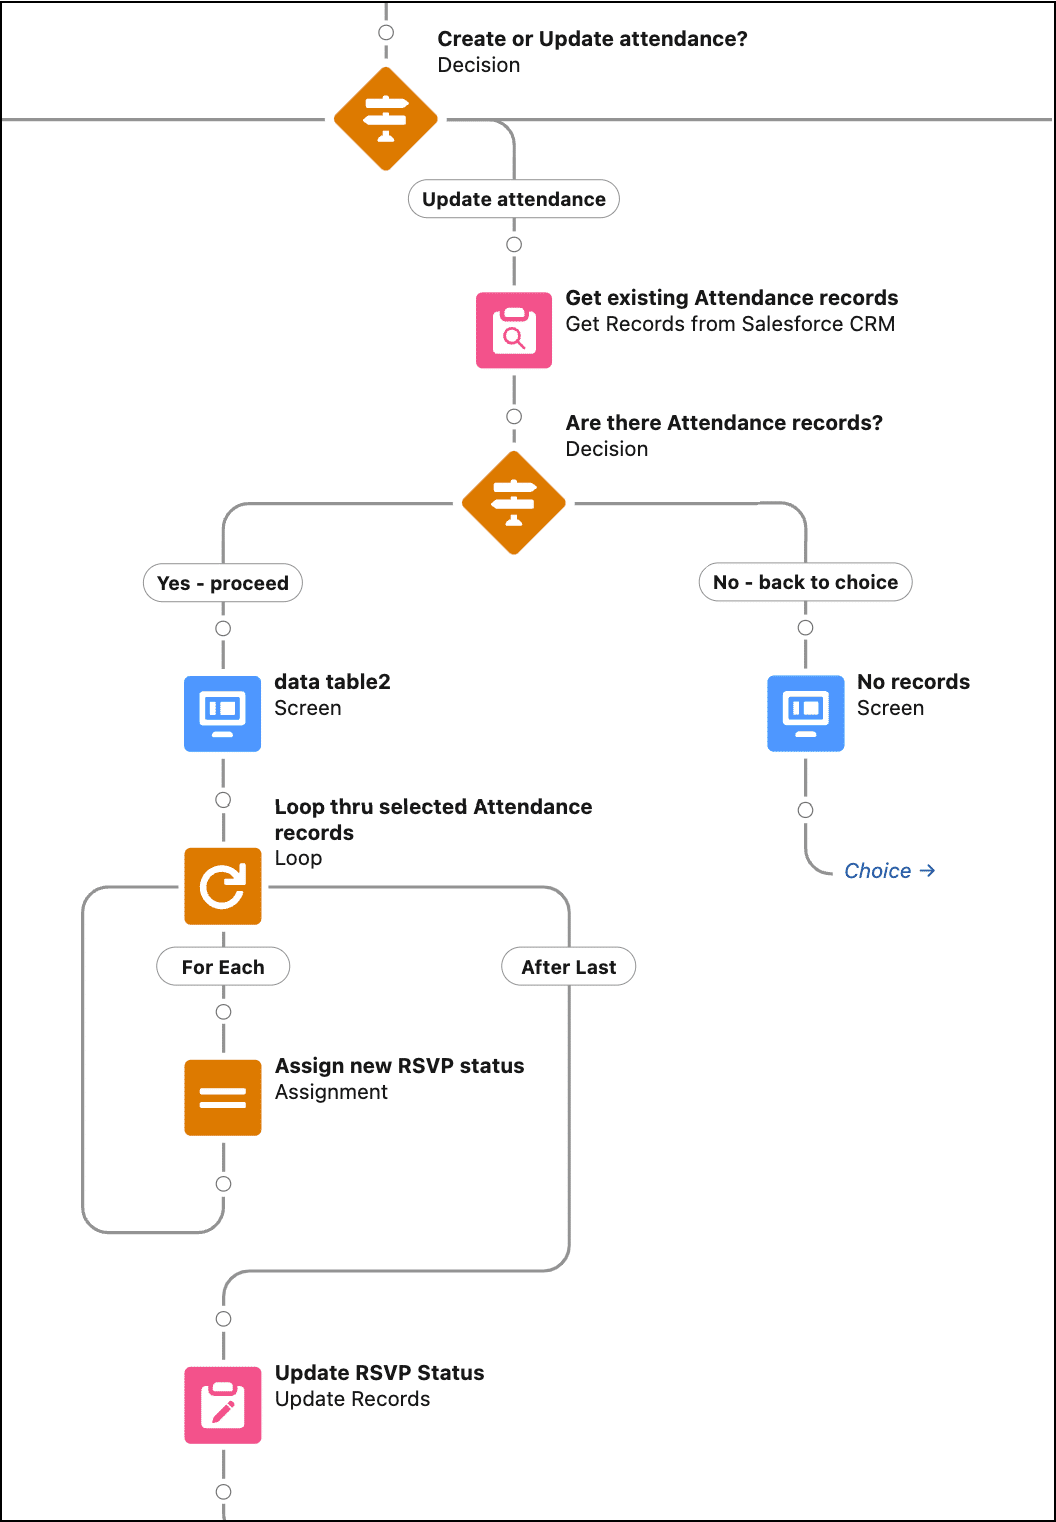
Update Attendance path
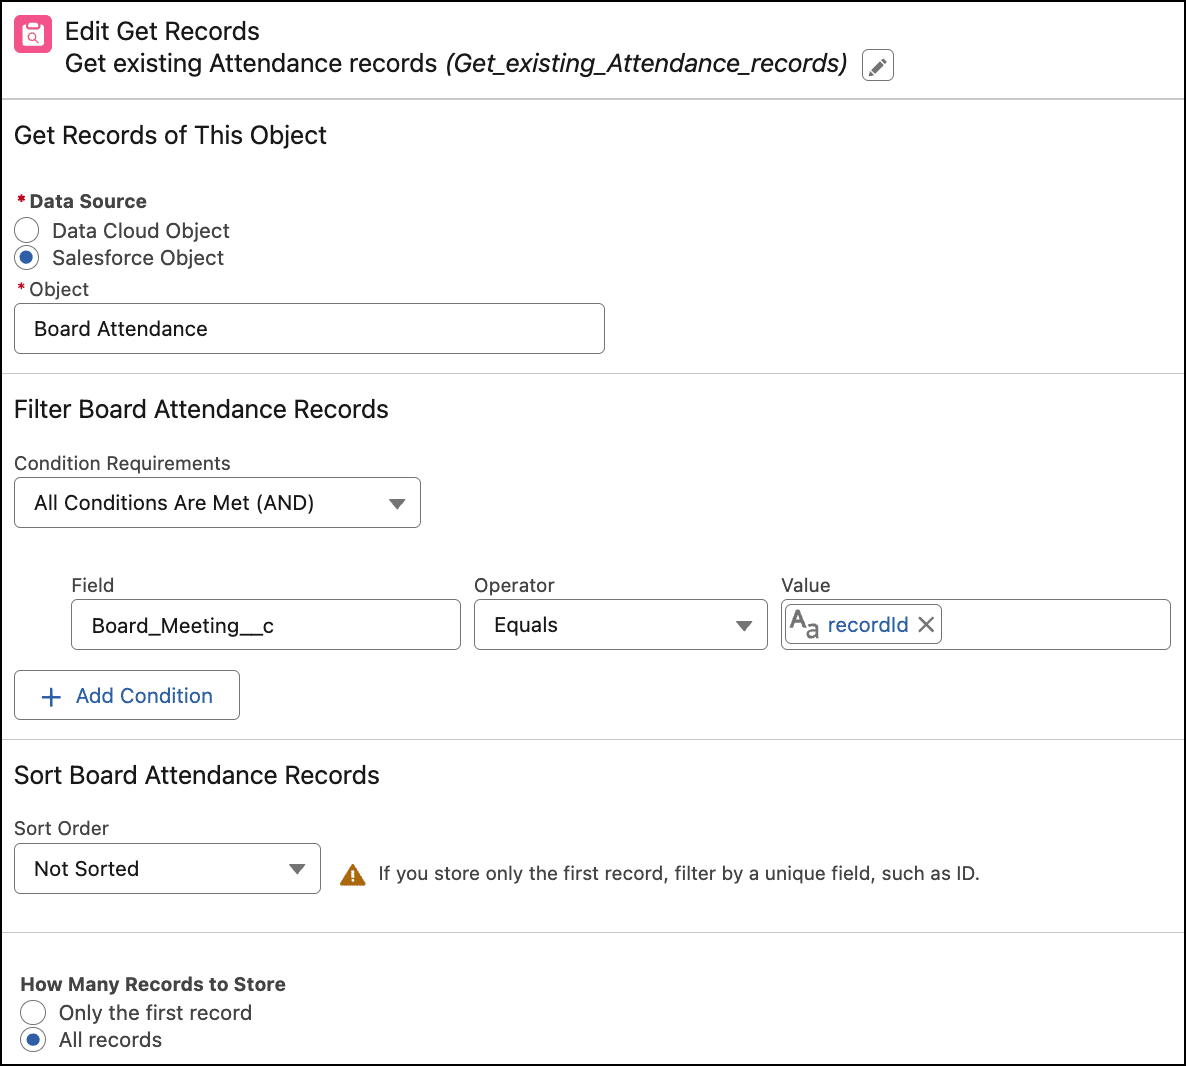
Step 1
This time, we’re using a Get Records element to get the related Board Attendance records for the meeting.
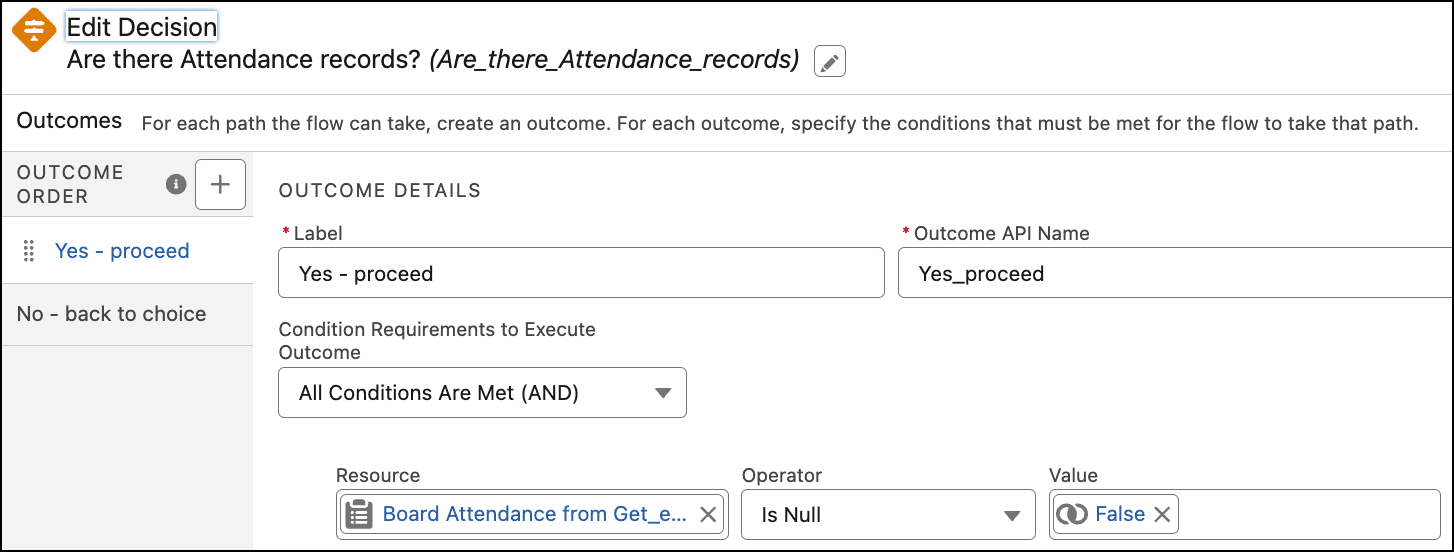
Step 2
Use a Decision element to determine if there are Board Attendance records (otherwise, there’s nothing to update!).
Step 3
Use a Screen element that contains a data table component showing the results from the Get Board Attendance element. We’ll save the selections in a record collection variable varSelectedAttendees.
Step 4
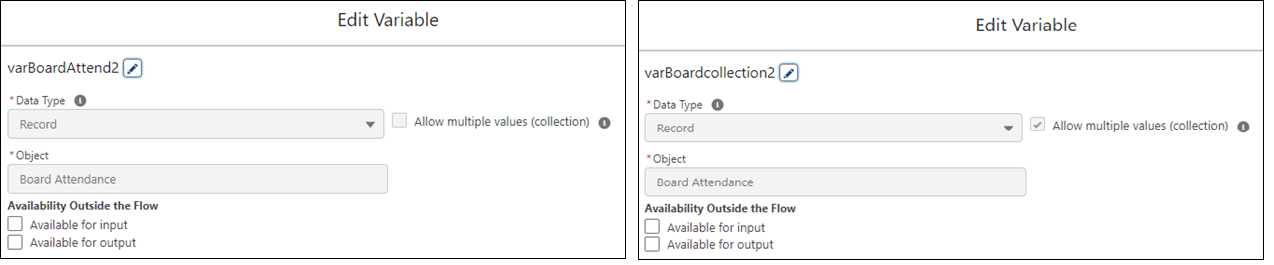
Loop through the varSelectedAttendees. Use an Assignment element to assign the new RSVP status. Create a new record single variable called varBoardAttend2(using the Board Attendance object). Assign the recordId and the RSVP Status, and add the varBoardAttend2 record variable to the varBoardcollection2 record collection variable.
Business results
Using a screen flow with a data table component is a great way to quickly mass create related records at once. This is a huge time saver because users don’t have to create or edit records one at a time. This avoids tons of clicks! Additionally, because a screen flow is very user-friendly, the end user can complete this task at their own pace and doesn’t need to rely on an admin to create the records through an import. I always like to empower my end users to be self-sufficient whenever possible.
Do try this at home
Using the data table component in a screen flow is pretty easy to learn. In your dev org or sandbox, create a new screen flow and test out the component (under the Screen element). Remember, you’ll first need a Get Records element to have data to expose in the data table.
Another way to use a data table is to simply display data without having a user make selections. It’s a great way to show a quick list of your organization’s Top 10 Donors/Customers This Week and put it on your home page, for example, or show a list of tasks that meet certain requirements that can’t be done from a list view. The options are endless. Have fun testing and exploring!
Welcome to a special edition episode of “How I Solved It.” In this series, we do a deep dive into a specific business problem and share how one Awesome Admin chose to solve it. But in this episode, we’ll show you how not one, not two, not three, but FOUR Awesome Admins solved the business […]
Welcome to another “How I Solved It.” In this series, we do a deep dive into a specific business problem and share how one Awesome Admin chose to solve it. Once you learn how they solved their specific problem, you’ll be inspired to try their solution yourself! Watch how Deanne Walters uses Flow to create […]
Welcome to another “How I Solved It.” In this series, we do a deep dive into a specific business problem and share how one Awesome Admin chose to solve it. Once you learn how they solved their specific problem, you’ll be inspired to try their solution yourself! Watch how Paolo Sambrano operationalized data collection using […]


![ass the ID into the recordId variable on the Lightning record page.]](https://d3nqfz2gm66yqg.cloudfront.net/images/20240327070914/Image-141.png)