Ah, winter . . . As I think about winter in the U.S., I have visions of me being fully decked out in my heated jacket and scarf, with my heated hand warmer keeping my hands nice and toasty. Yes, heated all the things. Meanwhile, my furry co-worker Mochi is living her best life, treating the fresh snow outside like her personal playground.
The thought of winter means one thing: A new release has landed! So to all my fellow admins, find your source of warmth (or cold, depending on where you are in the world) and get ready. Here’s my list of must-see highlights for Winter ’26.
After you read the summarized list of features below, go to your Winter ’26 sandbox and try them out yourself. You can also get hands on in a Winter ’26 pre-release org. Check the Maintenance Calendar for exactly when your Salesforce org will get the Winter ’26 features. Scroll through the list and check your Salesforce instance (NA__, EMEA__) against the release dates listed in the calendar.
Releases include pilot, beta, and generally available (GA) features.
- Pilot: Usually the first phase of public testing, pilots normally include a small subset of participant companies. These companies must request to opt in to a pilot and then be nominated for participation.
- Beta: This phase involves rolling out a feature publicly for testing. Beta features are normally given limited support as they are not yet fully functional or finished, so we recommend getting hands-on with these features in a sandbox.
- GA: Once a feature has passed the pilot and beta testing phases, it will be formally included in a Salesforce Release. GA features are considered fully functional and, in most cases, fully supported.
By no means is this meant to be a comprehensive list but rather just a few of the enhancements and new features in Winter ’26. As always, I highly recommend browsing through the release notes for features of interest to your company and industry.
Browse this post by release category:
Artificial intelligence enhancements
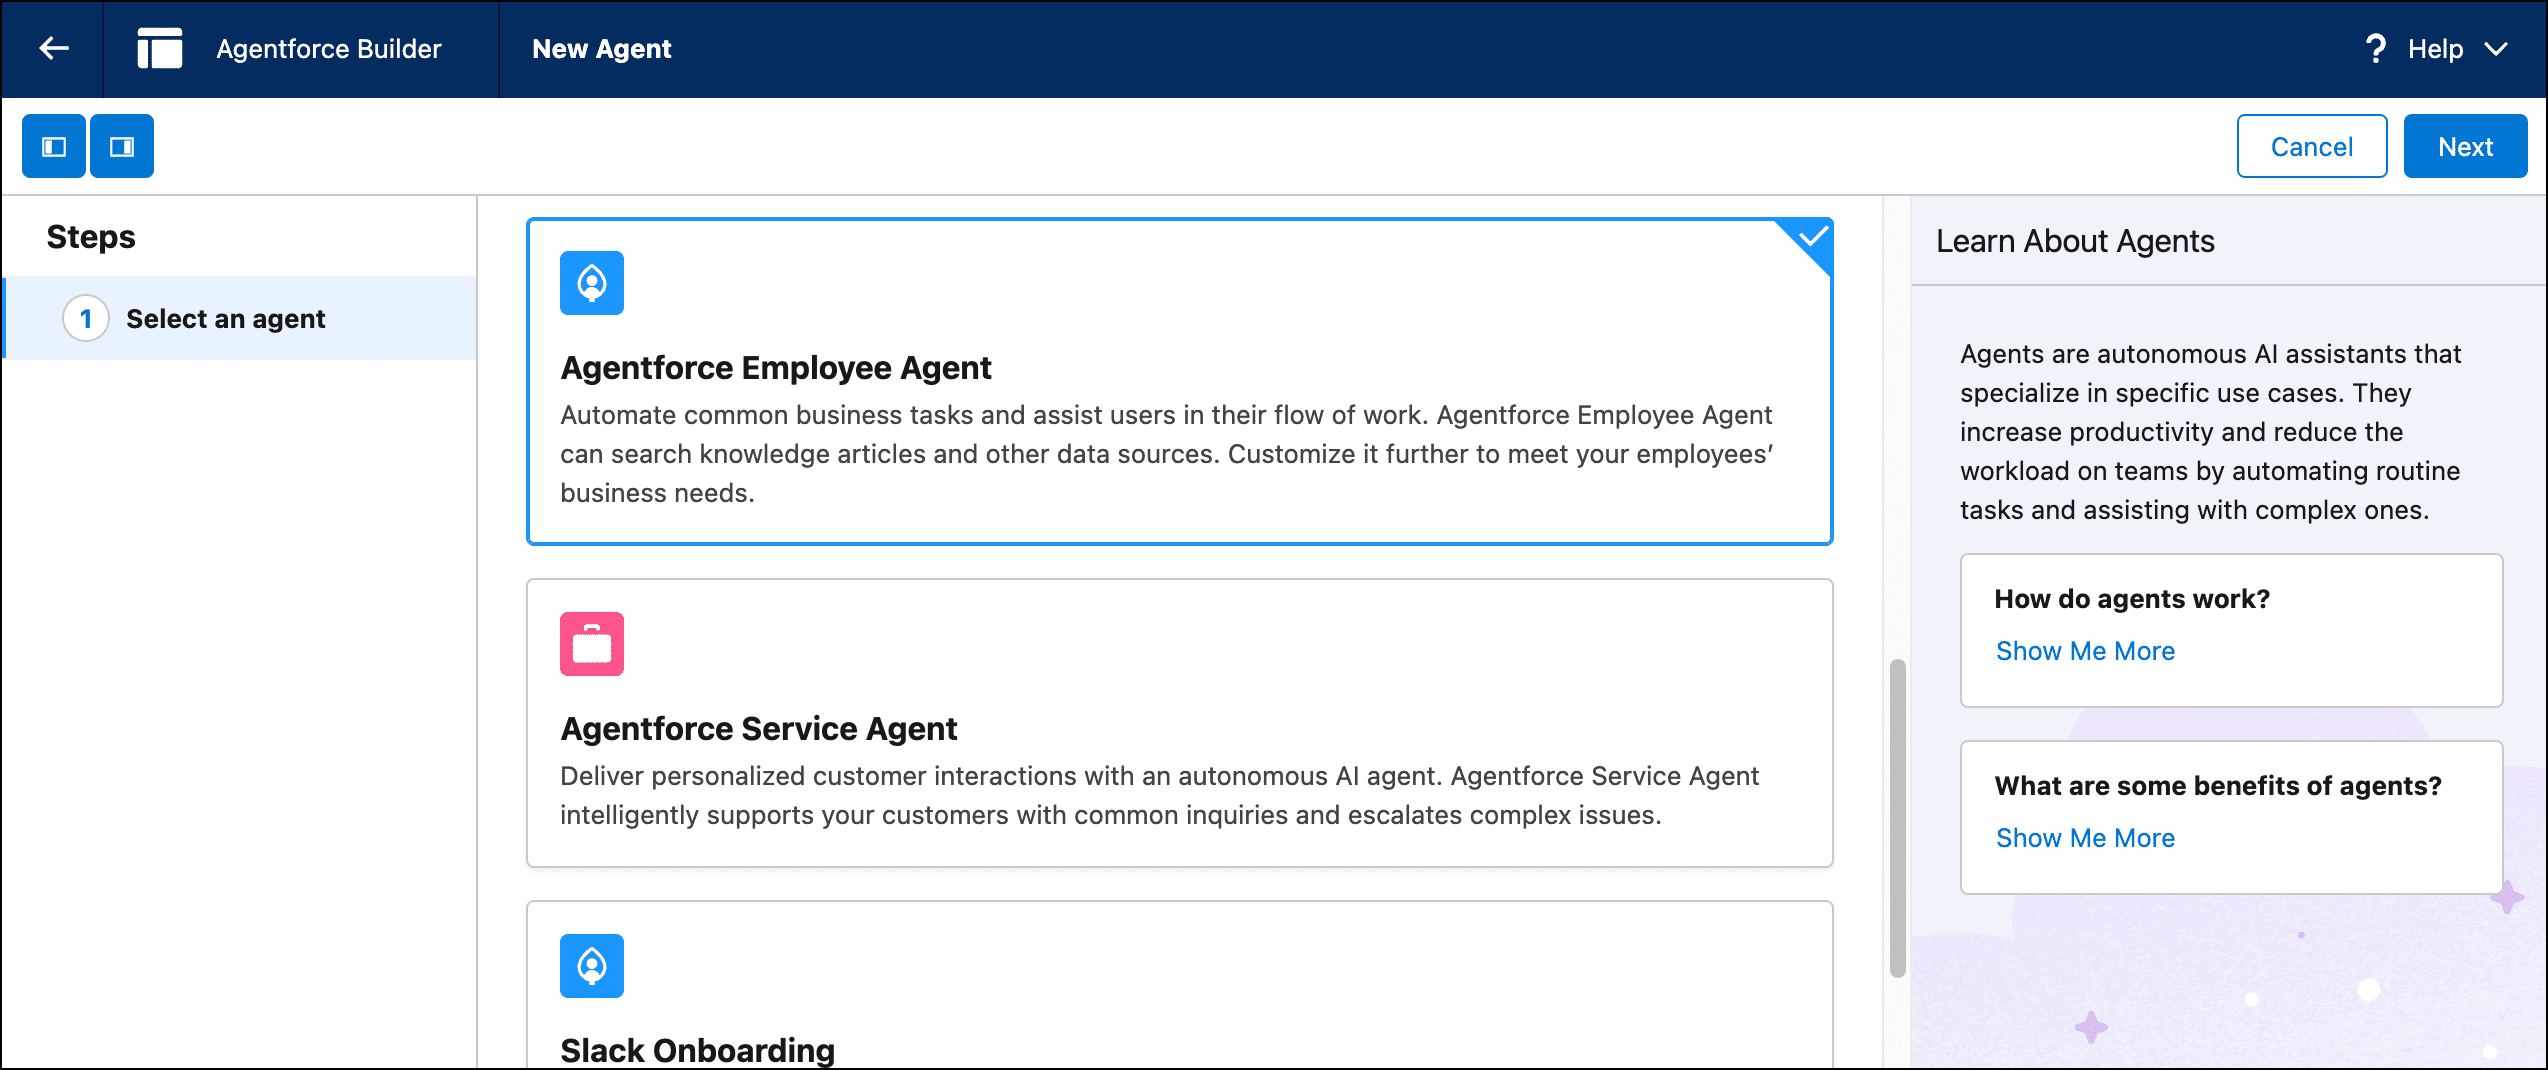
Let your Agentforce Employee Agent close cases
Admins, think about all the time your service reps spend on the simple, repetitive task of closing cases every single day. Give them that time back—starting the week of October 3, the Close Case Agentforce Employee Agent can close cases for them. This is a fantastic way to slash your Average Handle Time and let your agents focus on customers, not clicks. A service rep can now simply tell the Employee Agent the case number, and the Employee Agent will take care of navigating to the record and changing the status. It’s built on a customizable template, so you can easily add this capability by selecting the Employee Case Management topic from the Asset Library to your existing agent. Or, create a new one using Create from a Template and select the Service Employee Help template in the Agentforce Builder. It’s all about automating the mundane to free up your team to work on more crucial tasks. Get ready to roll out this powerful new assistant and watch your service metrics improve!
Note: This applies to Enterprise, Performance, Unlimited, Einstein 1 Edition, Agentforce 1 Edition, and DeveloperEditions.
Add new standard agent topics and actions to your agents
We’ve added new standard agent topics and updated a standard agent action.
- New topics:
- Participant Referral Management
- Participant Notes
- Participant Management
- Shift Capacity and Coverage (Beta)
- Wealth Advisor Client Meeting
- Wealth Advisor Client Post Meeting Follow Up
- Updated action: Answer Questions with Salesforce Documentation (beta)
Note: The availability of standard agent topics and actions can vary by edition and license.
Here are a few Agentforce enhancements that started hitting orgs in June and August.
Fine-tune your employee agent conversation recommendations
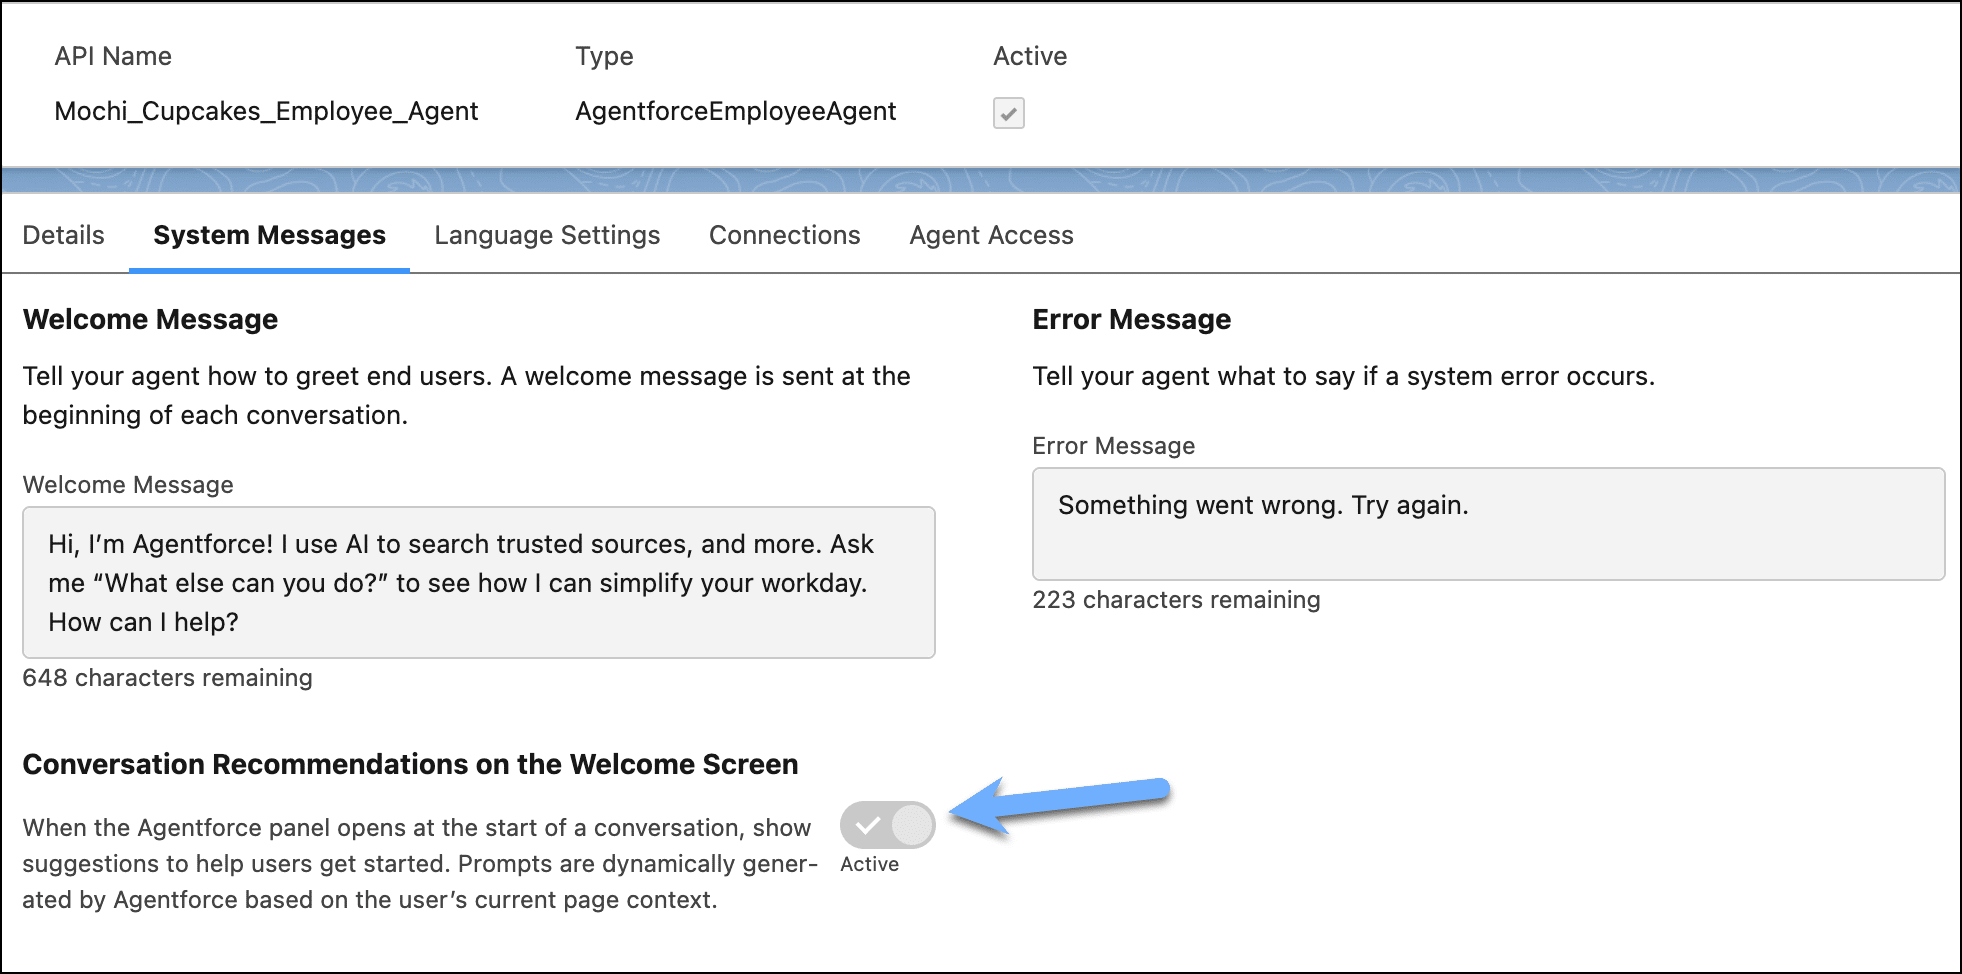
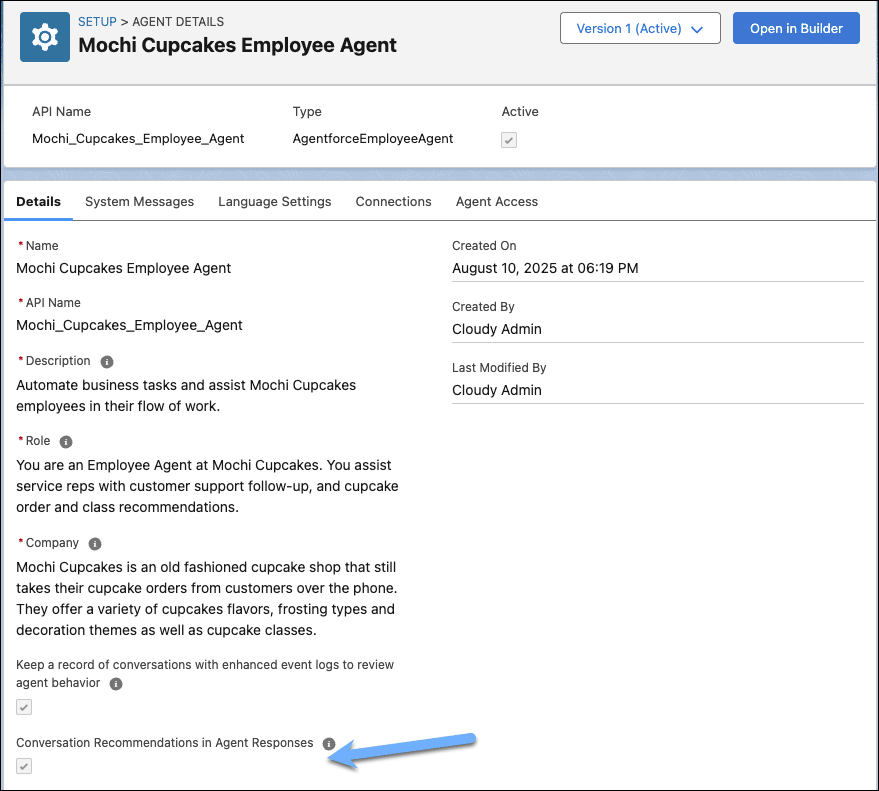
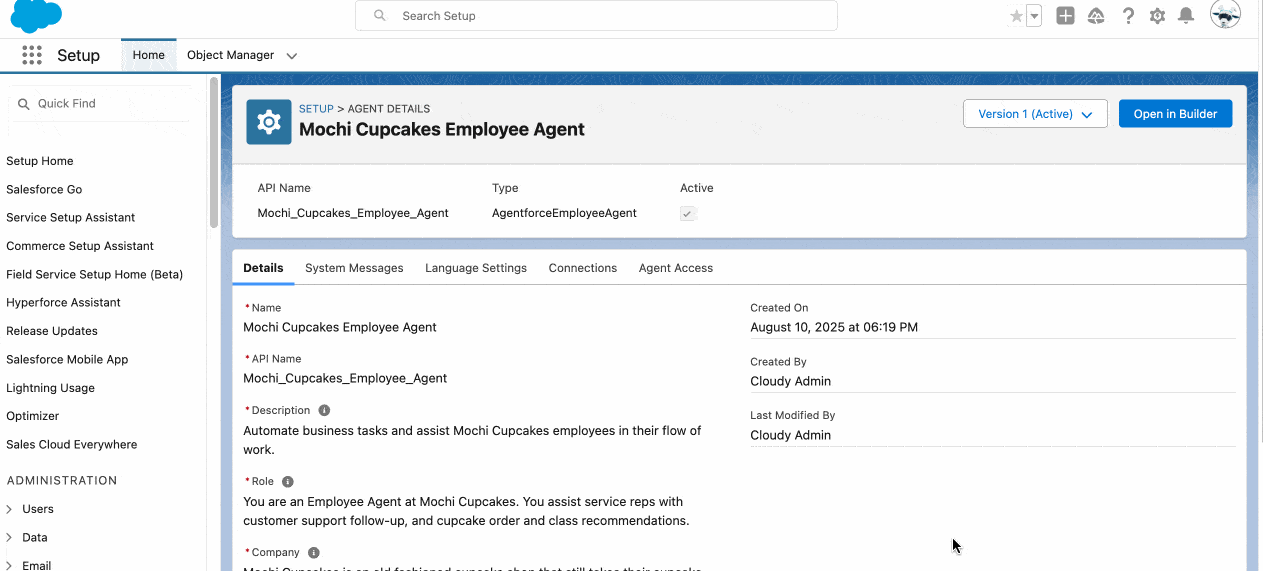
When it comes to AI, control and customization are key. You now have granular control over Employee Agent Conversation Recommendations. Previously, the helpful welcome and in-conversation suggestions for your Agentforce Employee Agents were always on. Now, you can tailor that experience for each agent. On the Agent Details page, you’ll find two new settings that let you independently turn the Conversation Recommendations on the Welcome Screen and the Conversation Recommendations in Agent Responses on or off. You can fine-tune the agent’s behavior, ensuring your employees see only the most relevant suggestions. For your existing agents, these settings default to ‘on’, so there’s no disruption. It’s all about giving you the controls to create the most effective experience for your team. Note: This applies to orgs with the Agentforce Employee Agent add-on.
Simplify access to Employee Agents with the Agent Access tab
How much time have you spent bouncing between an agent’s detail page and the permission set page in Setup just to grant or remove access? Say goodbye to that context switching, because you can now manage who uses an agent from one central location with the new Agent Access tab in Agentforce Builder. This workflow improvement puts everything you need in one place. Manage permissions without leaving the agent you’re working on. Simply click the agent’s name to open its detail page and select the new Agent Access tab. From this single screen, you can see, assign, or remove access for all relevant permission sets and profiles. Note: This applies to orgs with the Agentforce Employee Agent add-on.
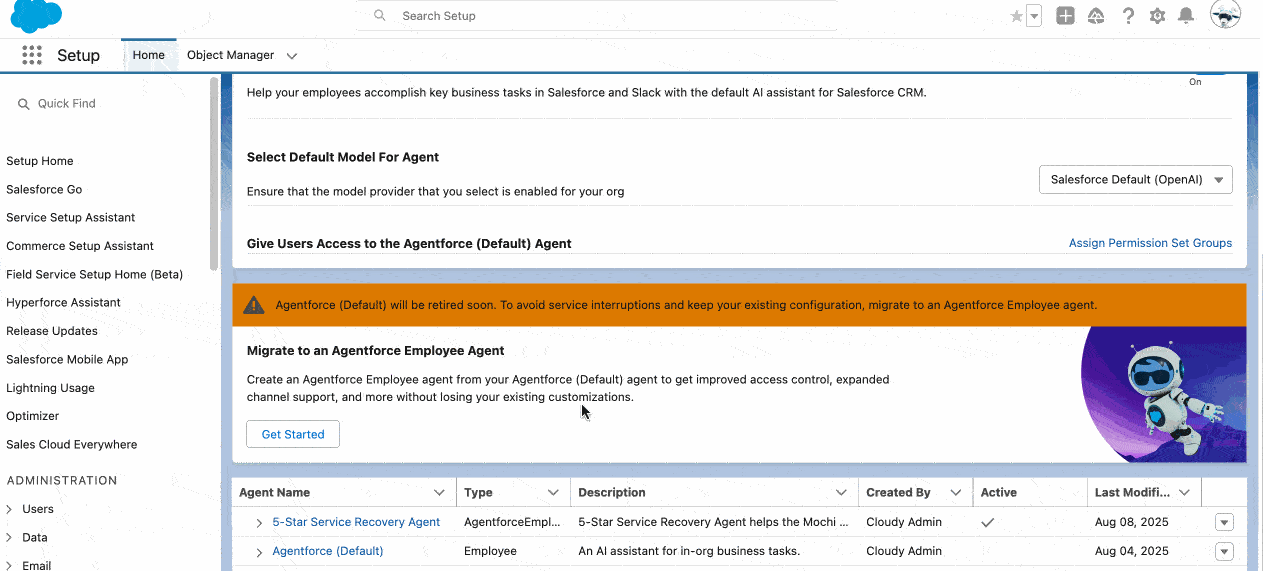
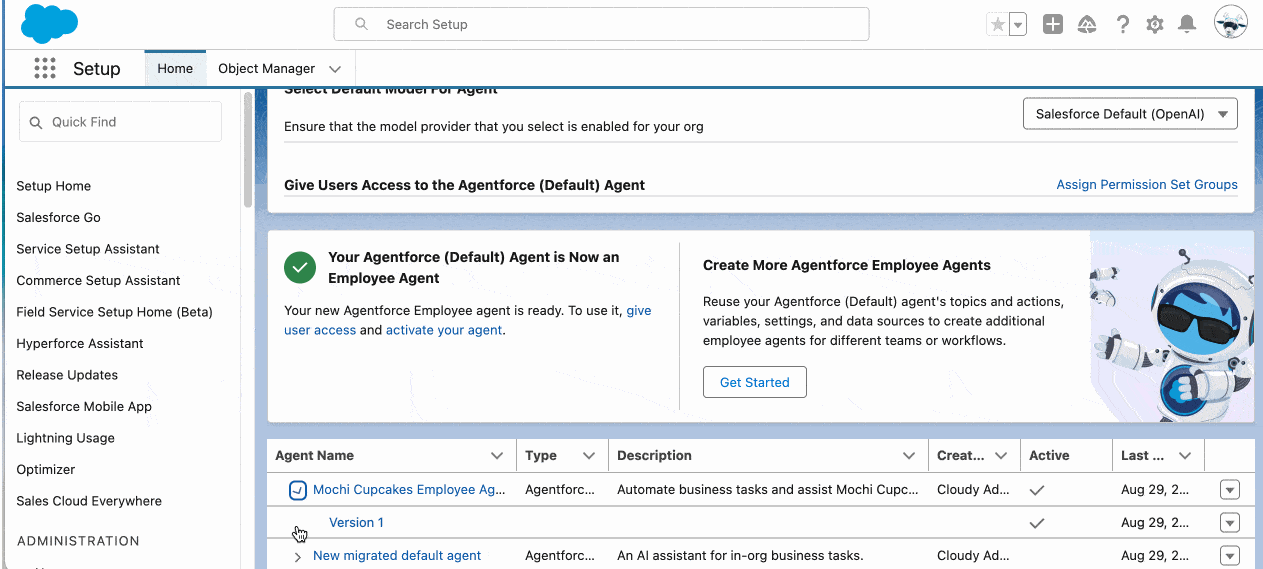
Easily migrate to an Employee Agent with a simple setup flow
Agentforce (Default) is now end of sale. Migrate the Agentforce (Default) agent to the new Employee Agent type without rebuilding all your topics and actions from scratch. Unlike Agentforce (Default), which supports only one agent, Agentforce Employee Agents support the creation of multiple agents using templates, each designed to handle a specific employee use case.
To get started, go to the Agentforce Agents Setup page, find the new migration section, and click Get Started. After entering a few details for your new agent, simply click Create and the flow does all the heavy lifting. It creates a brand-new Employee Agent while perfectly copying over all the topics, actions, and settings from your old one. This is a huge time-saver that makes the upgrade process painless. Note: This applies to orgs with the Agentforce Employee Agent add-on.
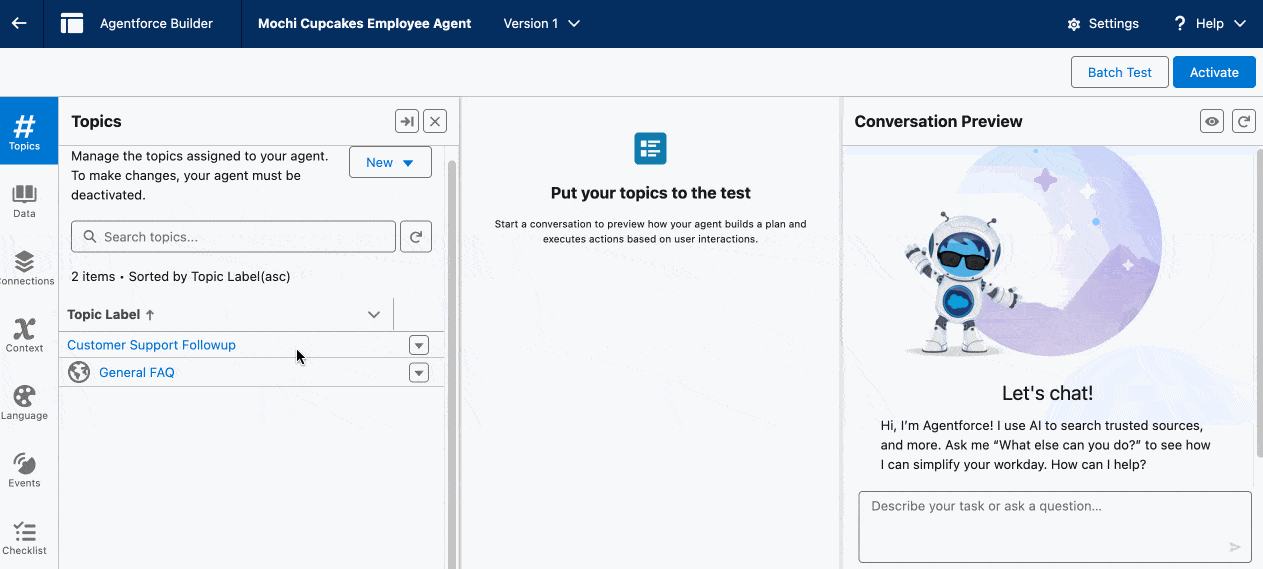
Take the guesswork out of building an Employee Agent with an Agent Readiness Checklist
Build your Employee Agent with confidence using the Agent Readiness Checklist in Agentforce Builder to guide you. This is your new best friend for creating complete and functional Employee Agents. Create a new agent, open its detail page, and click Open in Builder. The Checklist outlines all the key setup tasks you need to complete, from defining topics to setting access. It’s the perfect way to track your progress and ensure you haven’t missed any critical steps, reducing setup errors and making the entire process smoother and more predictable.
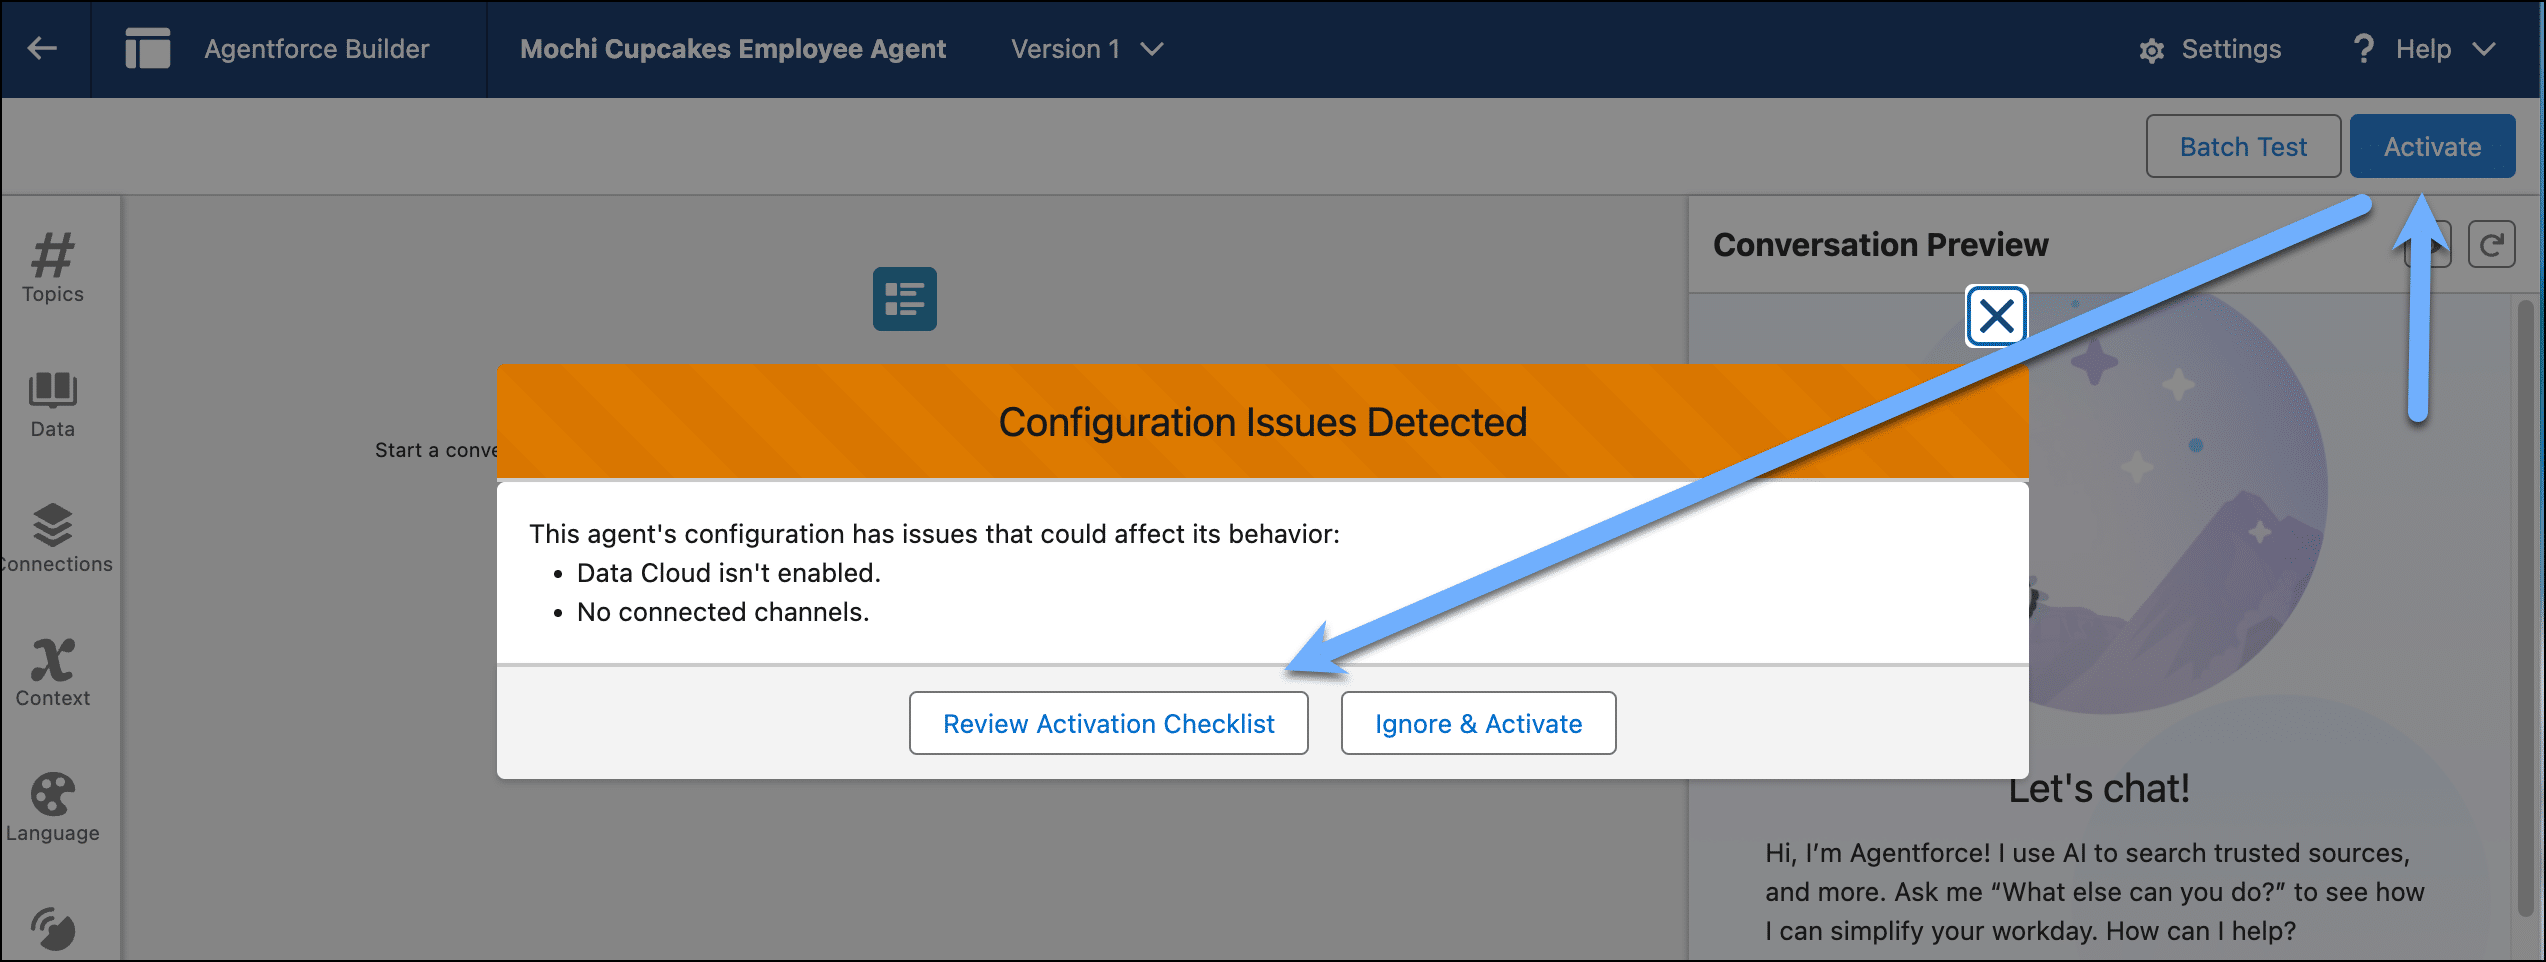
Check your agent setup before deployment
You can now perform a pre-deployment check of your agent’s setup. No more hoping you’ve covered everything from memory. Think of it as an expert co-pilot reviewing your work before takeoff. This new validation tool comprehensively scans your agent’s configuration, highlighting any potential issues like missing permissions, overlapping topics that could confuse the AI, or conflicting instructions. By flagging these problems before you go live, this check ensures all your components are in place and ready for a successful launch. It’s all about catching small issues before they become big headaches, so you can deploy your agents with total confidence.
Build Employee Agents in your Developer Edition org
Agentforce Employee Agents are available in all Developer Edition orgs. It means we all have a free, personal environment to build, test, and explore the future of AI-powered automation. You can now use the guided creation tools, test integrations, and fine-tune agent behavior, all without needing a special license. This is your chance to skill up, build that cool proof-of-concept you’ve been thinking about, and truly grasp what these powerful agents can do. Select the Agentforce Employee Agent template to create an Employee Agent.
Improve Agentforce Service Agent security with updated verification actions
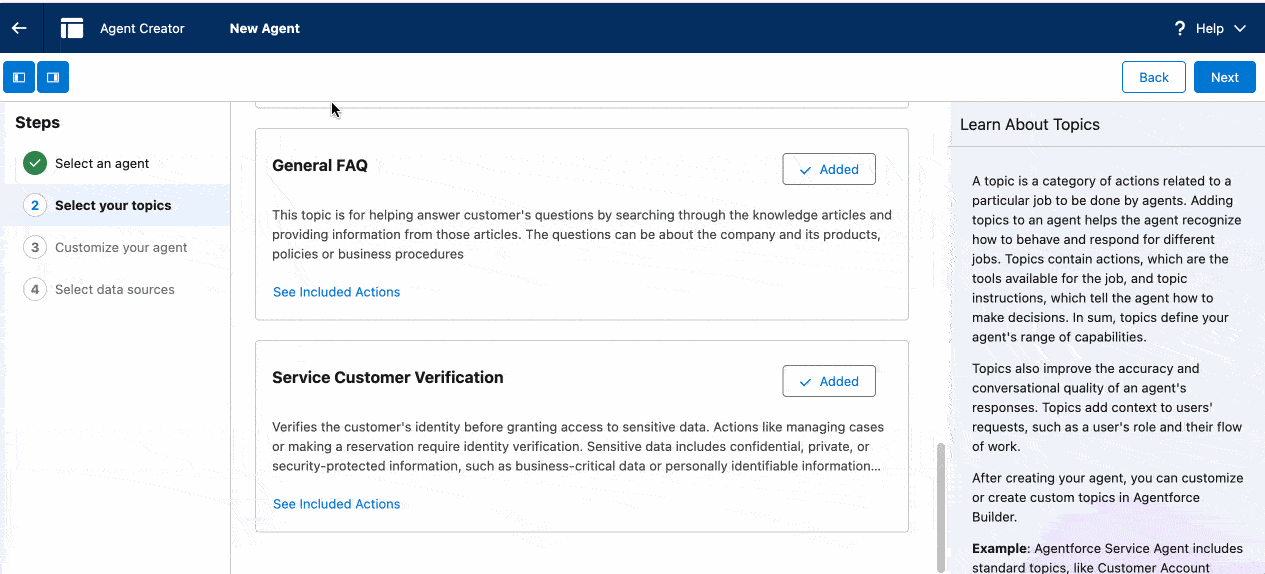
To better protect your customer’s data, older, unverified agent actions were deprecated in July, and you need to ensure your agents are using the new, secure versions. This critical update is all about making sure your agent knows who it’s talking to before performing sensitive tasks. The new actions now require a verified Contact ID, which you can get by using the new Service Customer Verification topic to securely confirm a customer’s identity. If you have any agents still using the old actions, you’ll need to update them to use this new verification topic and replace the deprecated actions with their secure replacements.
Call the Agent API from Flow or Apex
Salesforce is giving us a toolkit of new standard invocable actions to call the Agent API directly from an Apex class or a flow. Instead of one single action, you now have four distinct tools—Start Session, Send Message, End Session, and Submit Feedback—that let you manage every step of an agent interaction. This gives you incredible granular control. You can now use your flow’s logic to decide exactly when to end a session, or build a custom screen to collect user ratings and pass them to the Submit Feedback action.
Respond to customer emails autonomously with Agentforce Service Agent (GA)
Admins, get ready to automate routine customer emails and free up your service team for the tough cases because the Agentforce Service Agent can now respond autonomously to emails (GA). Your agent provides instant, 24/7 support by handling common inquiries from end to end. Grounded in your trusted Data Libraries, the agent can accurately answer questions like “Where’s my package?” with zero human intervention, freeing up your team to focus on the complex issues where they shine brightest.
Get detailed agent response scores in Testing Center results
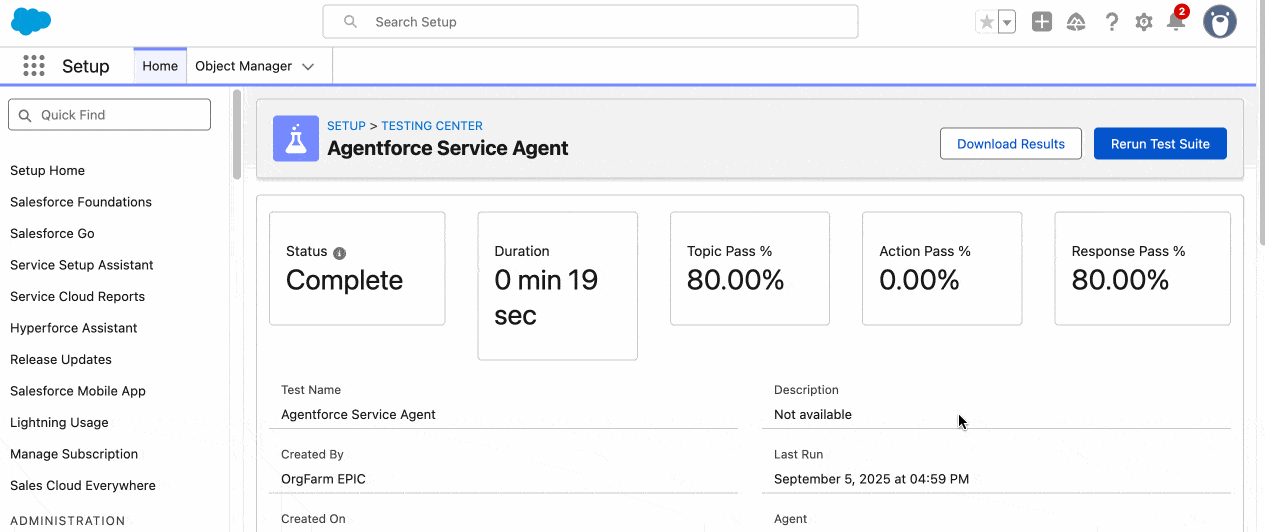
Admins, when you’re testing your AI agents, is a simple ‘pass’ or ‘fail’ really enough to tell you if the response was any good? Testing Center now provides detailed agent response scores. When you run a test, you’ll get a score from 0 to 5 for both the accuracy and quality of the agent’s response. This gives you valuable, nuanced insight into how well your agent is actually performing. Once you run the tests, download the results. The testing results csv file contains various scores ranked 0 to 5.
Test your agents with real-world context variables
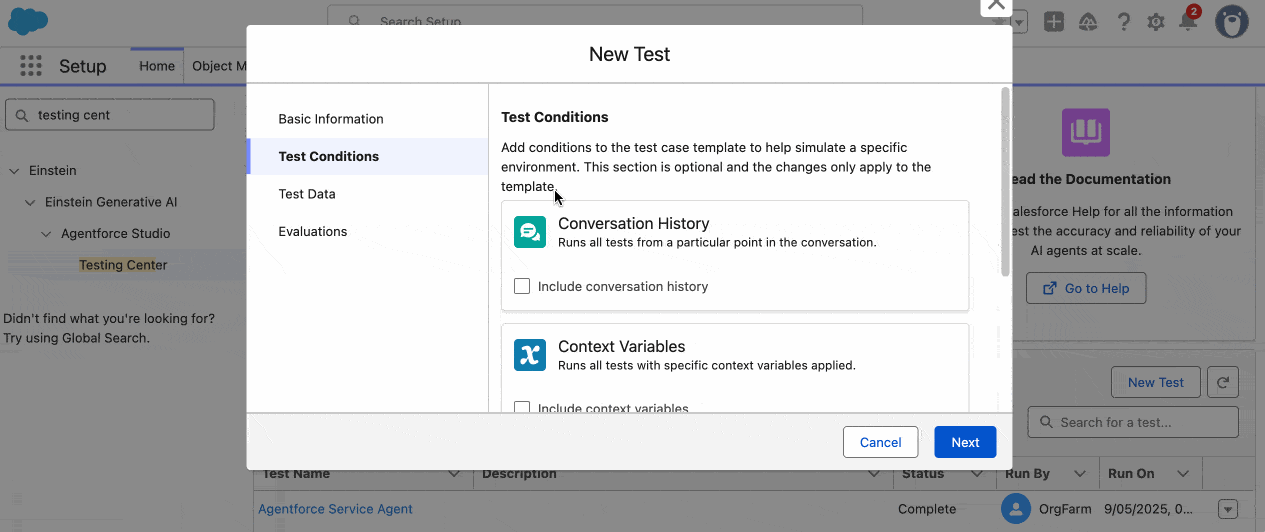
For our AI agent tests to be truly effective, they need to reflect the real world. A user never asks a question in a vacuum. They’re on a specific record, in a specific app. Now, you can test your agents with these real-world context variables in the Testing Center. This allows you to create more accurate and realistic tests. When building a test case, you can now include crucial context, like the record ID of the page or the current app the user is in, so you can really simulate how a user would interact with the agent. For example, you can test if your agent correctly summarizes the specific Opportunity record it’s running on. It’s all about testing in a way that mirrors your users’ actual experience, helping you build much smarter and more reliable agents.
Monitor and improve AI agent adherence to topic instructions
Once you’ve carefully created instructions for your AI agent’s topics, how do you ensure the agent is following your rules in every conversation? Now, you can keep your AI on track with Instruction Adherence, a new Agentforce guardrail. The Instruction Adherence guardrail constantly evaluates your agent’s responses against your topic instructions, giving you visibility into how well your agent is following directions. You can monitor this performance using enhanced event logs and Data Cloud reports, which makes it easy to spot when an agent is deviating so you can refine your instructions.
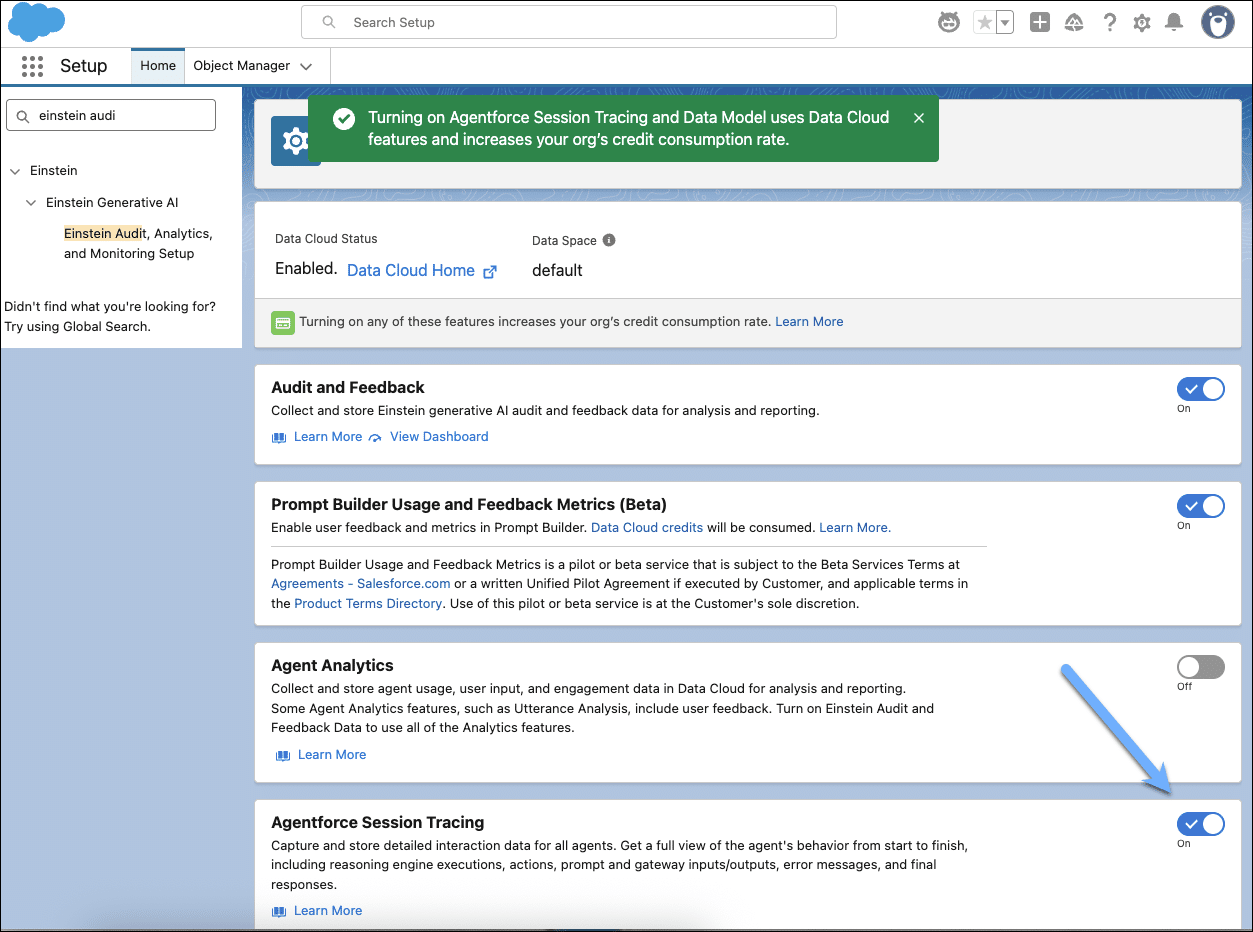
Gain visibility into agent behavior with Agentforce Session Tracing
Have you ever looked at an AI agent’s response and wondered, “How in the world did it come up with that?” Troubleshooting the ‘why’ behind an AI’s behavior can feel like looking into a black box. Well, it’s time to turn on the lights, because you can now get a complete, transparent view with Agentforce Session Tracing. This feature captures detailed data from every agent interaction—from the AI’s reasoning process and the actions it took, to the exact large language model (LLM) inputs and outputs—and stores it all in Data Cloud. This gives you the power to test, debug, and monitor with data-driven precision. Getting started is easy. In Setup, go to Einstein Audit, Analytics, and Monitoring, and toggle on Agentforce Session Tracing. The data model is provisioned in minutes, and you can start building reports to get a full view of your agent’s performance.
Build agents faster with a more intuitive variable management experience
Do you ever hesitate to change an agent variable because you aren’t sure what other actions depend on it? No more guessing. We now have a much more intuitive variable management experience in Agentforce Builder. Use the Context panel to build faster and safer. To see a variable’s dependencies, just select it in the panel and the new Where This Variable Is Used section will show you every connected input and output—no more hunting through your agent’s logic. Plus, to speed up your building process, when you create a New Variable, you can now connect it to an action’s input or output right from the creation screen, saving you a ton of clicks.
Iterate on your agents without breaking a thing
Have you ever tweaked a topic for a new agent version and accidentally broken the currently active version? That’s not a good experience for any admin. Rest assured. Topics and actions are now unique to each agent version, giving you a safe sandbox for testing and customization. This is a massive step forward for managing your agents. From the dropdown menu next to the agent in the Agents Setup page, you can now Clone Version of an agent and change its components freely, with 100% confidence that the currently active version is untouched. You can also delete agent versions from the dropdown as well. For any truly reusable components, you can build them in the new Agentforce Asset Library to share across all your agents. To get this powerful new behavior on your existing active agents, all you need to do is create a new version of them. Note: These changes are automatically applied to all inactive agents, inactive agent versions, and agents created going forward.
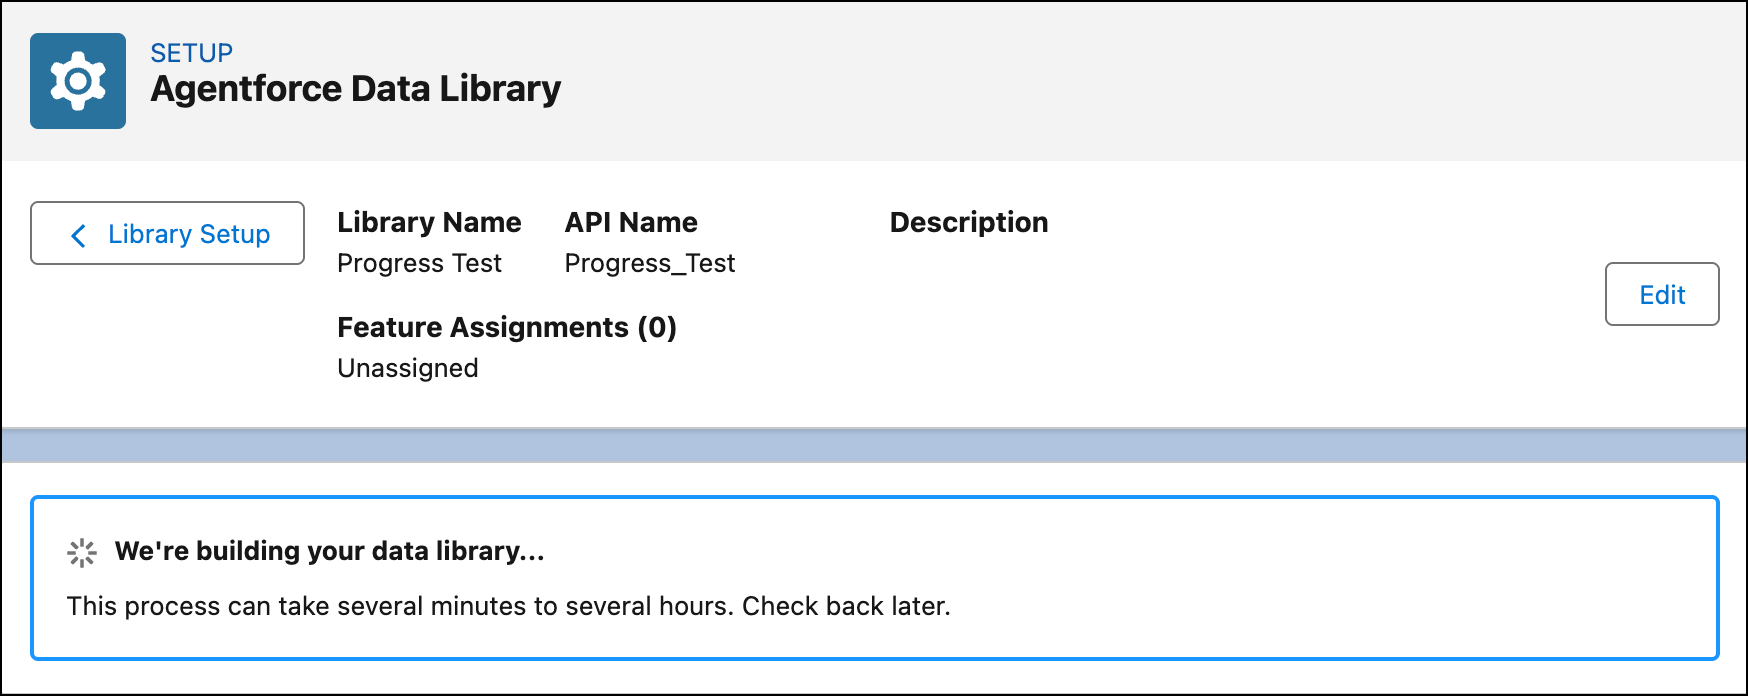
No more guessing: View your data library build status
Admins, I don’t know about you, but when I start building a new Agentforce Data Library, I keep wondering if the process is complete yet and wonder, “Has enough time passed?” No more guessing. We’re giving you real-time updates on your Agentforce Data Library build! Now, after you go to the Agentforce Data Library page to create and configure your new library, you’ll see a clear progress indicator. It tells you exactly when the library is building and, most importantly, when the status updates to “Your data library is ready to use!”—so you know you can confidently start testing your agents.

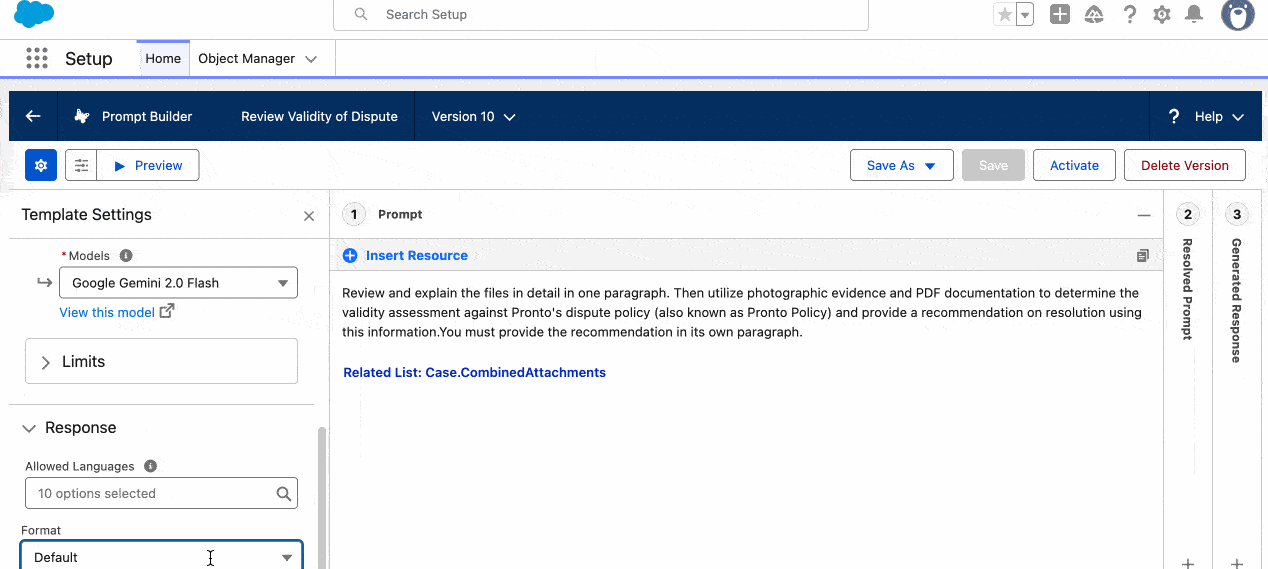
Unlock data in PDFs with Prompt Builder
How much of your organization’s critical information is locked away inside PDF files? Contracts, invoices, resumes . . . What if your AI could read and understand them directly? Now it can, because you can analyze PDF file inputs directly within your prompt templates. This is a huge new capability that lets you work with your unstructured document data like never before. You can ground your prompts with specific PDF files, either by uploading a sample for testing or dynamically pulling a file attached to a record. Imagine a prompt that automatically summarizes an attached contract or extracts key data from an invoice, all declaratively! The builder even previews the PDF right alongside the response, giving you a seamless experience to ensure everything works perfectly.
Watch my Agentforce Decoded video where I show how to use images and PDFs as inputs in prompt templates.
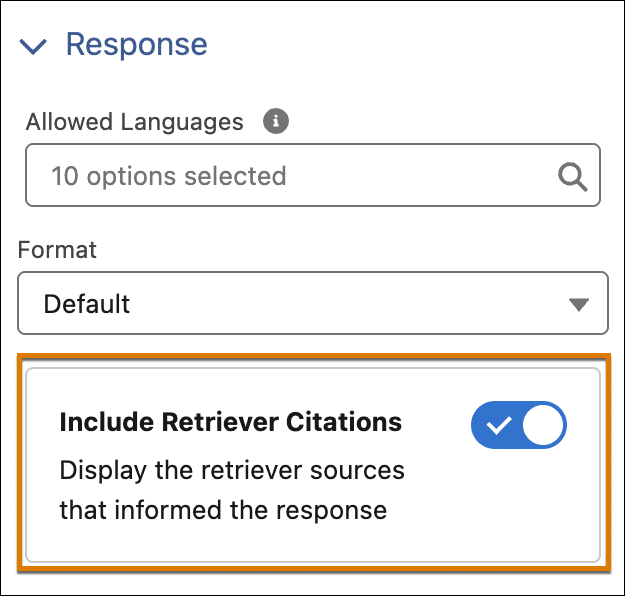
Trust but verify: Add citations to your prompt responses
We’re all building amazing things with AI, but the big question is always, “How can we trust the response? How do we know where it got its information?” Get ready to build more trustworthy AI, because you can now verify sources with citations in your prompt templates. This is a huge leap forward for transparency and explainability. You can configure your prompts to include numbered, clickable links that connect the AI-generated response directly back to the original source knowledge that was used. In Prompt Builder, insert an Einstein Search resource into your prompt template, then go to Template Settings and turn on citations in the Response section. This allows your users to instantly verify the accuracy of the information, building confidence and trust in your AI solutions.
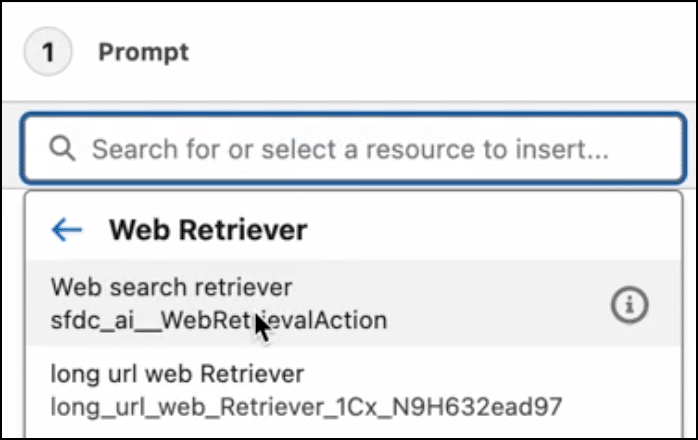
Give your prompts access to the internet
While we know how powerful LLMs are, their knowledge can get stuck in the past. So how do you make your prompts aware of what’s happening on the web right now? Get ready to connect your prompts to the live web, because you can now ground your prompt templates with knowledge from websites using Web Retrievers. This allows you to create more accurate and timely AI content. You can configure a Web Retriever to search only the trusted domains you specify. Then, in Prompt Builder, you simply add this retriever as a resource to your prompt template. When the prompt runs, Einstein first searches your chosen websites for the latest relevant information and then uses that fresh data to ground the AI’s response.
Use structured outputs (JSON and HTML) in your prompts
Have you ever built a prompt that needs to feed data into another system, and became worried that the AI’s freeform response might break your integration? You can now guarantee your output format, because Prompt Builder now supports Structured Outputs. This means you can require your template’s response to be in either JSON or HTML format. When you choose JSON, Prompt Builder even validates the syntax to ensure you get a clean, parseable response every time—perfect for feeding into a flow! On top of that, the preview window automatically renders Markdown and HTML, so what you see is what you get.
Slack enhancements
Create Salesforce channels just by typing
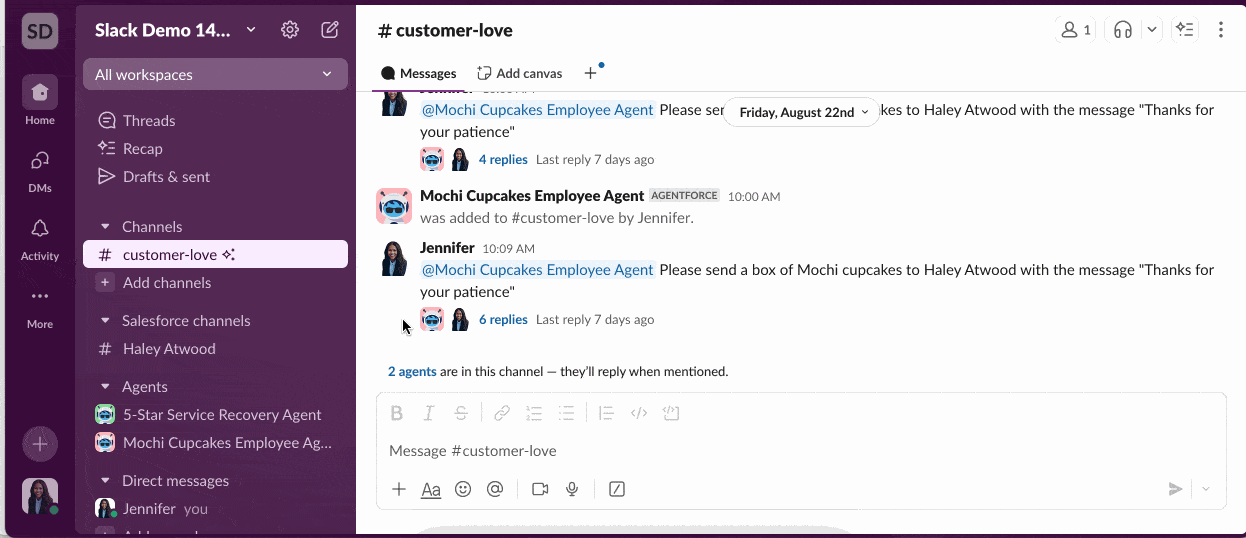
The best tools are the ones that get out of the way and let your users work at the speed of thought. What if creating a Slack channel for a record was as easy as just starting the conversation? That’s exactly what you can do now. It’s super easy to create Salesforce channels. No more searching for a ‘Create Channel’ button. When a user is on a record that doesn’t have an associated channel, they can simply start typing their message in the Slack component, and Salesforce will instantly create the channel for them. Yes, just by typing. It’s a simple change but will have a big impact on driving adoption of Slack integration with Salesforce.
Case management enhancements
Gain deeper insights with role-based reporting for case teams
Admins, have your service managers ever asked, “Who is really working on these cases, and what role are they playing?” With Role-Based Reporting for Case Teams, you can understand the true workload and contribution of their support ecosystem.
Once you start a new report, select Case Team Member Role Mapping as the Report Type. Add the Role as a column. In the Outline tab, in the Columns section, in the “Add column…” search box, type and select Team Role: Name. You can also add other fields you need here, like Case Number or Status.
By adding the new Team Role: Name field to your custom case reports, you can now group, filter, and analyze cases based on the specific role each team member played—whether they were the lead agent, a product expert, or an external partner. This unlocks powerful insights into resource allocation, helping managers see which roles are most in-demand and balance workloads more effectively.
Enhance your case descriptions with Rich Text Formatting (beta)
How many times have your service agents struggled to understand a customer’s issue in plain text, or had to immediately ask, “Can you please send me a screenshot?” Empower your customers to show, not just tell, what their issue is. This is a massive upgrade for your case submission process. By simply checking a box for Rich Text for Case Description (Beta) in your Support Settings in Setup, you’re allowing agents and customers to use bolding and bullet points, and—most importantly—to paste images and media directly into the case description field.
Protect your org with new Email-to-Case guardrails
Here’s an important update for everyone using Email-to-Case! To improve platform health and manage storage usage, Salesforce is introducing a new daily limit of 250 inbound emails per case. This is an automatic change. What this means is that any single case can now receive up to 250 emails within a rolling 24-hour period. For most use cases, you’ll never even notice this limit, but it’s a crucial guardrail to prevent runaway email loops from impacting your org’s performance. The most important thing to know is that if a case does hit this limit, any further emails will fail, and an exception notification will be sent to your Automated Case User. While this is a healthy change for the platform, if you have a specific business process that requires a higher volume, you can contact Salesforce Support to request an increase.
General platform enhancements
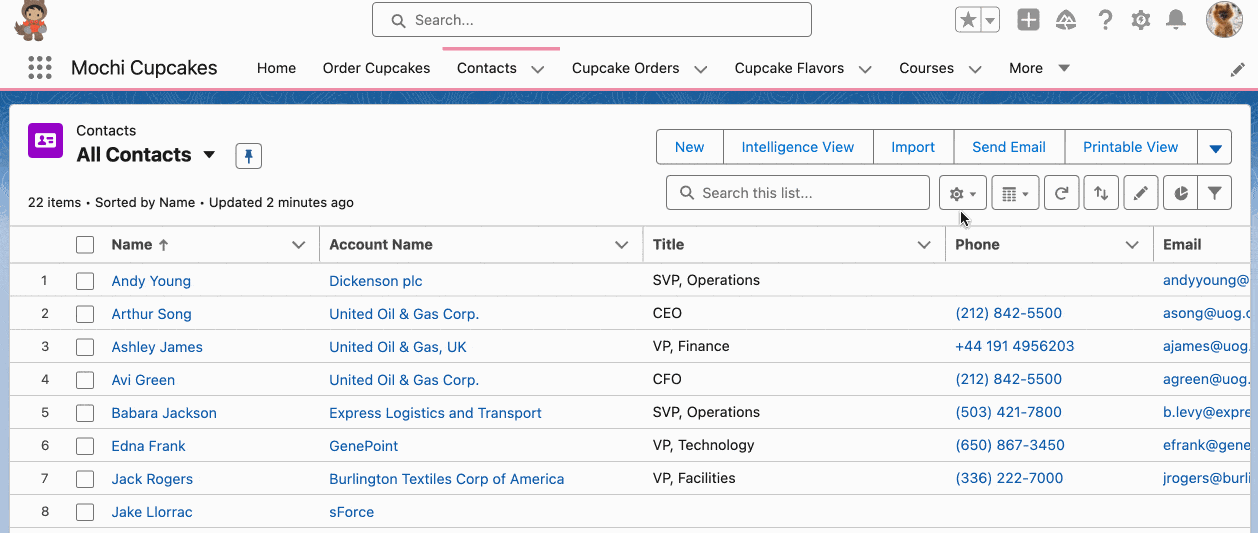
Sort list views using multiple columns (GA)
Sort the data in list views using up to five columns, giving you more sorting power than ever. With the ability to sort in ascending or descending order for each column, your data becomes instantly more actionable. Simply click the Column Sort icon and specify your column sort criteria. Need to return to a single-column sort? Just click the list view controls and select Reset Column Sorting. This update makes it easier to spot trends, prioritize tasks, and quickly answer key business questions—all without needing a report. Multiple column sort only affects your user preferences and can’t be saved as the default. This feature is now GA and includes some changes since the last release.
Check out the List View Multi-Column Sort | Winter ’26 Be Release Ready blog by Product Manager Nate Hossner for more information.
Use the type-ahead search on list view fields to eliminate the endless scroll
Friends, how much of your admin life have you spent scrolling through the Available Fields list, looking for that one specific field buried deep in an object with hundreds of others? Say goodbye to the scroll-and-search struggle! Introducing this amazing quality-of-life update (it’s the little things): type-ahead search is now available when you configure List View fields. When you configure fields from a list view, you can simply click into the field list and type the first letter of the field you need—like “C” for ‘Case Number’—to instantly jump to it. Need to cycle through all the ‘C’ fields? Just keep typing “C”! This simple shortcut drastically speeds up one of our most common tasks, saving you clicks and unnecessary frustration. It’s a small change that delivers a productivity punch.
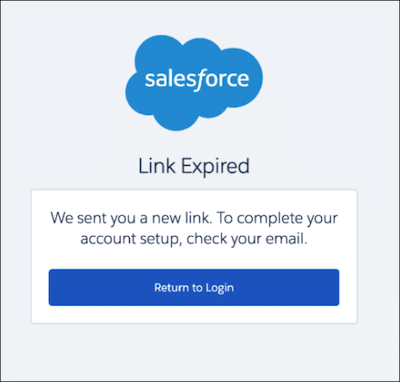
Spend less time assisting users with account setup
Admins, you know that ticket: “I’m a new user, I clicked the link, got distracted, and now I’m stuck in a forgot password loop asking for a security question I never set!” Get ready to see fewer of those in your queue. Starting this October, Salesforce is fixing this frustrating new user setup issue. Now, if a new user clicks their welcome email link but doesn’t finish setting their password, they’re no longer trapped. Instead, they can click that original link again within 7 days, and Salesforce will send them a new link to properly restart the setup process.
This empowers users to self-serve, dramatically improves their first-day experience, and saves you from unnecessary password reset tickets. It’s an awesome win-win that lets you spend less time on basic account help and more time on building!
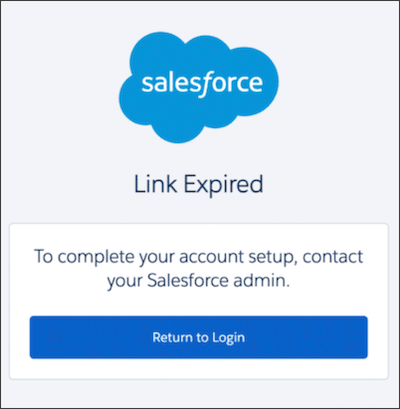
Note: If the user clicks the original link after 7 days, Salesforce displays a page directing the user to contact their admin. At that point, you can send the user a link to set a password and security question.
Reset your password using your email address
What’s more frustrating than a “forgot password” ticket? A “forgot my username AND password” ticket. When a user can’t remember their specific username, they can’t even start the password reset process. And guess what? That ticket lands right in your lap. Beginning in the Winter ’26 release, users can reset their password using just their email address. On the Forgot Password page, they simply click the new Use Your Email Address button which kicks off the process without needing to remember their exact username. This self-service enhancement empowers users to get back into Salesforce on their own, which means fewer login support cases for admins.
User management enhancements
Track user changes with field history on the User object (beta)
The feature admins have been asking, pleading, and dreaming about for years is finally in beta. You can now enable Field History Tracking directly on the User object for your internal users. Let that sink in. No more digging through the Setup Audit Trail to guess who changed a profile or when a user was deactivated. You can track up to 20 fields on a user record and get a reportable history of the old value, the new value, who made the change, and when. What an absolute game-changer for security, compliance, and troubleshooting! Answering “Who changed what on this user record?” just went from a forensic investigation to a quick glance at a related list. Go to—no, RUN to—the User Management Settings page in Setup, enable User Field History Tracking (Beta), and then configure the fields you want to track on the User object’s setup page.
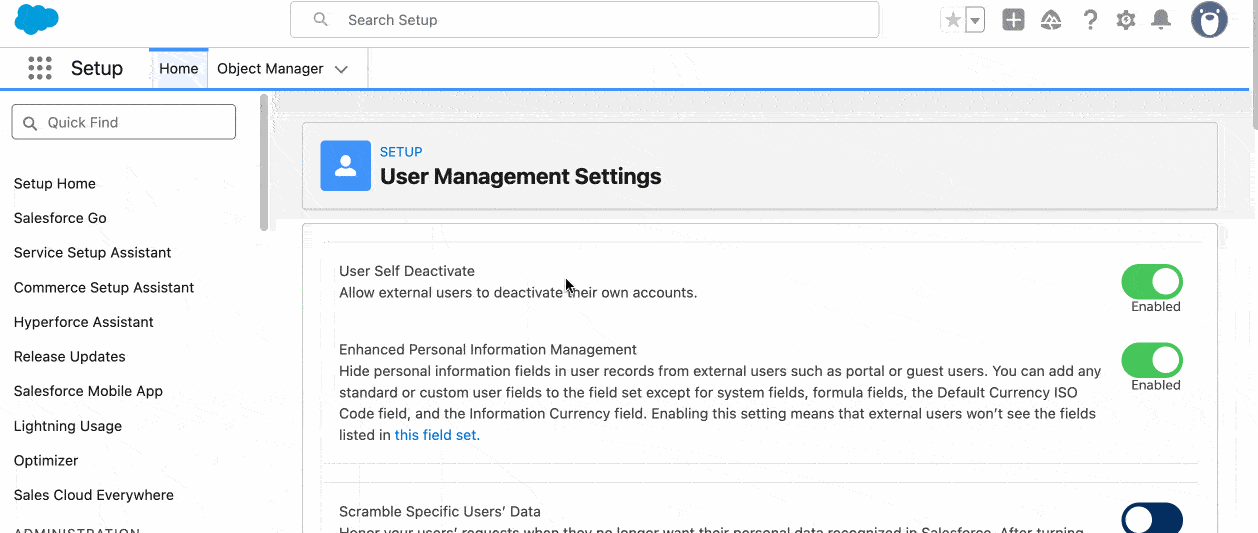
To view the User History, click on the Summary button and scroll down to the bottom to the Field History (Beta) section to see the history tracked field data.
Permission set licenses are removed after unassigning permission sets and permission set groups
Okay, so that title might be a mouthful, but let me tell you what it really means. This is a quality-of-life update we’ve been waiting for! You know that annoying extra step where you remove a permission set or group from a user, but the permission set license stubbornly stays behind, forcing you to go on a second hunt to manually free it up? What if I told you that the second step is finally a thing of the past? We now automatically remove the perm set license for you, as long as the user doesn’t need it for another permission set. What a huge win for efficient license management. No more wasted licenses tied to former users. No more manual admin cleanup for you.
Keep your org running smoothly with sharing recalculations running asynchronously
You know that heart-stopping moment when you make major changes to your role hierarchy, and you click Save and pray that you don’t lock up your entire org? You can breathe a little easier knowing that sharing recalculations may run asynchronously when that approach results in better performance. This means that after that large update to your roles or groups, Salesforce doesn’t grind to a halt while it figures out who can see what. Instead, it intelligently processes the recalculation for things like owner-based sharing rules in the background, keeping your org responsive and your users happy. That’s a huge win for performance and scalability, letting you make necessary org changes without having to schedule any downtime. Added bonus: You can even monitor progress in the Setup Audit Trail. Check out this Help article for more information.
Lightning Reports and Dashboards enhancements
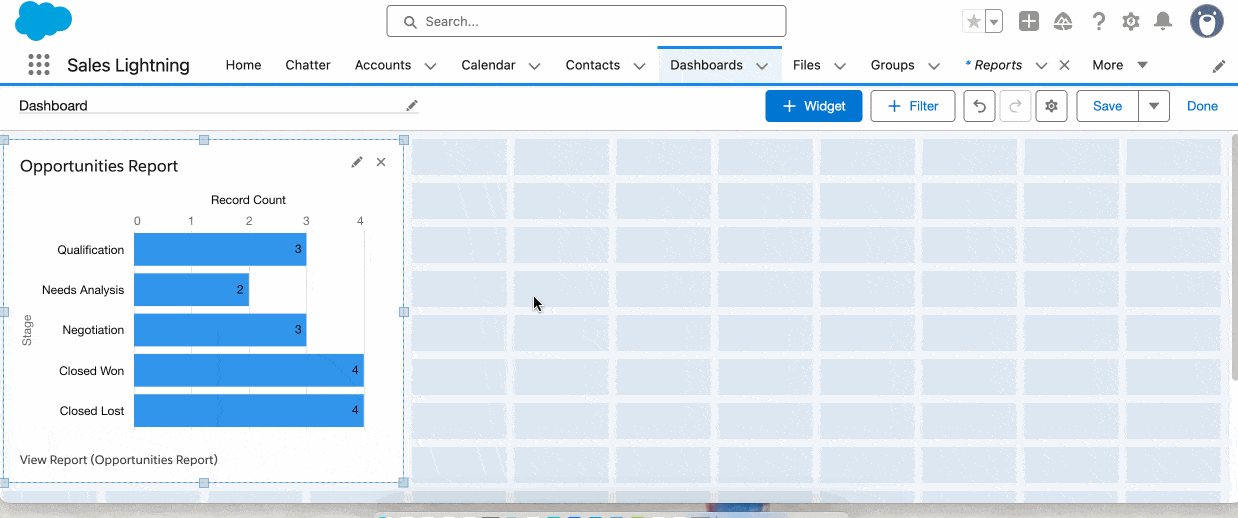
Give your dashboards an upgrade—Say hello to reference lines
How many times have your users squinted at a dashboard, trying to remember what their target was for the quarter or what last year’s average was? Get ready to add a whole new layer of powerful context to your data! You can now add Reference Lines directly to your Lightning Dashboard charts, a feature previously only available in reports. This is a game-changer for quick analysis. Reference lines don’t just about making charts prettier; it’s about empowering your users to immediately identify trends, spot outliers, and evaluate performance without any guesswork. Provide this crucial context right where they work to help them make faster, more data-driven decisions. And the best part? It’s incredibly simple. Just select Show Reference Line and enter the value when adding or editing a chart widget.
Work smarter, not harder using existing report settings for your dashboards
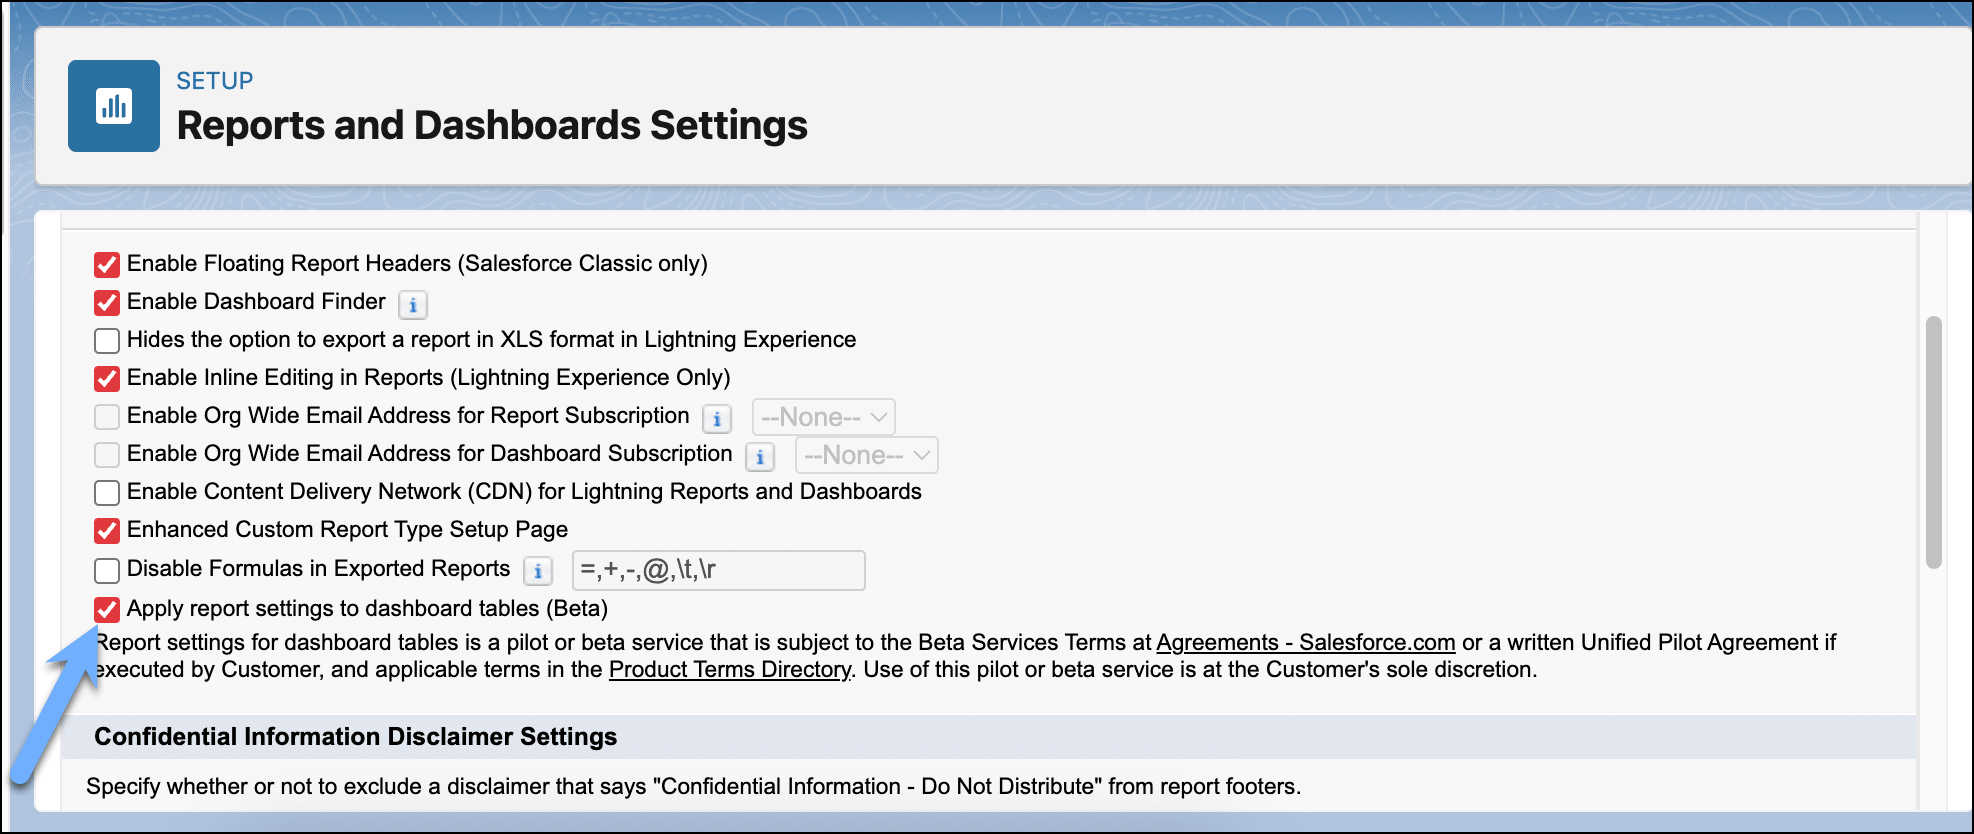
Let’s talk about one of those small but mighty annoyances: perfecting a report with custom formulas and groupings, only to rebuild it all when adding it as a table to a dashboard. Those days are gone. Introducing a new beta feature, Apply report settings to dashboard tables. This feature is a massive time-saver and a huge win for data consistency, because it allows you to simply apply all your report settings—your groupings, formulas, and buckets—directly from the source report. Now you can reduce manual errors and ensure your dashboard perfectly matches the underlying data. To use this beta feature, go to Reports and Dashboards Settings in Setup and enable the new Apply report settings to dashboard tables (Beta) checkbox.
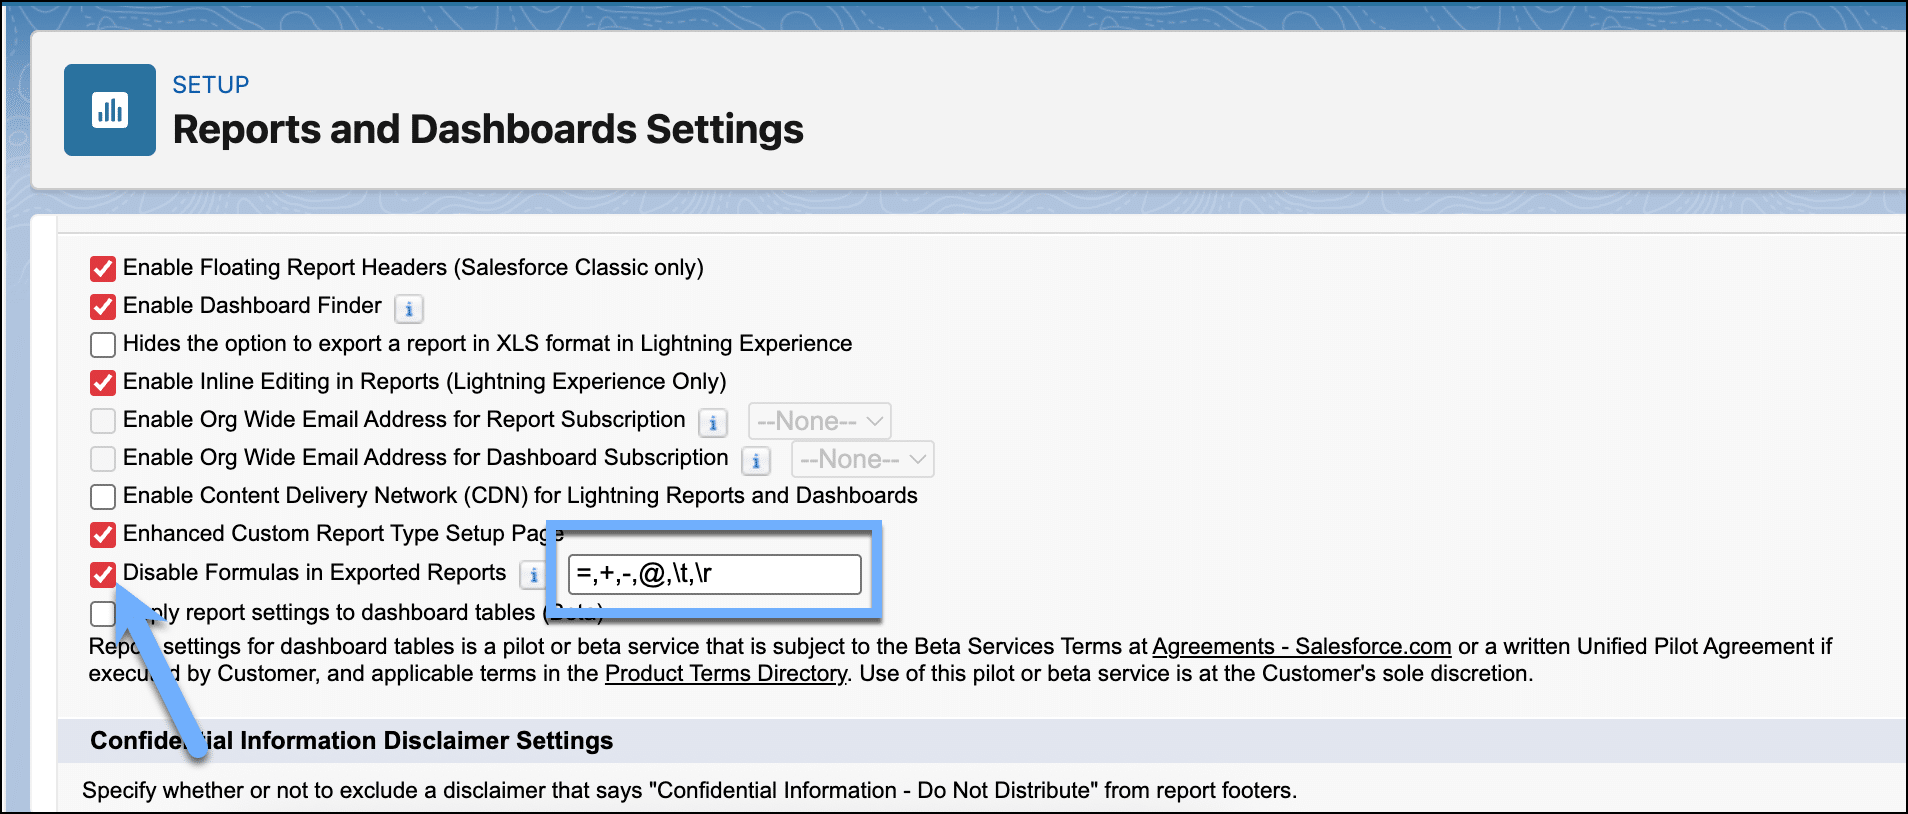
Secure your CSV report exports with this beta security setting
Keep your data safe when you export reports as CSV files. A seemingly innocent text field in a record could contain a value starting with an = or + sign, which, when exported and opened in a spreadsheet, can execute as a malicious formula, putting your users and data at risk. We have a new beta security feature to the rescue: Disable Formulas in Exported Reports. When enabled, Salesforce automatically prepends an apostrophe to any cell value starting with these potentially dangerous characters, forcing spreadsheet programs to treat them as simple text and neutralizing the threat. Protecting your org is incredibly easy. Navigate to Reports and Dashboards Settings in Setup, check the box for Disable Formulas in Exported Reports (Beta), and gain more peace of mind.
General Setup enhancements
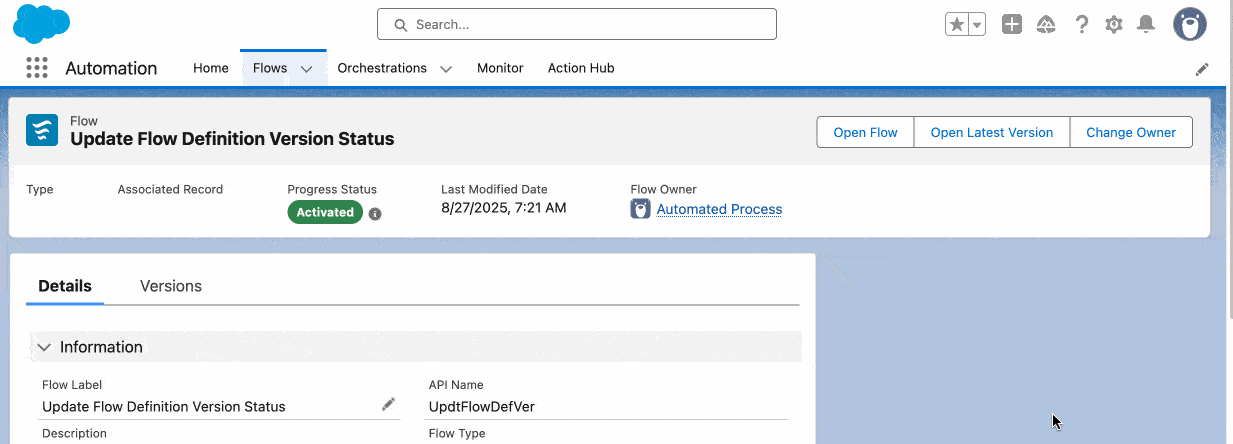
Take control of your flow default record pages in Lightning App Builder
With this release, you can now configure the Flow default record pages directly in the Lightning App Builder that is used in the Automation App. Create custom record pages for them just like you would for an Account or Contact. The new layout is cleaner and more standardized. For example, the Versions tab now lists versions of the selected flow instead of showing it in the Related tab. The real power comes from making it your own, and it’s easy to do. To customize the new page, head to the Lightning App Builder and create a new Record Page for the Flow object. In the template selection window, click the CLONE SALESFORCE DEFAULT PAGE tab and select the Flow Page Default. This gives you a perfect copy of the new layout that you can edit, add, or remove components from, and then save as your new standard.
Monitor and troubleshoot your orchestration runs in Lightning App Builder
Ever feel like your Flow Orchestrations are a bit of a black box after you launch them? This won’t be the case anymore when you add the new Orchestration Run Details component to your Orchestration Run page in Lightning App Builder. Simply drag this component onto your Orchestration Run page to create a real-time, centralized view of every stage and step. You and your users can now instantly see the status of each step, who it’s assigned to, and when it was completed, all in one clean interface. No more digging through related lists or logs to figure out where a process got stuck. This component provides the at-a-glance insights needed to monitor and troubleshoot your most important automations with total confidence.
Flow Builder enhancements
Let generative AI build Decision elements in your flows
For years we’ve been stuck building our flow Decisions based on structured data, like neat, tidy picklists. But what happens when the most important information is buried in the messy, unstructured text of an email body or a description field? We’ve all tried to solve this with giant, brittle formulas or by just routing everything to a human for triage. Well, those days are over. Say hello to AI-powered Decision elements in Flow. This incredible feature lets your automations read and understand unstructured text just like a person would. Instead of checking for a dozen keywords, you can now create an outcome and describe it in plain English, like “Use this path if the customer seems upset.” Einstein will then analyze the text, understand the actual sentiment and intent, and intelligently route the flow. This is a massive leap forward, allowing you to finally automate those complex, nuanced processes that have always required human judgment. It’s time to build brilliant flows that work with your data as it truly is!
Simply add a Decision element and provide the label, API name, and description. Select Let AI Determine Conditions. In the Decision instructions, describe the Decision. For each outcome, provide the outcome label, outcome API name, and description of when to execute the outcome. When you use AI, the order of your outcomes doesn’t matter. Generative AI will determine which outcome path to execute at run time.

Note: This feature is available in Enterprise, Performance, and Unlimited Editions with the Einstein for Sales, Einstein for Service, or Einstein Platform add-on.
Find your Flow resources lightning fast
Say goodbye to endless scrolling in the Flow Resource Picker. We’ve streamlined the experience by making it context-aware, dynamically filtering the list to only show compatible resources that are relevant at that exact point in your flow. This brilliant update cuts the clutter and prevents errors, letting you build with more speed and confidence.
Here’s what you can expect to see from this quality-of-life enhancement.
- Only element resources that have run and have a value at that point in your flow will be shown.
- Salesforce will hide any resources that do not have compatible data types. Related records and other parent resources appear and can be clicked into only if their child resources are the correct data type.
- The Current Item from Loop resources are only available for selection within their associated loop.
- The Flow Formula Builder found in the Start element of a record-triggered flow now uses the updated resource menu. (Note: To view the resource menu in the Flow Formula Builder, select Formula Evaluates to True for Condition Requirements. Then insert a resource for Formula.)
- The Wait For Conditions element also now uses the updated resource menu.
The Expand Search feature within the Resource Picker is GA and offers the following benefits.
- Get more relevant search results, with whole word or word beginning matches appearing first.
- The API name and parent resource are now available with each search result by hovering on the resource. No more guessing when you have similarly named resources.
- Information window placement no longer obstructs search results.
Check out this video to see this in action.
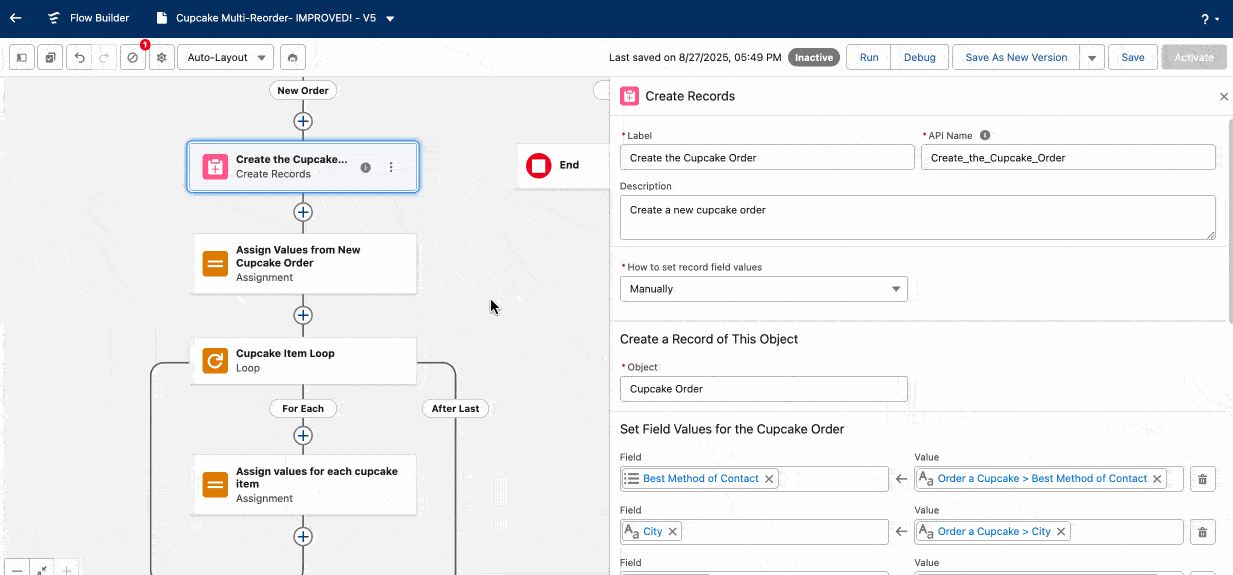
Say goodbye to that extra Get Records element to get data from your new record
Let’s talk about the most famous duo in Flow Builder: a Create Records element followed immediately by a Get Records element to retrieve the data you literally just created. We’ve all done it. I know I have many times. It’s time to break up the duo because with this release, you can use fields from a newly created record immediately in your flow! The Create Records element now automatically outputs the entire record as a resource, so you can reference the newly created ID or any other field in that record in the very next step. I’m so excited for this. One less flow element needed, making the way for simpler, cleaner flows. For your existing flows (API version 64 or earlier), save them in the new version, and update your references to point to the specific field from the new automatic output.
Get related records across all levels with nested loops (beta)
That title might sound technical, but let me translate: The days of fearing the “Get Records in a loop” error are over. We can solve for those complex, multi-level data structures, such as finding every case for every contact on an account, declaratively. With this beta feature, you can use a single Get Records element to retrieve a parent record, all of its children, AND all of their children in one efficient query.
First, to get the related records, select a collection or single object, such as the Account, in a Get Records element, and select Also add related records (beta). Then, add child objects such as contacts and cases, and link them to the Account object. Use nested loop elements to access more than one level of related records, and for the collection variable, select the Get Record element’s collection of related contacts.
Add a loop within the first loop. For the second loop’s collection variable, select the current item from the first loop, such as the related contacts, and then select the related cases.
Generate flows with greater accuracy with Einstein for Flow’s generation product (beta)
A smarter, more powerful beta version of Einstein for Flow is here for our record-triggered and schedule-triggered flows. This new version is a true game-changer, designed to understand your business needs with much greater precision by intelligently breaking down your instructions into specific sub-tasks for the AI. What does this mean for us admins? More accurate flows right from the start, with far fewer manual tweaks needed to get them perfect. Yes, please!
And the good news doesn’t stop here. In the next release, our Flow team is hard at work bringing these same improvements to screen flows and other autolaunched flows when the feature becomes GA, along with the ability to conversationally modify a flow after it’s been created.
Check out this video to see this tool in action.
Flow debugging enhancements
Debug your flows faster with a redesigned experience
Get ready for a much more streamlined troubleshooting experience, because the Flow Builder debug experience has been redesigned! Instead of a limited workspace debugging area, your debug setup and results now live in a slick, resizable side panel right next to your canvas. This is a game-changer for troubleshooting.
You can see your setup, your flow, and your results all in one unified view. Just click Debug on the flow canvas to open the new resizable side panel. You’ll use the Setup tab to configure your run, and after it’s complete, the results will appear as cards in the Details tab. And here’s the best part for quickly finding issues: On any result card, just use the dropdown menu and select View on Canvas to instantly jump to that specific element in your flow. No more hunting and pecking! It’s a more efficient, precise, and, frankly, enjoyable way to debug.
Troubleshoot your screen flows with the updated debugger
We were all thrilled with the new side-panel debugger for our autolaunched flows, but I know we were all asking, “What about screen flows?” Don’t worry, because that same unified debugging experience has now come to screen flows. Now, as you debug, you can see the detailed run information in the side panel while easily switching between the live user screen and the flow canvas using simple tabs.

Imagine clicking through your screens as a user would and watching the debug details update in real time, all without losing the context of your flow design. This makes inspecting screen components and identifying issues faster and more intuitive than ever.
Flow Management enhancements
Compare flow versions to track changes more efficiently
Flow builders, how many times have you played a stressful game of ‘spot the difference’ between two flow versions, or worse, tried to decipher XML just to see what changed? I can totally relate. I put on my XML inspector hat back in the day when I was an admin. Those days are officially over! You can now compare any two flow versions to track changes more efficiently, right from the setup menu. THANK YOU, Flow team! This is a win for troubleshooting, change management, and auditing your automations. Getting started is simple: When you’re in a flow, open the version dropdown and select Compare Versions. You then pick the two versions you want to compare and click Compare Versions, and Salesforce instantly shows you a summary of everything that’s been added, deleted, or changed. You can even click View Details on any specific item to see the exact before-and-after values. Share URLs to flow comparison results or use them to access specific comparisons.
Note: Currently, screen flows and the Transform element are not supported but on the future roadmap #ForwardLookingStatement.
Check out the LinkedIn post from the Flow PM herself, Aleksandra Radovanovic. Give her 👏 and 🙌 for her first major feature as a Flow PM.
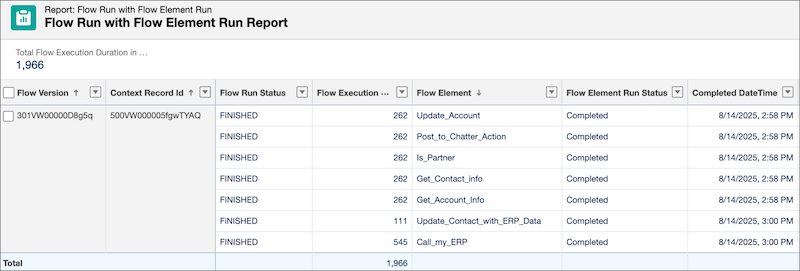
Get deeper insights with enhanced persistent logging for flows
Want a detailed, step-by-step history of what your record-triggered flow did last night? Troubleshooting asynchronous automation can feel like working in the dark, but it’s time to turn on the lights. Persistent logging now supports more flow types and provides enhanced, element-level details for a new level of visibility. Previously, persistent logging information was available for overall flow executions but at a high level. You can now get a persistent log of every single element that executed in your record-triggered and platform event-triggered flows, which is a game-changer for auditing and debugging.
To get started, do a one-time org setup by going to a flow’s advanced properties and click Set Up Persistent Logging for this Org. After that’s complete, you can enable it for any specific flow by checking the Enable persistent logging for this flow box.
You can then dig into the data in the Data Cloud app’s Data Explorer or—my favorite part—build standard Salesforce reports on the new FlowRun and FlowElementRun report types to prove which actions your flow took. Think of the Flow Run with Flow Element Run report as a detailed receipt for your automation. It shows a clear, element-by-element history of a flow’s journey, making it perfect for tracing the exact path it took. Furthermore, this report can be used as official evidence for compliance audits, confirming that crucial steps, like a successful callout to an external system, actually occurred.
Screen flow enhancements
Build Data Tables that update automatically to reflect field and language changes in screen flows
Admins, have you ever changed a field’s API name and held your breath wondering which screen flow you just broke? Or have you struggled to make your Data Tables truly multi-language? Breathe a sigh of relief, my friends. Data Table screen components now automatically update after field or language changes. When you update a field label or API name, or make user or org language changes, you no longer have to manually fix every flow that uses it to remove those dreaded runtime errors. The field API name will be updated in the Data Table component when you review the configured column. You’ll see the updated field name when you go to run or debug the screen with the data table, but the new field name is not reflected in the existing data table. However, if you remove and add the field back in as a column, the change will be reflected in the Screen element. To make use of this new enhancement, make sure your flows are running on API versions 65 or later.
Protect fields used in Data Tables in screen flows from being deleted
As admins, we’ve all had that moment of panic: An important screen flow is broken, and you realize the root cause is that a field you referenced in your Data Table was deleted. Rest easier. Salesforce has built us a fantastic new safety net. For flows running in API version 65 or later, you cannot delete a field that’s being used in a Data Table component. If you try to delete a field that a Data Table relies on, the deletion will fail, and—here’s the best part—the error message will give you a direct link to the exact flow that’s using it. No more panicked searching to find the source of the problem! This proactive check protects your flows from failures due to fields deletions and makes org maintenance safer and less stressful.
![Salesforce will not allow you to delete a field referenced in a data table in a screen flow.]](https://d3nqfz2gm66yqg.cloudfront.net/images/20250911104033/DeleteFieldinDataTable.gif)
Ensure your flow images survive deployment (beta)
We’ve all been there. You spend hours perfecting a beautiful screen flow in your sandbox. When you deploy your flow masterpiece to production, all your images are broken. What a deployment nightmare! Say goodbye to those post-deployment fixes, because you can add images to your Display Text components directly from Static Resources (beta). Unlike Salesforce Files, where you referenced your flow images previously (that are data and therefore not deployable), Static Resources are metadata that can be packaged and deployed right alongside your flow. Using Static Resources, your logos, diagrams, and instructional images will deploy with your flow from sandbox to production every single time.
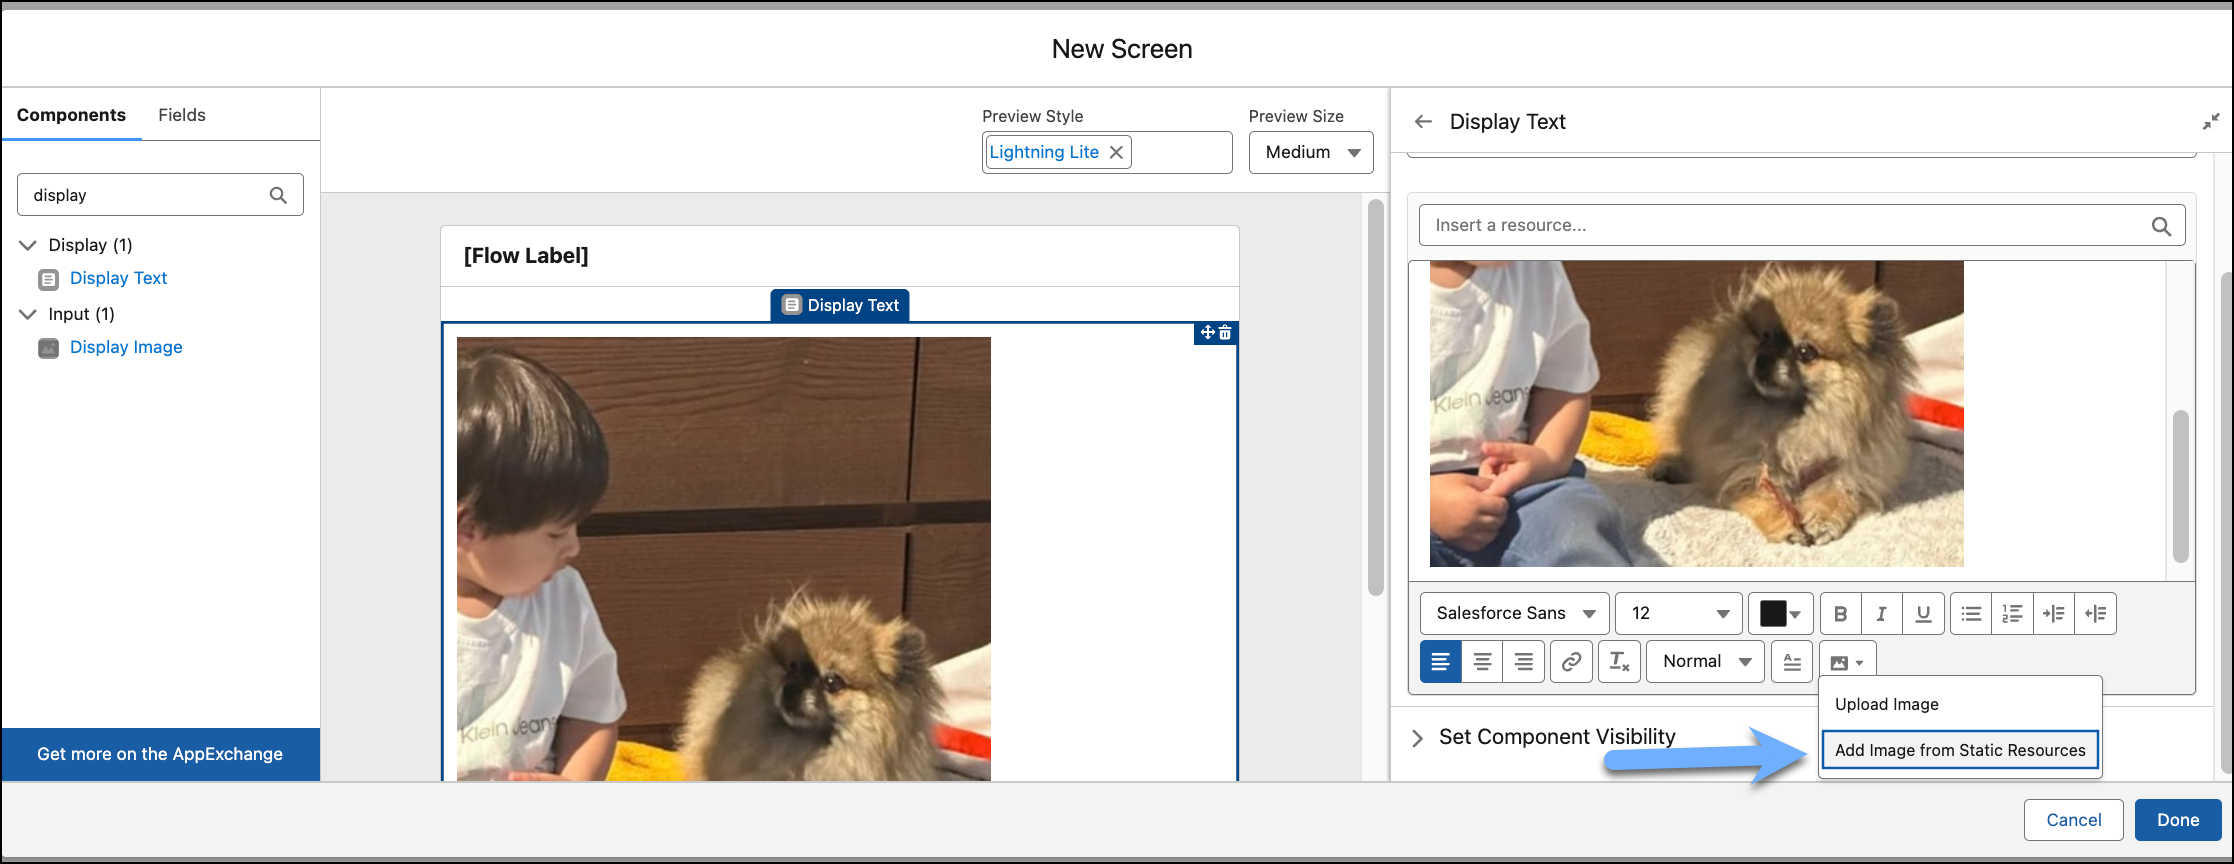
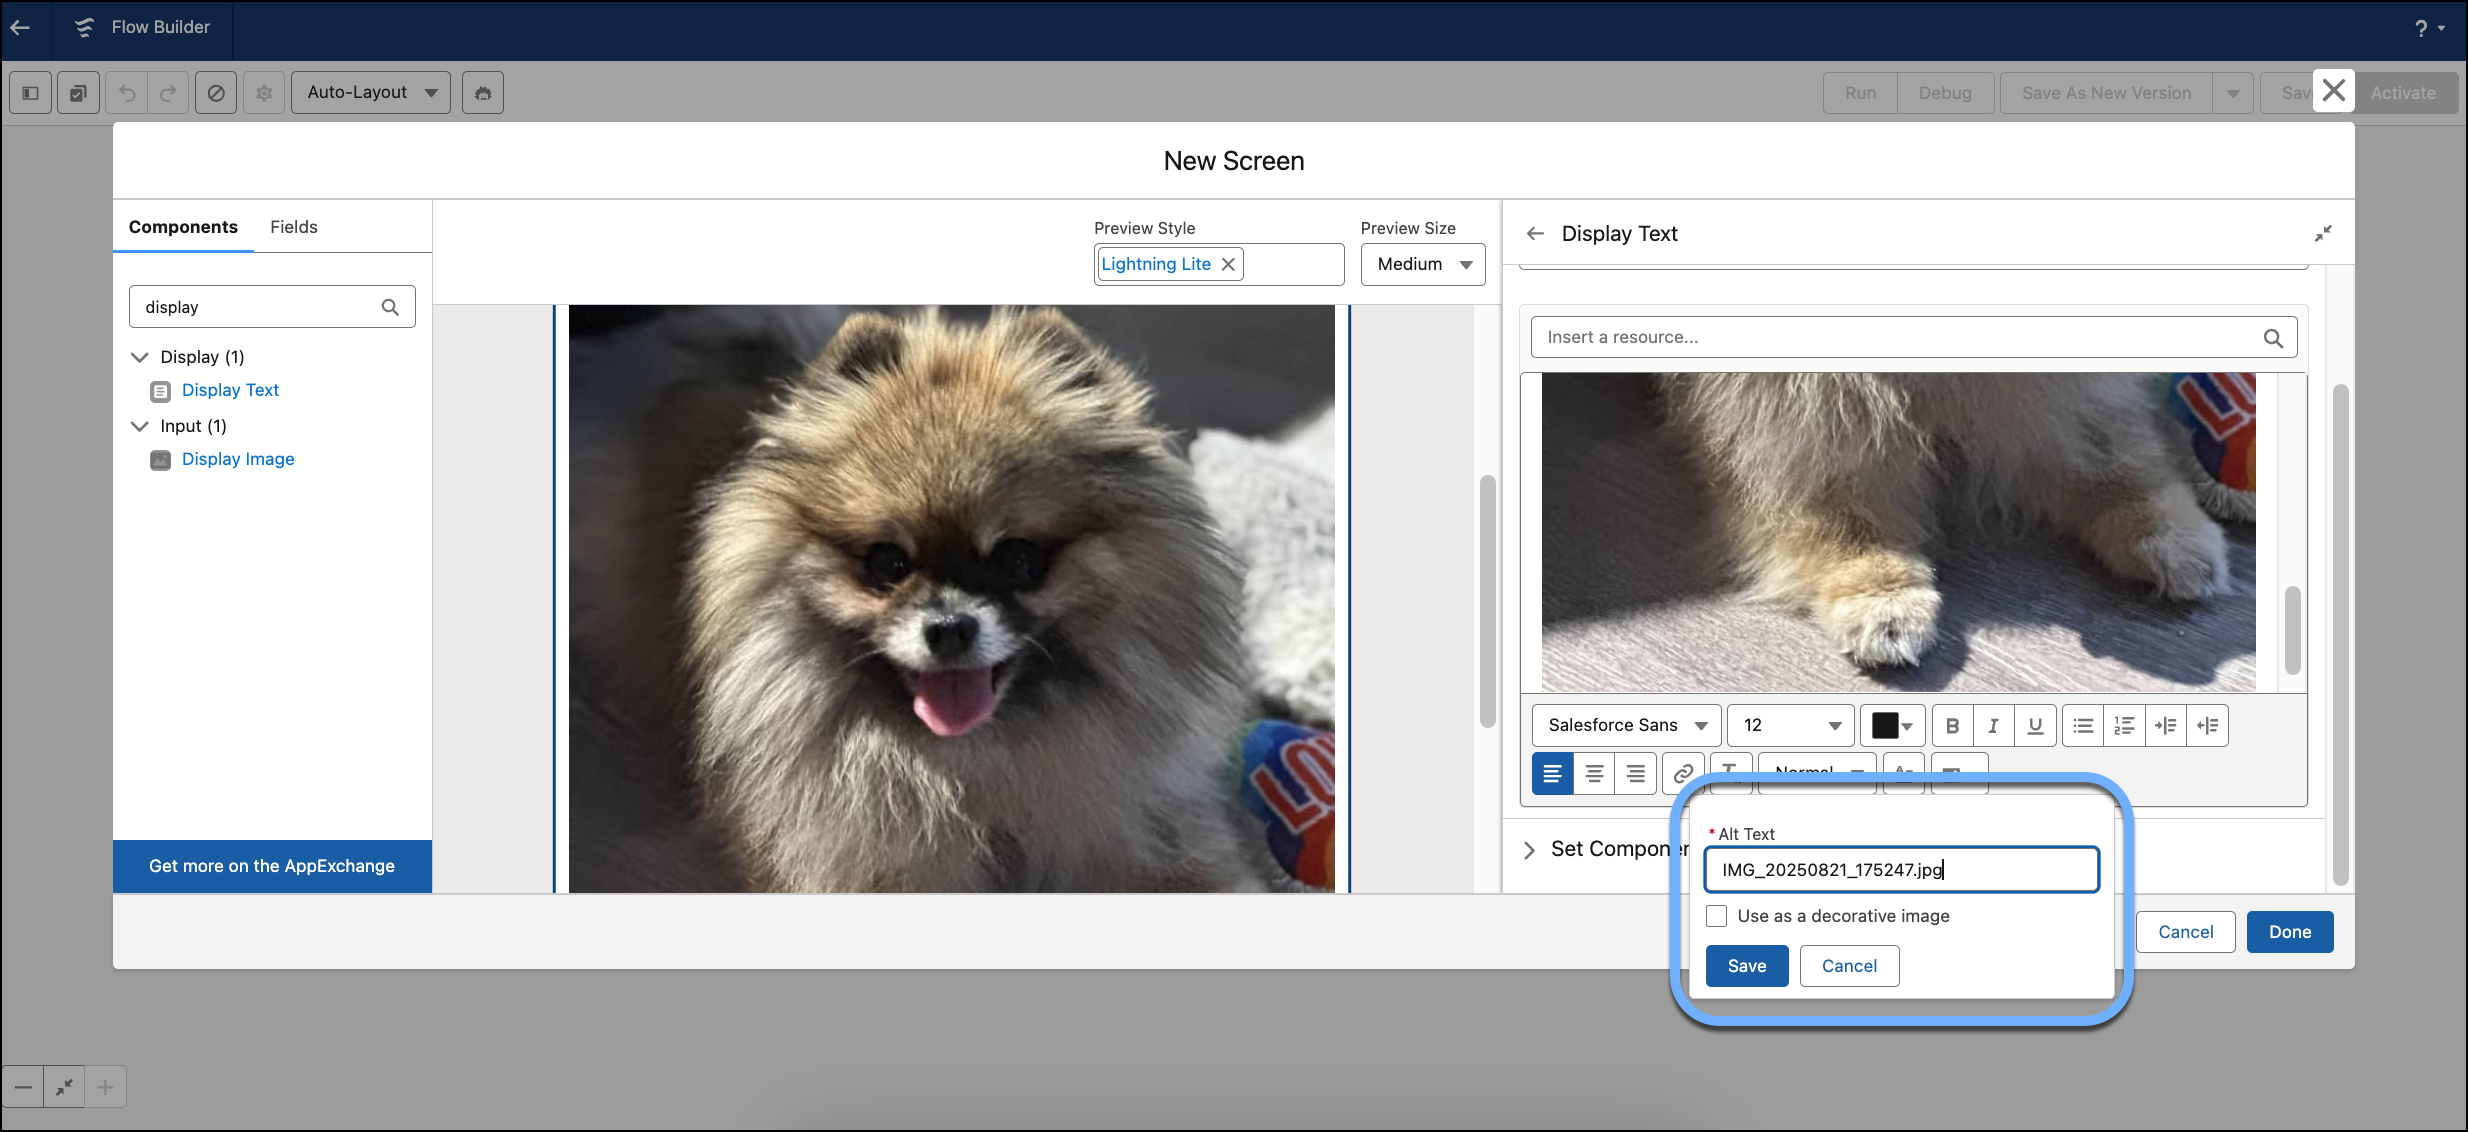
Make images in flows more accessible with alt text
Make your important logos and instructional images in your screen flows accessible to users with visual impairment. You can now easily add alternative text, or alt text, to images in your Display Text components. Alt text is a short description that screen readers announce to users, explaining the meaning of an image so even though they can’t see it, they know what the image is about. Mark images that are purely decorative as such so screen readers can skip them entirely. This isn’t just about compliance—it’s about being a great admin who builds for all users.
Preview your screen flows with Lightning or Experience Cloud site branding
You know the design drill: You build a beautiful screen flow, but to see how it actually looks with your company’s branding, you have to save, activate, drop it on a page, and refresh. Now, you can preview your screen flows with Lightning or your Aura or LWR Experience Cloud branding applied, right inside Flow Builder! With the new ‘Preview Style’ feature in the Screen element, you can select your org’s theme or a specific Experience Cloud site’s style and instantly see how your screen will render for end users. This massive time-saver allows you to create a polished and cohesive user experience, ensuring your flows look amazing.

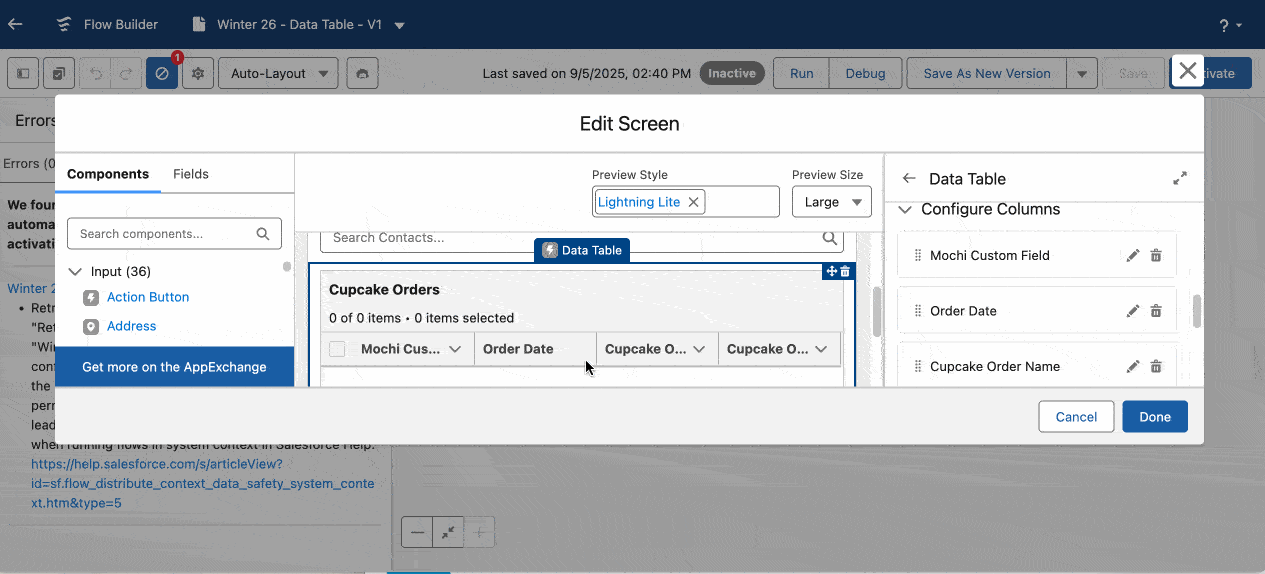
Display complex data in your screen flow data tables using Apex-defined collections
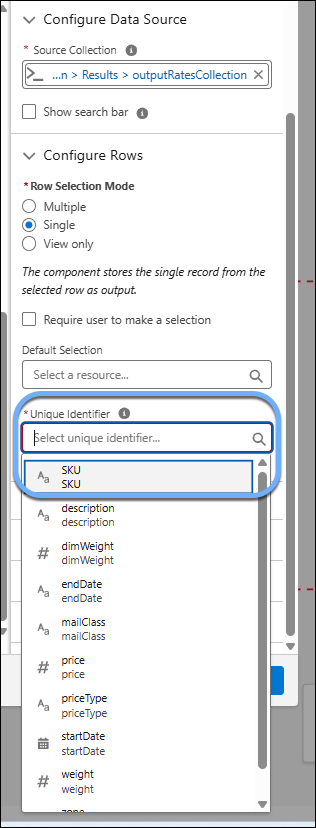
Ever had a collection of complex data that use Apex-defined types such as MuleSoft connector actions or external data types that you want to display in a Data Table in your screen flow, but couldn’t because it wasn’t a standard object? That limitation is now gone, because Data Tables in screen flows now support Apex-defined collections. This is a big win for declaratively displaying complex or external data. Now, you can take the output of an Apex action—like a list of results from an external API—and wire it directly up to a Data Table’s Source Collection.
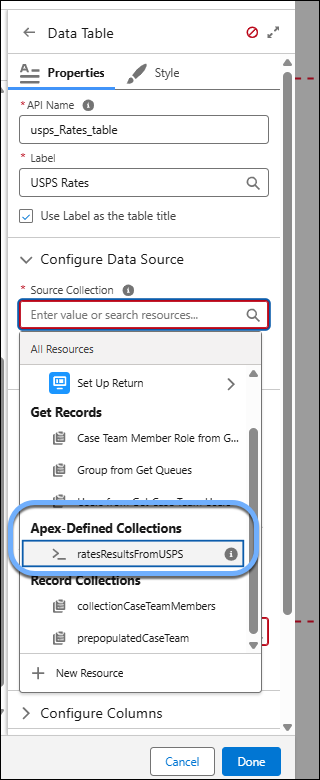
The key is to make sure you select a truly unique field from your data structure for the Unique Identifier to ensure row selection works perfectly. This means you may no longer need a custom Lightning web component just to show your data in a table format. It’s all about empowering you to build richer screens with clicks, not code.
Flow Action enhancements
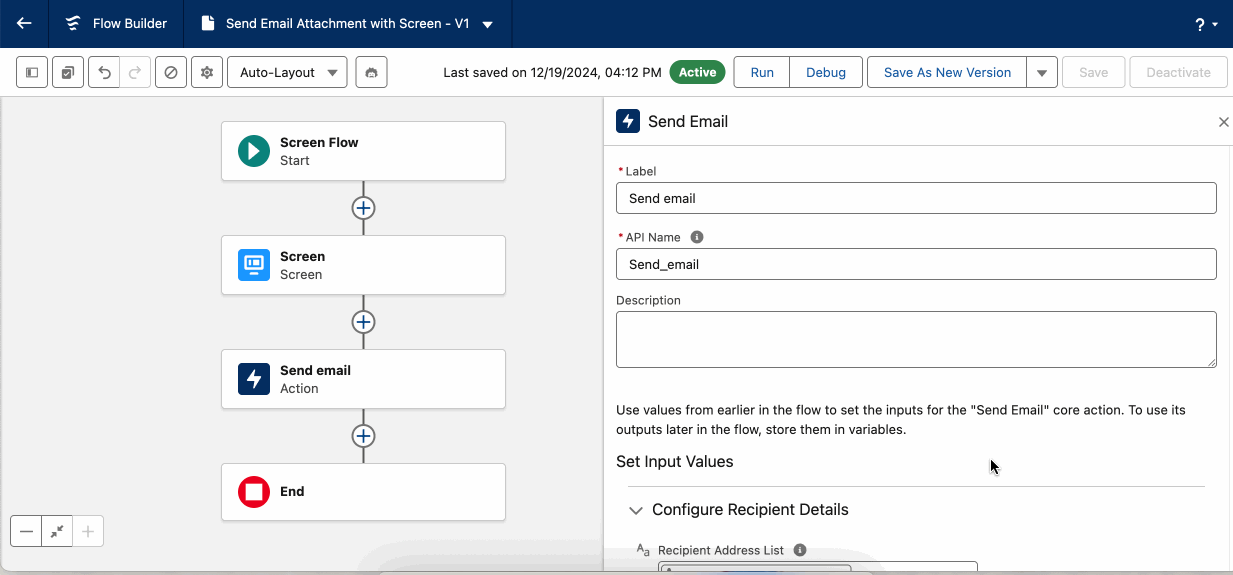
Send emails from flow more easily with a streamlined recipient field
We’ve streamlined the Send Email action to combine both email address collections and individual email addresses in one field. Now, for your To, CC, and BCC recipients, there’s just one smart multi-select field where you can add both your text collection variable and individual email addresses together. No more trying to figure out which box does what—it’s a cleaner, more intuitive layout that makes building dynamic recipient lists a breeze. To use this feature, you must select action version 2.0.1 in your Send Email action.
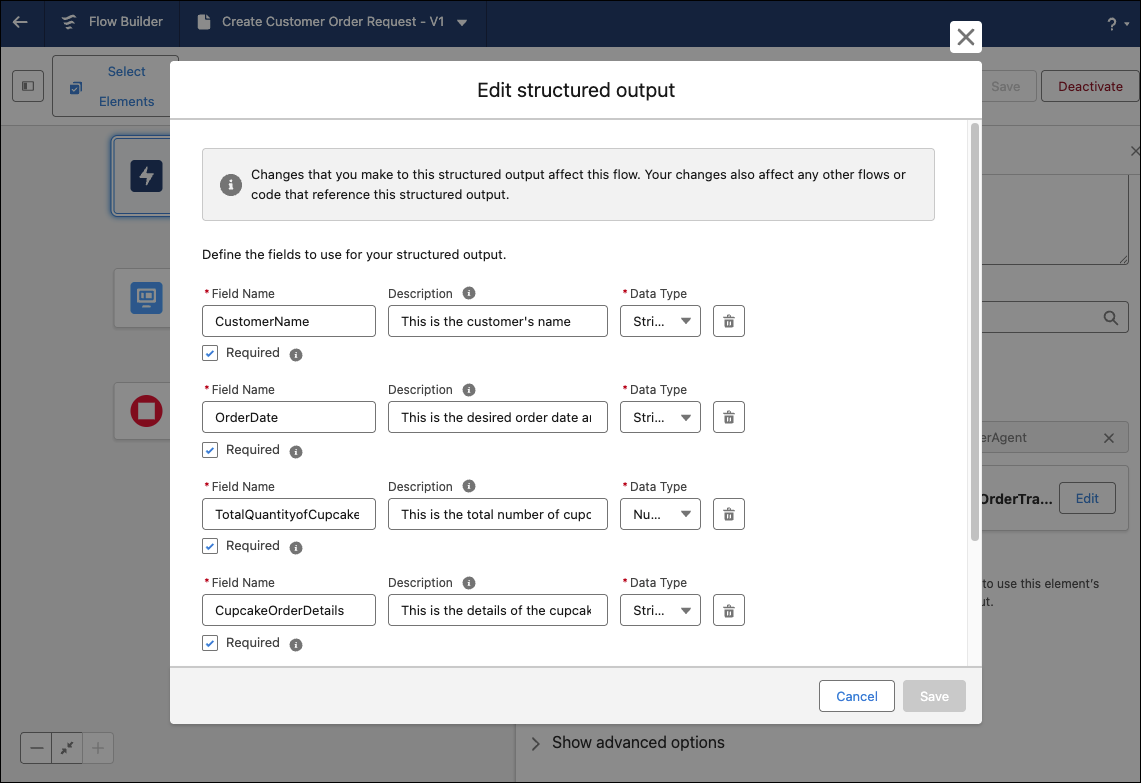
Make your custom agent actions in flow smarter with structured outputs
We’re excited about what AI can do, but getting a block of text back from an AI agent is one thing. Making that text truly usable in the rest of your flow can be a real challenge. What if I told you that’s no longer a challenge because you can now define structured outputs from your custom agent actions in Flow! Now, instead of getting a paragraph of text back and trying to parse it with formulas, you can define the exact ‘shape’ of the data you expect the AI to return, complete with specific fields and data types. For example, ask AI to summarize a case and have it return a structured response with clean outputs for ‘Sentiment’, ‘Urgency’, and ‘Next Best Action’. You can then immediately use this predictable data in decisions and record updates. It’s all about turning unstructured AI insights into structured, actionable results for your flows.
Note: If you configure structured output for a custom agent action, the Agent Response for that action element returns null. For custom agent actions with no configured structured output, the custom agent returns text for the Agent Response output.
To configure structured output for an existing custom agent action, in the Action properties panel, expand Show advanced options, and then for Action Version, select 1.1.0.
And configuring it is incredibly straightforward. In the Action element, you first describe in natural language what you want the AI to do in the Agent Request.
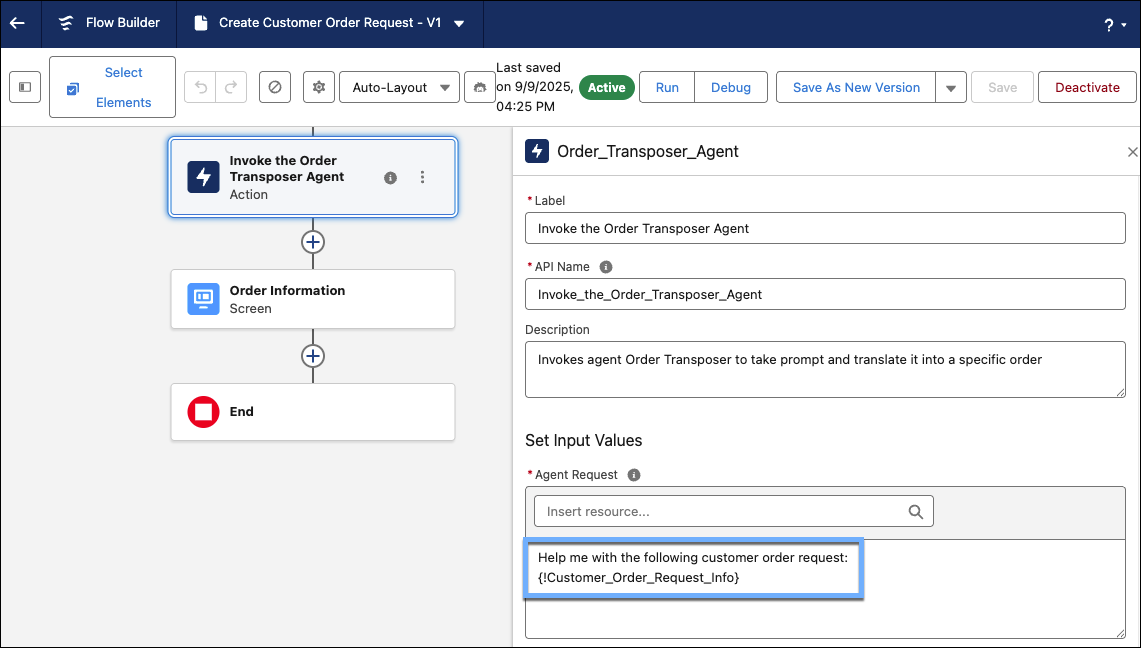
Then, in the Configure Structured Output section, click Configure and simply define each field you want back—giving it a name, a data type, and an optional description to guide the AI.
Once saved, you can use your new structured data later in the flow by selecting the action’s output, choosing Structured Agent Response, and picking the exact field you need.
Note: Required add-on licenses vary by agent type. Talk to your account executive for more information.
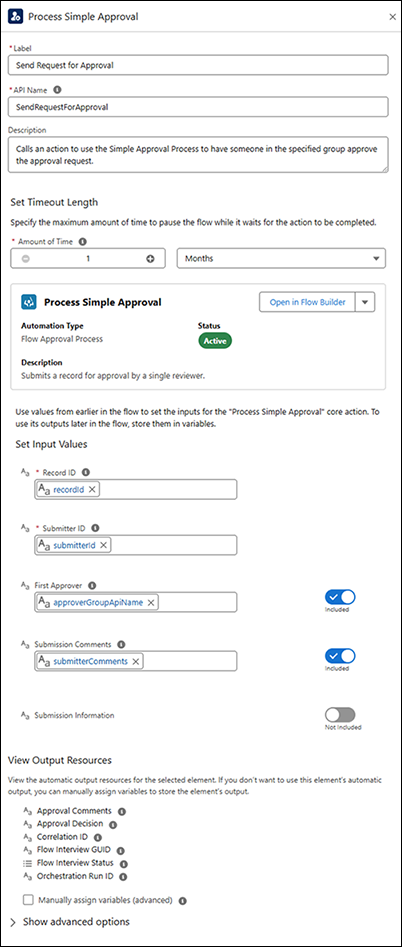
Leverage the enhanced Request an Approval action in flow
Have you ever built a flow-based approval process and wished you could just send it to a queue or group instead of a single user? Now you can with the enhanced Request an Approval action. Assign the first approver to a user, a public group, or a queue as the firstApprover input variable directly in the action—no more complex workarounds to get approvals in front of the right team. On top of that, the action itself is now more intuitive, using labels instead of API names. And by making the Record ID and Submitter ID required fields, this will help prevent configuration errors before they happen.
Flow approval process enhancements
Troubleshoot flow approval processes in Flow Builder
How can you be 100% confident your flow approval processes will work as expected before you deploy them? Now you can thoroughly troubleshoot your flow approval processes right in the Flow Builder debugger. To test your approval flow, click Debug and leave Run automation in rollback mode selected. The orchestration run for this approval process doesn’t run any asynchronous steps. You’ll then be able to Manually Set Output Values for any asynchronous steps, allowing you to simulate their results without making any real changes. When you’re ready for a live test (that is, debug and make changes to your Salesforce data), you can deselect rollback mode, and the debugger will smartly assign all approval work items to you, the running user (automatically overriding all approval work item assignees), so you can test the entire end-to-end process yourself. All changes to your Salesforce data are permanent.
Delegate approval process creation with confidence
Want to empower your business experts to build their own approval processes, but are hesitant to give them the all-powerful Manage Flow permission? Delegate with confidence. Users can manage autolaunched flow approval processes without needing full Flow admin rights. This is a huge win for governance and security. By combining the new Approval Designer and View Orchestration in Automation App permissions, grant users the ability to create and edit flow approval processes safely. When they’re finished building, they won’t see an Activate button; instead, they’ll see a new Submit for Activation button. This creates a perfect separation of duties where your business experts can design the process, and you, the admin, can perform the final review and activation. It’s all about empowering your team while maintaining control of your org’s automations.
Manage activations for flow approval processes
So we’ve seen how we can now safely delegate the creation of flow approval processes. But what does that handoff for activation actually look like? Let’s talk about how to manage activations for Flow Approval Processes. This is a clear, trackable change management process. When your business user is ready, they click Submit for Activation and are prompted to select a designated user (like you!) with Manage Flow permissions to be the reviewer. This updates the flow’s status to ‘Under Review’, giving everyone clear visibility. If the builder has second thoughts or needs to make a change, they can simply Recall Activation Request. As the reviewer, you get to make the final call to either activate the flow or return it to a draft. It’s a fantastic built-in process that provides the governance and control we need to safely scale our automation development across the business.
Use one resource to rule them all: A smarter way to assign approvers in Flow
Assigning approvers just got a whole lot smarter with the new Resource assignee type. Instead of separate options for user, group, and queue resources, there’s now just one flexible ‘Resource’ option. This simplification lets you use a single text variable in your flow to hold the ID of a user, a group, or a queue. At runtime, Salesforce will figure out what kind of assignee it is and route the approval correctly, which means you can build much more dynamic approval processes with less clutter on your canvas. To use it, simply select Resource as the Approver Type in your approval step, and then select the text resource that will hold your assignee.
Break down the silos—Trigger approvals from external systems
Do you have a critical business process that starts outside of Salesforce, such as an updated sales order in NetSuite or a new employee in Workday, which requires approval in Salesforce? Using a third party connector as a trigger for an External System Change-Triggered Flow approval process, you can now connect those dots seamlessly. This is a massive step toward true end-to-end automation. Powered by the MuleSoft for Flow add-on, you can build a new type of flow that listens for changes in a connected system. When a relevant event occurs, like that sales order update, it can automatically kick off your approval process in Salesforce.
Flow Orchestration enhancements
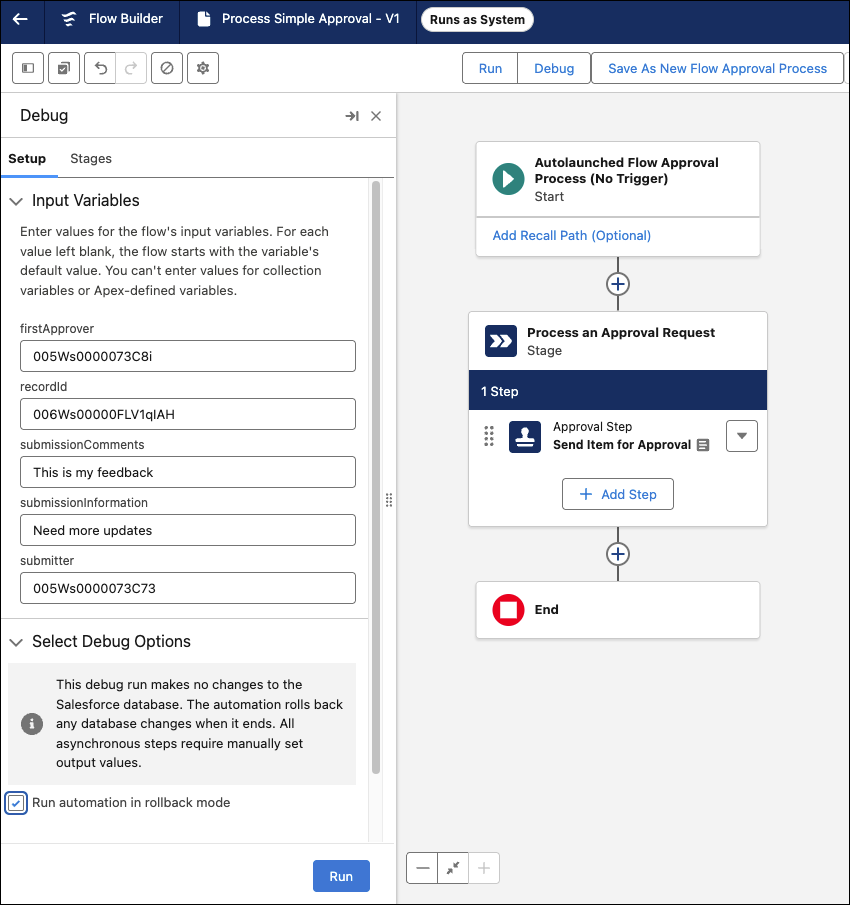
Debug your orchestrations in Flow Builder
Ever wish you could see an instant replay of your orchestration run to find out exactly where things went wrong? Troubleshooting a complex process after the fact can be tough when you can’t see the play-by-play. Debug gives you a step-by-step replay of your automation, letting you see exactly what happened right in Flow Builder. To start, open your orchestration, click Debug, and select Run in rollback mode for safe, read-only testing. The key to testing your complex logic is to simulate the results of your asynchronous steps: For each one, click Edit and turn on Manually Set Output Values to tell the debugger exactly what that step’s outcome should be. After configuring your manual outputs and saving, Run the debug and watch the execution play out in the details panel without touching your real data.
When you’re ready for a full, end-to-end test that makes permanent changes to your data, run the debugger in live mode by deselecting Run automation in rollback mode. A key feature of this mode is that the debugger automatically assigns all interactive work items to you, the running user, allowing you to test the entire user experience yourself. After entering your input variables and running the orchestration, you can watch the Details tab refresh in real time as each stage and step is completed.
![Debug orchestrations right in Flow Builder.]](https://d3nqfz2gm66yqg.cloudfront.net/images/20250911105008/DebugOrchestrations.gif)
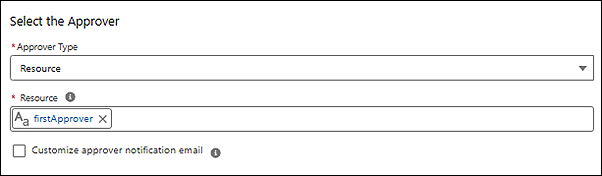
Simplify resource assignments in your orchestrations
Assigning an interactive step to a resource just got a whole lot simpler with the new Resource assignee type. Instead of separate options for user, group, and queue resources, there’s now just one flexible ‘Resource’ option. This simplification lets you use a single text variable in your flow to hold the ID of a user, a group, or a queue. At runtime, Salesforce will identify the assignee type stored in the resource and will validate the assignee, which means you can build much more dynamic orchestrations with ease. To use it, simply select Resource as the Assignee Type in your approval step, and then select the text resource that will hold your assignee.
![Resource assignee type for an orchestration in Flow Builder.]](https://d3nqfz2gm66yqg.cloudfront.net/images/20250911105050/Image-23.png)
Trigger orchestrations from external system changes
Do you have a critical business process that starts outside of Salesforce, such as a new Jira ticket or sales order update in NetSuite, which require orchestrations of complex processes in Salesforce? Using a third-party connector as a trigger for an External System Change-Triggered Flow approval process, you can now connect those dots seamlessly. This is a massive step toward true end-to-end automation. Powered by the MuleSoft for Flow add-on, you can build a new type of flow that listens for changes in a connected system. When a relevant event occurs, like that sales order update, it can automatically kick off your orchestration process in Salesforce.
Automation app enhancements
Find where your actions are used with Action Hub (beta)
Ever needed to update a custom invocable action and had that sinking feeling, wondering, “Where is this thing even used, and what am I about to break?” That guesswork is officially a thing of the past with the new Where are Actions Used (beta) in the Action Hub, your central command for impact analysis. Located in the Automation app, the Action Hub tab gives you a complete, searchable list of every standard and custom invocable action in your org. But here’s the magic: When you click on any action, it shows you every single flow or process that uses it in a handy related list. This is a game-changer for safe change management. Before you modify an action, you can instantly see its blast radius across all your automations. It’s the dependency analysis tool we’ve always needed, right inside Salesforce.
Use updated flow default record pages in Lightning App Builder
Tired of the standard, one-size-fits-all pages screen flows? With this release, you can now configure the Flow default record pages directly in Lightning App Builder. Create custom record pages for them just like you would for an Account or Contact. The new layout is cleaner and more standardized. For example, the Versions tab now lists versions of the selected flow instead of showing it in the Related tab. The real power comes from making it your own, and it’s easy to do.
To customize the new page, head to Lightning App Builder and create a new Record Page for the Flow object. In the template selection window, click the CLONE SALESFORCE DEFAULT PAGE tab and select the Flow Page Default. This gives you a perfect copy of the new layout that you can edit, add, or remove components from, and then save as your new standard. Previously, Salesforce used two different versions of the Orchestration Run Page. The Automation and Approvals apps used a modern layout with the Orchestration Run Details component, while all other apps used an older layout with separate related lists for stage, step, and log data. The new and updated versions of all these Flow record pages are used across all Salesforce apps.
Salesforce mobile app enhancements
Log in to the mobile app without your username
Raise your hand if your users can’t remember their username when logging in to Salesforce on their phone 🙋. Tell them to just use their email address! The convenient Log in with email experience, once reserved only for desktop, is now available on the Salesforce mobile app. This is a fantastic way to simplify the login process and reduce friction for your mobile users. Instead of fumbling with long, hard-to-remember usernames, they can simply enter their email address. If they have multiple accounts tied to that email, Salesforce will send a verification code and present them with a list of their orgs to choose from—no more guesswork. Make login easy breezy.
Release updates
As part of your release preparation activities, you should review the release updates to ensure you’re aware of upcoming updates that can impact your org. Give yourself and your team ample time to test and activate them before Salesforce enforces the updates in your org. Nothing good ever comes from scrambling at the last minute.
To learn more, go to Release Updates in Setup. Give yourself plenty of time before an update is enforced to enable it in a sandbox, do proper testing, and make any necessary changes to code and configuration to ensure all still works post update.
I’m calling out a few of the release updates here. I recommend reviewing the comprehensive list of release updates for those that apply to your org.
(Release update) Take action on an email address verification for users created in 2016 or earlier
To improve security and email deliverability, an upcoming release update will require that all users—including those created on or before November 1, 2016—have a verified email address in order to send emails from Salesforce. This brings all your users under the same modern security standard that’s already in place for newer accounts. This is an action-required update, and if you don’t act, your long-time users could suddenly lose the ability to send emails and disrupt business operations. Head over to the Release Updates page in Setup to review the details, identify your affected users, and get those email addresses validated.
(Release update) Enable secure roles behavior and update your sharing group references
With this release update, Salesforce is tightening up sharing to prevent unintended access for external users. As part of this, the default sharing group previously labeled ‘Roles and Subordinates’ is being renamed to the more accurate ‘Roles and Internal Subordinates’. This critical security enhancement means that any custom Apex, SOQL queries, or other customizations that reference the old group name will eventually break. Although Salesforce dynamically converts outdated references during a transition period, you must update all code and customizations to prevent errors. Use the Convert External User Access wizard to secure access so that records are available only to internal users and make manual updates. With this update, access to those records is limited to internal users by default. This update will be enforced in Winter ’26, so now’s the time to get ahead of it. If you previously enabled the sandbox version of this release update in your production org using the test run, no further action is required. You can find all the details on the Release Updates page in Setup.
(Release update) Restrict user access to run flows
The Restrict User Access to Run Flows release update is now scheduled to be enforced in Winter ’26, and it’s one we all need to act on. This update changes the security model so that users must be explicitly granted access to run a flow via a profile or permission set. This is a massive win for security, aligning flows with the principle of least privilege. However, if we don’t prepare, users could lose access and break business processes. Salesforce has postponed enforcement to give us more time to test, so now’s the perfect time to review your flows and update your permission sets to grant that access explicitly. There’s no impact to admins who have already enabled the update.
Resources
Each release brings tons of amazing, new functionality, and it can be a lot to digest. To help you make the most of Winter ’26, be sure to explore our Be Release Ready page, where you’ll find valuable resources for Salesforce Admins. Bookmark the page and check back for any updates as we continue to provide helpful insights!