Flow has become the backbone of modern automation in Salesforce, giving admins and developers a powerful way to streamline business processes without writing code. With that power, adoption has grown rapidly across orgs of all sizes, but at enterprise scale, it comes with real responsibility. High-volume processes and mission-critical automations leave little room for error. Even a single poorly designed flow can consume limits, fail transactions, and create costly technical debt.
That’s why best practices matter. To meet enterprise demands, admins need to think like architects and design flows for reliability, scalability, and long-term maintainability from the start. The goal is simple: build automation that teams can trust and businesses can depend on. Let’s dig into what it means to build automation that truly scales.
Planning for flow success (or, why we don’t build in prod)
Flow first, ask questions later? No. Plan first, build later. The big difference between a quick flow fix and a truly enterprise-grade automation usually comes down to necessary prep work. Every admin who wants to build automation that’s robust and won’t collapse under pressure must remember: The automation journey starts not in Flow Builder, but on a process mapping sheet.
Before even thinking about adding an element in the Flow canvas, an admin’s first step is to map out the business process. We’re talking about a full-on audit of the current state and a detailed visual plan using tools like Lucidchart or just an old-school whiteboard. Process mapping is crucial because it forces you to identify all the necessary triggers, inputs, outputs, and objects your flow will touch. It also provides an opportunity to identify existing bottlenecks and process inefficiencies, and even outline obsolete automation that’s just adding to technical debt.
For admins building enterprise-grade automation, resilience needs to be part of the design from day one. Anticipate failure scenarios before the automation goes live. Ask yourself: Where might null values sneak in? Which critical fields might be missing? Fixing these structural weaknesses in the design phase is way cheaper than debugging a production error at midnight.
If you ever wondered what happens to those who skip this rigorous planning, you’ll likely find an answer in the orgs where a record-triggered after-save flow was used for the same record field updates. That’s not just a tactical error, it’s basically writing immediate technical debt.
Pre-build planning isn’t just boring administrative work that can be skipped—it’s a mandatory performance optimization strategy.
The sandbox-first development rule
Here’s the non-negotiable rule in enterprise development: Never build or update processes directly in your production environment. Ignoring this rule is a high-risk gamble. Making changes directly in production and without sufficient testing may (well, to be honest, most certainly will) lead to new defects, potential data loss, a cascade of unwanted changes, unexpected results, or junk test records that mess up your data integrity.
Sandboxes are your safe playground. They’re essential for leveraging debug mode and testing features correctly. Run Apex classes to confirm there’s no unwanted interference in your automation. Prove your flow is resilient and test beyond just one successful run. A sandbox is the perfect environment for stress-testing your automation. You must cover all real-life scenarios, test edge cases and, most importantly, simulate real-world data volumes. A flow that handles 50 records perfectly but crashes with 5,000 is not ready for the enterprise production org.
Your business relies on scalable trust and consistent platform and automation performance. When stability is compromised by a poorly tested flow, you compromise core operational metrics, so your support ticket volume spikes, CSAT scores drop, and strategic goals take a hit. Sticking to the sandbox-first doctrine and simulating volume is essential for upholding your stakeholder’s trust and operational key performance indicators (KPIs).
One ring to rule them all? Well, more like three
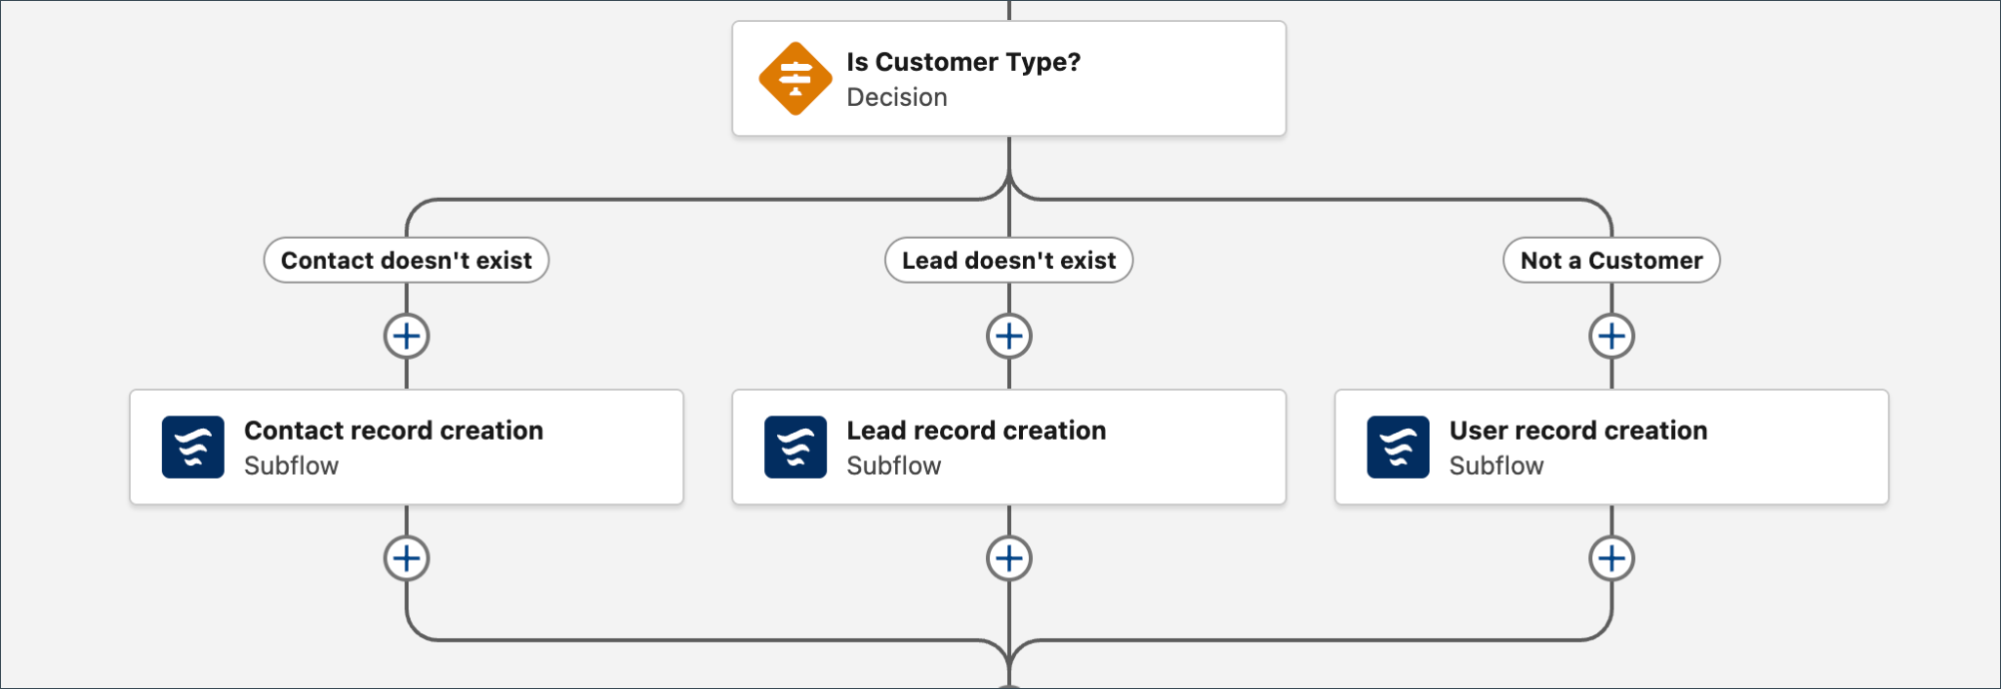
In order to build scalable and maintainable automation, admins must embrace modularity. The secret sauce is breaking down those large, monolithic flows into smaller, reusable subflows.
The benefits are massive: Modularity makes maintenance easier and troubleshooting simpler (you’re checking a small unit, not a giant spaghetti monster). It also boosts reuse by centralizing common processes.
If the company has a standard process to send CSAT surveys to customers, that can be automated as an autolaunched flow and be reused as subflow in various situations. Want to know what your customer thinks after they purchased the product? Wondering if the customer is satisfied with the latest support ticket that required some back and forth? Do you want feedback on that latest project professional services delivered? Don’t worry, you have one already-built flow to plug in as a subflow without worrying if the process is matching the latest standards.
Technically, subflows are just autolaunched flows. They get called by a parent flow using defined input and output variables to perform a common sequence of actions, logic, or complex calculations, then hand the result back.
This isn’t just about keeping things organized—modularization is a recommended strategy to manage those pesky CPU time limits more effectively. By breaking complex logic into focused subflows, the system processes smaller, dedicated units, which directly helps mitigate the risk of hitting the CPU time governor limit. Think of subflows as a mandatory performance optimization technique for any CPU-intensive automation.
The great debate: Single vs. multiple flows per object
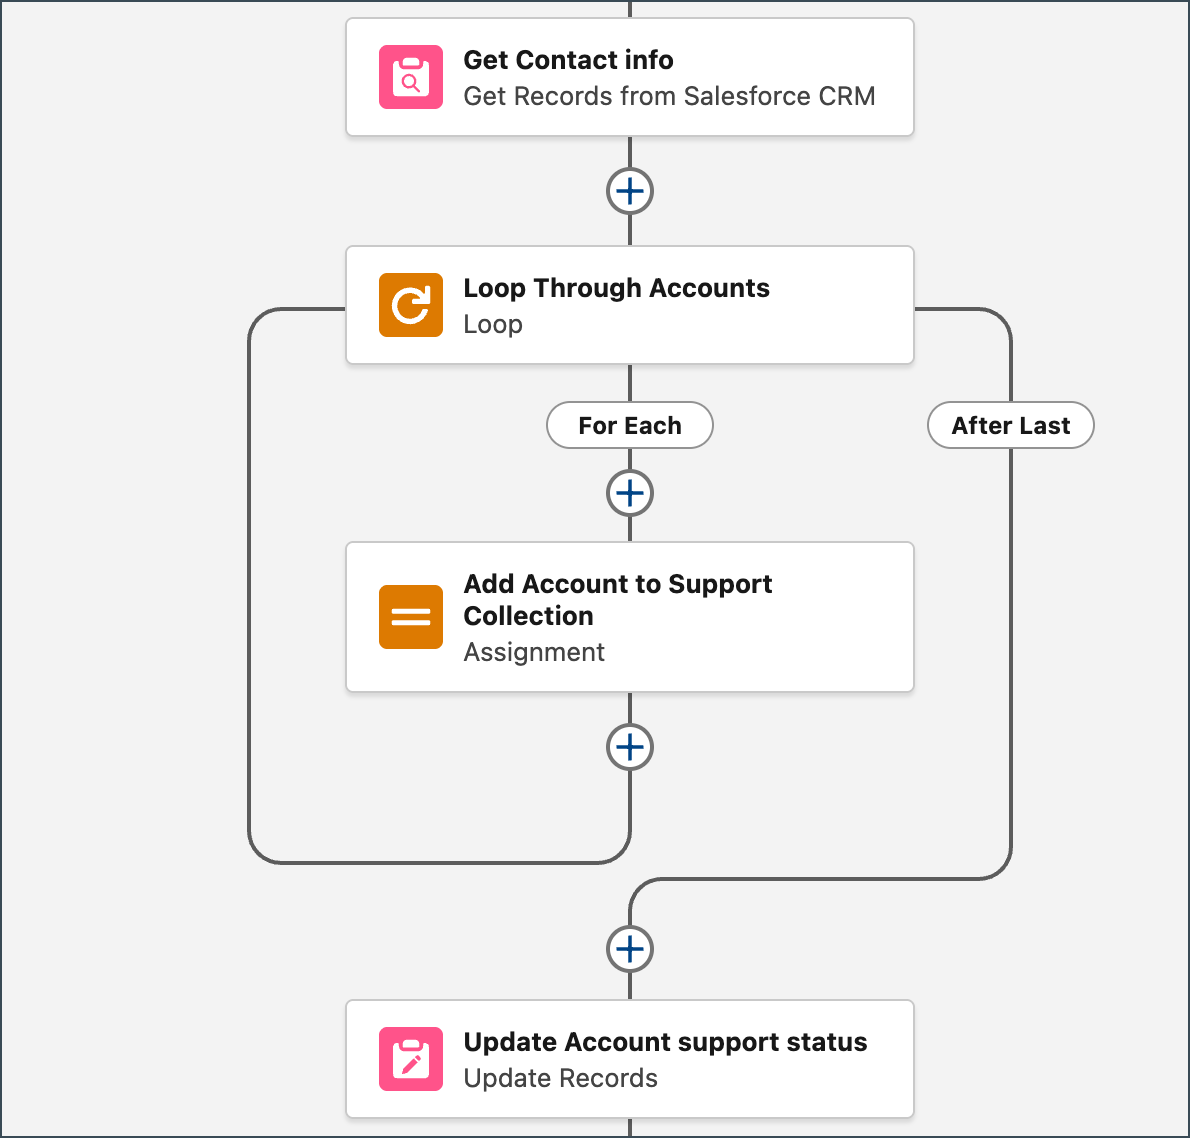
How many record-triggered flows should an object have? This debate is constantly evolving. The old “One Flow Per Object” concept came from the days of Apex triggers and was intended to centralize management, simplify troubleshooting, and enforce a clear order of execution.
However, Flow Builder’s current design makes a single, giant flow unrealistic for complex objects. Here’s the technical catch: A single record-triggered flow can only start with one trigger condition. It has to be either Before/After create/update, or Before delete and it can’t handle everything at once. This means the architecture for most used objects will require more than one flow.
The introduction of the Set Trigger Order on Record-Triggered Flows feature (Spring ’22) was a game changer. The current best practice leans toward using multiple, focused flows per object type (for example, a group of flows for Before Save), each utilizing highly targeted entry criteria to minimize execution time. This is a necessity for scaling since the “one flow” model is often only practical for small organizations. Using multiple, ordered flows with targeted criteria is like a micro-automation approach, and it’s easier to troubleshoot because the logic is isolated. That’s why enterprise admins should adopt a “Micro-Automation” governance model that prioritizes highly refined entry criteria.
When Flow takes a back seat
You’re a Flow expert, but building automation on the enterprise level means picking the right tool for the job. If a requirement can be met with a simpler, less resource-intensive tool, choose that first. Simpler options, like a formula field (for example, for cross-object display), are always better than creating a whole flow.
Also, Flow is powerful, but there are still times when Apex is the superior tool. You should use Invocable Apex when Flow elements simply aren’t enough for tasks like generating complex documents or performing complex, high-volume database interactions that aren’t easily achieved declaratively. A critical requirement is that these Apex methods must be defined with the @InvocableMethod annotation and must be bulk safe to prevent limit failures when processing multiple records simultaneously.
Finally, a huge anti-pattern to avoid: Never mix different automation types (Apex trigger, record-triggered flow, or legacy Process Builder) on the same object. That’s a guaranteed ticket to execution order chaos, poor performance, and technical debt.

The governor limits survival guide: Bulkify or bust
The first rule of bulkification: Data Manipulation Language (DML) in Loops is a big no-no. The most crucial performance rule in Salesforce, whether you’re building automation declaratively or programmatically, is bulkification. The rule is simple: Never ever run a repetitive DML operation (Get, Update, Create, or Delete data element) inside a Loop! Ignore this foundational constraint and you’ll quickly find yourself in DML limit trouble, leading to the infamous “Too many DML statements” error.
The technical solution? Bulkify! You need to use a collection to gather all the records that need manipulation within your Loop, and then execute the DML operation on the entire collection just once outside of the Loop. This applies equally to queries. A loop that executes a Get Records element for every iteration will quickly burn through the 100 Salesforce Object Query Language (SOQL) query limit, often resulting in limit failures. Bulkification is universal and a must-apply approach to both query operations (SOQL) and data manipulation operations (DML) if you want to survive high-volume execution.
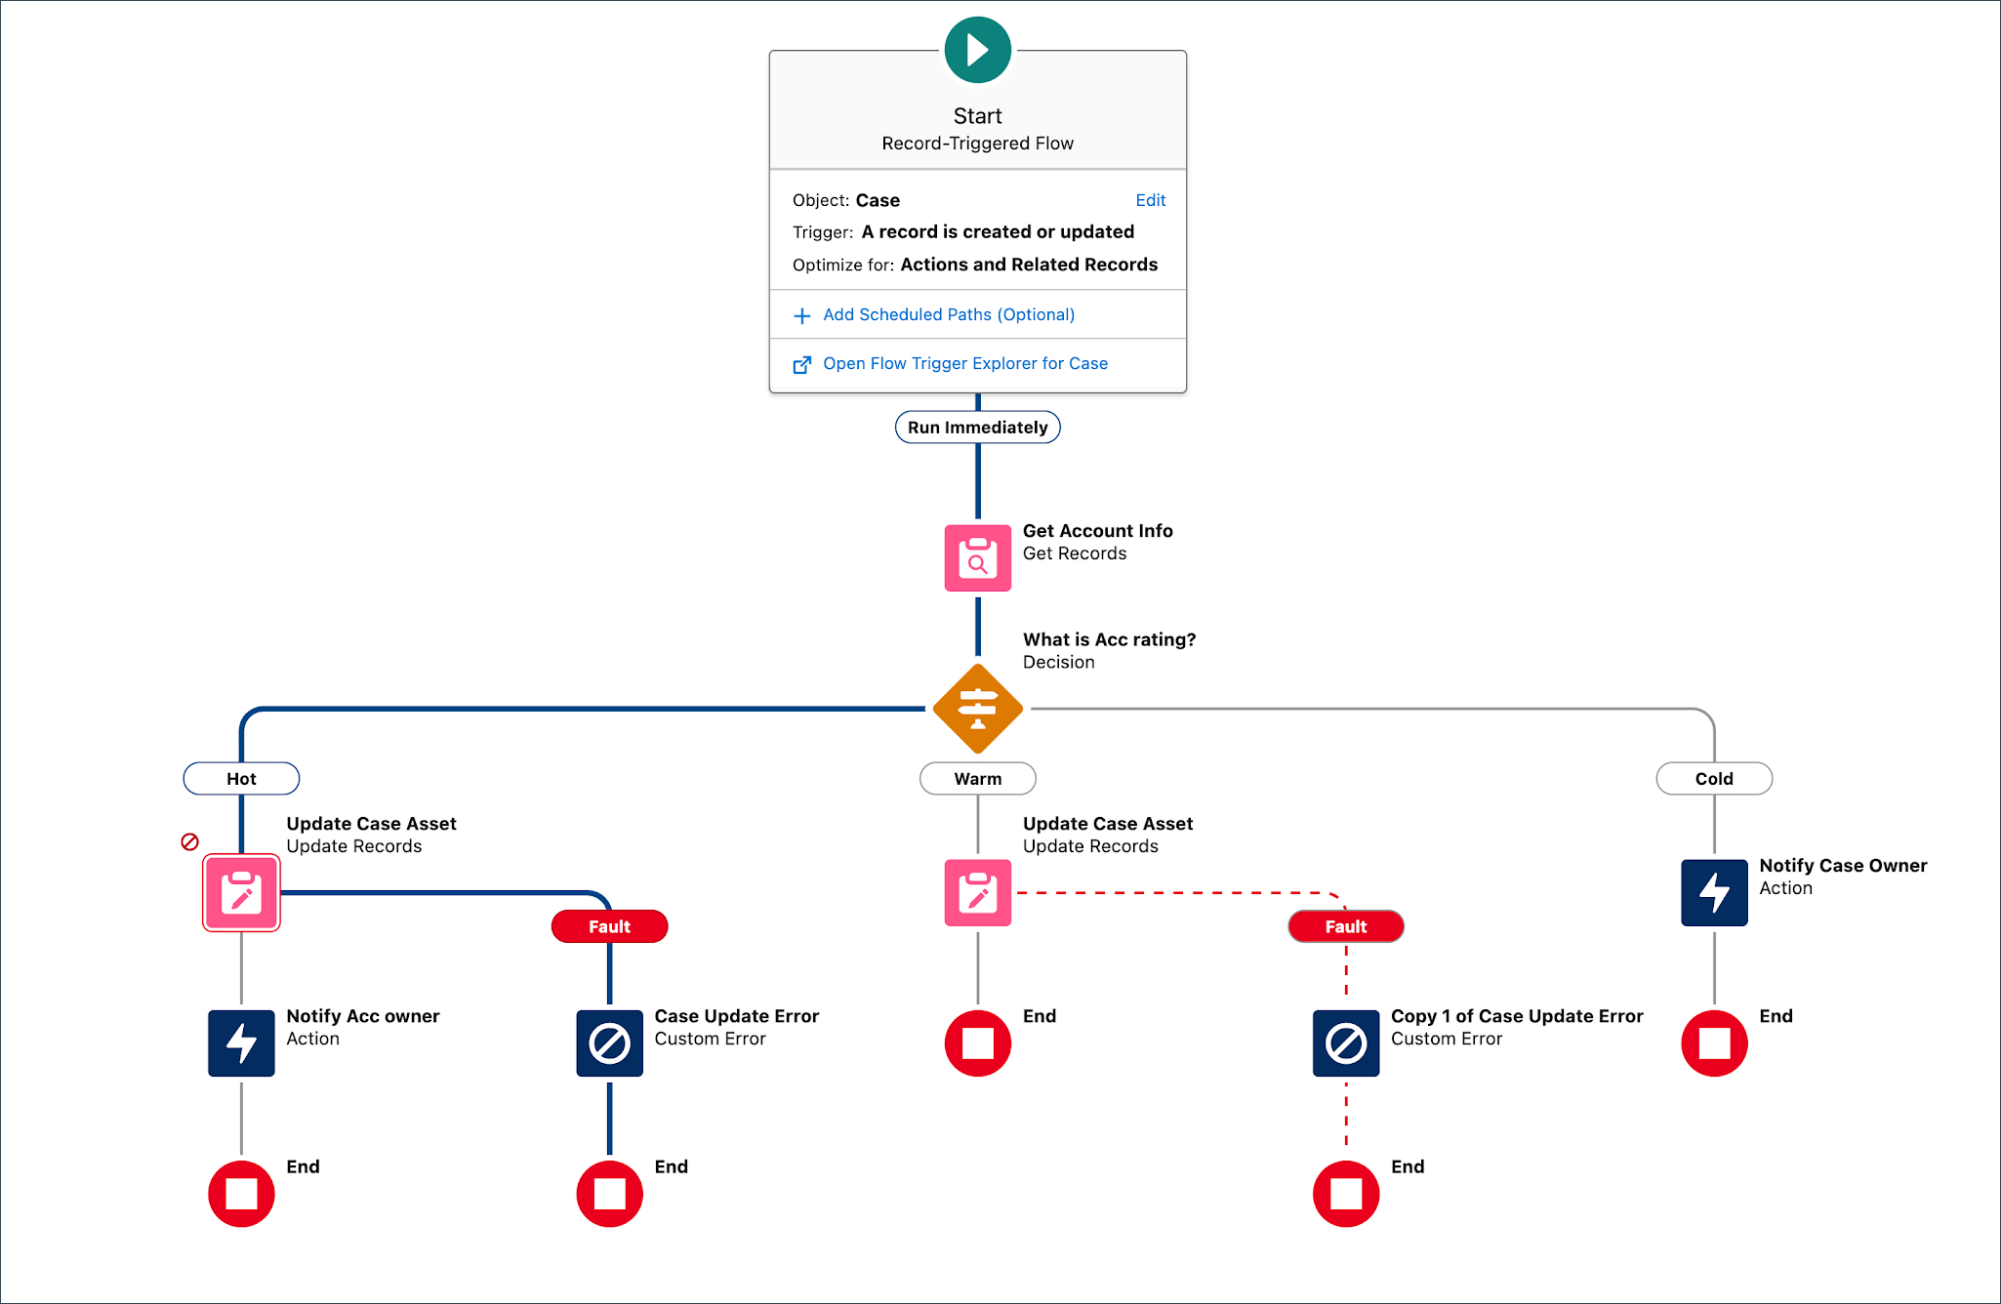
A massive performance boost comes from utilizing Before-Save record-triggered flows for same-record updates. Because this context runs before the data is committed to the database, it limits the transaction time and completely eliminates the DML operation since the system handles the save implicitly. This is the highest efficiency possible.
SOQL query optimization tactics
Retrieving data efficiently is key to good performance. When querying collections of related records, make sure to use the “In” and “Not In” operators in your Get Records elements. This practice helps you filter and retrieve only the specific records you need, rather than trying to pull entire datasets. Additionally, when traversing related records, leveraging relationship fields is essential. This lets the platform handle the data joins efficiently in the background, avoiding sequential, costly additional Get Records elements.

The CPU time crunch and asynchronous strategies
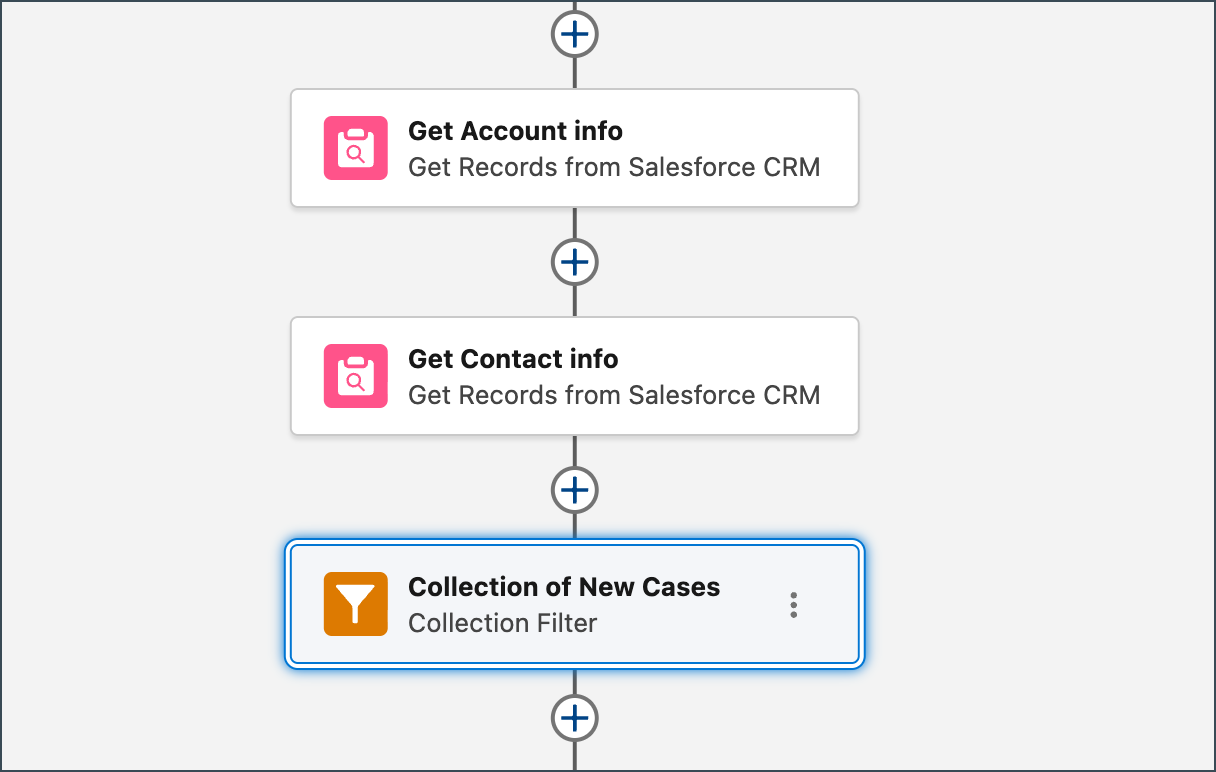
The CPU time limit is a transaction-specific governor that often trips flows that are doing intense calculations or processing a ton of data. You have a few strategies to manage this. First, maximize in-memory efficiency: Utilize collection filters to process and refine data you’ve already retrieved, which avoids additional, costly database queries. Second, remember modularization? Using subflows directly supports CPU time optimization, as we covered earlier.
For non-critical updates, you can offload the workload using asynchronous paths in record-triggered flows (think about it as a scheduled delay of 0 hours). This queues the work to run later, reducing the load on the immediate transaction and helping you avoid those CPU limits. This queuing strategy is perfect for generating logging, non-critical notifications, or less time-sensitive roll-up calculations. Finally, for advanced data manipulation, make sure you use the Transform element to map data between collection variables (for example, mapping Products to Opportunity Line Items). It’s much cleaner and faster than using traditional Loop and Assignment elements for collection manipulation.
Don’t hard code: Your future self will thank you
Hard coding is a guaranteed source of technical debt. Embedding configuration values or, worst of all, Salesforce IDs, directly into your flow logic is really bad practice. Salesforce IDs often change when you deploy between environments (like moving from sandbox to production), causing immediate, catastrophic flow failures. Plus, if your configuration logic is buried in a flow, you need a full deployment cycle just to change a simple setting, which slams the brakes on business agility.
The necessary practice is to either query for IDs using a Get Records element, or, if you know what you need and plan to reuse it, store all your variable configuration in external, cached resources. The platform gives us three excellent resources for centralizing this data.
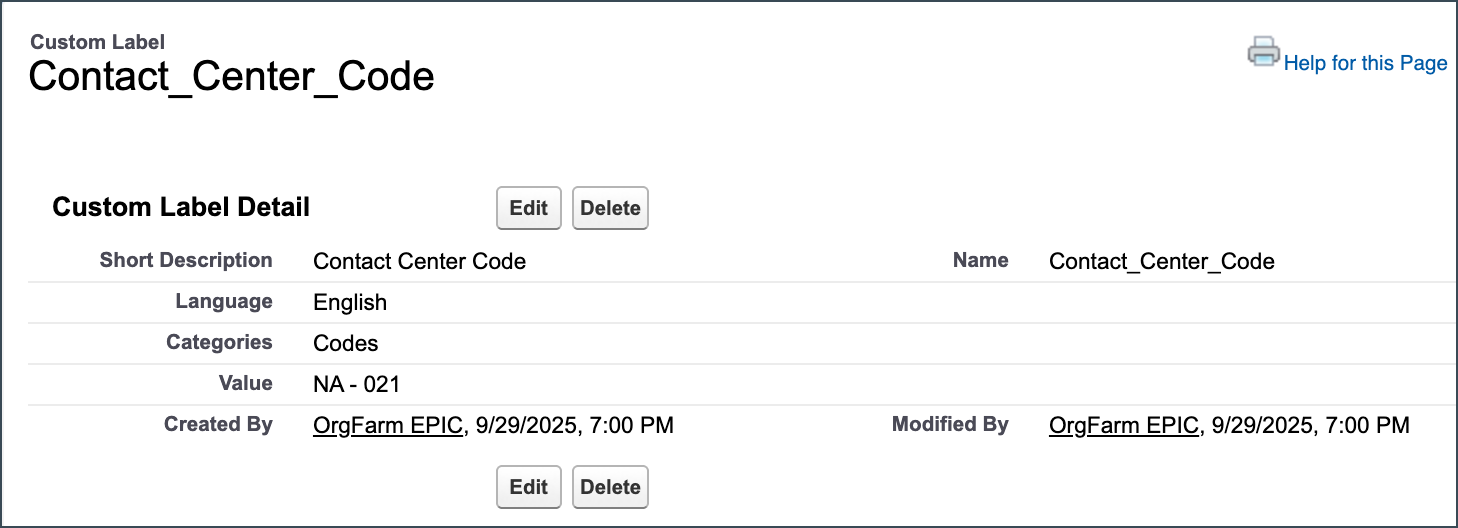
- Custom Labels (Simple Text): Custom Labels are for storing simple text values, typically used for internationalization, user-facing error messages, or non-configuration-dependent codes (for example, a Contact Center Code). They are explicitly not designed for storing complex configuration logic or data tables. You access them in Flow Builder using the $Label global variable.

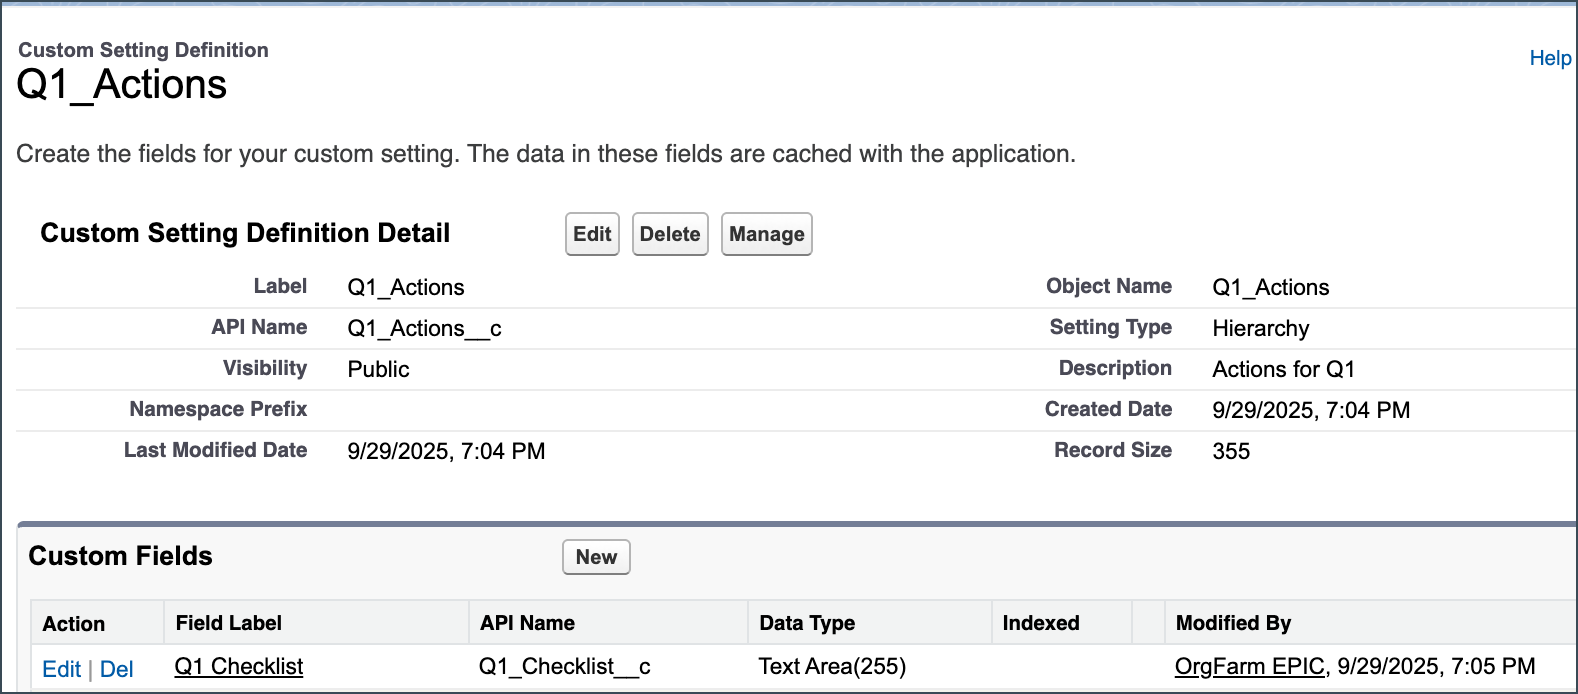
- Custom Settings (Cache Is King): Custom Settings are for storing configuration data that needs lightning-fast, cached access, especially if the values must be different between environments (for example, environment activation toggles or sandbox-specific API keys). They live in your org and can be List or Hierarchy settings, with their data available in the application cache. A critical limitation here is that the records do not deploy between environments, meaning you have to either use Data Loader to migrate them or set them up manually in each instance.
- Custom Metadata Types (the Deployment Powerhouse): Custom Metadata Types (CMDT) are the gold standard for storing static configuration records that need to be deployed consistently across all environments (for example, Discount tiers, complex routing matrix definitions). Since they’re treated as metadata, the records associated with the type deploy along with the definition, making them perfect for continuous integration/continuous delivery (CI/CD) pipelines. CMDT doesn’t support hierarchical relationships, though.
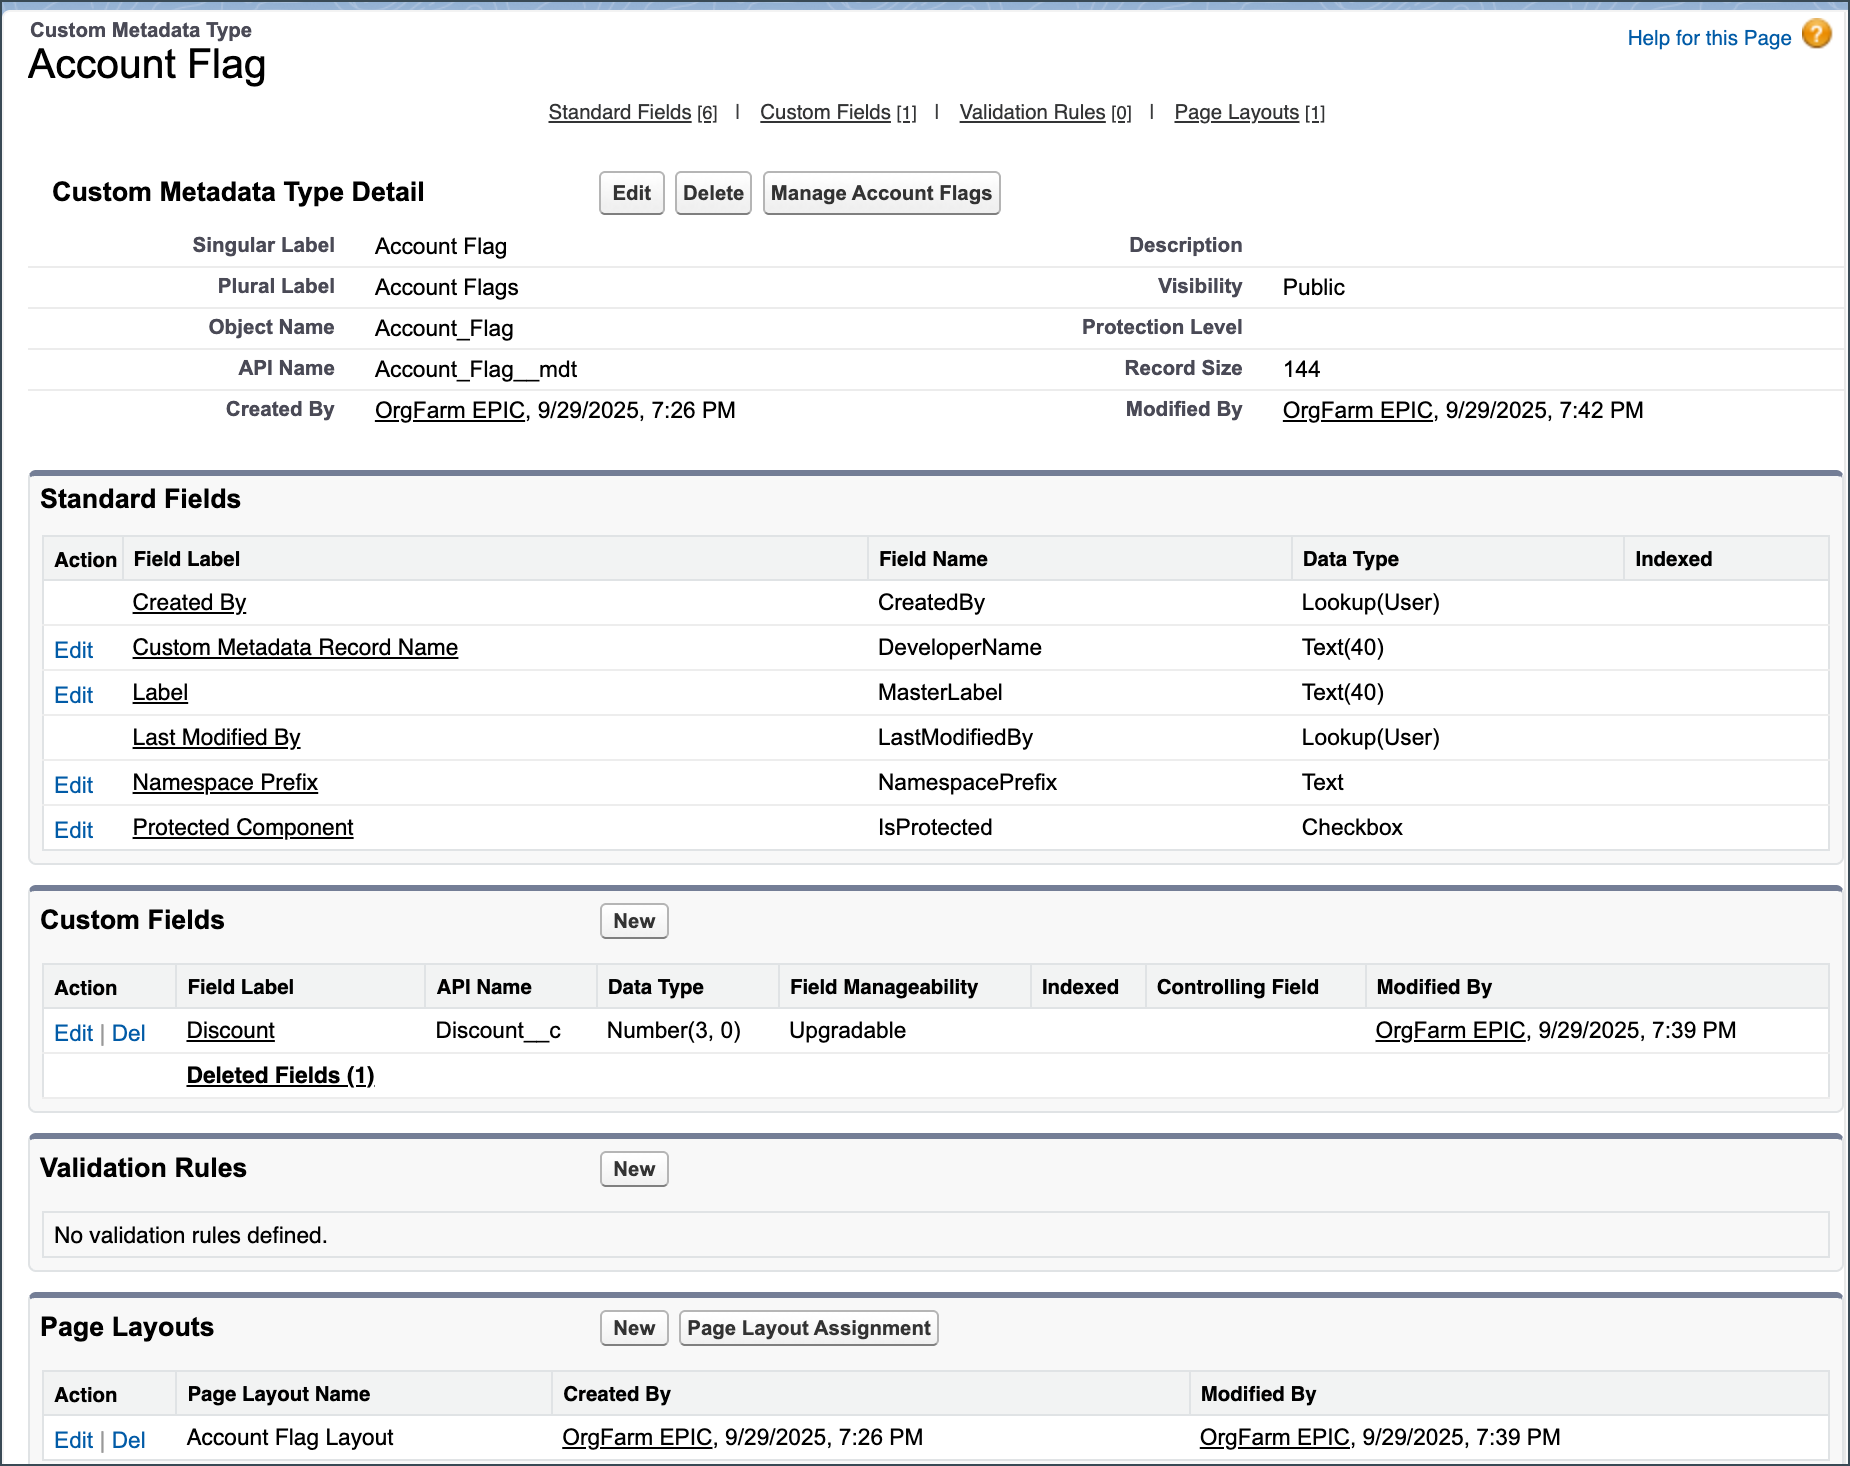
The choice between Custom Settings and Custom Metadata boils down to a release management decision. If configuration needs to be versioned and deployed seamlessly, CMDT is the architectural standard. If a value needs to be manually set and remain environment-specific post-deployment (like a temporary production bypass switch), Custom Settings work well. You must choose the resource based on its deployment behavior, not just its caching speed, to keep your automation clean.
| | | |
| Simple text, internationalization | | |
| Environment-specific toggles, run-time configuration | Records do not deploy (manual setup required) | |
| Static, deployable configuration records (for example, rules, tiers) | Records deploy as metadata (ideal for CI/CD) | |
What happens when flows fail
When flows fail, it’s not just a bad day—it’s a traceable audit event. Building resilient automation doesn’t mean they will never fail. Faults and errors are going to happen. It’s just a fact of (software) life. Enterprise flows need to ensure that when a failure occurs, it happens gracefully and the end user doesn’t get a rude shock. A generic UI error like “Something went wrong” is unhelpful and will leave the user confused. For admins, errors can be viewed using the standard Flow Error Email notification, the Flow Debug Mode interface, and classic Debug Logs.
The safety net: Implementing the fault connector
A fundamental requirement for any enterprise-grade flow is the mandatory inclusion of the Fault Connector branching path on every critical data or action element. Think about that dotted red line as your friend who will prevent your flows from crashing and burning in production right in front of your users. For screen flows, the fault path should lead to a special screen element that displays a custom error message. This message should replace the generic unhandled error and clearly explain what failed, why, and what the user should do next.
Advanced logging and traceability
The official error handling playbook strongly recommends creating systematic, centralized failure logging. Whenever Flow fails, a Flow Execution Error Platform Event is published. One of the things admins can do is create a platform event-triggered flow on this event and set up a custom flow error object that can capture details of the error message.
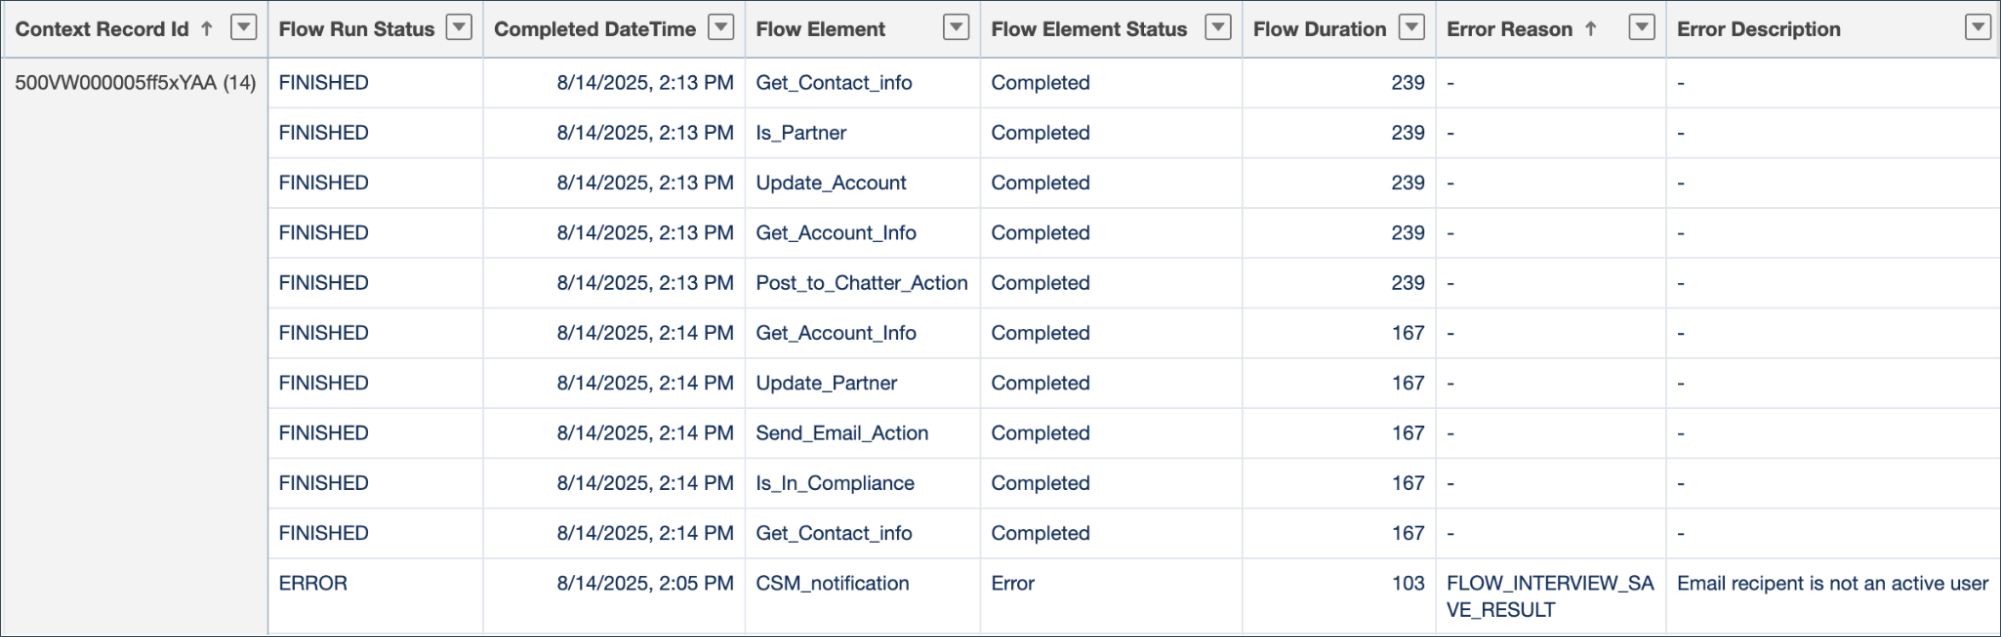
However, the latest and greatest tool for this job is Flow Persistent Logging. While the older methods require you to manually build a custom object and map the error fields, Persistent Logging offers a more structural solution for centralized, rich data logging. This feature is designed to fully log all execution data, including element running time length and error description. All of this data gives admins a deeper system-level understanding of failures across different flows, which is exactly what they need for complex enterprise tracing.
By implementing this kind of robust, centralized system (whether custom or using Persistent Logging), you can actually start measuring automation errors as a technical success metric. Tracking the failure location and type allows your team to analyze trends, proactively fix the automation causing the most headaches, and significantly reduce support inquiries related to flow failures.
Documentation for your future self: Don’t be haunted by your work
Documentation is often the last thing anyone wants to do, but it’s the critical element that separates maintainable enterprise systems from fragile, high-risk automation.
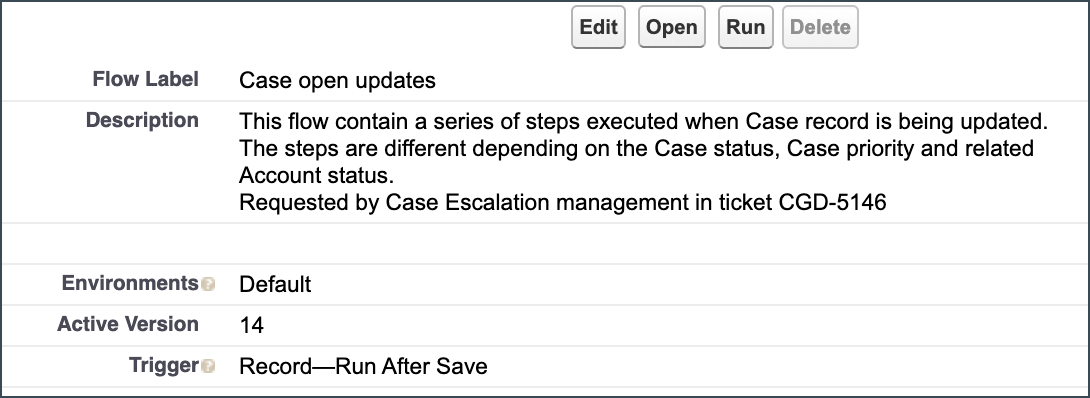
Every single flow should have a comprehensive flow description. You can think of it as the executive summary. This description must detail the flow’s main objective, the relevant business context (for example, “Requested by Case Escalation management in ticket CGD-5146”), and any outside dependencies. Furthermore, filling out the description value for each element (Decisions, Loops, Assignments) should be another must-do thing. The element description is especially useful for invocable actions, where an admin can’t simply open the element and understand what that action is doing. This detailed context shows up right in Flow Builder and is even used by Agentforce to understand what the flow is doing.
Governance also requires keeping a clear Version History, including notes on significant changes and their justifications (for example, “V2 – adding notification to CSG group when case is escalated”). For complex automations, we can go back full circle to the planning phase and remember the importance of documentation. Using external diagramming tools like Lucidchart is a good way to clearly map the logic, and these diagrams must be maintained as the org grows and changes.
When a flow fails, detailed element descriptions and external documentation drastically reduce the time needed for diagnosis and remediation. Reducing the Incident Resolution Time is a core operational KPI. That means that comprehensive documentation isn’t just compliance—it directly translates into faster incident response for admins and support teams.
Naming conventions that matter
To effectively manage the shift toward a multi-flow architecture, you need to implement and enforce a consistent naming convention. A recommended standard is Object_FlowType_Action (for example, Case_BeforeSave_UpdateCaseFlagOnEscalation). Consistency ensures that architects can quickly identify the function and execution context of any flow without even opening it. Regardless of the naming convention you go with, ensure everyone building flows uses the same naming convention.
Testing and validation frameworks
Your testing protocol should start with Flow Builder’s debug tool for initial sandbox validation, followed by thorough end-to-end process validation. Enterprise organizations need to embrace the Flow Tests framework. For the detailed approach to flow testing and debugging, watch Henry Liu’s video, Catch Me If You Can: Debugging and Testing Flow, on Salesforce+, where he explains how this should be done and what tools are available. (He also provides a sneak peek of what’s coming!)
The flow strong principle
Transitioning to enterprise-grade declarative automation requires admins to adopt a new way of thinking. This approach rests on five foundational pillars.
- Foundational Planning: Planning for failure and data scope before building
- Modular Architecture: Embracing focused, ordered flows, and reusable subflows
- Bulkification: Optimizing performance and strictly adhering to the “no DML in loops” rule (Seriously, don’t do it.)
- External Configuration Management: Using Custom Metadata and Custom Settings to eliminate hard coding
- Resilient Error Handling: Implementing fault connectors and centralized logging
By following these principles, enterprise admins can shift from constantly putting out fires to building proactive, well-governed automation. It’s about reducing technical debt, keeping the platform stable, and making sure it scales as the business grows. In the end, it’s what helps teams work more smoothly and keep things running reliably.
Resources