‘For the second part of the Salesforce Visual Workflow tutorial, I’ve asked Keith Sadler, Consultant (and Flow guru) from Appirio to return and expand on some really cool functionality and advanced features. We are going to build off of the original Flow that was designed for creating a Case from a Lead record that was accidentally generated via Web to Lead. If you were able to make it through the entire tutorial from the first VWF blog, congratulations! Now, we are going to learn a few more advanced tricks, again to help you think a little out of the box. Note: Any changes made to your original Flow will be saved in a new version, so that you can always revert back if needed.’ – Mike
Here is the scenario:
We have implemented the previous Flow, and the business team was excited for the great solution and quick turn around time, but now they have some enhancement requests. They like the fact that the lead fields are being mapped over to the new case record into the “Web Name” and “Web Email” fields, but the users still must manually edit the case and add a contact through the standard look-up. To make things more painful, they must search by the name provided, and not by email. The good news is that we can automate this in the Flow we have built. Our actual requirements are as follows:
-
Automatically attach the Case to an existing Contact if there is a contact in the system with the same email address as the Lead
-
Give user the ability to choose the contact it should be associated with if there is more than one existing contact with the same email address. (I know you may be thinking that this is because there are duplicates, but in our scenario, this is the actual business process to create duplicate contacts if they work for multiple accounts in the system.)
-
If there are no contacts in the system with the same email, keep the original functionality.
Part One: Set Up Flow and Save New Version
Let’s first open up our original Flow, and get this set up for customization to meet the requirements above.
-
Open the original Flow? Setup | Create | Workflow and Approvals | Flow | Click “Open” next to your Flow.
-
Since we will be adding logic to the Flow before the case is created, the first thing that you should do is delete the arrow connecting the first two elements. To do this, just click on the arrow (it will turn green), then push delete on your keyboard.
-
Next, go ahead and highlight the bottom two elements, and drag them down the palette to give yourself room in order to insert additional elements.
-
Once you have done this, click “Save As” on the top left control bar of your flow. Do NOT rename your flow, and make sure this is set to “Save as new version”.
-
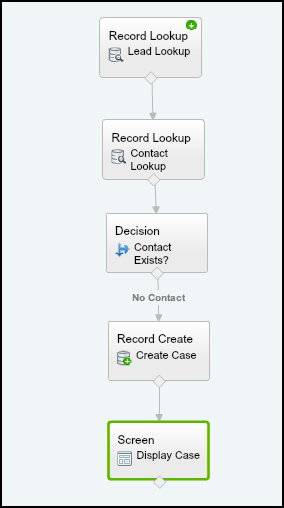
Your Flow should look like the one below.
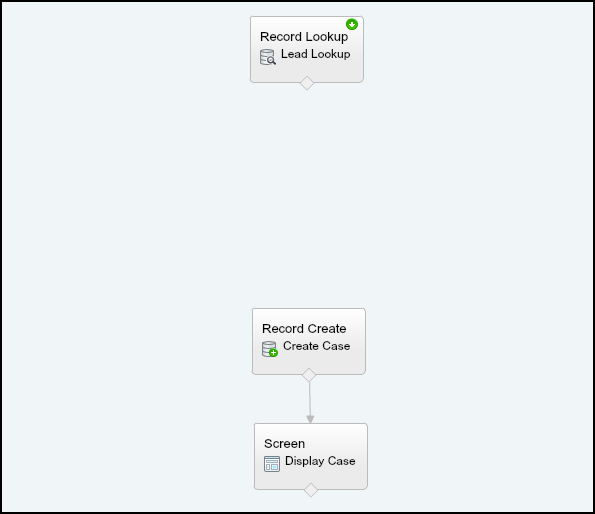
Part Two: Check for Existing Contact and Build Decision
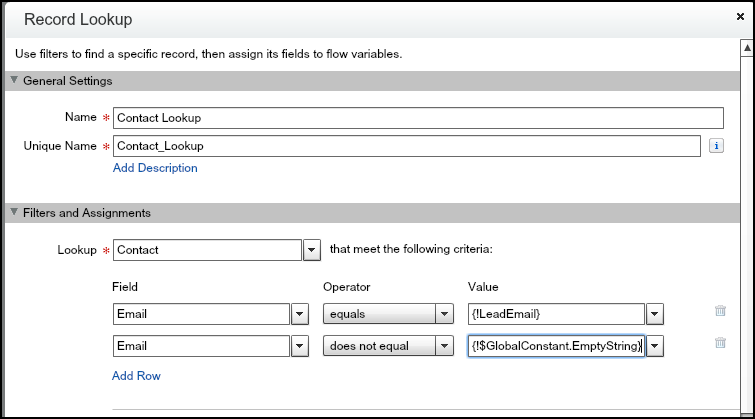
Alright, now that we have our Flow set up and ready to go, let’s look at our first two requirements. We need to check to see if there are any contacts in the system based on the Lead email. We also would like to give the ability for the end user to select which contact should be associated to the case, if there is more than one. We will accomplish this by using a few different elements such as Data Lookups, Decisions, and Dynamic Choices. Let’s get started!
-
Now that we have the lookup created, this element will actually produce a True or False result. If there is a contact found in the system where Email = LeadEmail, the value “True” will be returned, if not, “False” will be returned. With that being said, we need to use a Decision element that determines what will happen next. If the result is True, the user should pick the contact to be associated. If the result is false, then we just move on to the Create Case Element.
-
Drag the Decision element out onto the Canvas under the Contact Lookup.
-
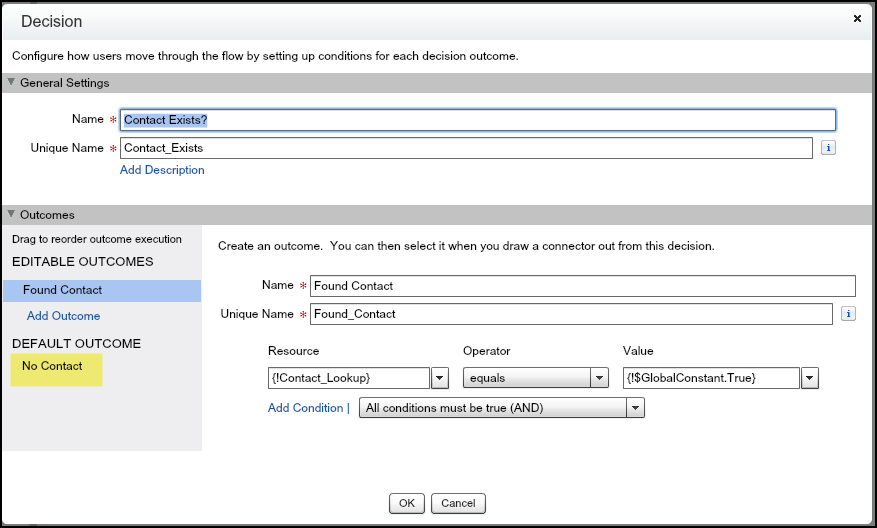
Name this “Contact Exists?”
-
For Decision elements, Outcomes must be defined. In our case, we only have two outcomes based on the “True” or “False” from the Contact Lookup element.
-
Create the first outcome by putting “Found Contact” into the name field
-
Below this we need to add a filter that determines when this outcome will be met.
-
This should be set to Contact Lookup equals GlobalConstant.True
-
So if we think about this logically, we are saying that if the Contact Lookup returns the value of “True”, we want the outcome to be “Found Contact”.
-
Next we must create a Default Outcome. This is the outcome that will occur if the other defined Outcomes’ criteria are not met.
-
Click on the Default Outcome link on the left side, and add the name “No Contact”
-
Remember anytime there is not a contact found, this Outcome will occur, because the “Found Contact” will happen anytime the Contact Lookup finds a contact record with a matching email.
-
Click Save and breathe 🙂
-
Now that the decision is built, go ahead and drag an arrow from the Contact Lookup element down to the “Contact Exists” element.
-
Next drag an arrow down from the “Contact Exists” element and attach it to the Create Case element.
Part Three – Creating a Dynamic Choice to Pick an Existing Contact
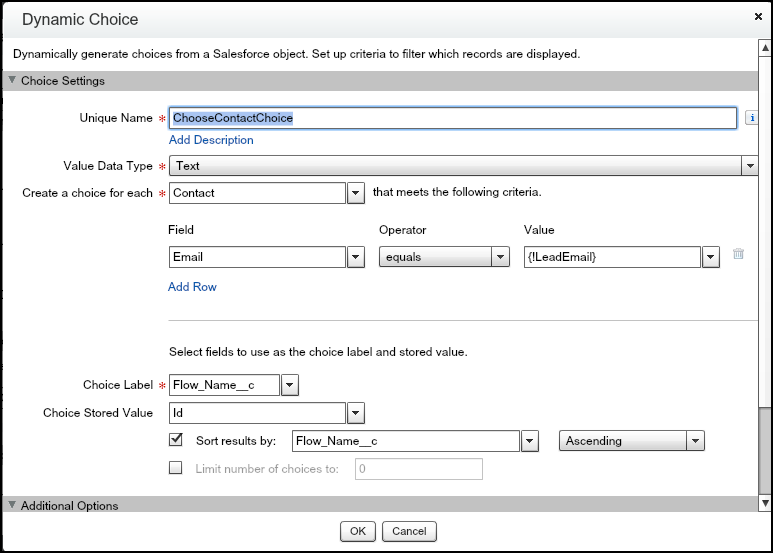
Creating dynamic choices can be one of the most powerful functions of Visual Workflow. A dynamic choice allows you search for records, then display the returned data to the end user in a picklist, or radio buttons to select. Once that is record is selected, you can then take the ID, as well as any other information from that record and store into different variables to use within your Flow.
One thing to note is that when you display records to the end user in a picklist, or radio buttons, you must pick a single field from the record that will be used as the values to choose from. Because of this, we are going to start this part off by creating a new custom field on the contact record, to give end user a better experience for selecting the contact. We would like the value they have to choose from look like {Contact.Name} – {Account Name}. Let’s get started!
-
Create a new custom Formula field on the contact record
-
Name this “Flow Name” and set to Text
-
Copy and paste this text to Formula: FirstName&” “&LastName&” – “& Account.Name
-
Remove from page layouts and Save
OK, now we have the field that we will use for our Dynamic Choice. Let’s go back to our flow and finish building this out!
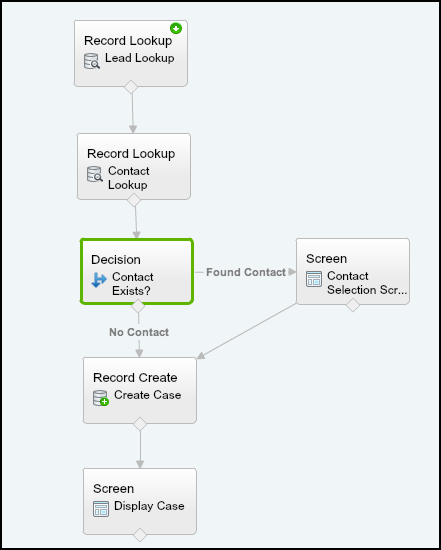
- Now connect your decision to the Screen element, and then the Screen element to your Create Case Element. It should Look like this:
-
Edit the Create Case Element that is already on the Canvas
-
In order to prevent the Flow from entering a loop, we will want to add one additional screen to the end of the flow.
-
Drag a screen element to the very bottom of the Flow and name this Close Window
-
Click add a field, and drag Display Text to the right.
-
Name this CloseWindowDescription
-
Add text “Flow is complete, you can now close out of Window”
-
On General Info tab, set to “Do not show Finish Button”
-
Click OK
-
Now edit and make sure the Display Case element is set to “Do not show Previous Button”
-
Make sure all elements are connected then Save your flow!
Now that the Flow is complete you can click close. Remember, Now you will need to Activate your new version. Go ahead and try it out!