Welcome to another post in the “How I Solved This” series. In this series, we do a deep dive into a specific business problem, and share how one #AwesomeAdmin chose to solve it. Once you learn how they solved their specific problem, you will be inspired to try their solution yourself! Let’s take a look at how Deanne Walters was able to create an application submission process using Flow.
Key business problem:
We wanted our participants to fill out a program application, and we wanted to collect and update their information in Salesforce. We also wanted to limit the application to only those who had previously attended an information session and had gotten a specific code.
Background:
New Leaders is a professional development and leadership training nonprofit organization for school administrators, principals, and teachers. We combine virtual on-demand learning with in-person training sessions (when it is safe).
Before participants begin our program, we need to collect relevant personal details, including some information we already have in Salesforce. Additionally, we want the participants to only be able to apply to cohorts that they have previously attended information sessions for, by using a code provided.
How I solved it:
I created an application that fits seamlessly into our Salesforce Community and restricts those who can apply to only people who have a special code using Flow.
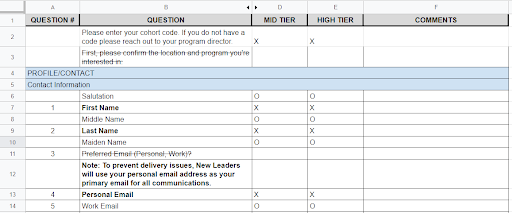
1. Outline what information you need to collect
In the external survey tool that we had been using, the application had been revised and changed for specific cohorts, so we had multiple variations of the same questions. This technical debt led to problems in the processing ability of the tool, as well as difficulty in understanding the order of the application process when trying to make any updates. So, I needed to find what we actually needed from everyone in the new application.
I included whether questions were optional or required, and if there should be any specific question validation. I also grouped together questions logically based on which questions should go on which screens.
When I started to build the flow, there was one point where I found that I had to turn one screen of questions into two, and another point where I had to combine two screens of questions into one screen. In the latter case, I had to recreate each question element and replace any reference to them. In the former case, I had to clone the page, delete the extra fields, and make sure any references to the fields were correct. I found cloning the page much easier; so, when drafting the outline of your flow questions, opt to combine screens first and separate later, rather than the other way around.
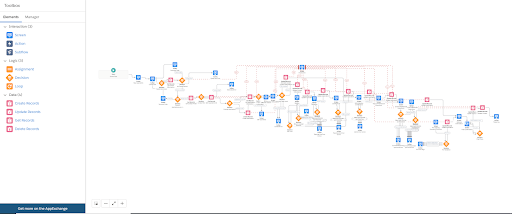
2. Outline the flow of the flow
Now that I knew what was going to be shown to the participants, it was time to think about what was going on behind the scenes. Here’s my step-by-step:
- Check the participant’s cohort code against cohorts in the system and only let them proceed if the cohort code matches an existing and open cohort.
- Do not create a duplicate application record if the user stops and restarts the application.
- Have the user’s progress saved after each screen.
- Have the ability to specify what year is next year, and have all screens show that year without having to manually change each place that year shows up.
- Pre-populate fields with information we already have in Salesforce.
- Require a resume file to be uploaded.
- Validate fields and show clear error messages.
- Have a custom error message if participants run into a Salesforce error.
- Automatically redirect users to a new page once they are done.
- Be able to direct users to the long version of the application or the short version, depending on what their cohort requires.
- Give participants the ability to register for a new cohort at any point in time.
When you are doing this for your own project, I encourage you to make this list as broad as possible and clarify what is a must-have and what is a nice-to-have requirement. (Spoiler alert: I was able to do all but one thing on this list in Flow without code.)
3. Check your object’s fields
The next thing I did was check that I had all of the necessary fields in our custom “Application” object. These fields will also have their own standard validation rules, so if you are making corresponding fields on the screen elements in your flow, then it is best practice to have the field types match. That is especially true if you are pre-populating information in your flow.
One of the custom fields I built was a “Cohort Code” field on the record. This is how the system will match the code that is entered with the actual cohort record. I got to use the “Do not allow duplicate values” checkbox for the first time! (Nerdy admin joy ?)
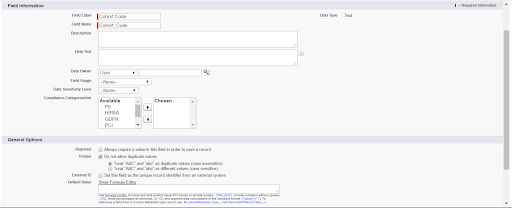
Note: Make sure you check the “case insensitive” checkbox; when I was testing out the record, filtering by the cohort code, it read the field as case insensitive for me.
4. Start building the flow
This is my minimum viable product stage; I find what is simple or easy and do that. I focus on not getting bogged down in details like complex validation rules or custom automation. This is about getting elements on the screen to test.
I started with getting the records I needed, putting all the questions on screens (including marking them as required if need be), updating records (goal C), and putting in a default value when there was an easy option (partially accomplishing goal E).
When I created my variables in the flow, I would try to name them as similarly as possible to the fields they would be updating on the application record.
This stage is where you should keep an eye on your process documentation to see what you can easily get done in the initial build. For example, I filtered by cohort code in the cohort Get Records element. That meant I could add decision points to divert people who entered an incorrect cohort code, and for people whose cohort code was for a cohort that was marked as closed (goal A).

I also found that when I had gotten the contact record and the cohort record, I could determine whether or not there was an existing application first before creating a new application (goal B).
When I was writing out the questions and the instructions, I also kept an eye out for when next year was referenced and had my “next year” variable ready to use (goal D).
Pro tip: Use a variable to reference things that might change over time, like “Years” or “Cohorts” in this example.
This is also a chance to add in your “extras.” For example, I added in a file uploader (part of goal F) and fault lines from the “Get Record” and “Update Record” elements to a generic error screen telling the user email support (goal H).
I also set up decision points and question visibility logic, depending on which version of the application they were using (goal J).
5. Test, fix, test, fix, and test again
Since the intended use of this flow was in a Community, I created multiple testing scenarios to account for the special type of Community users that Salesforce has.
I set up my contact Get Record element based on the Contact lookup field that is only populated on the Portal User, which meant I needed to always test the flow as a Community Portal user. This also helped me find the records and fields that the portal user profile did not have access to.

The above image is the most common error I hit. The Community Portal user profile did not have field-level access to the fields I had referenced in my flow.

I also hit this error shown above. This means that the Portal User did not have enough access permissions to the relevant record. They either needed Read access to the field or Read access to the entire object.
Flow errors will only show you one error at a time, so this becomes a long process of running the flow until you hit an error, then fixing the error and running the flow again. Using the Flow Debug functionality can help speed things up somewhat, but it still requires you to run the Debug repeatedly.
6. Look for unexpected learning opportunities
When I was building out the flow, I found features I did not know about. This is where you should keep yourself flexible to take advantage of what Flow has to offer.
For example, one of the questions we ask is what district participants work for. Previously, we had a hard-coded list that needed to be manually updated with districts each time a cohort started. However, now we had our entire Salesforce database to leverage. So, we could use the record choice set to get a list of districts we already maintained in Salesforce.
However, there were unexpected challenges, too. In this case, I wanted to make sure people only saw the districts that were in their state rather than every district. I decided to use a picklist to feed into the Record Choice Set.
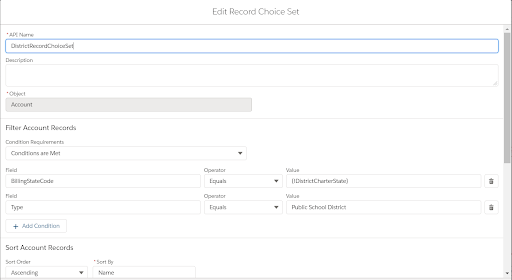
I did have to be flexible on where these questions were; I started out with them on the same page, but I needed the state picklist on one page and the school picklist on the next page for it to work smoothly.
7. Build all of the bells and whistles
It was time to review the list of the initial requirements. I found that I accomplished more than I thought was even possible! I looked at the rest of my requirements and did more research to see if they were possible.
In my research, I found since I was not launching this flow from a button, I could not easily do a final redirect (goal I), so that got deprioritized.
This is also where I worked on some things that got partially done in the first build. For example, the file uploader attached files to the application record successfully, but the flow did not require an upload and I also wanted a clearer success message. Additionally, I did not like that the picklist defaulted to the first value in the list and could not be auto-filled from the first build.
So now, I had time to do additional research and intensive testing just on the specific things I wanted to change. I found that if I had a Rich Text Screen Component with field component visibility, it would show up if I set it to the contentDocIds does not equal fileNames; I used that as my additional success message for people once they had uploaded their resume. I also used that as a decision check in a separate Decision element to make sure people uploaded a document (completing goal F).
My next challenge was the picklists. I wanted them to either default to a blank value or default to what information was already entered on the stored application.
I tried a couple of different methods for how to set it up like I wanted, but finalized on this one. I created this formula for each picklist:
IF( ISBLANK(TEXT({!Application.Field__c})), “Required Field – Please Choose One”, TEXT({!Application.Field__c})).
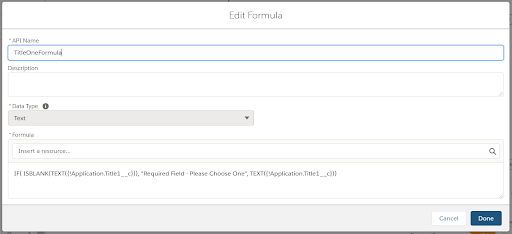
Once that was created, I created a Choice resource. In the Choice Label, I entered the formula resource {!FieldFormula}. In the Choice Value, I put in the reference to the picklist in the application {!Application.Field__c}.
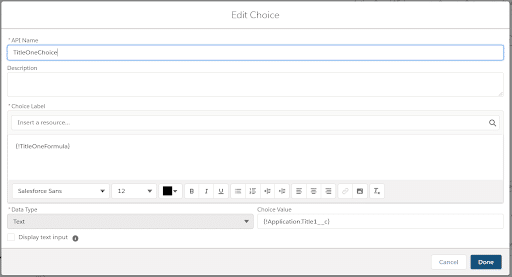
So, in the final setup, I put the custom choice first, then below it a Picklist Choice Set pulling from the picklist, and set the default as the formula Choice resource (completing goal E).
Note: With this setup, if someone has a value already selected, then that value will show twice: once at the top of the list, then again wherever the option is in the picklist list.

I realized during testing that people could keep filling out the application an infinite number of times. That’s not ideal, so in the flow, I marked the application with a completed date on the record and did a check to see if the application had been submitted based on that. This prevented people from submitting the application repeatedly, but if they were using a different cohort code, they could submit a new application because it would be for a different cohort.
8. Add and check validation
In my final round of testing and building validation, I tested to find the breaking points.
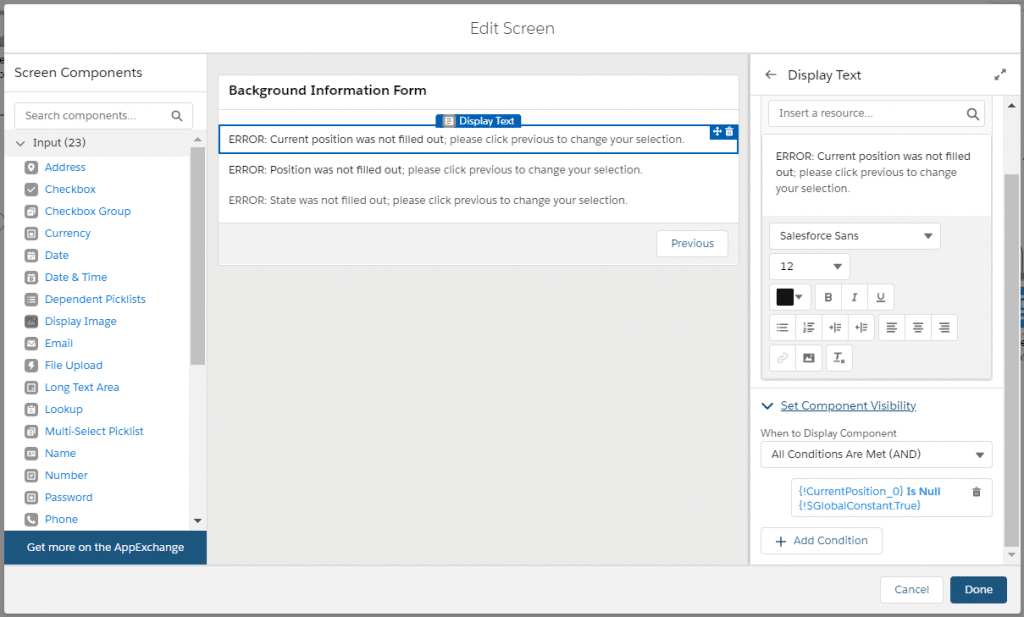
One thing I was looking for was, what happens if people do not fill out the picklists but just leave them on “Required Field – Please Choose One” (since the picklists are “filled out”, the users are able to proceed)? To stop that from happening, I added a decision element after each screen to see if any of the picklists are equal to empty string and, if that is the case, directing them to an error screen. I made sure to disable the “Next/Finish” navigation, requiring that the participants would only be able to go back to the original page, and all the values they already entered would still be there. I used component visibility on rich text components to show or hide the error messages based on what needed to be fixed from the previous screen (completing goal G).


Another type of validation to think about is system validation. For any Number or Text screen components, I used the standard “validate input” section to make sure none of the inputs went over the system character limit. I used the basic formula of LEN({!ScreenComponentAPIName}) < 255 and just changed the API name and max characters for each field. You should leverage screen component types as much as possible to make sure you limit on what you need to create custom validations for. For example, if you’re updating a Number field type, use a Number screen component.
You should also bring in real users to test your flow, and see what additional information or validation you might need to include. For instance, I had one user try to type letters in a Number screen component, so I included an additional note on that question that the field only accepts numbers. I would not have thought to do that unless I had tested with real people.
9. Embed the flow into your Community
Now it was time to put the flow into my Community. I knew we wanted this to be the first thing people saw when they registered, so I put it on the front page of our Community. However, not everyone needs to see the application page all of the time. So, I restricted the audience of that Flow component to people who were not participants or alumni, since those users had other things on their homepage.
However, we still wanted to make this form accessible to people who are participants or alumni, in case they wanted to reapply for a future cohort. One of the problems with our previous form was inflexibility for current participants and alumni. So, for this requirement, I created a page and tab that would be permanently available for all logged in Community users (goal K). Now, we simply send an email linking to that tab; people who are logged in with existing accounts are directed to that tab, and people registering for the first time will see the form on the homepage.

Business results:
We have reduced the time to update the application from multiple hours (and lots of dread) to about five minutes! Additionally, the closing of a cohort is now something that can be done by regular business users who are already in charge of managing the applications, instead of the Salesforce Admin.
Do try this at home
While this was a very complex flow, the underlying principle is straightforward. You can put a flow into a Salesforce Community in order to collect and store information from your Community users. Here are a couple of other examples of flows you could use in your Community:
Update contact information
You could use Flow to show people what their current contact information is and give them the option to update it.
Give program options
Use this as a way to let people select a program before applying. Then use that selection to direct where the flow goes.
Send a confirmation email
Do you want to notify the person that their application has been received or notify staff that an application has come in? Use an email notification or a Chatter post.
Digitize forms
Do you have a form that participants fill out when they start, when they end, or at any point in time? If you store that information in Salesforce, why not make it a flow?
Let us know what you thought of this solution, and tell us how you want to use it with the hashtags #AwesomeAdmin and #HowISolvedThis.
Resources
Trailhead badges