As an admin, there may be times where you want to simplify the process of gathering data from your end users by improving the user experience. This involves minimizing the number of screens and clicks needed to get the job done and increasing the overall efficiency of the process. You want to flex those declarative muscles and build this using clicks, not code. Sounds like screen flows are your solution!
We’re going to give you a high-level overview of a screen flow, highlight a few cool features you might want to use, and give you an example of a screen flow to inspire you to build your first one. Let’s get started.
Before we go any further, what’s a screen flow?
A screen flow is a flow type that requires user interaction as it includes screens, local actions, steps, choices, or dynamic choices. Your users can invoke a screen flow from many distribution methods, such as Lightning pages, Experience Builder pages, Lightning web components, Aura components, custom buttons, actions or links, and Flow Orchestration, just to name a few. You can use a screen flow to collect data or display data to users.
What are example use cases solved with a screen flow?
There are SOOOOOOOO MANY. Where do I even begin?! I’m going to give you just a few examples of use cases solved with a screen flow. Otherwise, I would be here for days…
- Digitize an application process to minimize the overall application lifecycle, decrease likelihood of NIGO (not in good order) where the application is sent back due to readability or data quality issues, and automate the application submission process.
- Allow customers to submit support cases directly, including providing file attachments, without having to contact a support agent.
- Create a guided experience for your users, providing the right information at the right time to the right users. You don’t want to show them a screen of fields and put the onus on the user to determine which fields they need to provide information for and which fields don’t apply.
- Decrease the number of screens and clicks down to a more manageable number of fields.
- Pre-populate information in an online form based on what you already know about the user.
- Allow a returning customer to easily place a re-order, rather than start the order from scratch.
What are some examples of use cases for a screen flow that you can come up with?
What can we do in a Screen element?
There are many cool things you can do in a Screen element.
Out of the box, you can choose from an assortment of input fields (Date/Time, Text, Long Text Area, Lookup, just to name a few) and a variety of components (such as File Upload, Slider, Toggle, Slack Workplace Selector, Display Image, Slider, or Display Text).
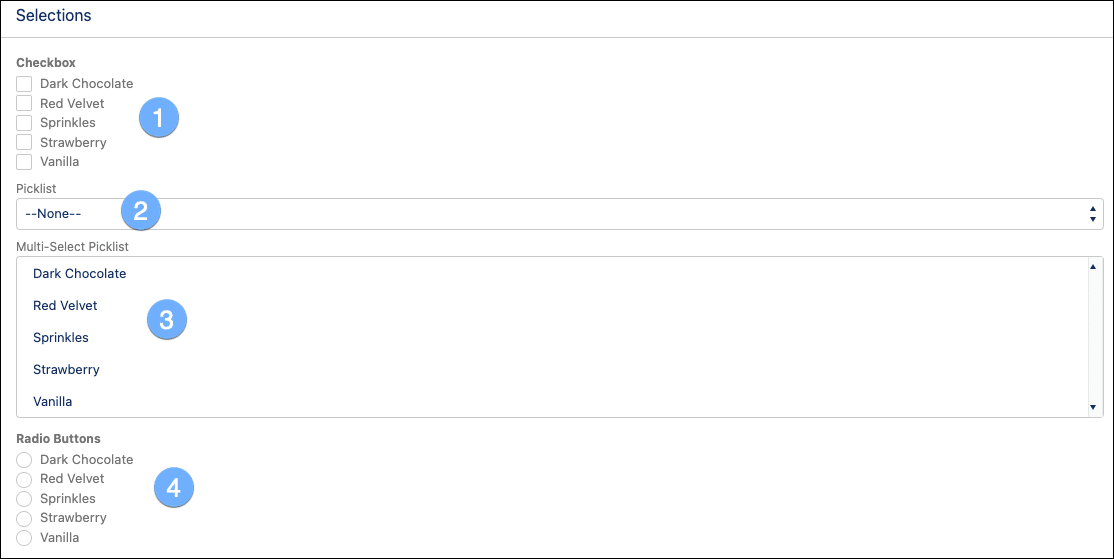
As shown in the image below, in terms of choice user interface styles, you can select from a (1) Checkbox group, (2) Picklist, (3) Multi-Select Picklist, or (4) Radio Buttons. You can select from a statically maintained list of choices, list of collection choices, list of record choices, or picklist choices.
The Data Table component, Generally Available (GA) in Spring ’23, is pretty neat. This component either displays records in read-only mode or allows for single or multiple selection. You decide! You configure the columns to show, specify the display order, and much more. Once the user selects the record(s), you can take further action on those records in your screen flow. You can do some pretty neat things using formula fields to show images and hyperlinks in your data table as well.
If you used Dynamic Forms in your Lightning record pages, then you know about component visibility. I absolutely love ❤️ that feature! You can use it in your screen flow too! Component visibility is a feature that allows you to specify when to show a component if conditions you configure are true. You can configure a field or section of fields in your screen flow to appear only if a specific field value is X. If it’s Y, the field or section of fields would be hidden. In the animated GIF below, you’ll see the Email and Phone fields have a component visibility filter to show only if the Best Method of Contact is Email and Phone, respectively. On the screen flow itself, the field will show accordingly based on the value selected for Best Method of Contact. Pretty slick!
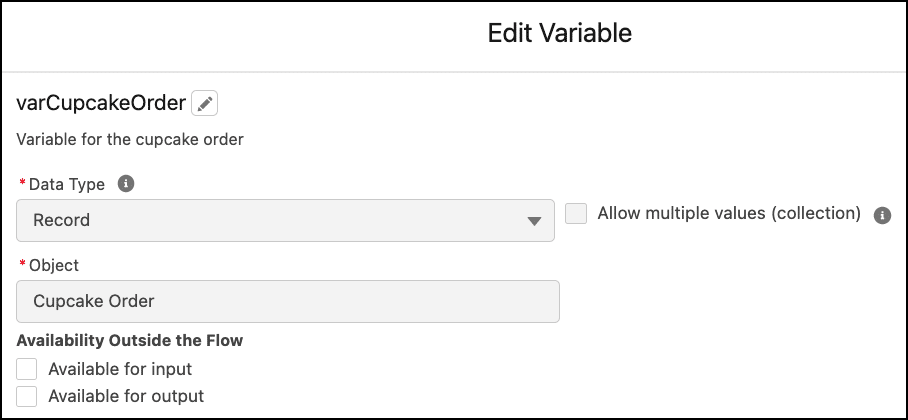
You can also use record fields, also known as Dynamic Forms for Flow, where you can add a record’s field to your Screen element and your flow will take on all the attributes of that field automatically. No need to replicate the attributes yourself. Added bonus: If the field attributes change in Object Manager, your flow is automatically taken care of. How’s that for efficiency?! All you need to do is create a record variable for that object, like the one below created for a cupcake order record. Record fields currently support only these field data types: Address, Checkbox, Date, Date and Time, Email, Name, Number, Phone, Picklist, Text, Text Area, and Long Text Area. Whoa, wait a minute. You’ve lost me. What’s a variable? Think of variable as a container that holds information for use later on in your flow. A record variable is a container that holds information for an entire record or record(s).
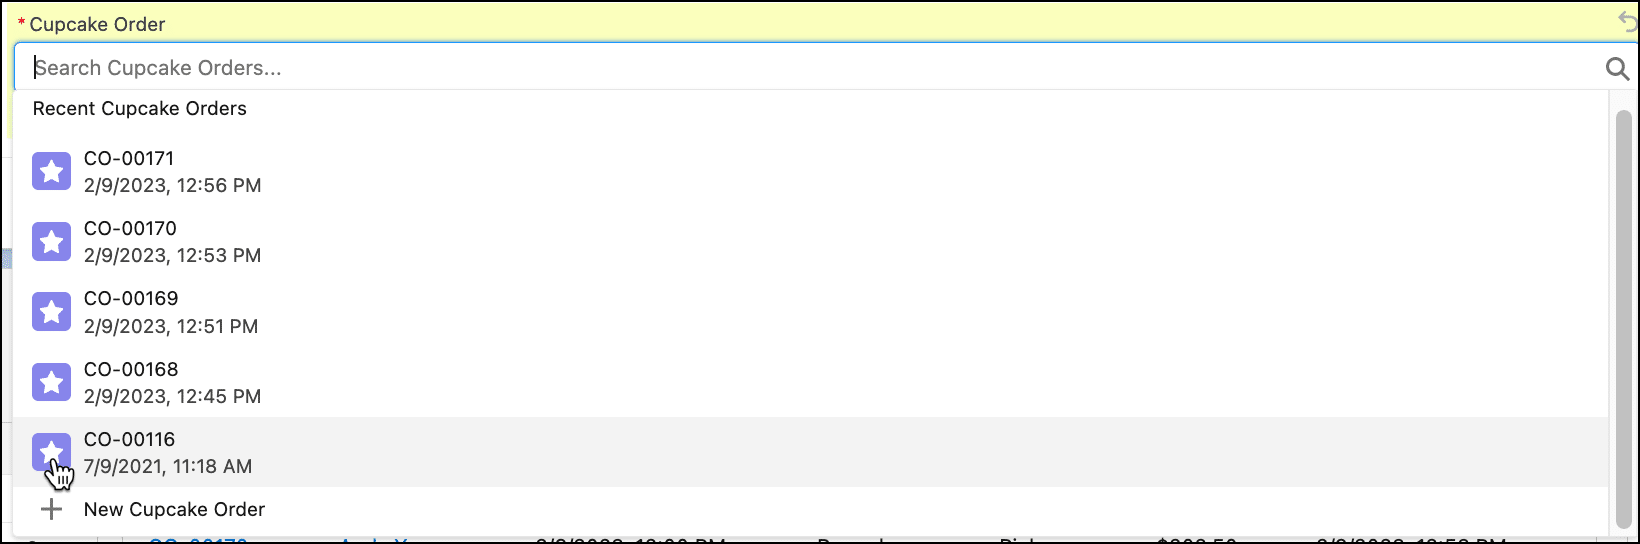
When you add the lookup field using record fields to your Screen element, not only can you search on all the available records for that object, but you can also create a new record, just like you can elsewhere in Salesforce.
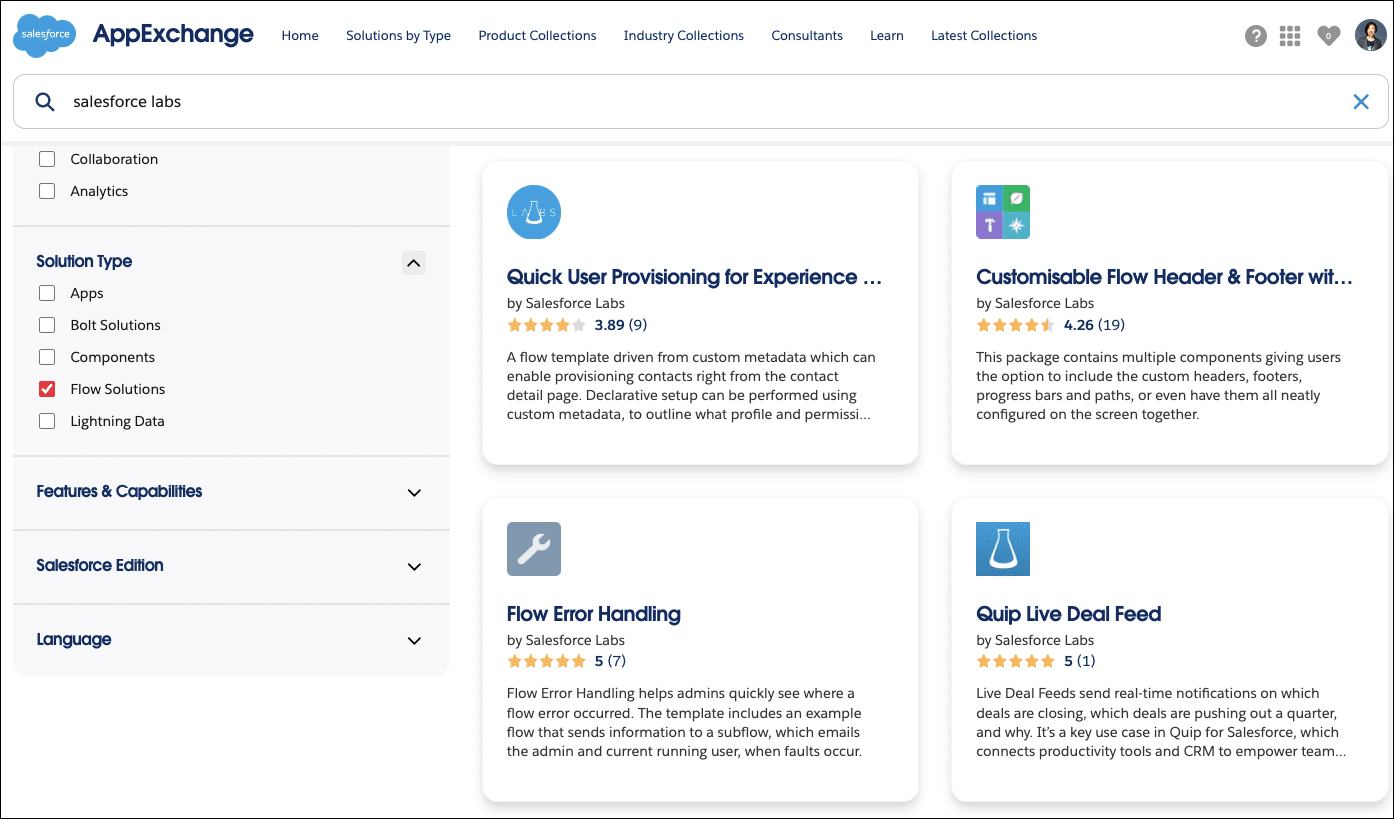
Additionally, you can use custom components your developers built or components you install from the AppExchange. While you’re there, check out the Flow Solutions that Salesforce Labs created. The best part of installing Salesforce Labs solutions is: They’re free! Who doesn’t love free?!
How do I get started?
It’s important to understand the requirements and overall process and to do your analysis BEFORE you start building your automation. I recommend sketching it out and validating the process with business stakeholders before you log in to Salesforce and go into Setup. It’s so much easier to make changes on paper than to have to reconfigure a flow. Remember, you’re automating manual steps, so think about what actions you take that you need to tell Salesforce to do on behalf of the user, including making decisions: If I search for open cases and I find some, now what do I do? What if I search for open cases and don’t find any; now what do I do? This process map becomes your guide to building your automation.
Show me an example of a screen flow
If you’ve been following this series so far, our #AwesomeAdmin Addison Dogster has been building a lot of automation at Mochi Cupcakes. This fictional company sells, you guessed it, cupcakes! I’m now craving a strawberry cupcake with sprinkles. Yum! Apologies, got distracted there for a sec.
Addison is working on a screen flow that will enable customers and staff to easily reorder a previous cupcake order. For simplicity’s sake, we’ll show the flow as a Mochi Cupcakes staff member uses it while taking a phone order. Here the staff member selects a customer, provides order details, and selects a prior order from the list of the five most recent cupcake orders. Behind the scenes, flow creates the cupcake order for the customer.
This is the screen flow Addison built to handle the cupcake reorder process.
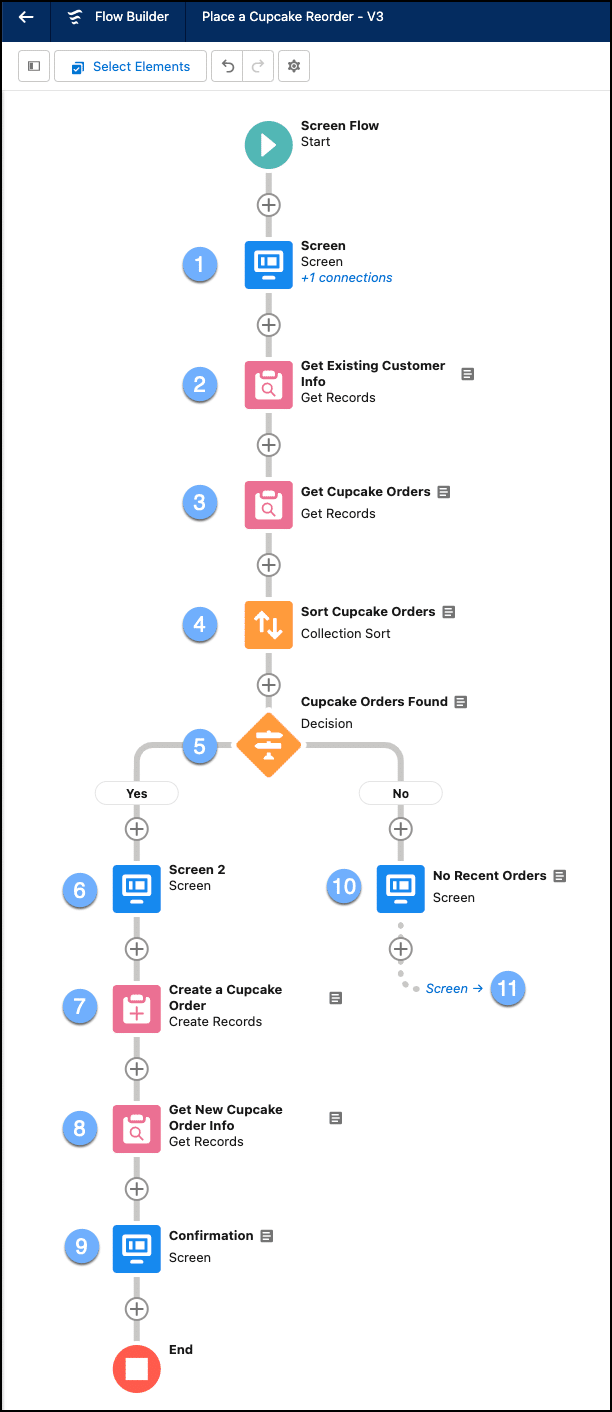
Now, let’s quickly step through the flow Addison built. It might look intimidating with so many steps at first, but hopefully with the explanation to follow below, this screen flow becomes a little less scary.
- The Screen Screen element allows the user to select the customer (that is, contact) making the reorder. Here, we use a Lookup component to search for a single contact record.
- The Get Existing Customer Info Get Records element finds the contact record the user selected in the screen element.
- The Get Cupcake Orders Get Records element finds all the cupcake order records associated with the contact record.
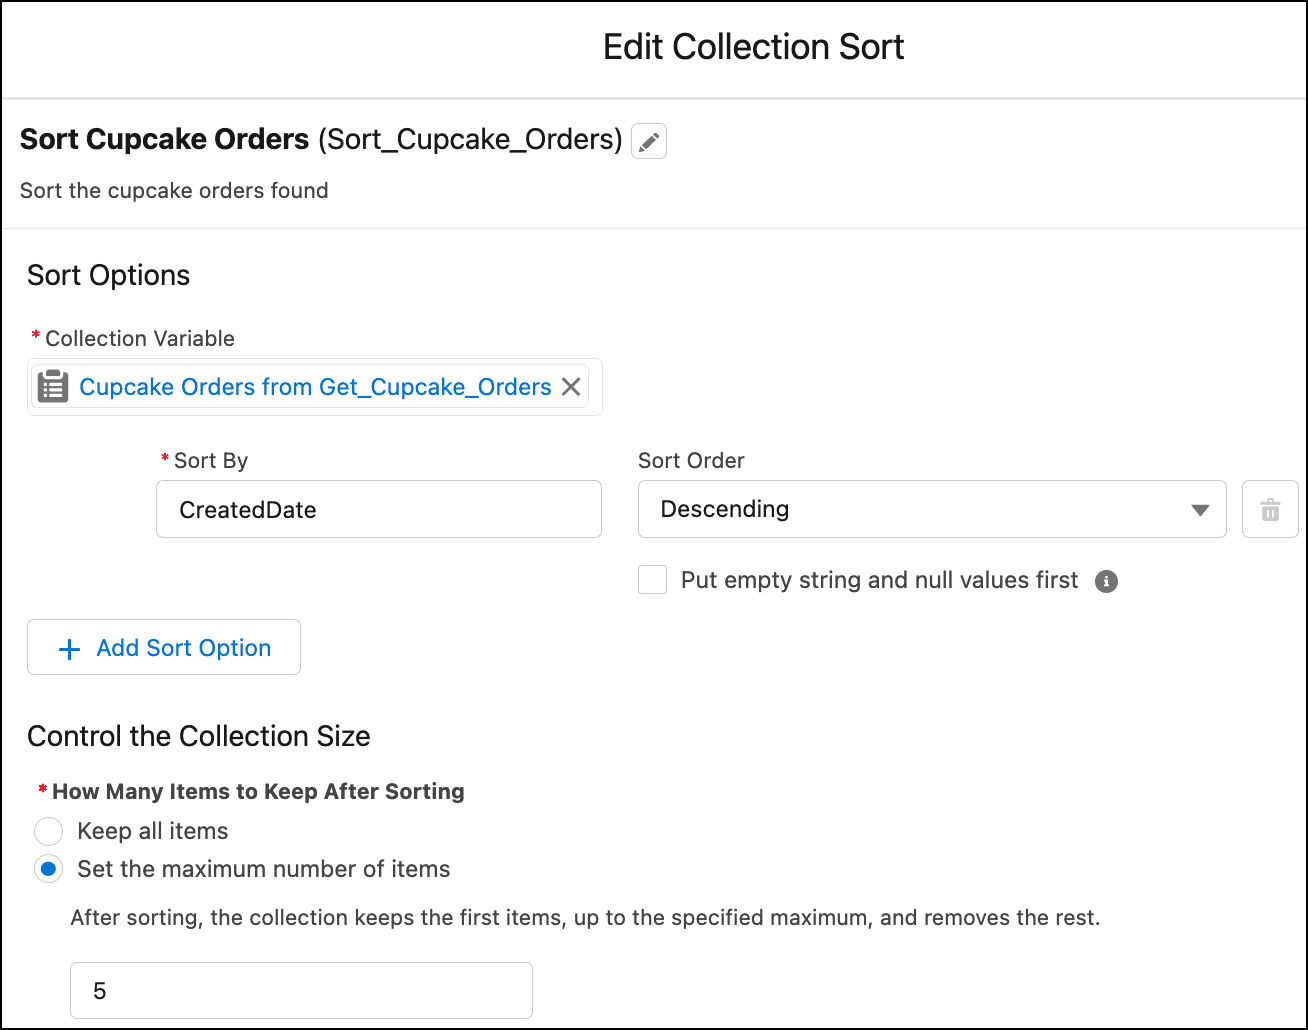
- The Sort Cupcake Orders Collection Sort element takes the cupcake order records and limits them to the most recent five cupcake orders.
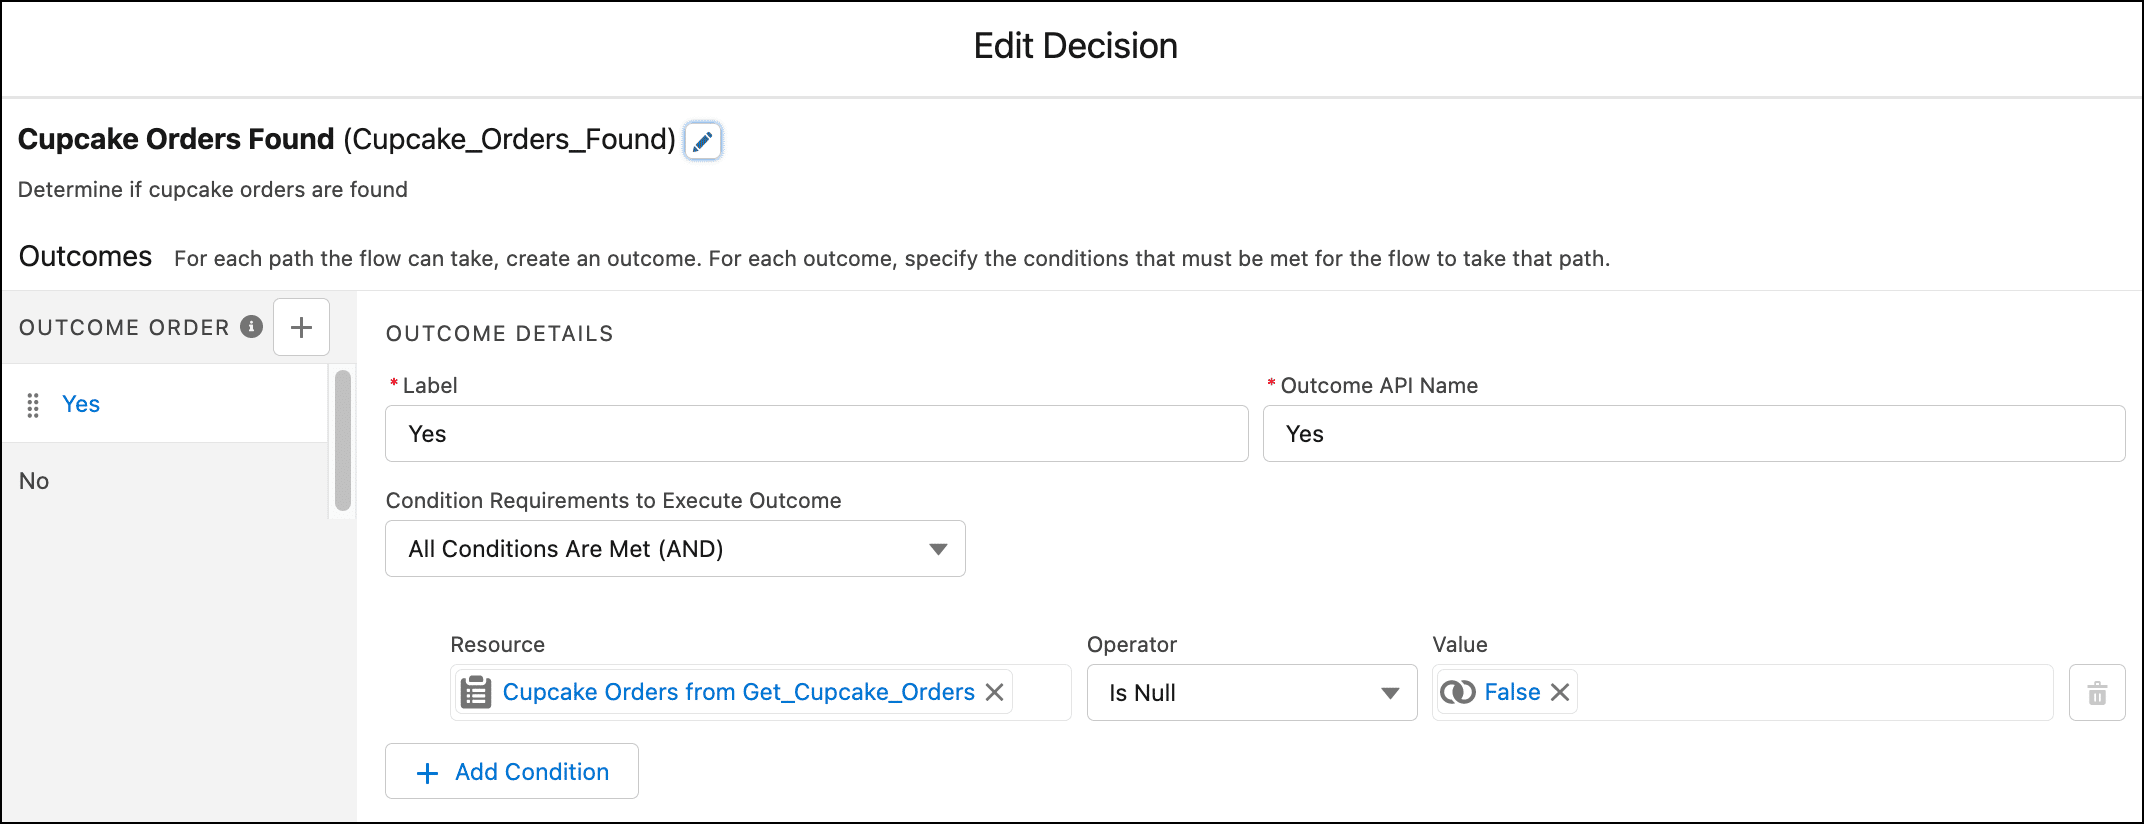
- The Cupcake Orders Found Decision element determines whether there were cupcake order records found in Step 3.
- The Screen 2 Screen element collects information about the new cupcake order such as order method (pickup or delivery), best method of contact (email or phone), email, phone, date/time order desired by, and the customer’s five most recent cupcake orders. There’s a mixture of record fields, standard field components, and the Data Table component. There are also uses of component visibility to ensure we’re asking for relevant information. Some fields are prepopulated with values we already know about the customer.
- The Create a Cupcake Order Create Records element creates the cupcake order based on the user’s input from the Screen elements and other fields we’re filling in for the user on their behalf.
- The Get New Cupcake Order Info Get Records element retrieves information about the newly created record, including the record name and Id.
- The Confirmation Screen element shows a confirmation to the user and displays user input for the cupcake order.
- Following the “No” outcome from the Cupcake Orders Found Decision element, the No Recent Orders Screen element shows a message to the user informing them that they have no previous cupcake orders.
- This connector takes the user back to the Screen Screen element.
Let’s check out how Addison configured her screen flow.
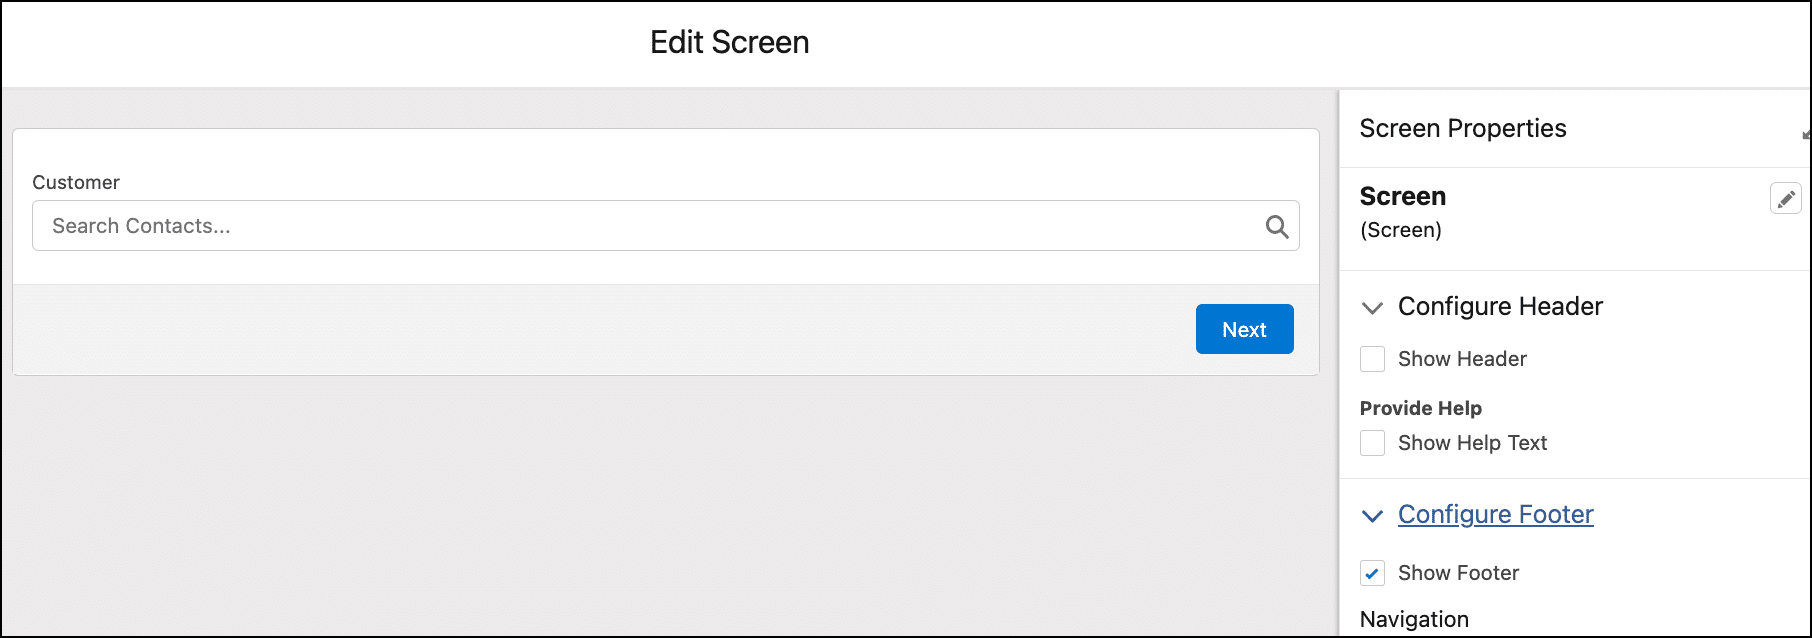
Addison used a Screen element for the Mochi staff member to select the customer. By default, the name of the flow is shown as the header. Addison chose to hide it. She also configured to hide the Previous and Pause buttons from the footer.
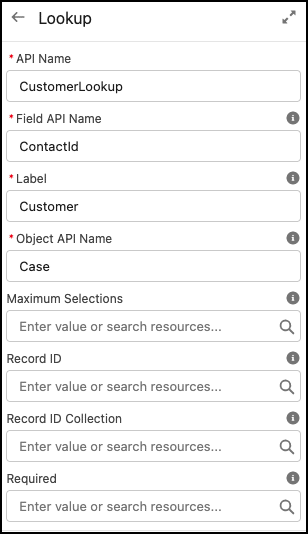
Addison used the standard Lookup component, not the Record Field Lookup component, as she didn’t need the functionality to create a new contact record to look up the contact records. Here she configured the Lookup component to reference the ContactId field API name from the Case object.
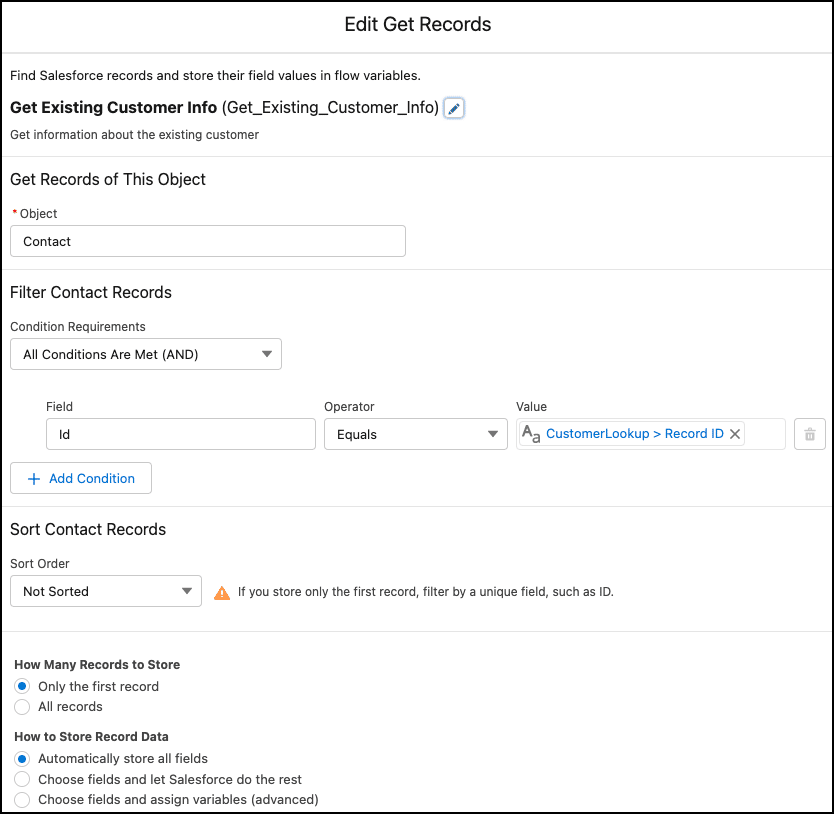
Addison used the Get Records element to find the contact record where the Id equals the Id of the contact record selected in the Lookup component in the Screen element. She selected to store only the first record found and all the fields of that record.
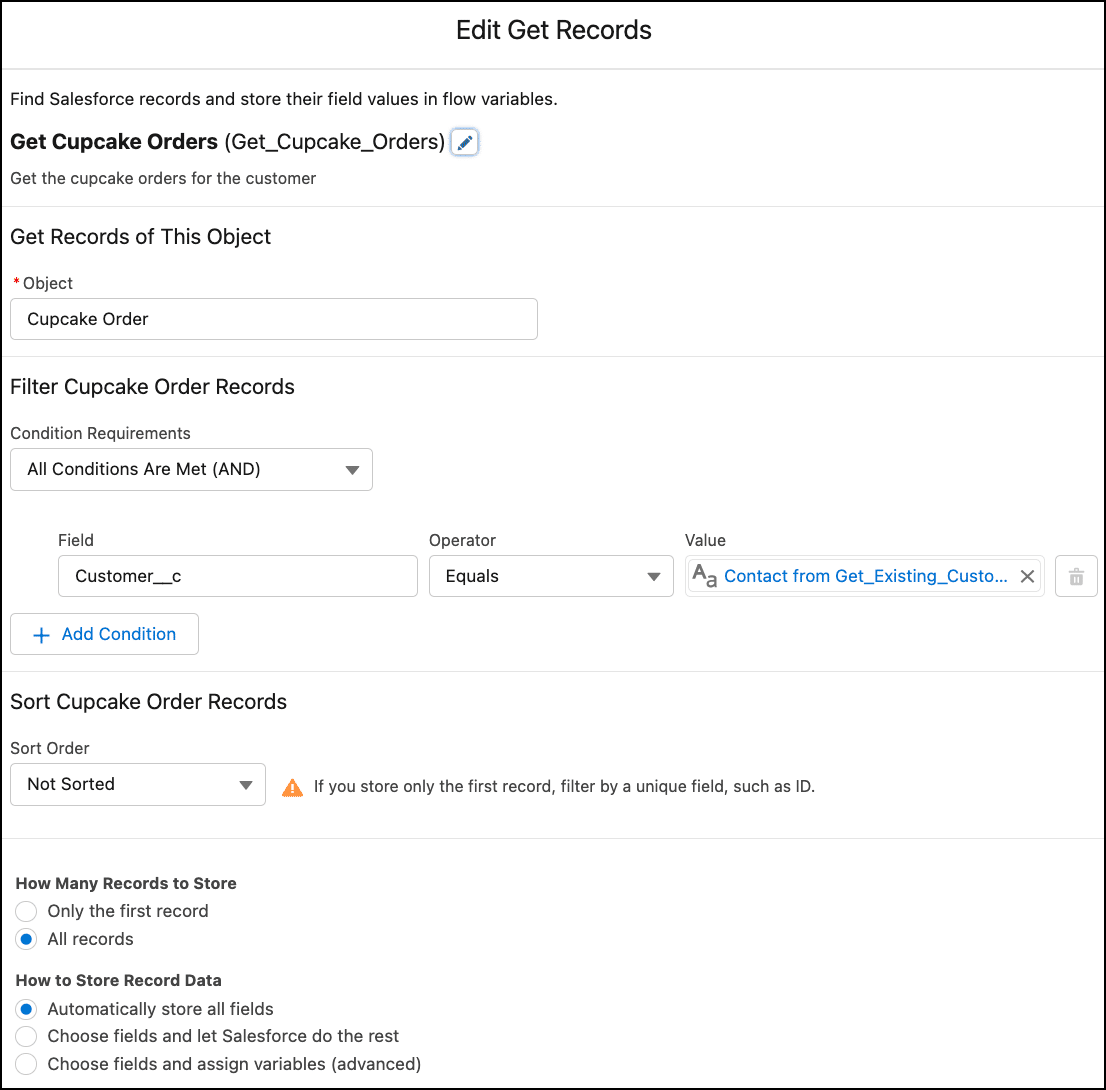
Next, Addison used another Get Records element. This time, she queried the Cupcake Order object and looked for records where the customer field equals the Id of the contact record in the previous Get Records element. Here, Addison instructed her flow to store all records found.
Addison wanted only the five most recent cupcake orders, not all of them, for the customer to reorder from. She used the Collection Sort element. Here she specified the flow to look at the cupcake order record Ids in the Get Cupcake OrdersGet Records element and sort the records by Created Date in descending order. She also set it to limit the records after the sort to five, and thus removed all extra records beyond the first five records.
We should allow the customer to proceed only if there were any cupcake orders found. If there were no cupcake orders found, then the reorder process would basically come to a halt as there was nothing to reorder. Addison used a Decision element to determine whether the flow should continue to proceed with the reorder process or stop. She defined the Yesoutcome to see if the cupcake orders from the Get Cupcake Orders Get Records element is not empty (that is, Cupcake Orders from Get Cupcake Orders is Null False). Null is equivalent to blank/empty. Is Null False is basically two negatives, which make a positive, meaning there were records found. Addison set the default outcome to No which is the opposite of the “Yes” outcome.
Assuming cupcake orders were found, Addison configured another Screen element to collect information about the cupcake order: order method, date/time order desired by, best method of contact, email, phone, and recent cupcake orders for selection.
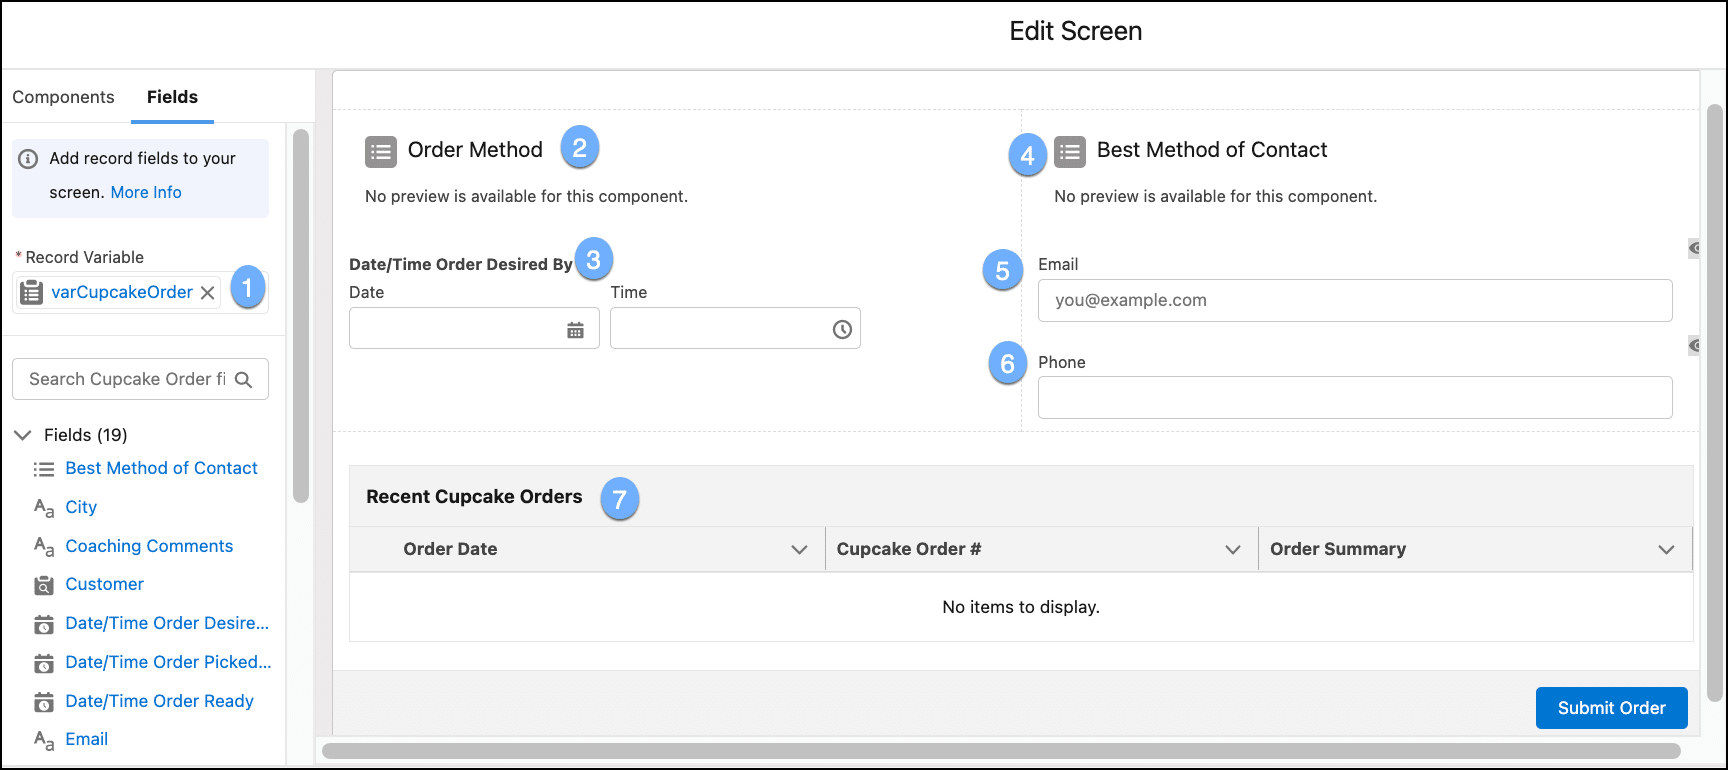
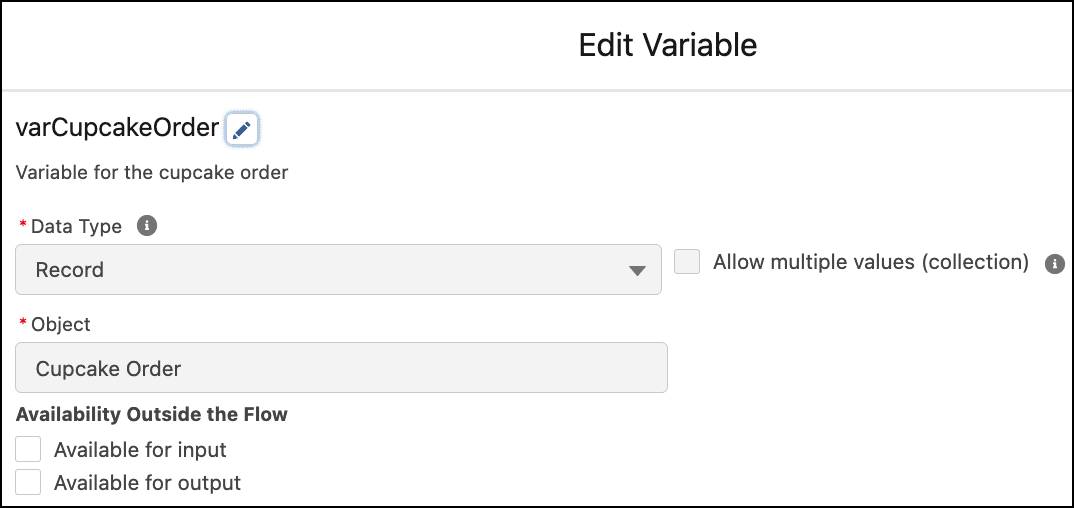
She used record fields to reuse the cupcake order record fields (2) Order Method, (3) Date/Time Desired By, and (4) Best Method of Contact so she didn’t have to recreate the field attributes. To do this, she created a record variable called varCupcakeOrder (Data Type=Record, Object=Cupcake Order) and referenced the Record Variable (1) under the Fieldstab to access the record fields.
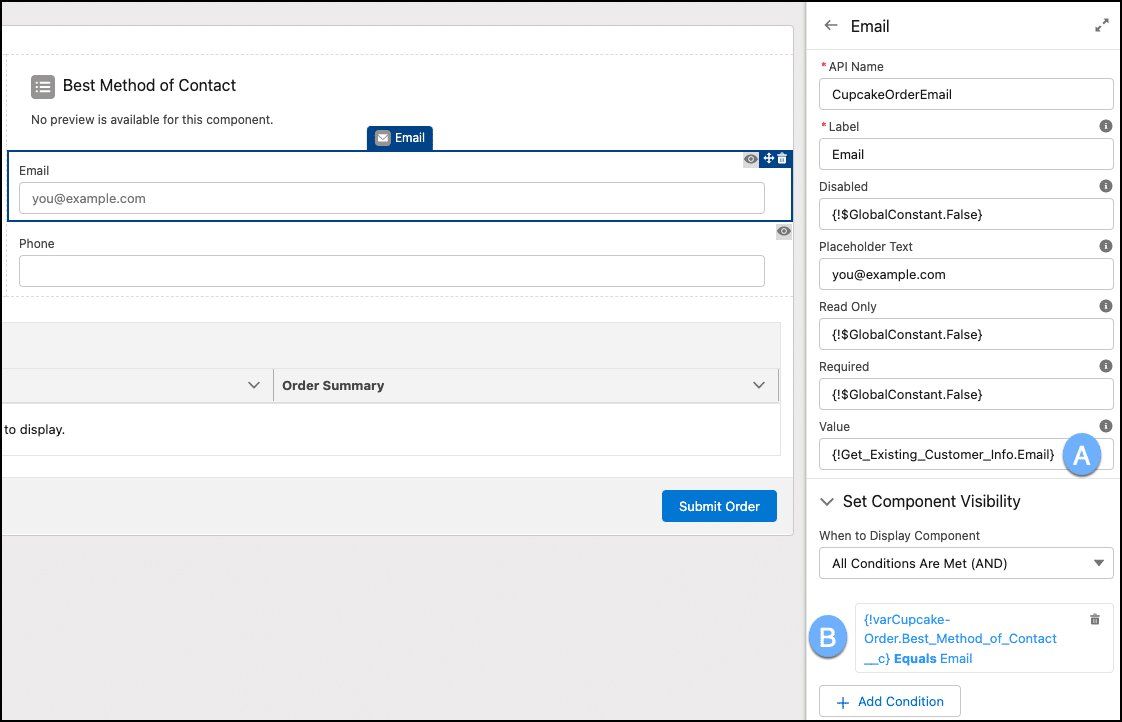
Addison wanted to prepopulate the (5) Email and (6) Phone fields with data from the contact record. In this case, she decided against using record fields and instead opted to use the standard Email and Phone fields where she could set the default values. Additionally, Addison wanted to show relevant information to her users at the right time. She wanted to show the Email field only if the best method of contact was set to email, and she wanted to show the Phone field only if the best method of contact was set to phone. To do this, she configured component visibility on the fields.
Here’s an example of how Addison configured the Email field. She set the default value (A) to show the value from the Email field of the contact record from the Get Existing Customer Info Get Records element. Addison set the component visibility filter (B) to show the field only if the record field Best Method of Contact’s selected value is Email. Otherwise, the field is hidden.
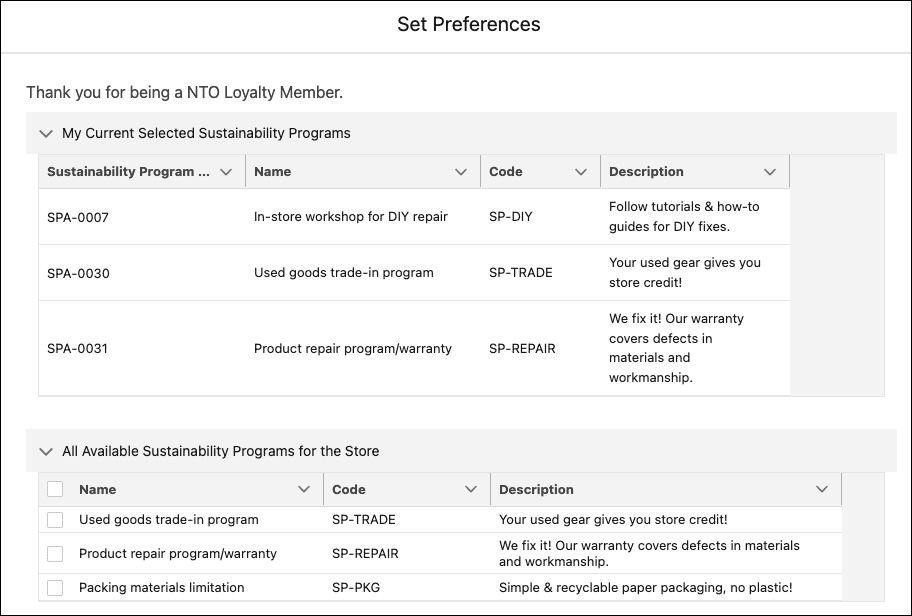
Addison added the Data Table component to display the five most recent cupcake orders for selection. The animated GIF below shows the various attributes you can configure as an admin. Here, Addison configured to show a custom table name, selected the records to display using the cupcake orders from the Get Cupcake Orders Get Records element, set the row selection to Single, required the user to make a selection, and configured the columns from the record to show in their display order.
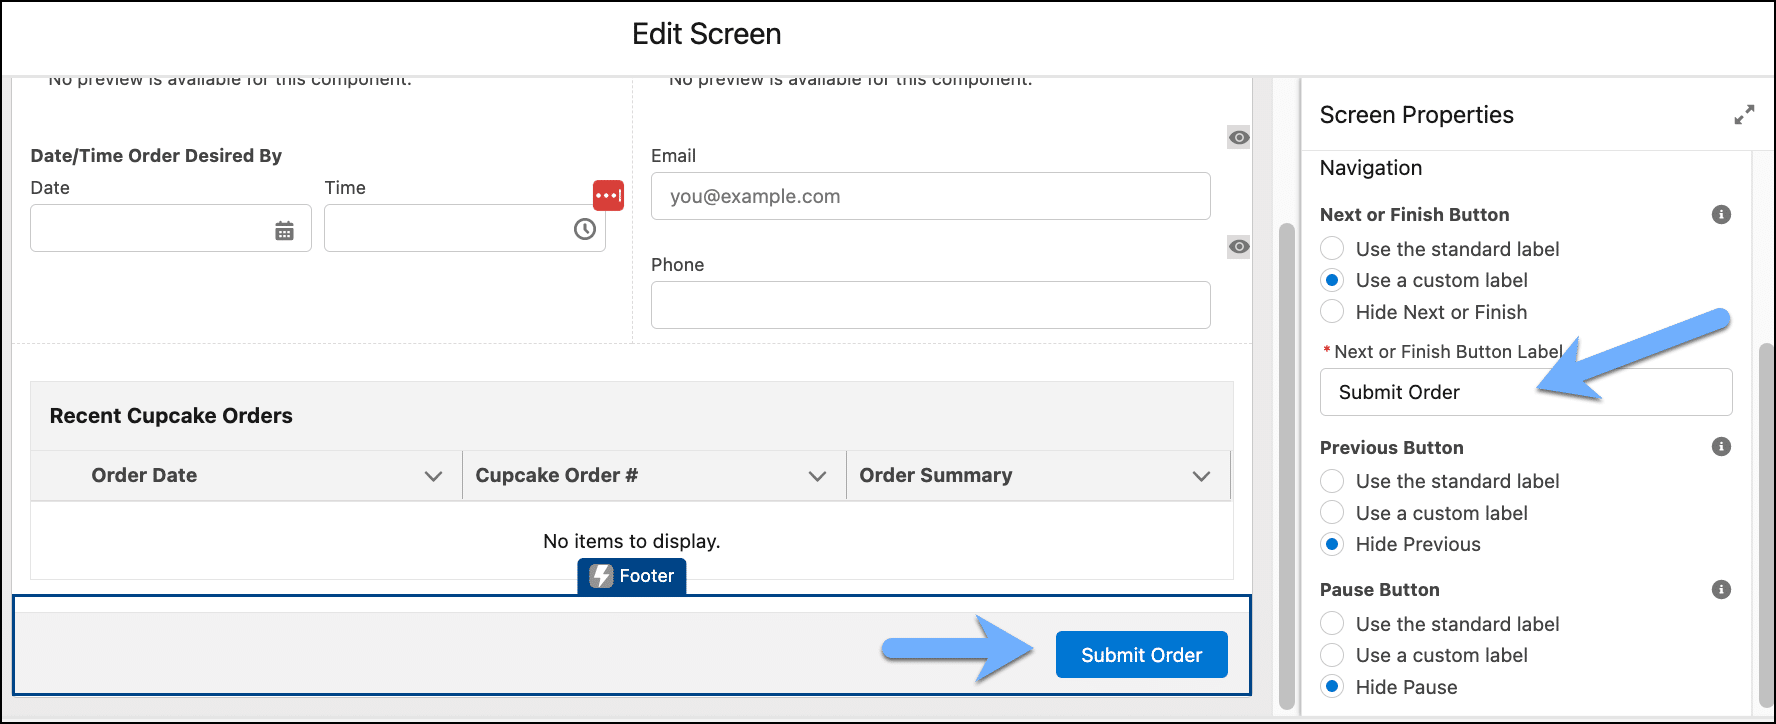
Lastly, on this Screen 2 Screen element, Addison configured the footer button to update the standard “Next” button label to Submit Order.
Now that Addison had all the information for the order, she used the Create Records element to create the cupcake order record using the user selections and setting field values on behalf of the user. Where she used record fields in her screens, such as (A) Best Method of Contact, she set the field value by finding the record variable varCupcakeOrder and the appropriate field. For the data table record selection, Addison selected the (B) CupcakeOrderTable Data Table component, First Selected Row (since her table allowed only for a single selection), and then the appropriate field. For the standard field component, such as the (C) Email field, she set the field value to use the Lookup component’s Value field. In some instances, such as for order type, she needed to set the actual value. In this case, she set the order type to (D) Re-order to specify that the cupcake order is a reorder.
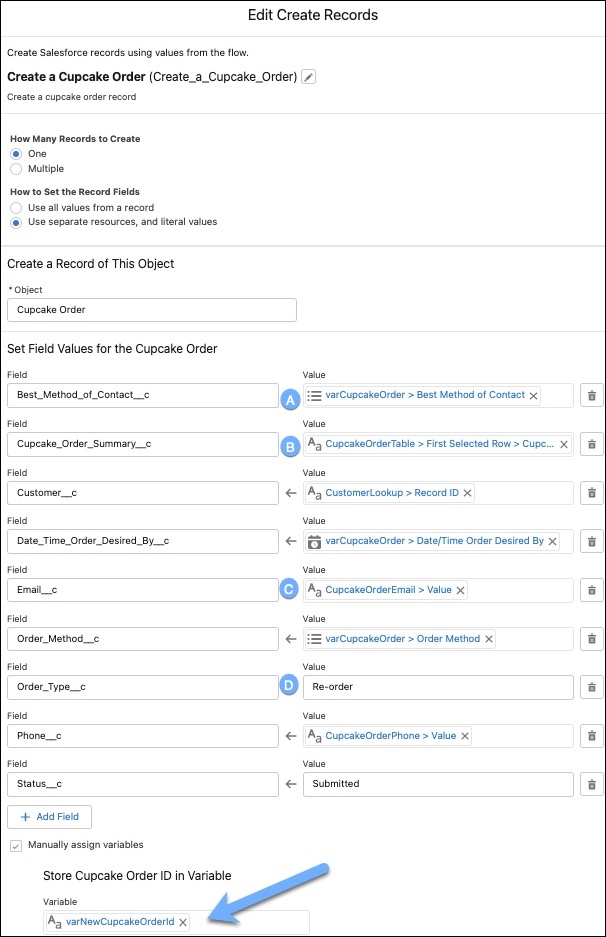
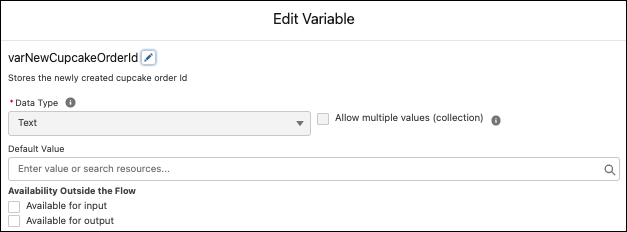
Lastly, because Addison will display a confirmation page to the user with the newly created cupcake order information, she needed to store the newly created record Id in a variable varNewCupcakeOrderId (Data Type = Text).
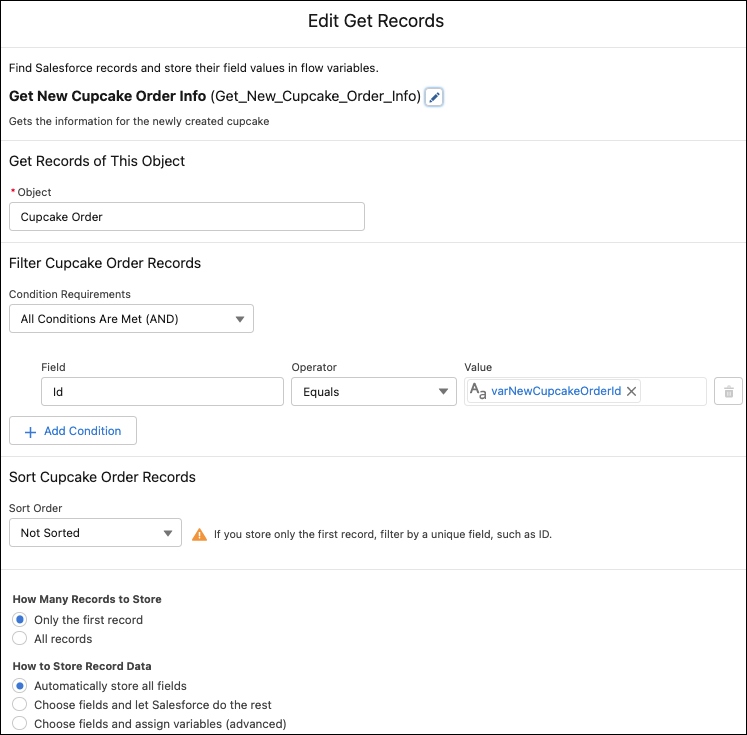
Next, Addison configured a Get Records element to query the newly created cupcake order by looking for the first record it could find in the Cupcake Order object where the Id equals the Id stored in the variable varNewCupcakeOrderId.
As the last step in the reorder process, Addison configured a Screen element to show a confirmation message (using the Display Text component) with the order number for the newly created cupcake order, details from the order itself, and a link to view the cupcake order. You can use merge fields in flow just like you use merge fields elsewhere in Salesforce. With the Display Text component, you can format your text with font type, size, color, and various formatting options.
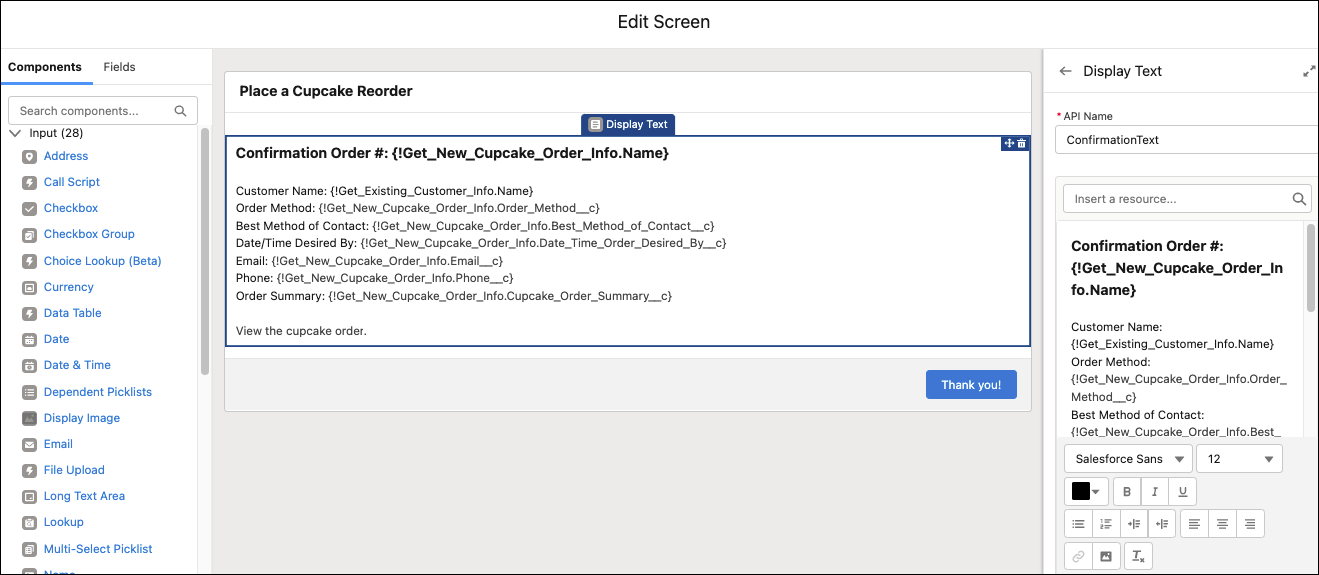
To add the hyperlink to the newly created cupcake order, Addison created a dynamic link. She found the merge field for the variable varNewCupcakeOrderId, cut and pasted the text, highlighted the link text, clicked on the link icon, and added /{!varNewCupcakeOrderId} in the link URL field, which instructs the flow to link to the record Id. Pretty neat, huh?
In case there aren’t any recent cupcake orders (aka Decision outcome “No” path), Addison configured a Screen element to show a message (using a Display Text component) to the user that there are no recent orders, and the button takes the user back to the initial screen.
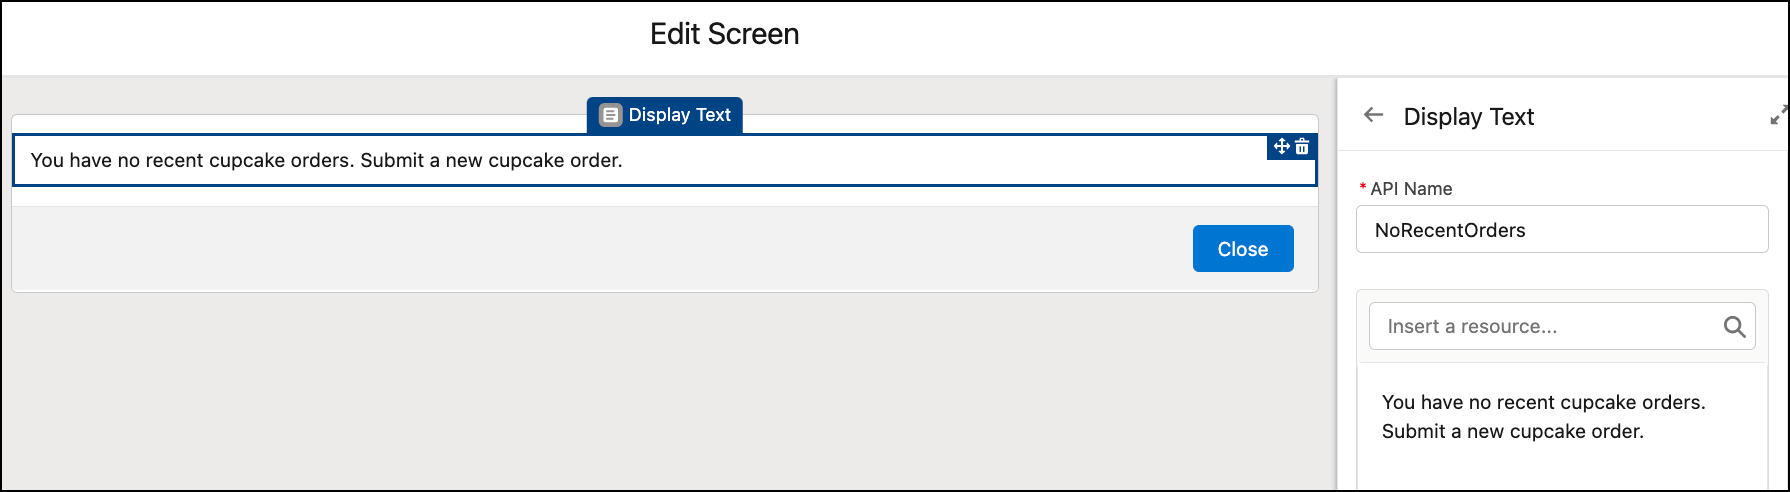
To connect an element to another element in the flow, Addison selected to connect to element and selected the initial Screen element. Now the user will be taken back to the initial screen after the No Recent Orders screen.
Before Addison saved and activated her screen flow, she tested it first using the Debug feature to save herself time from saving and activating several flow versions. Note: Be sure to test the screen flow as the intended user to ensure that user has all the necessary permissions needed to execute all the actions in the screen flow.
Whew! We got through Addison’s screen flow. While it may have been a long one, I hope you found it helpful and picked up inspiration for your own screen flow.
Get practicing. Build your first screen flow!
There’s no better way to learn than to roll up your sleeves and start building some screen flows. Start with a very basic use case to get started. Complete the Trailhead Project: Build a Simple Flow or Trailhead Module: Screen Flows. Or, create a screen flow that captures basic contact information and creates a contact record. Next step: Create a screen flow that captures a person’s name and case information, creates the contact and case records, and associates the case to the contact. Continue to build your flow skills from there. By exercising those flow muscles, you’ll be able to create a similar screen flow to the one Addison created in no time!
Create your screen flow and share it with us on Twitter @SalesforceAdmns. We want to see those screen flows!
Resources


