As I write this blog to highlight features in the upcoming Spring ’26 release, I’m certainly thinking of warmer times when I can retire my heated jacket, heated scarfs, heated all the things, and the snow pants I wear to walk Mochi while staying warm. I look forward to an actual physical spring season where Boston shakes off the gray winter, we start seeing yellow daffodils and pretty pink and white flowers in the magnolia trees, swan boats return, runners come to our city for the 130th Boston Marathon, and Mochi and I can take nicer walks outside. What does spring where you are remind you of?
After you read the summarized list of features below, go to your Spring ’26 sandbox and try them out yourself. You can also get hands-on in a Spring ’26 pre-release org. Check the Maintenance Calendar for exactly when your Salesforce org will get the Spring ’26 features. Scroll through the list and check your Salesforce instance (NA__, EMEA__) against the release dates listed in the calendar.
Releases include pilot, beta, and generally available (GA) features.
- Pilot: Usually the first phase of public testing, pilots normally include a small subset of participant companies. These companies must request to opt in to a pilot and then be nominated for participation.
- Beta: This phase involves rolling out a feature publicly for testing. Beta features are normally given limited support as they are not yet fully functional or finished, so we recommend getting hands-on with these features in a sandbox.
- GA: Once a feature has passed the pilot and beta testing phases, it will be formally included in a Salesforce Release. GA features are considered fully functional and, in most cases, fully supported.
By no means is this meant to be a comprehensive list but rather just a few of the enhancements and new features in Spring ’26. As always, I highly recommend browsing the release notes for features of interest to your company and industry.
While we have you, which feature would you like to learn about at TDX or see featured in content created by our Admin team? Drop us a line. We’d love to hear from you.
Artificial intelligence enhancements
Finally, an agent for admins! Supercharge your admin productivity with Setup with Agentforce (beta)
Imagine having a “co-admin” built directly into your Setup menu. Instead of clicking through dozens of screens to manage users or build automation, you can now simply chat with Salesforce. You describe what you need in natural language, and the agent handles the heavy lifting, from troubleshooting complex formulas to creating entire custom objects. Your Setup agent can help you manage user access, create objects and flows, and even troubleshoot formulas, all while minimizing clicks to navigate and take action. Yes, please! The best part is you can access Setup with Agentforce from any page within Setup. Chat with the agent in the panel and when a task gets complex, the chat panel expands into a full-screen canvas. This gives you a rich workspace to preview record details, list views, and metadata changes before you hit “Apply”. It’s the perfect blend of AI speed and human oversight.
The following actions are supported in Setup with Agentforce.
- Managing users
- Troubleshooting user access
- Managing permission sets, permission set groups, organization-wide defaults, and sharing rules
- Creating custom objects and fields
- Creating and managing flows
- Getting information from Salesforce Help
- Navigating to the right Setup page to complete a task
- Creating a custom report type
- Creating Lightning pages
- Fixing issues and getting an explanation of formulas
- Getting information about usage and licenses
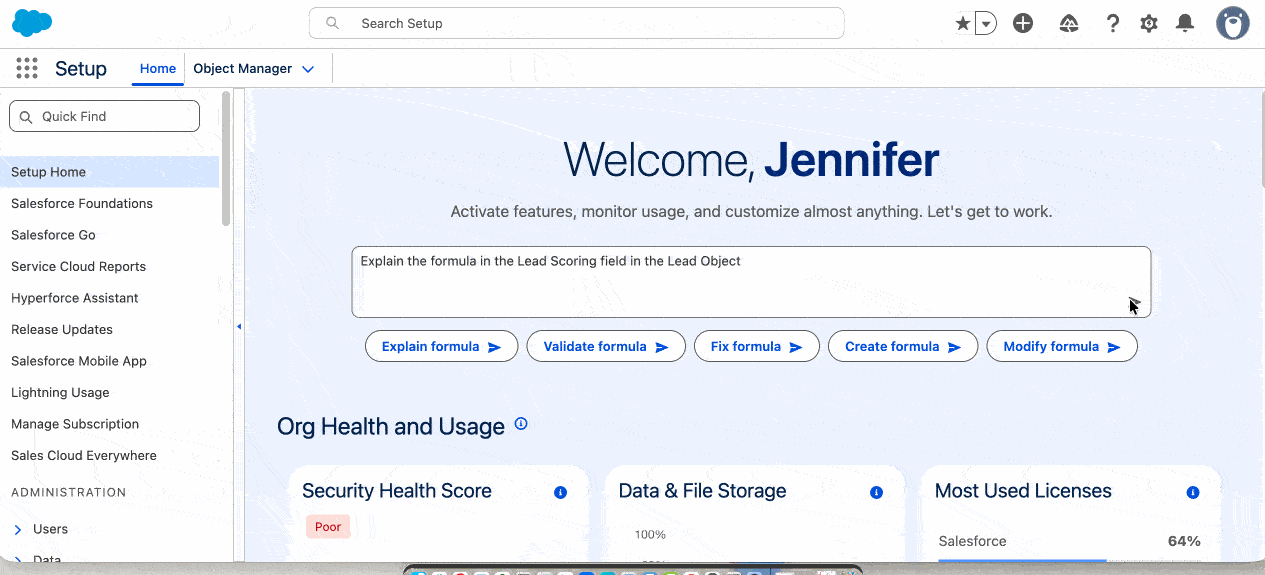
We’ve also reimagined Setup Home. It’s no longer just a landing page—it’s an interactive Setup command center. With the new Setup agent, you can stop hunting through the sidebar. Instead, use a prompt bar to get things done. You don’t need to worry about security access or that the Setup agent will make config changes without your review. It respects user permissions and has the human-in-the-loop built in. It only makes changes with your approval. Think of this as your Setup assistant. You know what you need to accomplish. The Setup agent does the work based on your direction and instructions. It also monitors your Org Health and Usage in real time, offering conversation recommendations to help you fix issues before they become headaches.
Here are a few examples of what the Setup agent can do.
- Get information from the Setup Audit Trail: “Show me changes made in the last 7 days” and “Filter this to only show me changes to queues”.
- Get formula explanations and help updating formulas: I used the prompts, “Explain the formula in the Lead Scoring field in the Lead Object” and “Modify this formula to add a second negative penalty of 40 points if the AnnualRevenue field is blank”.
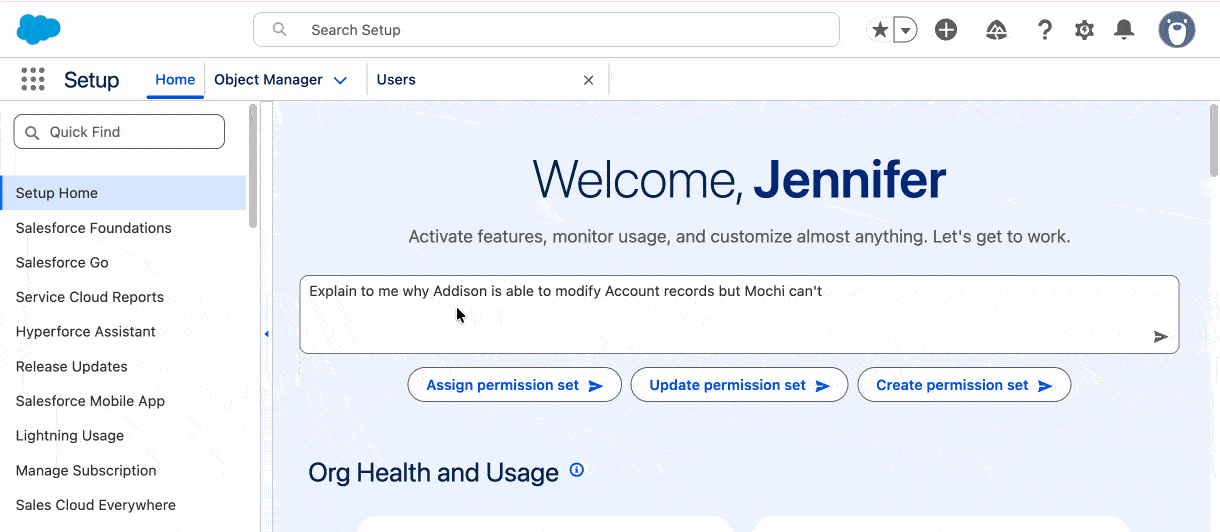
- Troubleshoot user access issues: I used the prompts, “Explain to me why Addison is able to modify Account records but Mochi can’t” and “Assign Mochi the missing permission set. She should have the same permissions to the Account as Addison”. Here, we have an example of the human-in-the-loop where the Setup agent asked me to confirm the action of the permission set assignment before actually performing it.
Note: This feature is available in Lightning Experience in Enterprise, Performance, Unlimited and Developer Editions with Foundations or Agentforce 1 Editions. This feature will be available in early January 2026. To enable Setup with Agentforce, you must have the Customize Application and Data Cloud User permission set. To access the Setup with Agentforce, users must have the Use Setup with Agentforce AND Execute Prompt Template permissions, as well as access to the Data 360 default data space, Data Cloud User permission set, and required permissions to perform the task they’d like to perform. To activate this beta feature, enable Setup with Agentforce (Beta) in Setup and refresh your browser. Then, on any Setup page, click Ask Agent for Setup (Beta).
I highly recommend you check out Setup with Agentforce (Beta) for use cases and sample prompts to get started.
Get started in your flow building with AI (GA)
Ok, so we made Einstein for Flow generally available a bit ago. Now, we’re making a new and improved version of this feature generally available, called Agentforce for Flow. Let AI draft your record-triggered, scheduled, or screen flows for you! Instead of manually creating elements, describe your business process in natural language and have Agentforce create the flow for you. This not only saves massive amounts of time but also acts as a “best practice” guide, suggesting logic and structures you might not have considered. Additionally, you can use sample instructions and tweak them to generate your draft flow. Best of all, this feature does not consume generative AI credits, making it a free efficiency boost for your team.
Note: This change applies to Essentials, Pro Suite, Professional, Enterprise, Performance, Unlimited, and Developer Editions with Foundations or Agentforce 1 Editions. To learn more, visit Agentforce and Generative AI Usage and Billing.
To get started, provision and enable Data 360 in your org and turn on Einstein generative AI. When you create a new flow in Flow Builder, in the Let AI Help You Build section, click Get Started, provide your instructions, and click Draft with AI.
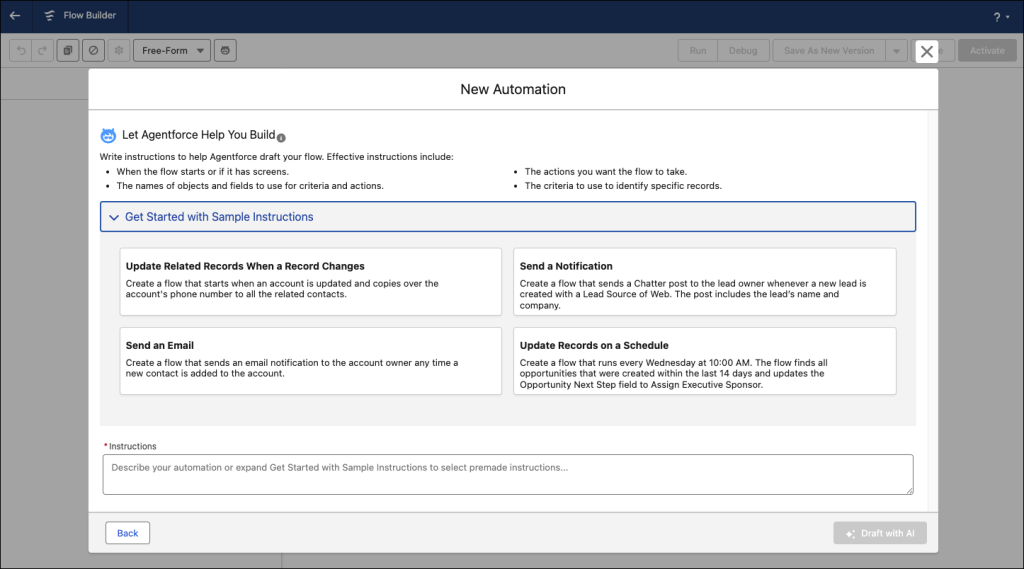
Example prompt to create a screen flow:
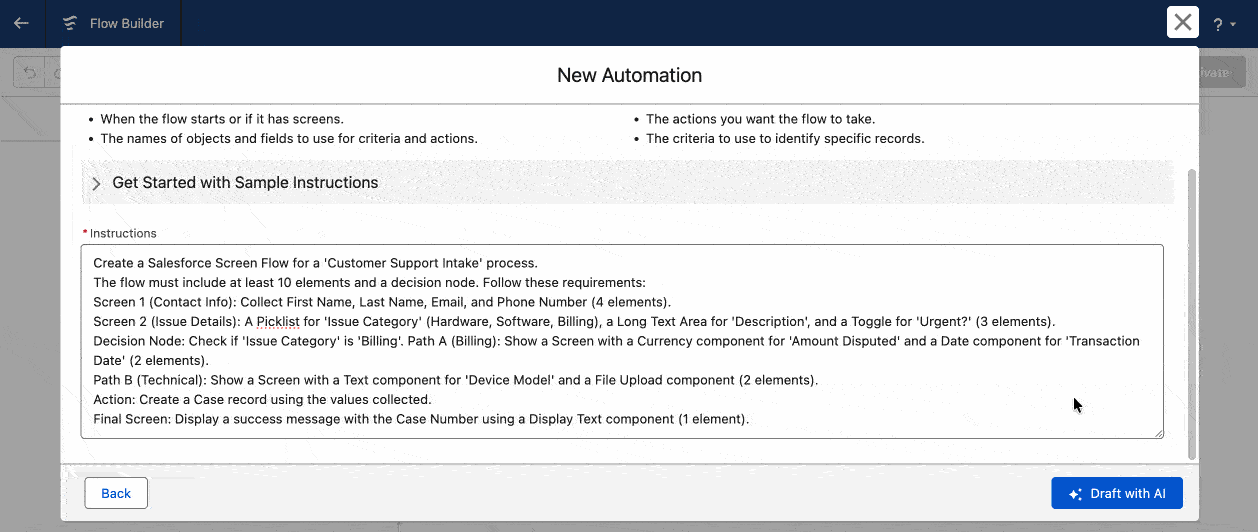
Create a Salesforce Screen Flow for a ‘Customer Support Intake’ process.
The flow must include at least 10 elements and a decision node. Follow these requirements:
Screen 1 (Contact Info): Collect First Name, Last Name, Email, and Phone Number (4 elements).
Screen 2 (Issue Details): A Picklist for ‘Issue Category’ (Hardware, Software, Billing), a Long Text Area for ‘Description’, and a Toggle for ‘Urgent?’ (3 elements).
Decision Node: Check if ‘Issue Category’ is ‘Billing’. Path A (Billing): Show a Screen with a Currency component for ‘Amount Disputed’ and a Date component for ‘Transaction Date’ (2 elements).
Path B (Technical): Show a Screen with a Text component for ‘Device Model’ and a File Upload component (2 elements).
Action: Create a Case record using the values collected.
Final Screen: Display a success message with the Case Number using a Display Text component (1 element).
Iterate through your flows with Agentforce
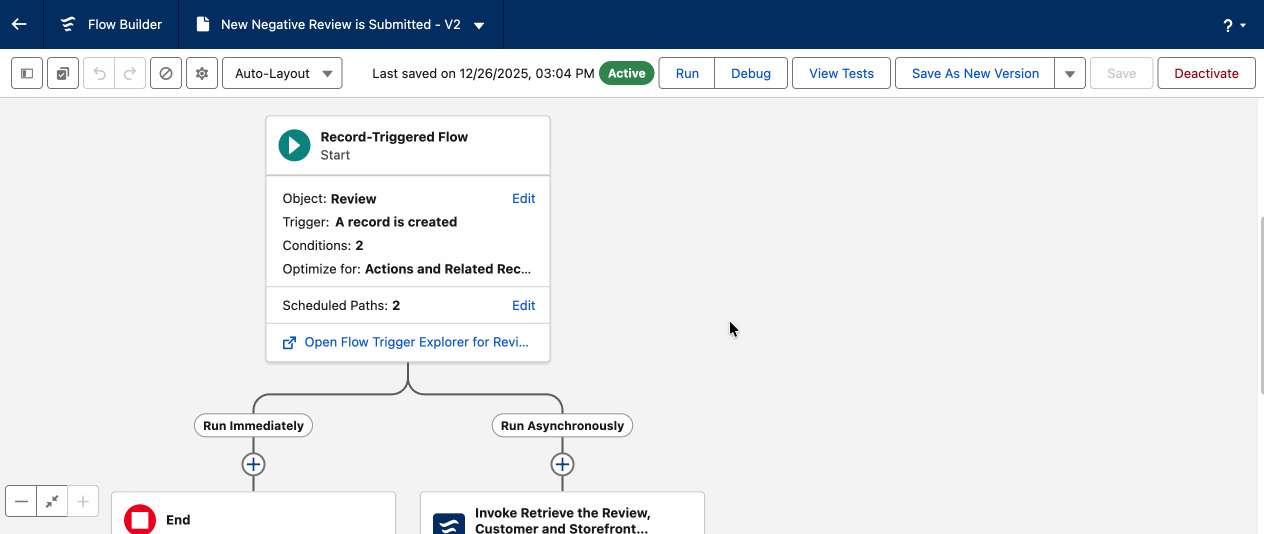
Building a new flow from a prompt is great, but what about the real day-to-day work of maintaining and optimizing your record-triggered or schedule-triggered flows? Or when that first prompt doesn’t quite work as expected? I think we’ve all been there. What if you could iterate on a flow like you would using ChatGPT or Google Gemini, for example? Adding a simple error handling path or new enhancements requires adding new elements. Tweaking or remapping variables may mean walking a delicate line so you don’t break your flow. In Spring ’26, you can “talk” to your existing flows. Open the Agentforce panel inside an active flow in Flow Builder and describe your changes in natural language. Agentforce will act as your expert flow assistant, performing the heavy lifting of adding, moving, or deleting elements while you simply review the results.
Here are some example prompts.
- Add an email element that sends an email that your business contact is updated
- Add a Decision element that checks if the category is X
- Remove the Loop element that processes inactive accounts
- Add a fault path to handle errors in the Create Records element
This feature is included in Agentforce 1 Editions, and the best part is you do not consume generative AI credits by using this feature. 🙌 To use it, provision and enable Data 360 and Einstein Generative AI. Then, opt in to migrate to Agentforce and use the Agentforce panel to describe your updates.
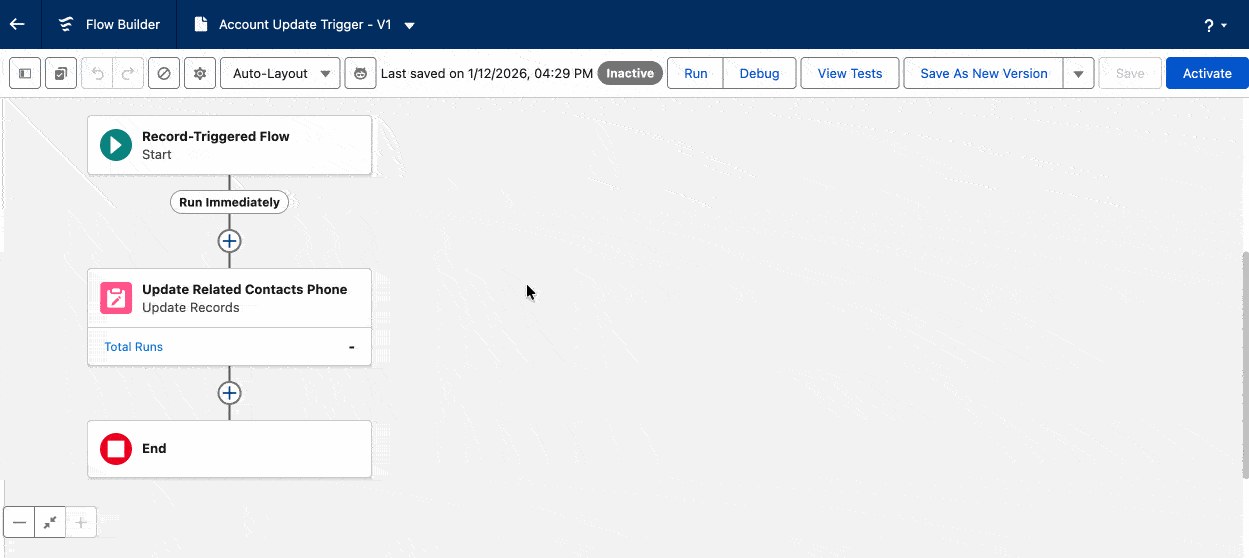
I created a record-triggered flow that will update the related contact’s phone number if the account business phone is changed. I used Agentforce for Flow to iterate on my existing flow with the prompt, “Add an email element that sends an email that your business contact is updated”. The agent shows me the update and asks me to accept or reject the changes.
Accelerate your builds with Agentforce Vibes (AI-powered IDE)
Agentforce Vibes is your technical AI assistant, now available directly in VS Code and a browser-based IDE. It uses Salesforce’s secure AI models to help write code, create tests, and solve technical problems using natural language prompts. It’s enabled by default in Enterprise Editions and above, giving your team a secure way to use AI without risking your company’s data.
While it’s built for “pro-code,” here’s why it’s a massive win for admins.
- Zero Installation: You can access the full power of VS Code and the Salesforce CLI from any computer without installing software or managing Java versions.
- Bridge to Pro-Code: Use “Natural Language” to describe a requirement (like a complex validation or trigger) and let the AI generate the draft code for you to review.
- Secure Troubleshooting: It’s built on the Salesforce Trust Layer, meaning you can safely debug code or parse documentation without your proprietary data leaving Salesforce’s secure boundary.
See the off-cycle Agentforce Vibes IDE release notes on GitHub.
Check out Josh Birk’s blog, Introduction to Agentforce Vibes for Salesforce Admins, to understand what vibing means and see what you, as an admin, can do with Agentforce Vibes.
Case Management enhancements
Standardize Case Comments with Quick Text
Instead of manually typing or copying and pasting standard responses to Case Comments, which can be fraught with typos and inconsistent data, service reps can now insert defined snippets into the Case Comments with Quick Text. Quick Text supports dynamic merge fields, which automatically pull in information such as case number, contact name, etc., and helps you standardize company language for common issues using a one-click action.
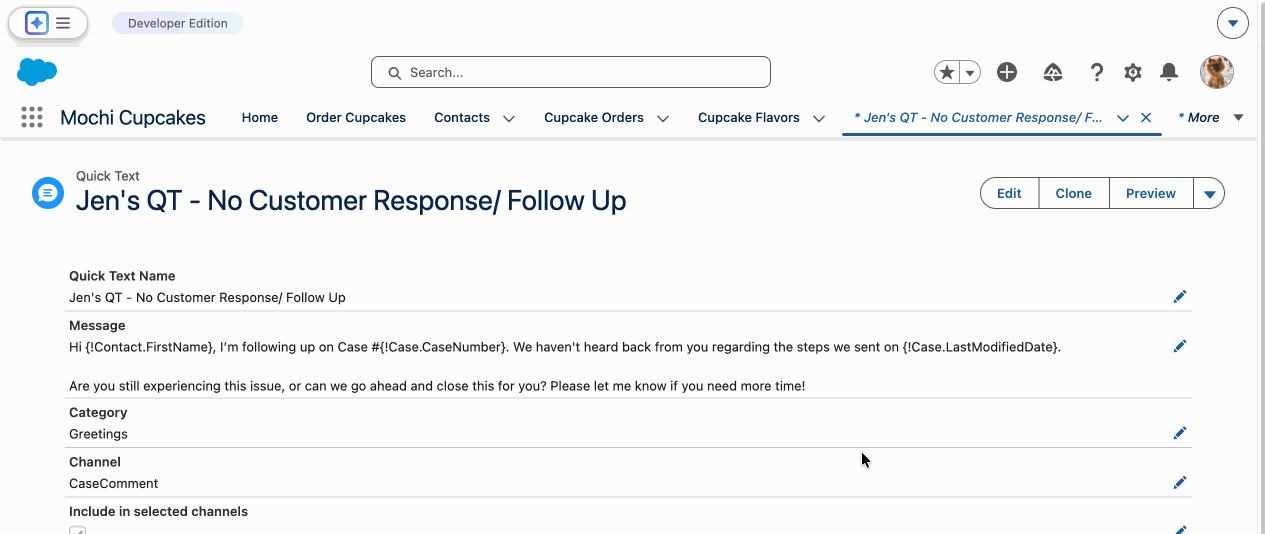
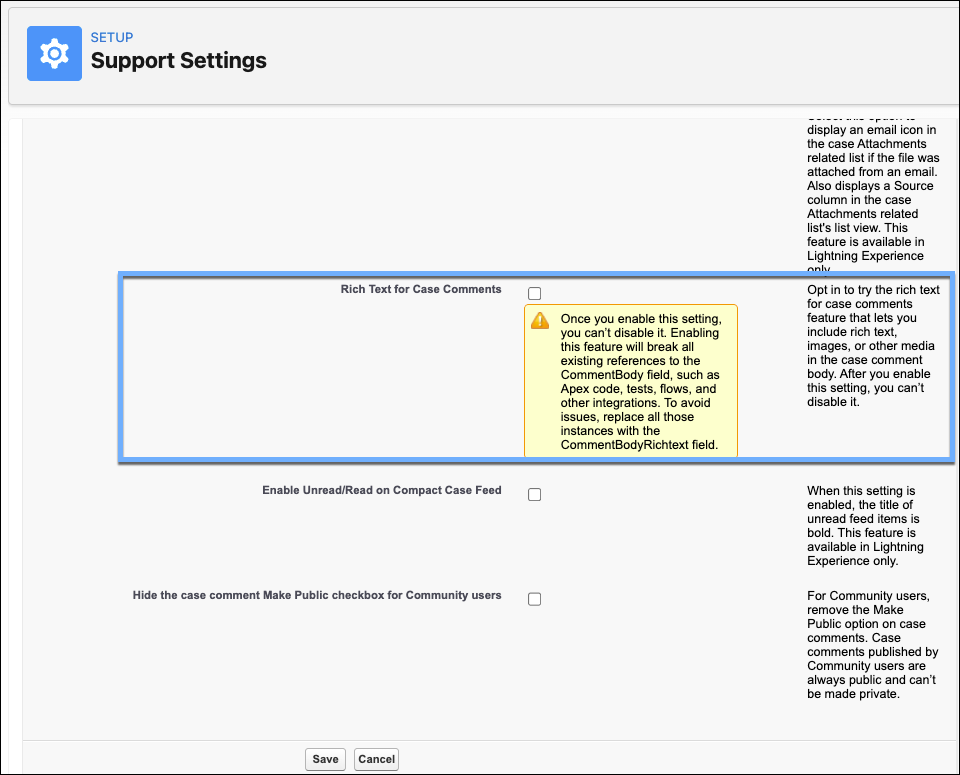
To enable this feature, you must activate two settings.
- In Quick Text Settings, enable Quick Text.
- In Support Settings, for Case Comments, enable Rich Text for Case Comments. Note: Once you enable this setting, you can’t disable it. Enabling this feature will break all existing references to the CommentBody field, such as Apex code, tests, flows, and other integrations. To avoid issues, replace all those instances with the CommentBodyRich text field.
Get instant access to original case attachments
It’s such a time sink for your service reps to sift through a long “Attachments” or “Files” related list to find the one document the customer sent in their original request. After multiple back-and-forth emails, the original context often gets buried under dozens of new files.
Now, your reps can get a dedicated view of the files that started the conversation. By isolating the “day one” attachments, reps can instantly understand the customer’s initial problem without hunting through a cluttered list. The cool thing is that this requires no setup—it’s turned on by default. Look for the See Attachments link on the Case Detail page in Lightning Experience to open the Original Attachments panel.
Secure your case communications with a required OWA verification
Salesforce now requires all Organization-Wide Email Addresses (OWA) to be verified, which is a major win for your org’s email deliverability and security. With this requirement, we’re preventing “spoofing”—that’s when a bad actor tries to send malicious emails that look like they’re coming from your trusted domain or a generic Salesforce address. This means fewer of your customer service emails will end up in spam folders, and you gain peace of mind knowing that every email leaving your system is authorized and authenticated.
Previously, some workflows could bypass verification, occasionally defaulting to <noreply@salesforce.com>. If you’ve already verified your OWA, great news! No further action is needed. Your emails will continue to send as normal. If you haven’t yet, verify your OWAs immediately. If you try to send a Case email with custom content from an unverified address, the email will fail to send. In Setup, go to Organization-Wide Addresses, and check the Status column. If it’s not verified, then click Edit or create a new one. Salesforce will send a verification link to that email address. Once someone clicks on that link, the status will be updated to ‘Verified’.
General platform enhancements
Salesforce blocks invalid bulk edits in list views with LWC automatically to prevent user frustration
We’ve all been there: A user spends time carefully bulk-editing a long list of records, only to hit “Save” and get a frustrating error because they exceeded the 200-record limit. Salesforce has fixed this “trap.” Now, list views built with Lightning Web Components (LWC) will proactively block the edit icon if more than 200 records are selected. This prevents your users from wasting time inputting data that Salesforce can’t actually save, drastically reducing frustration and “broken” list view complaints.
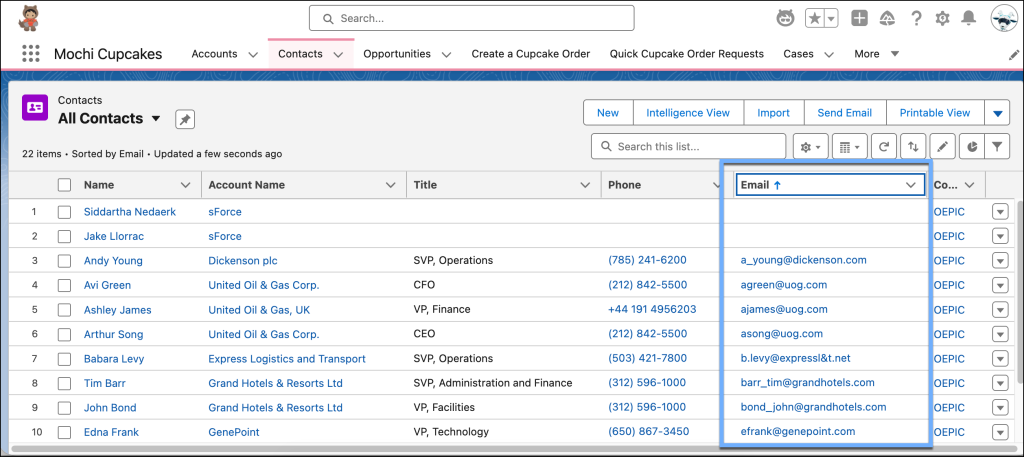
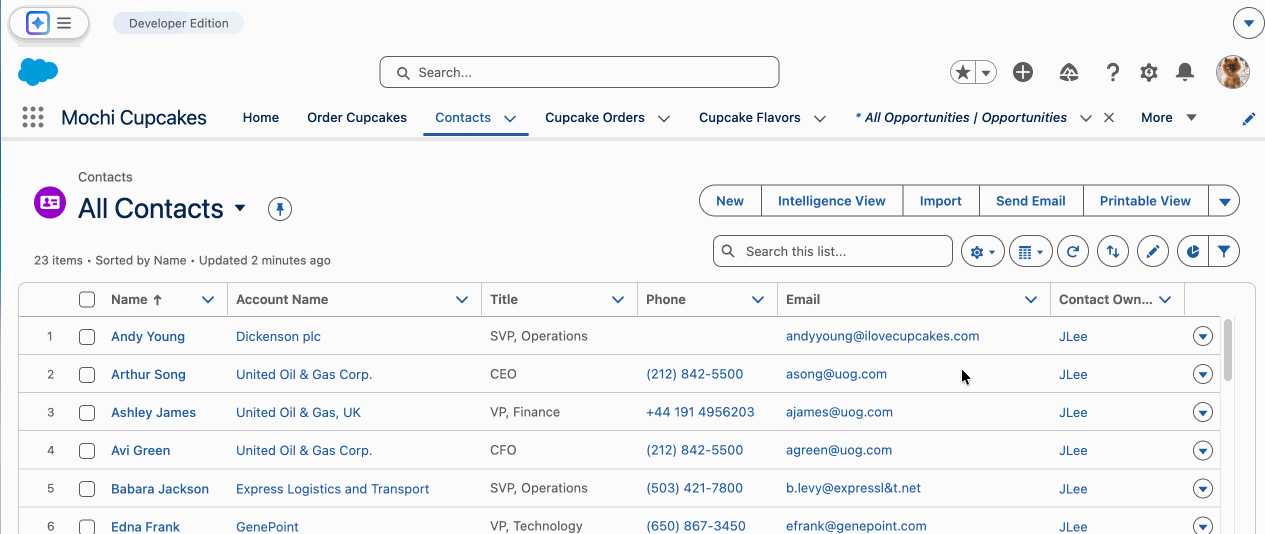
Prioritize real data by moving blank fields to the bottom of list views
Finding your data just got easier! When you sort a list, any records with missing information will now automatically drop to the bottom of the list, so you can focus on the actual data first.
One of the most common user frustrations is sorting a list view and seeing a “wall of blanks” at the top. Salesforce has fixed this by changing the “weight” of empty (null) values. Previously, blanks were treated as the lowest value, so they always appeared first in an ascending sort. Now, blanks are treated as the highest value, which pushes them to the very end of the list. Your users can now see actionable data immediately without having to scroll past empty rows.
Here’s the Winter ’26 List View with the Email field sorted in ascending order. The records with a blank email are displayed first.
In comparison, here’s the Spring ’26 List View, with the Email field sorted in ascending order. The records with a blank email are now shown last.
Lightning Reports and Dashboards enhancements
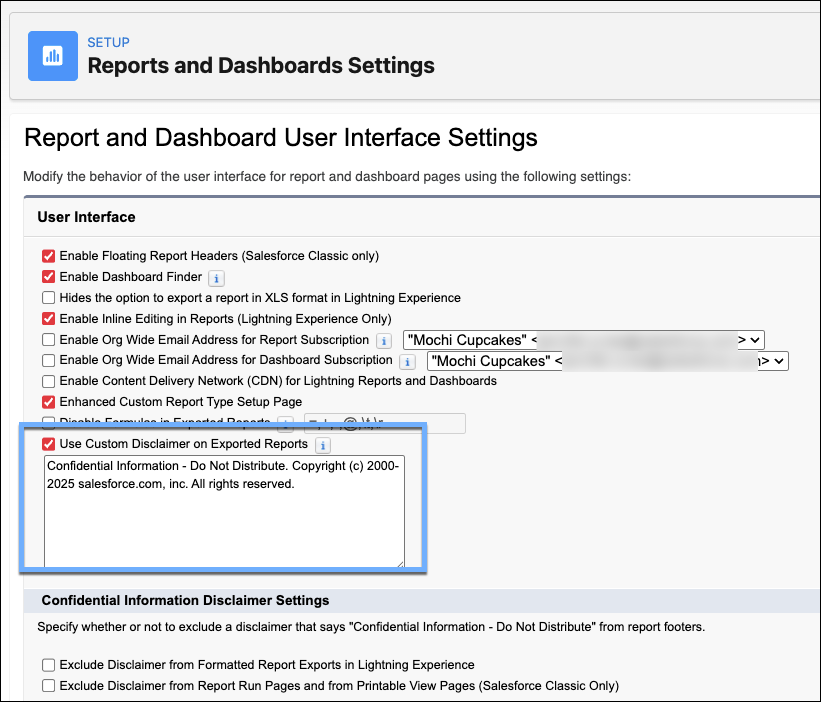
Add a custom disclaimer to your exported reports
Keeping exported data compliant usually requires users to manually add legal text, which can be error prone. Now, you can add a custom disclaimer to the bottom of all exported reports and “set it and forget it,” ensuring every report exported automatically includes your company’s specific legal and regulatory language without any manual work by your users. Win-win for all!
To use this feature, go to Reports and Dashboards Settings in Setup, select Use Custom Disclaimer on Exported Reports, provide your legal disclaimer, and click Save.
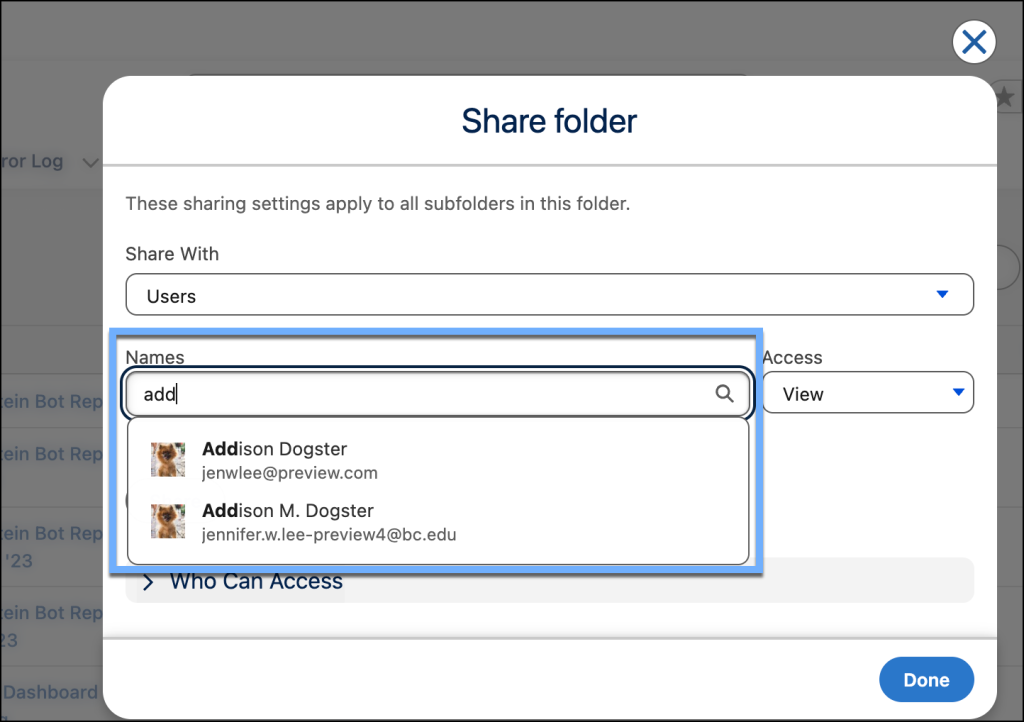
Prevent accidental data leaks by report and dashboard folders using usernames
We’ve made sharing report and dashboard folders a lot safer. Now, you can search and verify users using their Username(for example, JenniferLee@company.com) instead of their Display Name (for example, Jennifer Lee). The Display Name isn’t an issue until you have at least two people with the same name. How do you pick the right one?! Previously, Salesforce only showed the Display Name when sharing folders, making it anyone’s guess whether you picked the right person (fingers and toes crossed). This small update eliminates the guesswork and ensures that sensitive reports are only shared with the intended person.
Apply report customizations automatically when adding dashboard tables (GA)
Gone are the days of having to manually rebuild complex reports inside a dashboard. Now, you can pull your groupings, custom formulas, and bucket fields directly into a dashboard table with a single click. This isn’t just a time-saver; it’s a “safety net.” This change ensures that the data shown on the dashboard perfectly matches the source report, removing the risk of a user misconfiguring a setting and seeing different numbers in different places.
In Setup, go to the Reports and Dashboards Setting page, and enable Apply report settings to dashboard tables. When adding a Lightning table to your dashboard, select Use table settings from report.
General Setup enhancements
Update global addresses with updated state and province codes
Keeping address data accurate is a constant battle. Salesforce has updated the standard picklist codes for Canada and Japan to reflect updated state codes. This ensures your mailing lists, tax calculations, and integrations remain accurate and professional.
- Canada: The “Yukon Territories” (YT) has been shortened to simply Yukon (YT).
- Japan: Updated codes and names for Aomori (02), Akita (05), and Aichi (23).
Note: These updates are automatic for new orgs created in Spring ’26 or later. If you have an older org, you’ll want to review your current picklist values to ensure they align with these new codes. Be sure to audit your data, update any necessary integrations, and clean your existing picklists.
Track sandbox copy progress with an updated UI
No more staring at the static “Processing” status for your sandbox and wondering when it will be ready. Salesforce has replaced the interface with a real-time, visual progress bar that shows you updates at every stage, from metadata copy to data transfer, helping you better predict your development and testing timelines. This new UI is available by default. If you prefer the classic look, you can switch back to the old UI in Dev Hub Settings (available until the Summer ’26 release).
Flow Builder enhancements
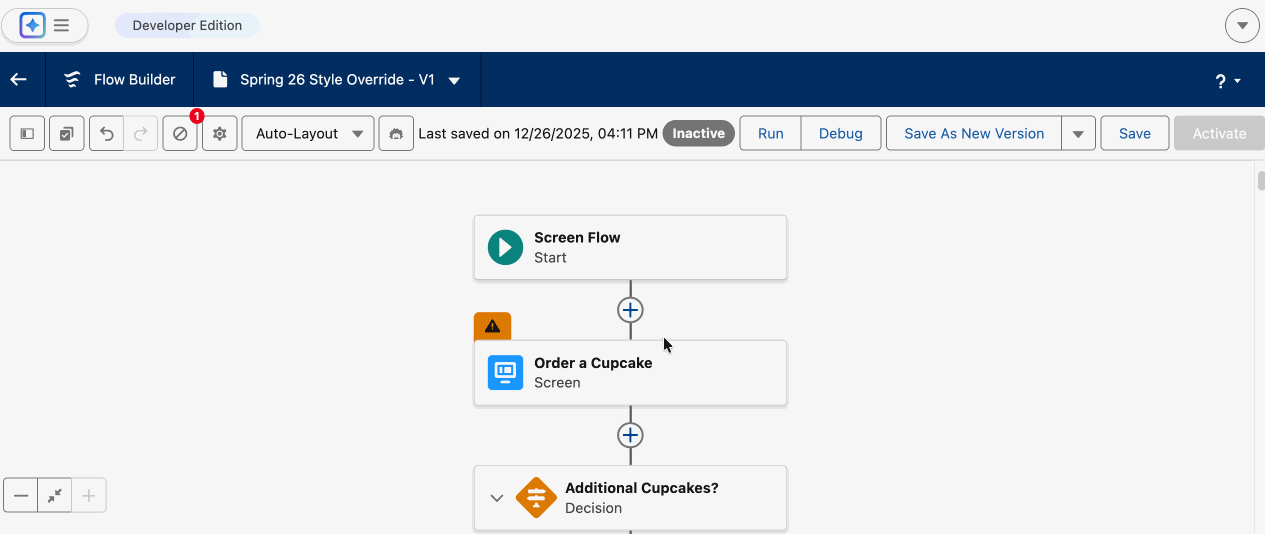
Declutter your complex flow canvas by collapsing branching elements
Who has those massive spaghetti flows in their orgs that are difficult to read and navigate? You know what I’m talking about. I’ve definitely worked in orgs with them. You’re going to be excited for this Spring ’26 feature that allows you to collapse branches and “Marie Kondo” your flow canvas. Having the ability to hide detailed parts of your flow that you’re not currently working on can drastically reduce that visual noise and help you laser focus on the part of the flow you’re working on. Now this feature makes me super happy: Flow Builder remembers your preference so you can easily pick back up what you’re working on, and the view is personal to just you! 🙌
Opt in to the Agentforce Panel in Flow Builder
Enabling the Agentforce panel in Flow Builder now requires zero admin configuration. Previously, the Einstein for Flow required feature enablement and permission set assignments. Now, users with the right base licenses can self-transition to Agentforce within the flow canvas. Your users can now access the full power of the Agentforce panel—including the ability to summarize, draft, and evolve flows using natural language—without waiting for an admin to manually configure a dedicated panel interface.
Note: This applies to Essentials, Pro Suite, Professional, Enterprise, Performance, Unlimited, and Developer Editions with Foundations or Agentforce 1 Editions. Agentforce must be enabled for the org, and either the AgentforceEmployeeAgentor AIEmployeeAgents org permission must be enabled.
Navigate your flows faster with mouse scrolling
Are you tired of having to grab and move your flow multiple times so you can pan the flow elements? This small quality of life feature now allows you to easily scroll your flow using the mouse scroll wheel, trackpad, or keyboard arrow keys, and scrollbar (vertical and horizontal). In case you didn’t know (like me), you can use the CTRL or Command and + or – keys to increase or decrease the zoom, use your trackpad to pinch zoom, or hold the arrow keys to move slow or fast through the flow canvas. Yes, please!

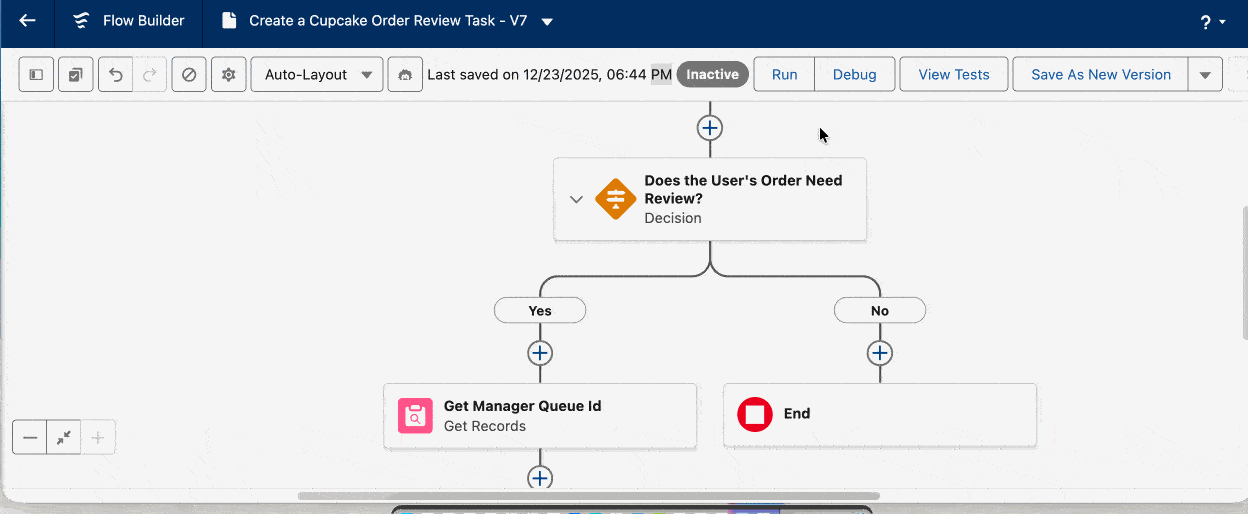
Logic labels updated for the Decision element for clarity
As AI becomes a standard part of the Flow Builder, clarity in your “Logic Toolbox” is essential. Previously, the labels for how a Decision element evaluates data were somewhat generic. In Spring ’26, Salesforce updated the labels to Define Manually (Default) and Define with AI (Advanced). By labeling manual as default, we’re reinforcing a best practice: Use deterministic transparent logic whenever possible, and use AI for the more complex unstructured scenarios where the traditional filter operators like Equals and Contains just aren’t sufficient.
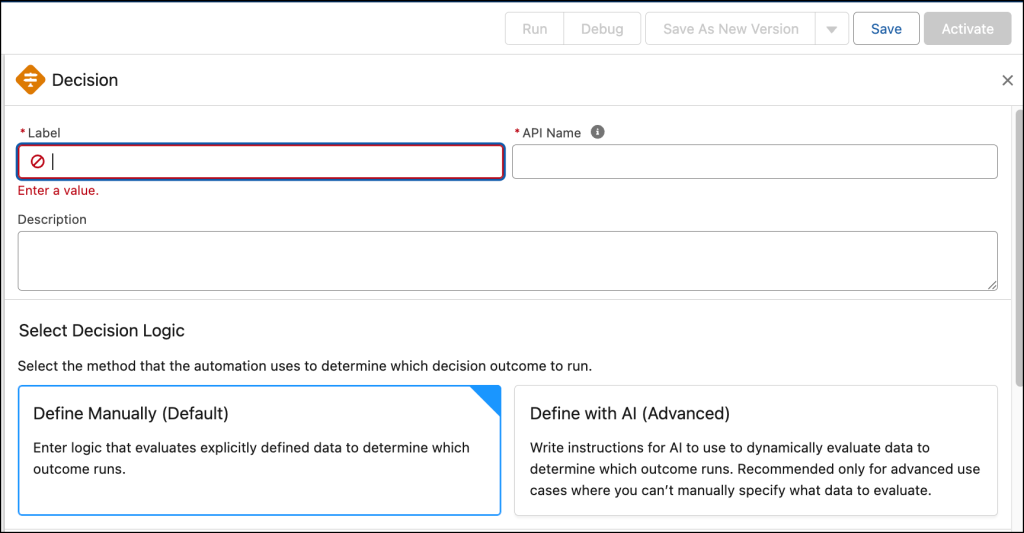
This change helps admins make the right architectural choice at a glance.
- Manual is for structured data (for example, “If Rating = Hot”).
- AI is for unstructured data (for example, “Analyze this customer feedback email and determine if customer’s tone is ‘Angry'”).
Note: This applies to Enterprise, Performance, and Unlimited Editions with the Einstein for Sales, Einstein for Service, or Einstein Platform add-on.
Access your subflow input and output variable descriptions via infobubble
Building and maintaining modular flows (aka subflows) is best practice, but it often requires a lot of “mental gymnastics” to remember what each variable does. Have you ever been in the master flow and wanted to see the description of a subflow’s input variable? You couldn’t see it unless you enabled that input first. And if you didn’t need that input, that’s another click to disable it. If you’re looking at output variables, you often get that generic system message instead of the meaningful notes the original flow builder left you. We’re eliminating the unnecessary clicking.
With Spring ’26, you can view the variable description for any subflow input or output variable by hovering over it. You can access the information you need without cluttering your configuration with “trial and error” clicks.
Hover over the infobubble for a subflow input to see its description. Hover over the infobubble for an output reserve to see the variable’s name, label, type, and description. When you manually assign variables, hover over the infobubble next to each output to see its description (instead of a generic message previously).
Stop the guesswork with viewable action descriptions
Configuring actions in Flow Builder, such as sending an email, posting to Slack, or calling an agent, often involves long lists of potential input parameters. If an input variable’s name wasn’t perfectly clear, you had to toggle the “Include” switch to see if any documentation or help text appeared. In Spring ’26, you can now hover over the action to vet every input parameter before you commit to using it, only enabling the ones you really need for the automation you’re building.
Screen flow enhancements
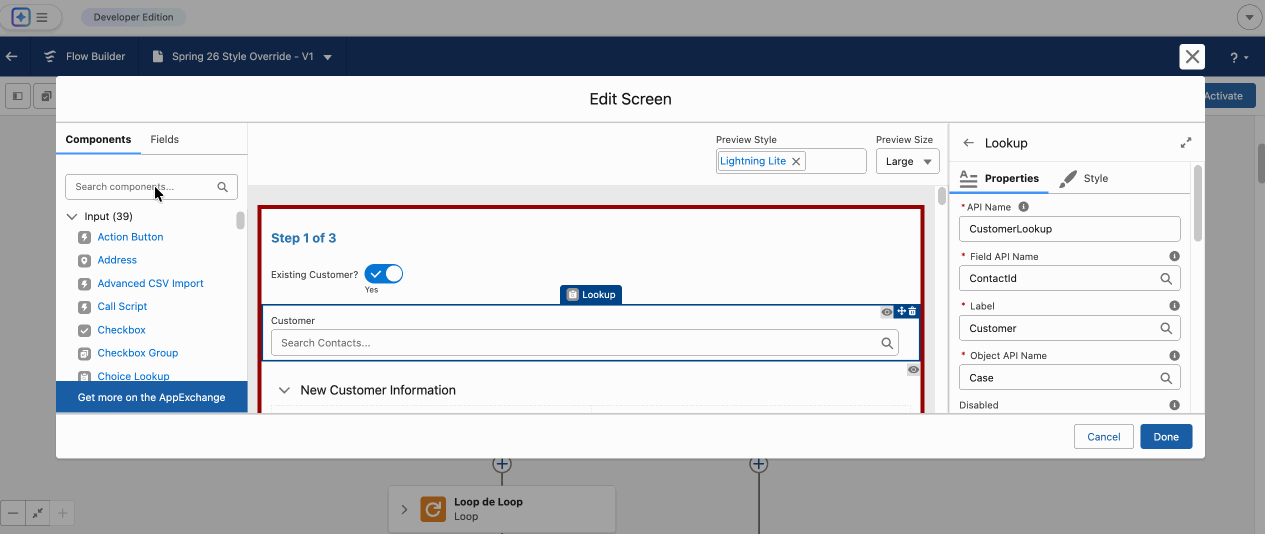
Customize your screen flows with component-level styling overrides
Until now, if you wanted to build a screen with a different alert or different branding for your org’s global game or Experience Cloud site’s CSS, you had to resort to custom LWCs or some sort of CSS hack. In this release, we’re introducing native styling overrides, giving you granular control over the look and feel of individual screens and components—all done without writing a lick of code.
Now, with great control comes great responsibility. Don’t go crazy. Just because you can override the styling, use it only where it makes sense. Don’t turn your screen flows into a “franken-flow” using all the possible styles under the sun. When in doubt, override responsibly and consult your designer friends.
You can now override your default theme by adjusting these properties directly in Flow Builder.
- Colors: Background, text, border, and “in-focus” text colors
- Borders: Color, weight (thickness), and radius (rounded corners)
- Buttons: Style the “Next”, “Finish”, “Previous”, and “Pause” buttons independently, including their Hover and Active states.
- Layout: Adjust the header, container, and footer styles for each individual screen.
This styling applies to a wide array of standard input and display components.
- Basic Inputs: Text, Password, Number, Currency, Date, Date/Time
- Choice Sets: Checkbox, Checkbox Group, Radio Buttons, Picklist, Multi-Select Picklist
- Containers & Layout: Section, Repeater, Display Text, Long Text Area (psst… you can now configure the Long Text Area’s height 🙌)
Note: This change applies to screen flows in Lightning Experience and Classic. For Experience Cloud, use these overrides on Aura, LWR, and Visualforce sites where you have at least one active community license.
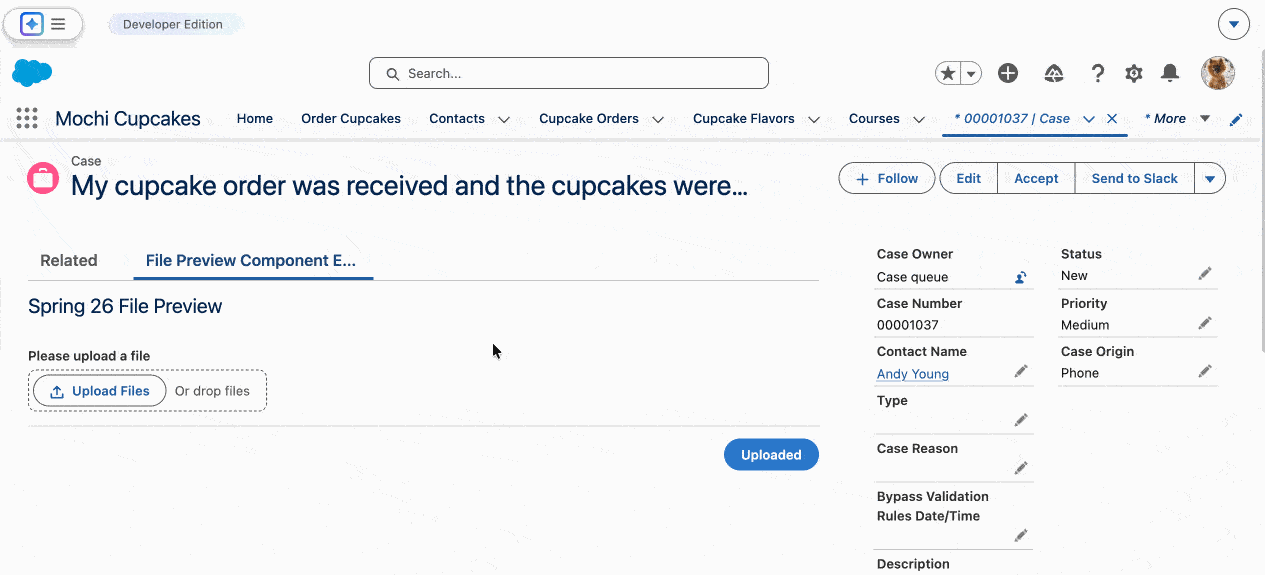
Preview files right in a screen flow—no more downloading needed
You can now configure files to be previewed directly in your screen flows, in the flow of work. In Flow Builder, simply drag the new File Preview component to a screen element and set the Content Document ID to reference the document that the user will preview. Pro-tip: Add a Display Text component to provide some information to the user about the file they’re viewing. At runtime, the user will see the document displayed right in the screen flow, eliminating the friction of having to download the file in order to view it within a document-based process. This screen flow component is an important piece of the puzzle for users of MuleSoft for Flow: IDP where users may need to manually preview a document and compare it against extracted fields and tables.
I used the File Preview component in a screen flow where users upload files and can then preview them by selecting the individual files from the Data Table. Pretty cool.
Enhance user clarity with new Message screen component
Communicating status updates to users in a screen flow has historically required a mix of Display Text elements, custom banners, or even some complex CSS hacks to get the right “look and feel.” These manual workarounds often lacked consistent styling and weren’t always friendly to screen readers. The new Message screen component provides a standardized way to show these message alerts. It’s a major improvement to accessibility as this component provides an alert-level notification to screen readers, which the Display Text component and conditional field visibility lacked. 👏
To use, simply drag the Message component to where you want it to appear on your screen, then select the Message Type (info/warning/success/error) and Message Content. Additionally, you can set component visibility rules on this component. Salesforce automatically displays the appropriate icon and color coding (adhering to the SLDS) to reflect the selected message type.
Flow-tip (see what I did there?): Use a formula if you want to reference field values in the message content.
Visualize record progress with the new Kanban Board component (beta)
Visualizing a pipeline or workflow stages has always been a strength of Salesforce list views, but bringing that same “at-a-glance” clarity into a screen flow used to require complex custom LWCs. With the new Kanban Board component, you can embed a fully functional Kanban board right into your screen flows, giving your users a visual map of their records without having to leave their automation.
To use this feature, add the Kanban Board component to your screen, select the record collection you want to use to show the records on the board, then select a picklist field from the Source Collection for column headers. Note: You can only select picklist fields for column headers. Lastly, add the fields you want to show for each record card and add a second level summary under each column, if desired.
You’re probably wondering, “When would I use a list view Kanban or a screen flow Kanban?” Great question. It all comes down to scope versus guided action. Think of this another way. A list view is your “command center” for daily operations while a screen flow Kanban is a “visual aid” for specific, high touch processes. Use a Kanban list view for general record management where users jump between records, search, and change views frequently. You can use a beta feature in a screen flow to view a filtered list of records and then take further action on those records in the next screen. This is great for users who need confidence and clarity visually but don’t need the ability to edit.
Here are a few use cases for the Kanban component.
- Ordering or requesting intake flows
- Agent + human orchestration scenarios
- Reviewing and monitoring screens
- Executive or operations visibility
- ❌ Scenarios requiring inline updates (for now)
The beta version of this component is display only, meaning you can’t drag-and-drop, perform inline card actions, make status updates from the Kanban board, or auto-refresh the board to reflect updates.
Open screen flows in Lightning using a URL (GA)
We have a new standardized URL format that launches screen flows right in Lightning Experience. The new URL format supports the Cosmos theme, and flow local actions. Now, you can use components like Show Toast and Navigate Record (actions from AppExchange and UnofficialSF), which the old method didn’t support. The older URL format resulted in a screen flow set to the “Classic” look or behaved inconsistently across different browsers. Your screen flows will load faster because the browser already has the core Lightning components cached from the rest of the user’s session. And if your team uses the Lightning Console, you’re golden. These URLs will open in new tabs without refreshing the entire workspace. Plus, users can jump between the screen flow and other records without losing their place. Another key benefit of this new URL format is that the browser’s Back and Forward buttons work.
Here is the URL format: /lightning/flow/YourFlowApiName
Need to pass data into the URL? We’ve got you.
You can pass data into the URL if you use ?flow__ before your variable name.
- One variable:
/lightning/flow/Register?flow__recordId={!Case.Id}
- Multiple:
/lightning/flow/Register?flow__recordId={!Case.Id}&flow__source=Email
Pro-tip: For URL links to work where you’re passing in data, ensure your flow variables are checked as “Available for Input”, otherwise the data passed in the URL will be ignored.
Flow testing and debugging enhancements
Keep your debug configurations within your flow editing sessions
The flow “fix and re-test” loop just got significantly faster. Previously, every time you found a bug in a flow, made a quick change, and hit Save, your Debug window would reset. You’d have to re-select your test record, re-toggle your debug options (like “Rollback mode”), and re-type all your input variables from scratch—what a time waster! Now, Flow preserves these configurations for the duration of your session. You can tweak your logic and immediately jump back into testing with your previous test data already in place. If you refresh your browser, close Flow Builder or click Reset Debug Settings; however, your debug settings will be cleared.
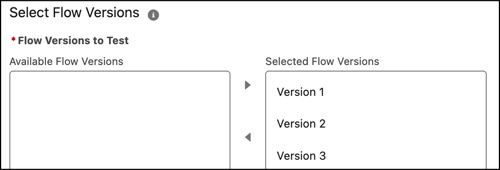
Keep your testing relevant with version-specific flow tests
You now have greater control over your flow tests. You can assign flow tests to specific flow versions, which lets you reuse your tests and keep legacy flow tests to your older versions of a flow, while still allowing you to build new tests for your new flow versions. Previously, the flow tests only applied to the latest version of your flow. So, if you made a major change to the next version that made your previous version tests obsolete, you had to delete the old tests. If you needed to roll back your flow version, those flow tests were gone.
Flow Management enhancements
Compare your screen flow versions to track changes more efficiently
Tracking changes between flow versions has historically been a major pain in the you know where—as a completely manual and error-prone process. With Spring ’26, we’re extending the flow version tracking feature to include screen flows, thus covering all flow types. I hear you rejoicing over there. 🙌 You can use this feature as an alternative to using third-party “diff” tools or side-by-side browser windows. This feature shows you exactly what changed in your screen flows. Compare any two versions of the same screen flow and see the differences, including changes made to flow properties, resources, and elements.
Additionally, you can share the flow version comparison results using the direct link. Recipients can open the page with the flow versions preselected and the results displayed. If they change the flow versions and run the comparison again, a new link gets generated.
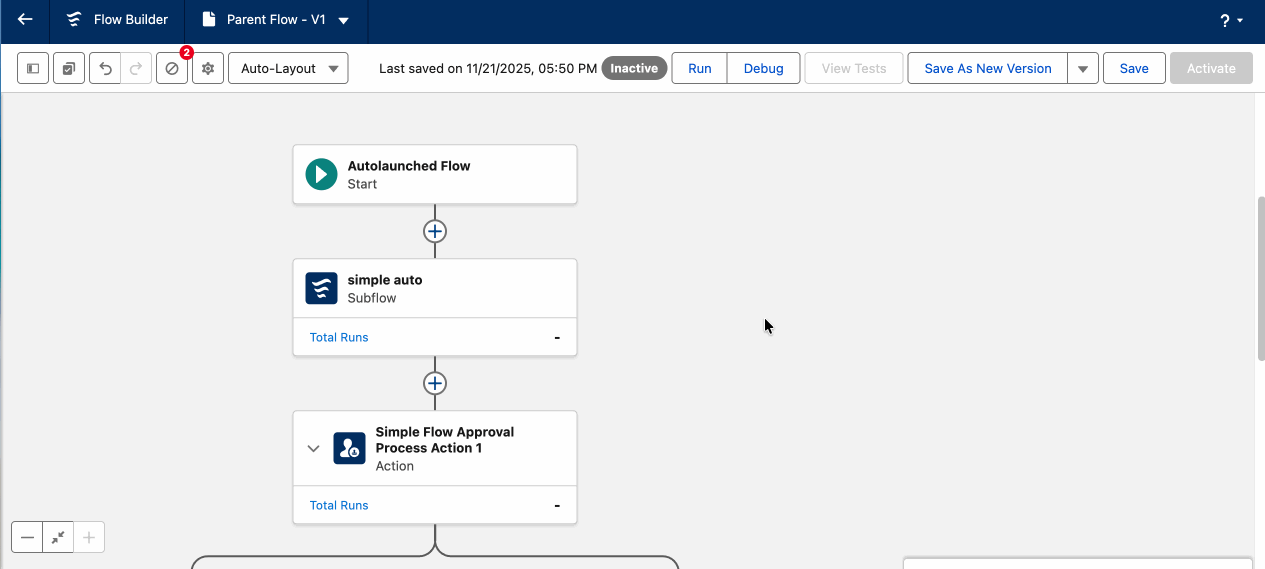
Understand your flow dependencies with the new Usage tab in the Automation Lightning App
As a flow builder, you know making updates to an existing flow could possibly have ripple effects elsewhere, and proactively identifying those dependencies can be a difficult task. That change to a subflow or variable can accidentally break a parent process that you didn’t even know existed. Doing the investigative work to track down those dependencies often requires third-party metadata tools or (gasp!) manual documentation.
Thanks to your highly requested IdeaExchange feature, the new Usage tab in the Automation Lightning App is here for the rescue. It lets you see dependencies both ways—what this flow depends on and what depends on it. It makes for a great ultimate impact analysis tool, ensuring you have all your bases covered when making updates to a flow.
In the Automation Lightning App, go to the Flows tab, select a specific flow, and click the Usage subtab to view the relationships. Note: You must have the Manage Flow user permission to see the relationships.
Here’s a look at the parent flow and its flow and orchestration dependencies.

Discover and track your invocable action usage with the Action Hub (beta)
As you build more AI-driven automation, it starts getting hard to keep track of where a specific action (like a specialized Apex class or an email alert) is actually being used. Previously, you could only see action usage within flows.
In Spring ’26, with the enhanced Action Hub in the Automation Lightning App, you now have a “Global View” that includes Agentforce Builder and Prompt Builder, in addition to Flow Builder. You can see not only what invocable action is used but also where it is used. This means before you delete or edit an action, you can see exactly which AI agents or prompt templates rely on it, preventing accidental “breaks” in your AI logic. Click the agent label or template name listed in the Agentforce Builder or Prompt Builder tab to open the referenced action directly in its builder interface.
Optimize performance with the new Flow Logs tab in the Automation Lightning App
Troubleshooting complex automation just got a massive upgrade. Previously, analyzing flow performance required digging through messy debug logs or building custom reports. The new Flow Logs tab in the Automation Lightning app centralizes everything. Because it leverages Data 360 (formerly Data Cloud) to store persistent run metrics, you get real-time insights into which flows are running slowly, which are hitting governor limits, and where errors are occurring—all from a single, high-level dashboard.
You need to first set up Data 360 and configure logging using resources provided on the page, and then enable persistent logging for each flow you want to monitor.
Flow approval enhancements
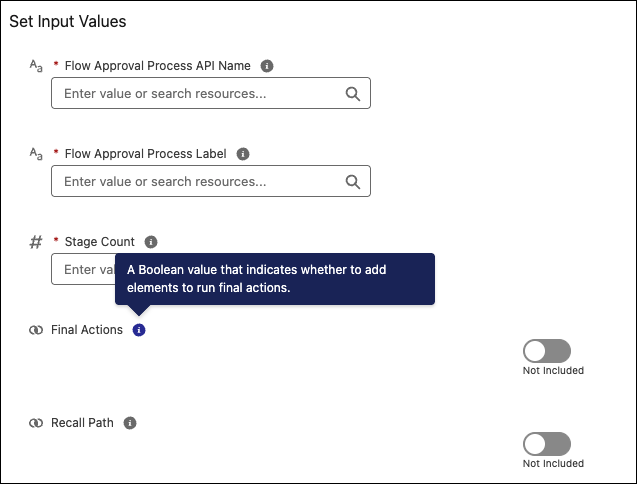
Request approvals right on your Lightning or Experience Cloud pages
Gone are the days of needing to create a custom Submit for Approval button or some URL hack to request approvals. With Spring ’26, simply drop the new Request Approval component on your Lightning page or Experience Cloud record page and you’re good to go. This component handles the pre-submission logic, such as soliciting comments or requiring a user to pick a specific approver, AND launches the approval process. Yes, please.
Note: The Request Approval component passes data into specific variables. In your autolaunched flow, ensure you’ve created these exact variables as available for input:
firstApprover: Stores the User ID of the person the submitter selectedsubmissionComments: Stores the text the submitter typed into the component
In App Builder, drag the Request Approval component onto your record page, then select the appropriate active autolaunched flow. If you need an approver, select Require submitter to select first approver. If your process doesn’t need comments, select Hide submitter comments. Make sure you have an active flow approval process so you can hook this up right away in App Builder.
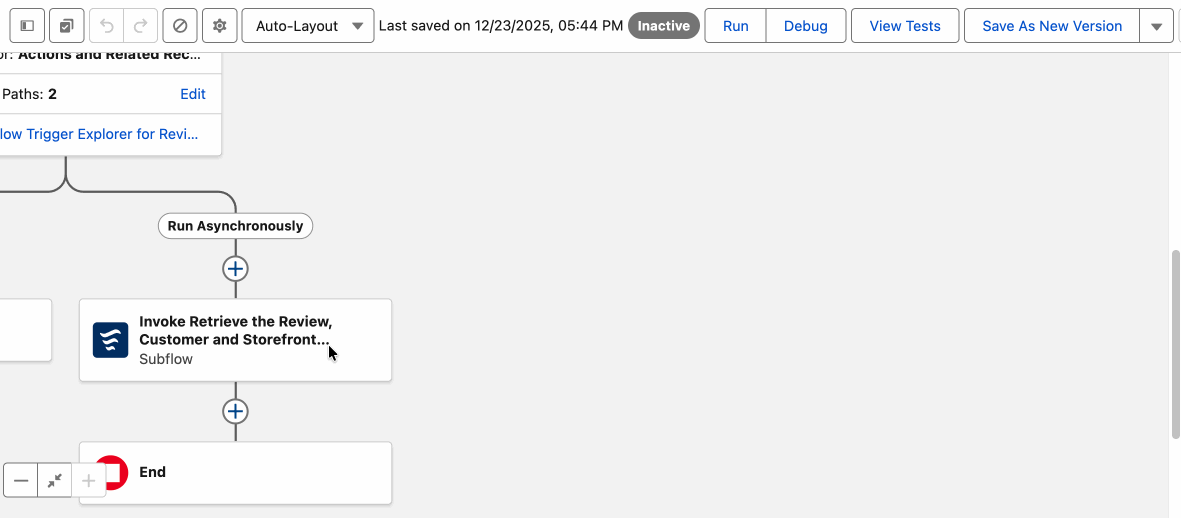
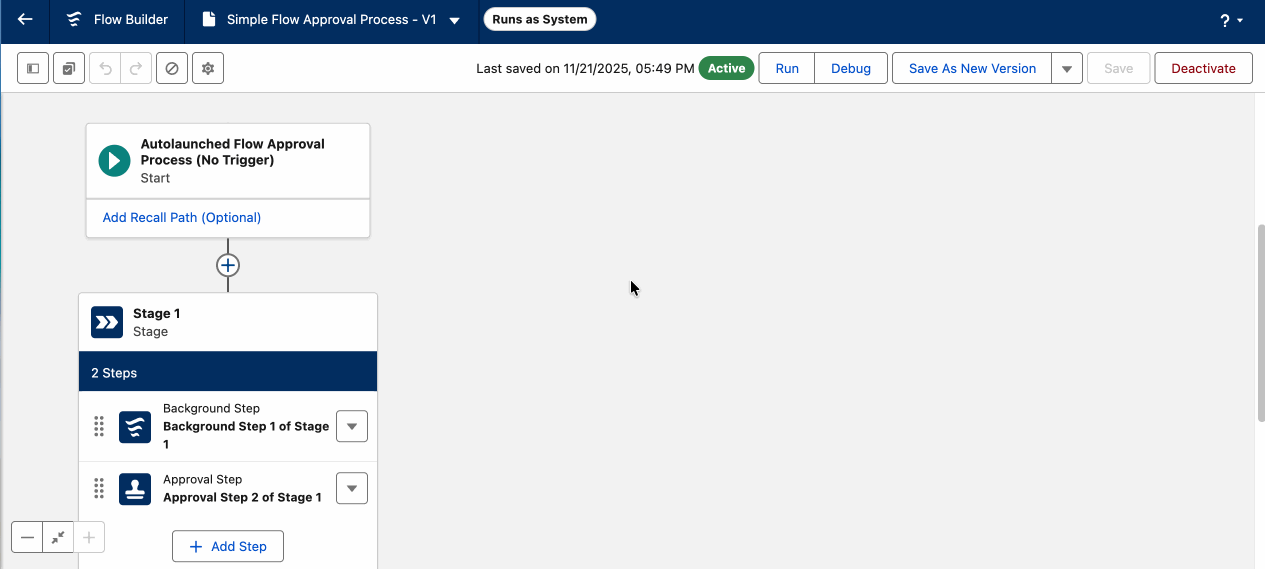
Trace approval dependencies with the Usage subtab in the Approvals Lightning App
Managing Flow Approval Processes (FYI, this is the replacement for the legacy Classic Approvals) involves coordinating several moving parts. You’ve got the approval orchestration itself, the screen flows used by approvers, and any background autolaunched flows that update records. Keeping track of these connections used to be manual and difficult.
To address this, we’re bringing the Usage subtab to the Approvals Lightning App. We’re giving you a dedicated “Impact Analysis” view for your approval logic. Whether you’re trying to find which screen flow an approval step uses, or which parent flows are triggering a specific approval process, the Usage subtab makes these bidirectional relationships visible at a glance.
In the Approvals Lightning App, under Orchestrations, select a Flow Approval Process or a version from the list, and click the Usage subtab. The Used in Flow versions section shows where the approval process is referenced.
Debug specific parts of a Flow Approval Process
Testing an approval process, especially one with multiple stages, can be a major time sink. If you needed to fix an error in the final Board Approval stage, you typically had to trigger the flow and manually approve it through every preceding level just to get to the logic you really wanted to test.
We’re introducing a targeted debugging feature that lets you bypass the “fluff” and jump straight to the problem. Once you define a Start Point, you can initiate a debug run at any stage. Conversely, if you want to ensure a flow doesn’t accidentally trigger final email alerts while you’re still testing the middle logic, you can set an End Point to stop the execution exactly where you want.
Target your testing of Flow Approval Process steps in Debug with Test Output
In Spring ’26, the Configure Test Output tab in Flow Builder debugger lets you selectively skip Flow Approval Process steps in either Rollback or Default mode. This gives you the surgical precision to bypass steps that aren’t ready while still allowing the rest of the flow to commit real changes to your Salesforce records.
Debug and complete approvals right in Flow Builder
Context switching has always been the enemy of efficient debugging. Previously, if you were testing a Flow Approval Process and reached an approval step, you had to leave Flow Builder, find the record in Salesforce, or check your email to approve or reject the request before you could see how the rest of the flow behaved.
In Spring ’26, you can act as the approver without leaving Flow Builder. When your debug gets to an approval step, you can complete the work item in a dedicated tab right inside Flow Builder. Once you click Approve or Reject, the debugger immediately picks back up and continues to the next element, allowing for a truly seamless end-to-end test.
Important note: Ensure “Run automation in rollback mode” is unchecked. Since approval work items are actual records that need to be processed, they cannot be completed in a simulated rollback state.
Flow Orchestration enhancements
Build orchestrations faster from the Automation Lightning App
Flow Orchestration is a powerful tool for building complex, multi-user processes (like a multi-department employee onboarding or a complicated legal approval). Previously, you had to navigate deep into the Setup menu to start a new orchestration. In Spring ’26, you can create new orchestrations directly in the Automation Lightning App. This means you can manage your standard flows and complex orchestrations from one place, significantly reducing the “administrative friction” of jumping back and forth between Setup and your automation workspace.
Create orchestrations directly from the Orchestrations tab within the app. Clicking New opens a prefiltered window, where you can quickly choose between autolaunched orchestrations and triggered orchestrations. Added bonus: The “Frequently Used” section is dynamic—it automatically displays the top three orchestration types based on the number of orchestrations the user creates for each type.
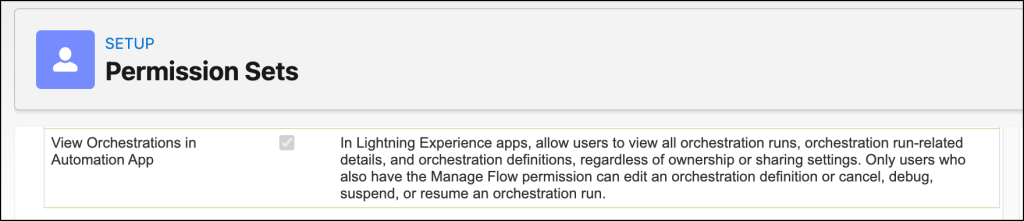
Note: In order to see the Orchestrations tab in the Automation Lightning App, you need the View Orchestrations in Automation App app permission.
Review orchestration automation usage in the Automation Lightning App
One of the hardest parts of managing Flow Orchestrator is tracking how all the pieces fit together. Since an orchestration acts as a “conductor” for many individual flows, it’s easy to lose track of which flows are being used by which orchestrations.
From the Orchestrations tab in the Automation Lightning App, select the orchestration or version. The new Usage subtab acts as your “Impact Analysis” tool. Before you make a change to a subflow, you can now verify exactly which orchestrations rely on it. This prevents a “house of cards” scenario where a small change in one flow breaks a massive, multi-step business process.
We have an orchestration that has four flow dependencies, which we can see on the Orchestration record page in the Automation Lightning App. And when we view the specific Orchestration version, we see the flows that reference the orchestration.
Accelerate your orchestration testing by debugging specific segments
Debugging an orchestration used to be a time-consuming “all or nothing” process. If you needed to test an error in stage 9 of a 10-stage orchestration, you had to manually click through the first 8 stages just to reach the part you actually cared about. With the new Targeted Debugging feature, you can now “jump” directly to a specific stage or segment. This allows you to isolate and fix complex multi-user logic in a fraction of the time and bypass the segments you know are working correctly.
Define exactly where the debugger should begin and where it should stop by specifying the start and end point. Use the Configure Test Input tab to set input values for steps that rely on outputs from skipped stages or steps. To debug a single stage, set it as both the start point and the end point.
Use the ‘Test Output’ to control orchestration steps to run in Debug
Admins testing an orchestration can now skip working stages to jump directly to a specific segment, such as testing stage 9 of a 10-stage process, by using the Configure Test Output tab in Debug to manually provide mock data for skipped steps, ensuring the logic remains intact without running the entire automation. We’re moving away from the old “Manually Set Output” (which only worked in Rollback Mode) to a unified “Test Output” experience in Default Mode that allows for faster, iterative testing of complex multi-user workflows without repetitive data entry.
Finish orchestration work items in Flow Builder while debugging
Now you can finish orchestration work items without ever having to leave Flow Builder. Simply open the orchestration and click Debug. Within the Debug setup pane, provide your input values and ensure “Run automation in rollback mode” is deselected. Then, click Run. Next, on the Details tab, click Continue in Work Guide on the interactive step card to open the work item in the Work Guide tab in Flow Builder.
Salesforce Files enhancements
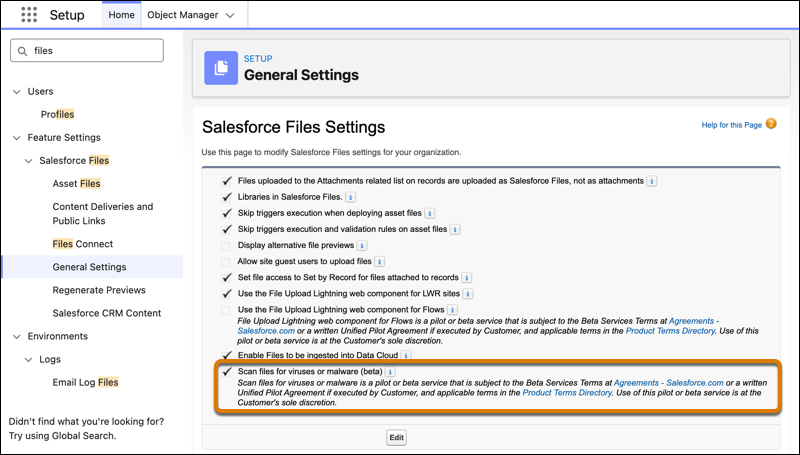
Protect your org by scanning files for malware (beta)
For so many years, scanning files for viruses in Salesforce required expensive third-party AppExchange packages. This native feature—brought to you directly from your feedback on IdeaExchange—fills that major security gap. By blocking malicious files during both the upload and download process, you protect your company from ransomware and phishing attacks hidden in innocent-looking PDFs or spreadsheets, keeping your data and your users’ local machines safe.
To use this feature, in Setup, go to Salesforce Files | General Settings, and enable Scan files for viruses or malware (beta). (Note: This is often on by default in new Spring ’26 orgs).
Store and share files up to 10 GB
The 2 GB file limit in Salesforce Files has forced many teams to use external storage, such as SharePoint or Box, to store high-resolution videos, large CAD drawings, or massive datasets. With the limit now increased to 10 GB for Files home, libraries, and on a record’s Files related list, you can keep more of your critical business assets directly inside Salesforce. Note: The 2 GB limit still applies to Chatter feed posts and comments and Experience Cloud sites built on the LWR framework.
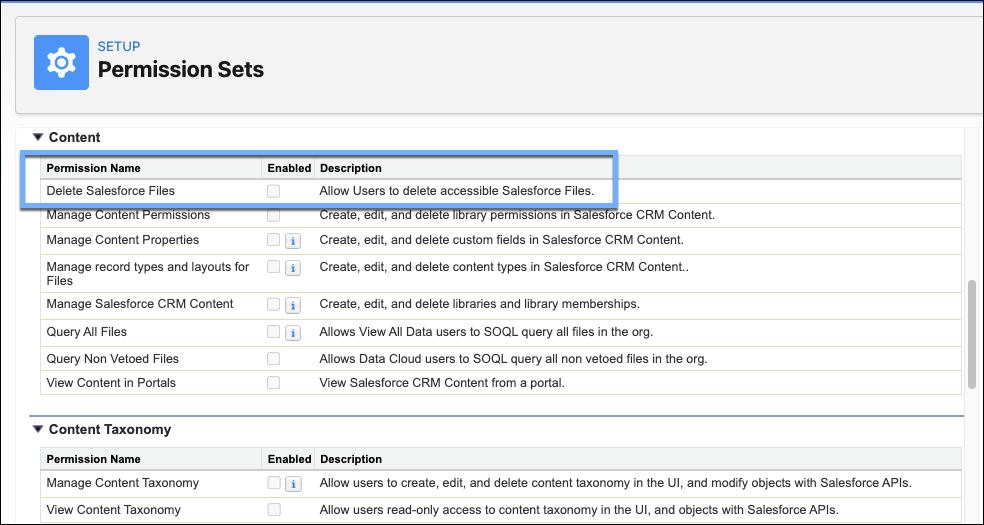
Delegate file deletion with the Delete Salesforce Files permission
We’ve delivered on a long-standing request on IdeaExchange. You can now grant users access to delete Salesforce files. Previously, if a user needed to delete a file they didn’t own, you had only two choices: Have them ask the file owner or grant them the Modify All Data permission—which is a major security risk.
With the new Delete Salesforce Files permission (via a permission set or profile), you can empower specific users (like team leads or data cleansers) to manage files they have access to, without giving them the “keys to the kingdom.” This streamlines document management and keeps your file storage clean without constant admin intervention.
Security enhancements
Prepare for the shift: Connected App Creation is now disabled by default
Salesforce is taking a proactive stance against modern security threats. With Spring ’26, we’re disabling the ability to create new Connected Apps by default, thus closing a common attack vector used by malicious actors. Instead, you should create External Client Apps (ECA), which is a more secure, modular, and modern framework for integrations. As an admin, this means your org is inherently more “secure by design,” reducing the risk of unauthorized integrations being stood up without oversight.
Rest assured, your existing connected apps and packaged, existing connected apps deployed to a new org are not affected. We do recommend that you migrate your existing connected apps to external client apps. If you have an absolute business necessity to create a traditional Connected App, you must now contact Salesforce Customer Support to have the permission manually re-enabled.
Monitor and control access to uninstalled connected apps
Salesforce security is “locked by default,” meaning if a connected app isn’t explicitly installed in your org, Salesforce automatically blocks it. While this is great for security, it often leaves your users frustrated when a legitimate tool (like a new productivity plugin) fails to connect without a clear error message.
This new tracking feature of denied app attempts gives you visibility into the “black box” of denied access. You can now see exactly who is trying to connect which apps, helping you distinguish between a frustrated employee trying to do their job and a potential threat actor.
To audit use and respond, in Setup, go to Connected Apps OAuth Usage, and look at the Denied Attempts Due to Usage Restriction column. Click Install if the app is trusted. This will allow the user to connect to the app. If the app looks suspicious, click Block. This kills all current sessions and prevents any future attempts, even for users with high-level permissions.
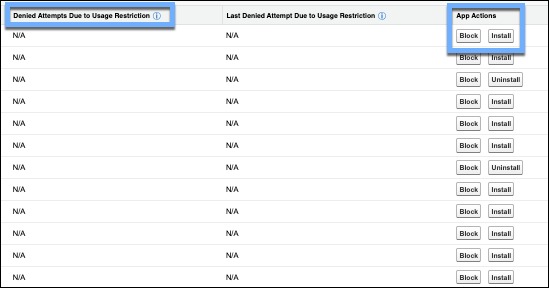
Note: The Approve Uninstalled Connected Apps permission allows users to bypass this block. We recommend that you only grant this to your system admins and only those highly trusted users. Otherwise, all other users have to wait until an app is officially approved for use.
Ability to unfreeze sandbox users is limited to unique usernames only
Salesforce is tightening security to prevent “identity spoofing” and login confusion across your development environments. Previously, you may have encountered scenarios where a user was frozen in a sandbox but held a username that already existed in a different sandbox.
Starting in Spring ’26, Salesforce will no longer allow you to unfreeze a user if that same username exists for another active user in any other sandbox instance. This change ensures that every active sandbox user has a unique identity, reducing the risk of a user accidentally logging in to the wrong environment or gaining unauthorized access via shared credentials.
If you’re blocked from unfreezing a user with this new rule, you mist rename the username by adding a specific identifier to the end of it. I recommend using user@company.com.sandboxname. Once the username is unique, the Unfreeze button will work.
Note: This does not affect Production usernames, which have always been unique. This change specifically targets conflicts between multiple sandbox environments.
Prepare for shorter certificate lifespans
Industry-wide changes are shortening the lifespan of TLS certificates, meaning you’ll soon need to renew them much more frequently—moving from annually to eventually every 47 days. Because renewals will happen so often, Salesforce will also stop sending manual rotation announcements for certificate changes for first-party (1P) production orgs through the Certificate Changes Trailblazer Community Group. The maximum certificate lifespans will drop in phases: 200 days (March 2026), 100 days (March 2027), and 47 days (March 2029). This makes manual tracking impractical. Transition to automated tools to avoid any service interruptions.
Stop “Certificate Pinning” immediately to prevent connection breaks. Assign the Expired Certificate Notification permission to your admin team for automated alerts. Use the Certificate Metadata API type to automate the creation and update of these certificates so you aren’t manually updating them every few months.
Get ready for IPv6
In Salesforce, an IP allowlist is basically a VIP list for network traffic. It tells the system, “Only trust connections coming from these specific addresses, and block everyone else.” Salesforce is introducing IPv6 support to address the global shortage of IPv4 addresses. If you currently restrict access using IP allowlists, you must update them to include IPv6 addresses to prevent users and integrations from being blocked. IP address allowlist in Salesforce only allows for either the IPv4 or IPv6 addresses but not both. Existing IPv4 allowlists do not cover IPv6 connections. When this rolls out to your org, anyone connecting via an IPv6 address will lose access unless you’ve specifically added those new ranges to your Salesforce Profiles and network settings. Note: Today, IPv6 is supported only for the Salesforce Content Delivery Network (CDN) for Experience Cloud sites.
If you use IP allowlists, consider moving to Domain Allowlists or SNI, which are more flexible than IP ranges. Ask your network team for the IPv6 addresses your users and systems use. Government Cloud starts in early 2026; other orgs will get at least 2 months’ notice before their specific rollout.
Try out new (beta) Salesforce My Trust Center features
Why use the generic Trust Status site when you can move into a “VIP” experience with My Trust Center? No more scrolling through the list of instances to find the ones that apply to you. Now, you can log in to My Trust Center (Beta) to see health information for your specific Salesforce products and services. Here’s a quick summary of the new features.
- Custom Notifications: Subscribe to alerts specifically for your “tenants” (orgs), so you only get notified when your services are affected.
- Better History: Access 1 year of past incident data and see a 90-day forecast of upcoming maintenance.
- Org Deep-Dives: View specific details like your org location and MyDomain information in one centralized place.
- Broader Status Tracking: The public status site now includes health monitoring for Heroku and Spiff.
To access My Trust Center, go to Trust.salesforce.com, click Log In, and use your Trailblazer credentials to access your personalized dashboard.
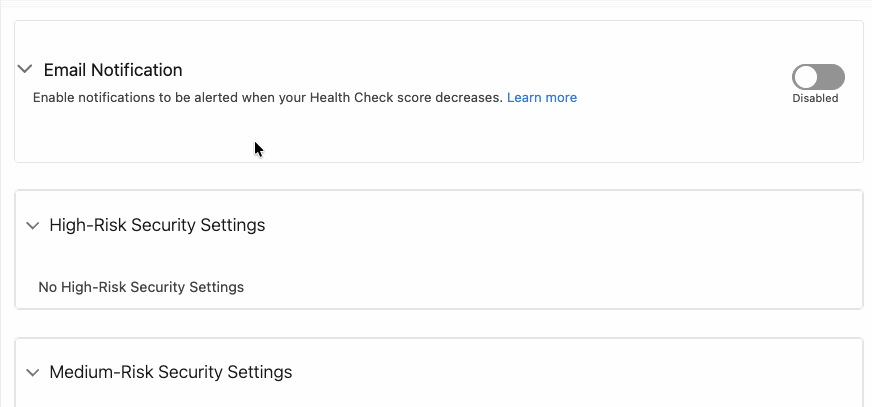
Strengthen your org with new configurable Health Check settings
In Spring ’26, Salesforce has expanded this tool to track seven new configurable settings (including MFA status, SAML enablement, and session management controls), giving you a much clearer picture of your identity and access management (IAM) posture. No more hunting through different Setup pages to check your MFA or SAML status. You can now see these critical metrics—and how they impact your overall security score—in one unified dashboard. Access the dashboard via Health Check in Setup.
Stay informed with proactive Health Check notifications
No more manually running the Security Health Check to see if your org’s security posture has changed. Spring ’26 brings you proactive emails so you know when your security score shifts. Whether a change was made to session settings or a password policy was adjusted, these notifications ensure you aren’t blindsided by security gaps. This is “set-it-and-forget-it” peace of mind for your most critical security configurations.
To set this up, go to Health Check in Setup, enable the Email Notification, and configure it to send notifications to all admins and add additional recipients.
Salesforce mobile app enhancements
Ensure the Salesforce mobile app is supported on your phones and tablets
To ensure the app remains fast, secure, and compatible with the latest Lightning features, Salesforce is raising the minimum operating system requirements for those who use the Salesforce mobile app. As an admin, knowing these benchmarks early helps you coordinate with your IT department and prevent your mobile users from losing access to their CRM on the go.
- Android 11.0 or later, Android WebView 90.0 or later
- iOS 17.0 or later
Complete tasks directly from custom phone notifications (beta)
Imagine your VP of sales approving an expense report or a manager closing a high-priority case right from their phone notification. This new feature turns “passive” alerts into “active” workflows. By adding actions to custom notifications, you can reduce a multi-step process—such as approving requests, closing a case, or following up on deals at risk—into a single tap on a phone’s lock screen. What a great feature for those busy executives and field teams who need to keep business moving while on the go.
Lightning Design System enhancements
Use dark mode (beta) in more orgs to enhance user comfort
You can now offer dark mode to your users in in Free Suite, Pro Suite, Professional, Enterprise, and Developer edition orgs. Dark mode was previously only available for Salesforce Starter Suite orgs. Dark mode isn’t just a style choice; it’s a major accessibility win. By reducing eye strain in low-light conditions and improving readability with high-contrast elements, dark mode helps your team work more comfortably throughout the day. This update also lays the groundwork for more advanced branding and customization of your Salesforce interface in the future.
To enable this, go to Setup → Themes and Branding, then click New Theme or edit an existing SLDS 2 theme. In the dark mode section, select Let users enable dark mode. Once you save and activate the theme, your users can click their profile image and choose how they want Salesforce to appear.
Share your feedback about dark mode! See the Trailblazer Community for Design Trailblazers.
Release updates
As part of your release preparation activities, you should review the release updates to ensure you’re aware of upcoming updates that can impact your org. Give yourself and your team ample time to test and activate the updates before Salesforce enforces them in your org. Nothing good ever comes from scrambling at the last minute.
To learn more, go to Release Updates in Setup. Give yourself plenty of time before an update is enforced to enable it in a sandbox, do proper testing, and make any necessary changes to code and configuration to ensure all still works post update.
I’m calling out a few of the release updates here. I recommend reviewing the comprehensive list of release updates for those that apply to your org.
Prepare your Apex code and flows for changed asynchronous sharing updates (release update)
Salesforce is making a major behind-the-scenes change to how it recalculates record access (sharing). Currently, when you change a user’s Role or Group, Salesforce tries to update all affected record permissions immediately (synchronously). For large companies, this can cause the system to “hang” or slow down.
To boost performance, Salesforce will now process these big sharing changes in the background (asynchronously). This makes the system faster, but it means there might be a short delay before a user actually gets access to their new records.
If you have Apex code or flows that update a Role/Group and then immediately try to perform an action on a record those users should now see, your automation might fail because the “background update” hasn’t finished yet. Update Apex classes, tests, and flows that update group membership or roles if they rely on synchronous sharing recalculation. This update is available starting in Spring ’26 and Salesforce plans to enforce this in Spring ’27.
Enable accessibility enhancements for page headers and modal windows when zoom is greater than 200% (release update)
User accessibility is no longer just a “nice-to-have” feature; it’s becoming a core platform requirement. We’re beginning a multi-release journey to comply with WCAG 2.2 (Web Content Accessibility Guidelines), specifically focusing on Resize and Reflow.
Previously, users with visual impairments who zoomed in past 200% often faced a “broken” UI. Fixed headers would block the content they were trying to read and modal windows (pop-ups) would bleed off the edge of the screen, requiring frustrating horizontal scrolling. This update fixes those “magnification traps,” ensuring your org remains usable for everyone, regardless of their visual needs. When your users zoom 300% to 400%, the page header still scrolls with the page and doesn’t block the content. In modal windows, the buttons and content will still display within the viewport and the window is fully functional. This update is available starting Spring ’26 and will be enforced in Summer ’26.
Enable accessibility enhancements for date pickers, popovers, bottom utility bars, record headers (release update)
Building on the “page headers and modals” release update, we’re expanding our commitment to WCAG 2.2 Resize and Reflow compliance. This second phase focuses on the “interactive” layers of the UI; specifically, the tools users interact with most frequently, like date pickers and bottom navigation bars.
Without this update, high magnification (200%–400%) can cause these elements to overlap or truncate data in a way that makes them unusable. By enabling this, you ensure that every part of the record page, even the small utility pop-ups, remains functional and clear for users with visual impairments. Note: This update has a technical dependency. You must enable the first accessibility update before this one will function correctly.
- First: Enable Accessibility Enhancements for Page Headers and Modal Windows.
- Second: Enable Accessibility Enhancements for Date Pickers, Popovers, Bottom Utility Bars, and Record Headers.
This release update is available starting Spring ’26 and will be enforced in Summer ’26.
Enable accessibility enhancements for cards, docked containers, menu lists, and panels (release update)
We’re completing our push for WCAG 2.2 Resize and Reflow compliance by addressing the remaining building blocks of the Lightning UI. In this final phase of the update, “secondary” but high-traffic elements like cards (where you see Related Lists), docked containers (like the Email Composer or Chat window), menu lists, and side panels are being optimized for high magnification.
Currently, these elements often “clip” their text or hide their headers when a user zooms in past 200%. Instead of disappearing off-screen or becoming unreadable, these elements dynamically wrap their content with this release update. A user at 400% zoom has the same functional capacity as a user at 100%, fulfilling a major requirement for digital inclusivity.
This update is part of a “Chain of Dependencies.” To ensure your UI doesn’t break, Salesforce requires you to enable these accessibility updates in a specific order.
- Step 1: Enable Page Headers and Modal Windows.
- Step 2: Enable Date Pickers, Popovers, and Utility Bars.
- Step 3: Enable Cards, Docked Containers, Menu Lists, and Panels.
This release update is available starting Spring ’26 and will be enforced in Winter ’27.
Resources
Each release brings tons of amazing, new functionality, and it can be a lot to digest. To help you make the most of Spring ’26, be sure to explore our Be Release Ready page, where you’ll find valuable resources for Salesforce Admins. Bookmark the page and check back for any updates as we continue to provide helpful insights!