Einstein Prediction Builder: How to Turn Your Idea Into a Prediction

By

Being an #AwesomeAdmin is all about delivering business value with technology that makes our end-users’ lives easier and helps our organizations run more efficiently. Harnessing the power of artificial intelligence (AI) can help you, as an admin, deliver these results in more impactful ways than ever before. Einstein Prediction Builder makes it easy to create a custom prediction for your business. You don’t have to worry about ETL-ing your data, data wrangling, or picking which algorithm to use or tuning its parameters. Even better, you don’t have to worry about the infrastructure to run these models in production, model retraining over time, or how to integrate the predictions back into your business processes in Salesforce. Once set up, training and scoring happen automatically behind the scenes. And, the predictions are available on a custom field on the object where your data is stored — readily available on the records your end users interact with and for automation via Process Builder or Einstein Next Best Action, for example.

Keeping all that in mind, setting up a prediction with Einstein Prediction Builder is only one step of the journey. This blog will take you through the six steps of the prediction lifecycle and help you turn your idea into a prediction.

Step 1: Define your use case

It all starts by identifying a business outcome that you want to improve.

For example, your sales team may have a low lead conversion rate, spending hours chasing leads that don’t convert. Another example could be that your support team may get low CSAT scores because of high-priority cases that got escalated while lower-priority cases were being addressed. Maybe your churn rate is higher than you’d like, and there might be a way to resolve that by targeting specific groups with special offers before you lose them.

You’re probably already thinking about many potential use cases for your business and wondering where to start.

Here are a few questions that may help you select a use case:

  1. Is it tied to a high-value business outcome? (If not, nobody will care.)
  2. How are you going to use the prediction?
  3. Is there a business KPI you can measure to determine whether or not the prediction has had an impact?
  4. Do you have the data in Salesforce, and can you report on it? (If you can’t report on it, you can’t predict it!)

To help you think that through, there’s nothing like good old Mad Libs to make it fun. See this post to learn more.

The example I’ll use for the remainder of this post comes from a customer in Paris I worked very closely with. This was an up-and-coming business in the networking services industry, and the problem they faced was that many of their customers were paying their invoices late. In fact, after pulling a quick Salesforce report, they realized that only 35% of their invoices had been paid on time in the past year! In turn, that caused them cash flow issues.

To address this problem, they used Einstein Prediction Builder to predict which invoices would be paid late. Here’s how they addressed the questions above:

  1. Is it tied to a high-value business outcome? Yes, more money in the bank, less cash flow issues.
  2. How are you going to use the prediction? Create a task for account managers two weeks ahead of the due date — for invoices that are likely to be paid late — so they can remind their customers.
  3. Is there a business KPI you can measure to determine whether or not the prediction has had an impact? Yes, percentage increase in invoices paid on time.
  4. Do you have the data in Salesforce, and can you report on it? Yes, the data is in the Invoice object in Salesforce.

Step 2: Identify the data that supports your use case

Now that you’ve picked a solid use case, the next step is to frame your prediction for Einstein Prediction Builder.

Prediction Builder can handle two types of predictions:

  • Binary predictions (answering a Yes/No question)
  • Numeric predictions (predicting a number)

In our case, we could frame the problem both ways:

  • Will an invoice be paid late? (Yes/No question)
  • How many days late is an invoice likely to be paid? (Numeric)

To answer these questions, Prediction Builder uses machine learning, leveraging historical data to predict the future. In a nutshell, machine learning algorithms find patterns in historical data to apply to new data and make predictions. If you want to know more, I recommend reading this introduction to machine learning.

Going with the first question above (Will an invoice be paid late?), we’ll need examples of invoices that were paid late (answer is yes, so we call them positive examples) and examples of invoices that were paid on time (answer is no, so we call them negative examples). These records constitute the Example Set (also called the Training Set).

Once Prediction Builder has been trained on those examples, it can then predict on records for which we don’t know the answer yet. These records are referred to as the Prediction Set (also called the Scoring Set).

A handy tool to help you frame the problem correctly is the “avocado framework.”

Here’s some helpful information about the avocado framework:

  • The dataset represents all the records in your object. In our case, the Invoice object.
  • Within that, you can choose to segment your data if parts of your dataset are inherently different. In our case, we have both B2B and B2C customers. The ways we handle their invoices are pretty different from each other, so we’re going to segment our data to focus on B2B customers that have invoices over $10K (as they represent 85% of our business).
  • The Example Set is composed of invoices from the past. Some of them have been paid on time (records where invoice balance is 0, and the last payment date was before the due date) and others were paid late (payment date is after due date, or it’s past the due date and there’s still a balance).
  • The Prediction Set is composed of records that have a balance but are not yet due.

If you want to create your own avocado diagram, you can get the template here.

Step 3: Create your prediction

Here is where Prediction Builder really shines. Once you’ve framed your question using the avocado framework, you can follow the screens in the Einstein Prediction Builder wizard and create your prediction in just a few minutes. Continuing on with our example, I’ve outlined the steps for you here:

  1. Select the Invoice object and specify the segment.

2. Select Yes/No. (The question we’re asking is, “Will an invoice be paid late?”)

3. Select No Field.

Note: If you already had a checkbox field indicating which invoices have been paid late, you would select Field here, and then select that field on the next screen.

4. Set up the conditions for “Yes examples” and “No examples” as defined in the avocado framework.

Yes (positive examples)

No (negative examples)

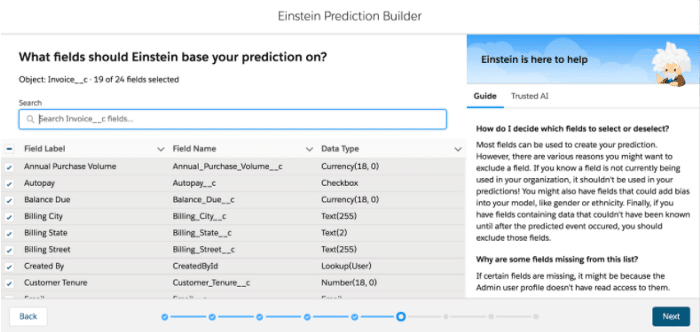
5. Choose which fields you’d like to include or exclude from the Invoice object.

We recommend keeping most fields selected; however, there are a few exceptions to keep in mind. See this post to learn more.

6. Pick the name of the field where your predictions will be stored, then review and build!

Step 4: Review, iterate, and enable your prediction

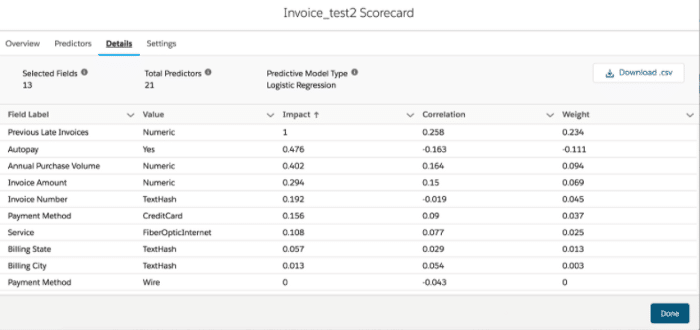
Once your prediction is “Ready For Review,” click on the drop-down menu of your prediction and select View Scorecard.

The scorecard gives you access to different metrics on your prediction.

When reviewing your scorecard, there are a few things to look for:

  • On the Overview tab, take a look at the Prediction Quality. In general, the higher, the better, but if it’s too high (greater than 95%), it might be too good to be true.
  • If you’re in the red zone over 95%, it’s probably because your model suffers from a common issue called label leakage. For example, the first time this customer created the late payment prediction, they were in the red because a field called “Late Payment Fee” had been left in. This field was a leaker, as this information was never available at the time of prediction but only after the fact, when the outcome was known. Fortunately, we’ve got you covered. This post will help you better understand what leakers are and how to remove them from your models.
  • On the Details tab, sort by impact and look at the top 10–20 predictors. Here are some things to keep in mind as you look at this tab:

* Do the top predictors and the sign (positive or negative) for the correlation coefficients make sense based on your business knowledge?
* Are there any potential leakers in your model?
* Are there some fields that should be removed as they could introduce some bias? (This is a tricky one, but we’ve got you covered again in this post.)
* There might already be interesting business insights there; predictors that are actionable will be particularly interesting to you, as you’ll be able to integrate them into your business processes right away. For example, “Autopay” and “Payment Method” seem to have high impact here, so you could see how you could try to encourage more of your customers to switch payment methods via a campaign with potential incentives, such as a small discount.

Based on this analysis, you’ll most likely need to iterate a bit and tweak your prediction.

Common tweaks include:

  • Adding or removing fields (usually leakers).
  • Creating a segment to focus on parts of your data.
  • Updating your example filters.
  • Adding relevant data from other objects via formula fields or roll-up summary fields. (Using data from child and parent objects for your prediction is on our roadmap.)

What’s extra nice is that Prediction Builder makes it very fast and easy to do these iterations, as you can clone or edit your prediction — and everything will be pre-filled for you.

Once you’re happy with your prediction, click on the drop-down menu on your prediction and select Enable. This will trigger the initial scoring of your data, and all of the records in your Prediction Set (right side of the avocado) will get a prediction.

Moving forward, all new records and updated records in that set will be re-scored on an hourly basis. The model will also be retrained automatically every month, so you don’t have to worry about it becoming stale over time!

Note: We also have a pilot for real-time scoring. Reach out to your Salesforce Account Executive if you’re interested!

Step 5: Monitor your prediction

Enabling your model doesn’t necessarily mean it’s ready to integrate into business processes just yet, though! In fact, it’s recommended to let it run for a period of time behind the scenes (or only surfacing scores to a small number of users) until you can assess its performance on new data.

After your model has run for a while on new data, you’ll indeed be able to know if it’s really working by comparing your predictions with what actually happened! The timeframe for this analysis will vary based on your data throughput and the length of your business cycles, but a good rule of thumb is a couple of months.

An easy way to do this analysis is by using reports. This post will give you step-by-step instructions on how to set those up.

Below, you can see that for higher scores, most invoices ended up being paid late, while for lower scores, most were paid on time. It seems that our model is performing pretty well!

For those of you who have access to Einstein Analytics, we’ve also created this nifty little package that you can get on the AppExchange for free: Einstein Prediction Builder Model Accuracy Template.

If you’re happy with what you see, you’re ready to move on to the next and final step: using your prediction!

Step 6: Deploy and use your prediction

There are multiple ways to use a Prediction Builder prediction in Salesforce:

  • Add the prediction field to a list view and sort by score. If we used this method in our example, invoices that are more likely to be paid late will be listed at the top and brought to everyone’s attention.
  • Add the Einstein Predictions Lightning Component to the Invoice page, so you can see the top predictors that influence each particular prediction. This will give you helpful information when you reach out to each customer.
  • Run automated flows based on the prediction using Process Builder. For example, send a task to account managers two weeks ahead for invoices that are predicted to be paid late. This post will tell you how to set that up.
  • Use your prediction along with business rules in an Einstein Next Best Action strategy. For example, you may decide to send a reminder to customers that are likely to pay late, but only if they haven’t had a meeting with you in the last month and they’re not part of an open up-sell opportunity.

However you decide to use your prediction, it’s important to:

  • Track your KPI from Step 1 of the prediction lifecycle. You can create reports to track those and review them regularly. This post will give you some ideas about the types of dashboards you can set up.
  • Consider a phased rollout to collect qualitative and quantitative feedback from your users and improve as needed.
  • Review your assumptions and the reports from Step 5 regularly. Even though the model gets retrained automatically, your business will change over time; new processes will be put in place and new fields will be added, which may require modifications to the model.
  • Manage the change in your organization. As an AI trailblazer in your organization, you’ll have to show the way and make sure your hard work and cool new predictions provide maximum impact! Transforming your business with AI will take time, and some business processes will have to evolve to reap the maximum benefits. Folks often ask me how AI can become a painkiller instead of a vitamin for business, and for me, it has to do with the depth of integration into business processes. You’ll need to get buy-in from everyone involved (management and end-users) and show the benefits (hence, the importance of hard KPIs you can measure over time).

Now that you’ve successfully set up your first prediction, you’ll likely uncover many more predictions that would help your business and that you can set up with Einstein Prediction Builder. Fortunately, Einstein never sleeps!


Here are the different blog posts mentioned to help guide you through the various steps of your journey, from idea to prediction:

  1. An Introduction to Machine Learning
  2. My Einstein Prediction Builder Toolkit
  3. Einstein Prediction Builder: Which fields should I include or exclude from my model?
  4. Understanding Your Scorecard Metrics and Prediction Quality
  5. Understanding the Quality of Your Prediction
  6. A Model That’s Too Good to be True – How to deal with Label Leakage
  7. Thinking Through Predictions with Bias in Mind
  8. How do I know if my prediction is working?
  9. How to Use Custom Logic in Einstein Prediction Builder

For additional help with Einstein Prediction Builder, check out Salesforce documentation and our modules on Trailhead.


How Salesforce Einstein Is Supercharging Mobile Experiences.

How Salesforce Einstein Is Supercharging Mobile Experiences

While its impact is widespread, one of the most exciting aspects of artificial intelligence (AI) is its ability to create conversational interactions that generate personalized experiences, supercharging productivity and efficiency. In this blog post, we’ll explore how the implementation of large language models on mobile devices is reshaping the enterprise mobile landscape and how Salesforce […]

READ MORE
Einstein standing next to text that says, "How to Use Generative AI Tools to Write SOQL Queries."

How to Use Generative AI Tools to Write SOQL Queries

Salesforce Object Query Language (SOQL) is a powerful tool that allows you to retrieve data from Salesforce. You can use SOQL to query any Salesforce object, including custom objects, custom fields, and user permissions like profile and permission set perms. As a Salesforce Admin, I know that writing SOQL queries can be a pain. Not […]

READ MORE