Welcome to a new series on the Salesforce Admins blog called “How I Solved This.” In this series, we deep dive into a specific business problem and share how one #AwesomeAdmin chose to solve it. Once you learn how they solved their specific problem, you will be inspired to try their solution yourself! Let’s take a look at how Kelly Bentubo migrated data from one object to another while keeping her IDs consistent.
Key business problem
My organization needed to move a business process from the Case object into a new custom object. I wanted to move all of the data correctly and retain the legacy Case IDs and Record Owners — some of whom no longer work at the company — all while new records are created on the new object seamlessly.
Example:
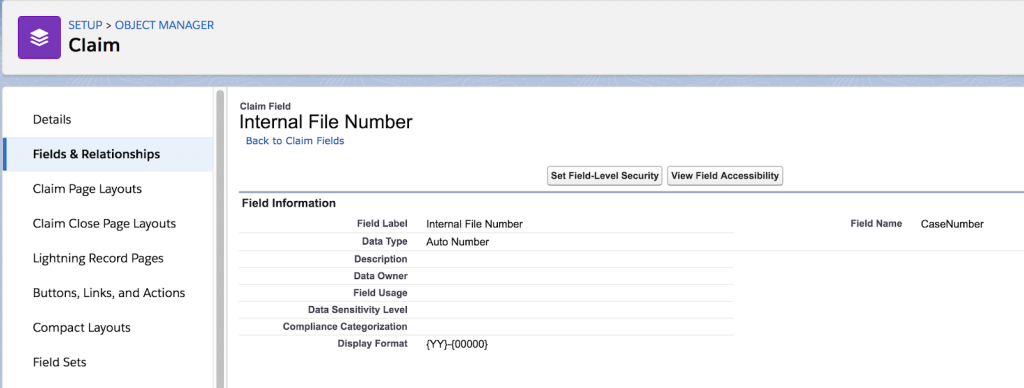
The Case Number data type is Auto Number, and the Display Format is set to: {YY}-{00000}. This ensures that each Case starts with the year the Case was created. If all Cases were exported and just inserted into the new custom object, they would all start with “20-”. So, how do we replicate a previous year’s Auto Number into the new object?
Background
It is critical to the organization and their clients that the assigned Case Number and legacy Creation Date and Owner be retained on the new object records. There can be no disruption to the business or clients during the transition. All record detail needs to be retained when the data is moved to the new object.
Example:
The created date and ownership of records need to be carried to the new object records. Some of the employees that were at the company 5 years ago are no longer active, but we want to keep the ownership intact. The highlighted columns are the fields from the export that we want to maintain in the new object.

The company wants to be easy to do business with, so clients have many options when it comes to requesting information or checking in on the status of a Case. Clients can access their Cases by logging in to a Customer Community or by calling a support line. When the data moves from the Case to the new custom object, it is critical that all of the information matches and the transition is seamless for the customer.
How I solved it
1. Use a Text field for Object Name during the initial data import
Testing in sandbox proved that I could set the “Name” field of the new custom object to a Text data type (rather than Auto Number) and then insert the numbers from the legacy Case records into the new Text “Name” field. After importing the data, I was then able to update the field data type to be Auto Number while keeping the legacy data intact. Reviewing the last record name of the Auto Number sequence provided me the starting number to set for the next Auto Number in the sequence. So, for example, I started with {YY}-{001234}. This should be done during off hours to minimize the impact for internal and external users.
2. Create a Permission Set to keep the Legacy Dates and Owners
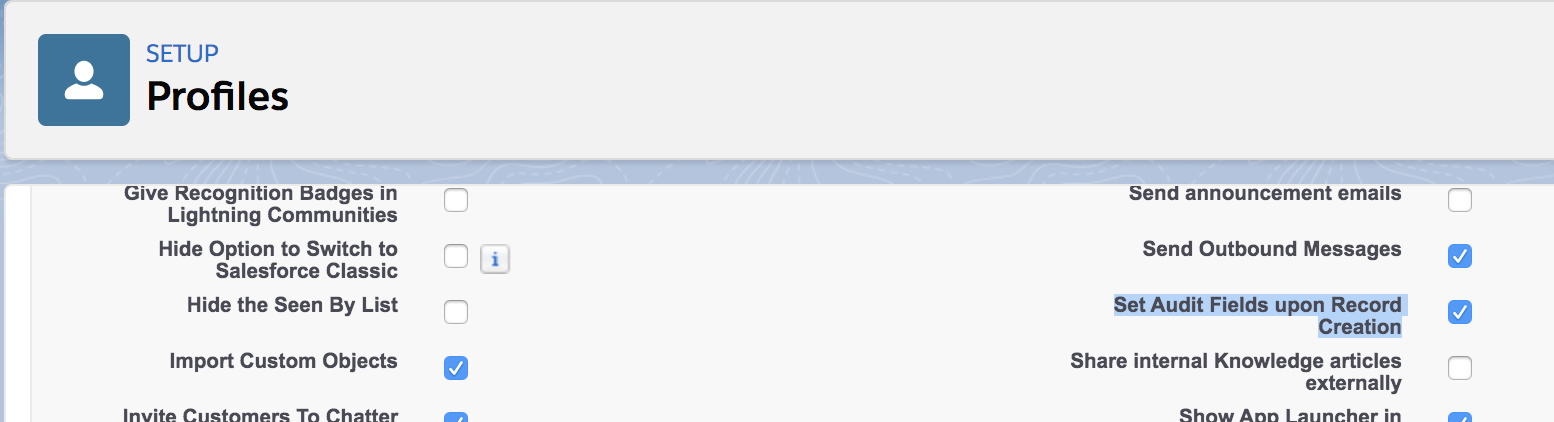
I also wanted to maintain the record ownership for people who have since left the company (and are not active Salesforce users) and the record created date, even though it’s in the past. In order to do this, I had to enable these permissions:
✅ “Set Audit Fields upon Record Creation”
✅ “Update Records with Inactive Owners”
“Set Audit Fields upon Record Creation” gives us the power to ensure that the Created Date and Created By fields show the original data that was on the Case records. If we don’t set this permission and we load the data, the Created Date will be TODAY for ALL records.
“Update Records with Inactive Owners” gives us the power to ensure we can load records that are showing an inactive user as the Owner or Creator of a legacy record. The original record may have been created 10 years ago and that person is no longer with the company. Without this permission, the record will throw an error when we try to insert the records.
I created a new Permission Set with these perms and assigned it to my Salesforce Development Team to ensure we all had the ability to do this.


3. Create a custom “Legacy ID” field on the new Object
We want to be able to easily verify that our data migration project was successful. And we also want to make sure that we have an easy path for additional updates from the Case record to our new custom object record. In order to accomplish this, we are going to create a field on the Case object called “New Ticket” as well as a new field on the custom object called “Legacy Case”. You can choose to name these fields however you want — just be sure you can keep them straight at a glance of just the name of the field.
As a best practice, I also include the word “New” on the legacy object and the word “Legacy” on the new object. There are a few steps to ensuring that this transition goes smoothly, so we want to keep things as simple as possible! Using Dataloader, complete a full export of all fields for the Case object. Ensure that the file name is updated for backup documentation.
Business results
I was able to migrate all the existing Case data into a new custom object while retaining key information and a seamless customer experience, without disrupting existing business processes.
Do try this at home
Transitioning your data from one object to another can be a daunting task. Make sure to review exactly what data you want to keep, and if you need to maintain original dates and IDs, you now have the steps to do that.
Let us know what you thought of this solution, and how you want to use it, with #AwesomeAdmins #HowISolvedThis.
Resources:
Trailhead badges—
Data Management
Data Modeling