Key business problem:
In order for the National Aquarium to reopen during the COVID-19 pandemic, we needed guests to make advance reservations so that we could limit the number of guests in the building to allow for social distancing.
Background:
In order to enter the National Aquarium, people need to purchase tickets. General Admission ticket buyers have always had a date and time for entry, but many other ticket programs have historically allowed guests to arrive at any time and gain immediate entry. This is particularly true for Aquarium members where immediate, anytime entry is a benefit of membership.
Unfortunately, due to COVID-19, the National Aquarium needs to operate at reduced building capacity and strictly enforce the number of guests. So that our guests can arrive with confidence that they won’t have to wait for entry, we needed to offer a way for them to make an advance reservation.
We also needed a way for members to make a reservation that was consistent with their membership benefits for a time where there was sufficient capacity in the building. Furthermore, we needed it to be simple, to enable us to change various requirements quickly, and, having been closed for more than 3 months with limited capacity going forward, to not be cost-prohibitive. Finally, we needed something the guests should show our team at entry that both confirmed the reservation and conveyed important elements such as date, time, and party size, so that we could process folks in quickly without clustering everyone together.
How I solved it:
I created a digital experience (formerly a Salesforce Community) which allows public access (that is, no usernames or logins) where screen flows control all of the data manipulation.
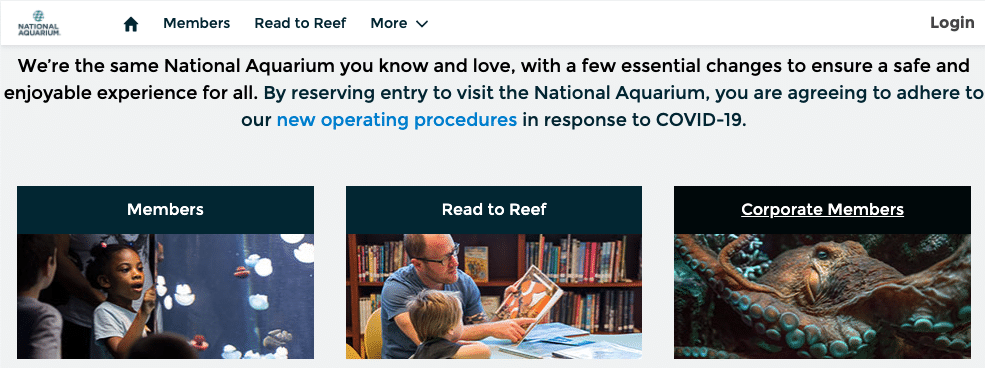
Digital Experience site home page of the National Aquarium
1. Create custom objects to track reservation information
The new application revolves principally around three new custom objects: Reservation Dates, Reservation Time Slots, and Reservations. The Dates and Time Slots establish the capacity and entry times, as well as monitor the current availability for any specific entry point.
For members, they are validating against their Account record, which already stored their membership information, such as Member Number and Expiration Date.
Ultimately, the Site User will create a Reservation record, which is a junction object between their Account and the Time Slot they have chosen. The Reservation record contains the details from its parent objects, as well as the number of guests expected, the status, and the confirmation number.
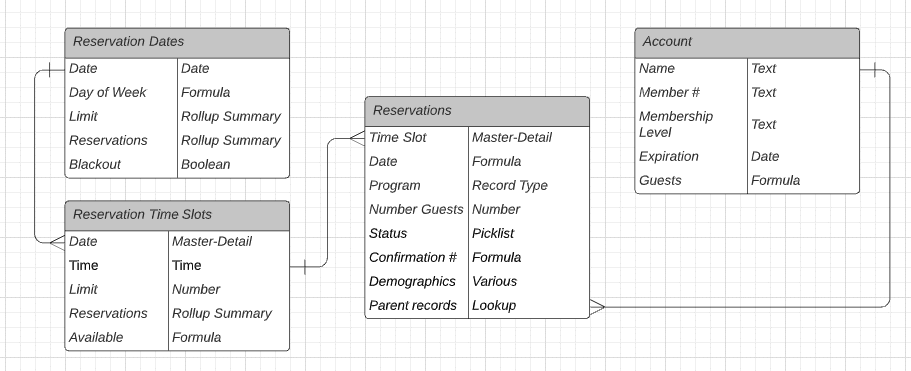
Entity relationship diagram of core objects in Time Slot Reservations app
2. Create the membership reservation flow
There are five screens for the guest to make a reservation.
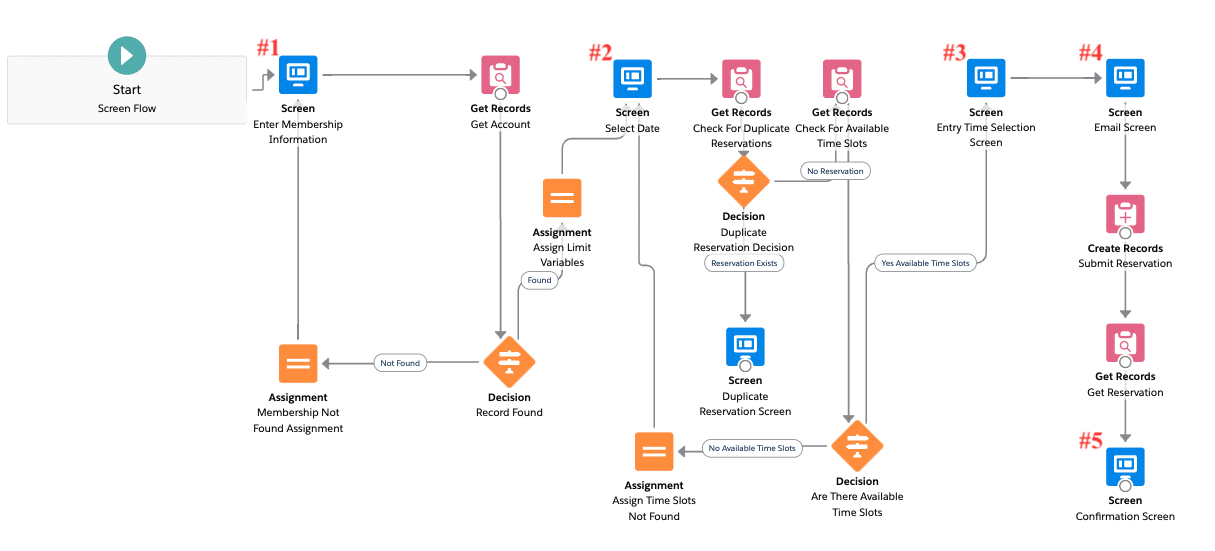
Screen Flow for membership reservations
Screen #1 — Asks the member to enter their Member Number, which is located on their digital or physical membership card, and their ZIP Code.
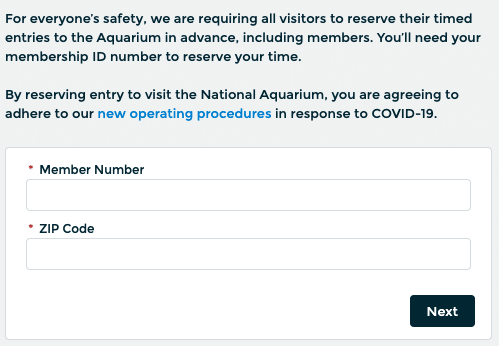
First Screen of Flow, where membership details are collected
This information is stored on their Account record, so what’s happening behind the scenes is that the flow looks for the Account that matches the entered details. If a record is not found matching, it returns to the same screen with a message stating that, and encourages the guest to try again or to call for assistance.
Screen #2 — When the Member’s Account is found, the next screen confirms the Membership Level and the number of guests for which the member can make a reservation. It then asks which date the guest would like to visit and how many guests will be in the party.
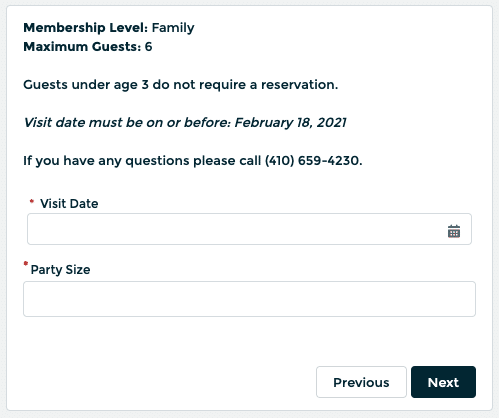
Second Screen of Flow, where visit details are collected
The screen is also determining how far in advance a reservation can be made. The screen enforces the maximum date and party size, and the entered information will be used to return the available Time Slots that have the required availability for the requested Visit Date. If there are no available Time Slots, the flow will return to this screen with that message and ask the guest to select a different date.
Screen #3 — On this screen, the guest is asked to select their desired entry time from the Time Slots with available capacity. They are also asked to confirm their agreement to follow the posted COVID-19 safety procedures.
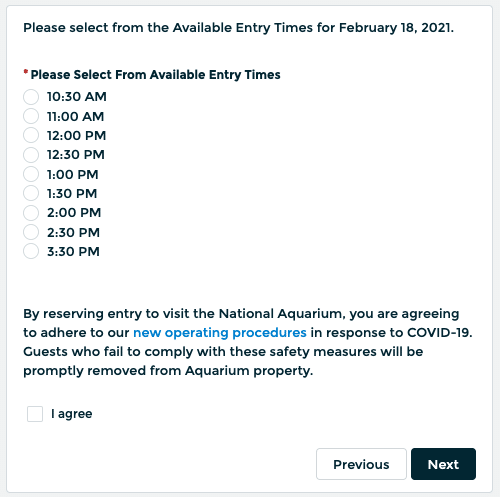
The Time Slot selection is a Record Choice Set. What the guest is actually selecting is the Time Slot record that becomes the other parent record (in addition to their Account record) to their Reservation record. What the Reservation record needs is the Time Slot Record Id.
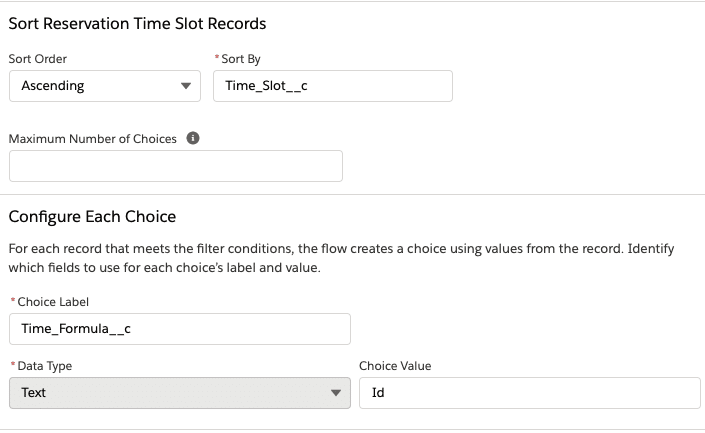
Flow configuration options for entry time Record Choice Set
Because fields with the Time data type cannot be used as Record Choice Set labels, I created a formula (Time_Formula__c) which is a text representation of the Time field. However, it’s important to sort by the Time field (Time_Slot__c), so that the records display in chronological order and not the text alpha/numeric sort order. Notice that the field for the Choice Value is Id.
Here’s the formula to display the time value as text (using 12 hour time AM/PM) in the flow screen:
IF(HOUR(Time_Slot__c)<=12, TEXT(HOUR(Time_Slot__c)), TEXT(HOUR(Time_Slot__c)-12)) &
“:” &
IF(MINUTE(Time_Slot__c)=0, “00”, TEXT(MINUTE(Time_Slot__c))) &
IF(HOUR(Time_Slot__c) < 12, ” AM”, ” PM”)
Screen #4 — The next screen allows the guest to enter an email address for the confirmation. We’re already going to send the confirmation to the primary email we have on file for the membership. But, for example, should a spouse make the reservation, this screen provides an opportunity to enter a secondary email address to receive the confirmation as well.
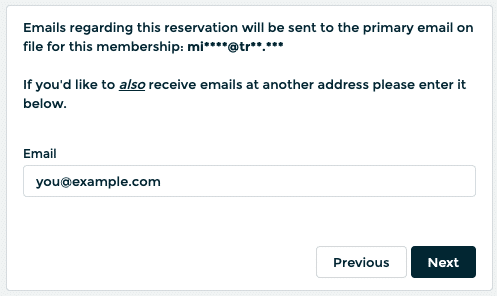
Fourth Screen of Flow, where email address is collected.
Screen #5 — The final screen displays the confirmation details after the Reservation record is created.
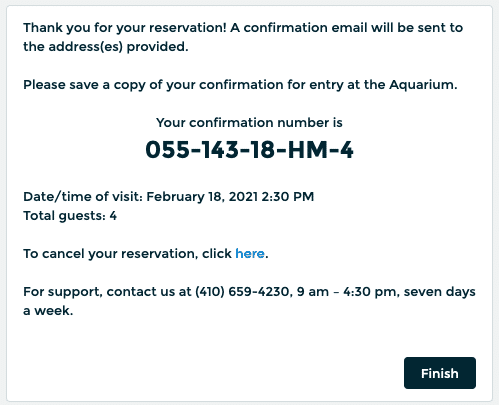
Final Screen of Flow, where confirmation details are displayed.
Between Screens 4 and 5, the Reservation record is created. The flow also gathers the Confirmation Number, which is a formula field on the Reservation record. Coded in the number is the date, time, type, and guest count. When the member shows their confirmation number upon arrival, our operations team can confidently know that the guest has a reservation for that time, scan the membership card, and encourage the guests to have a safe and enjoyable visit. In the confirmation email, the member is also provided a quick link to cancel their reservation should their plans change, so that the time slot becomes available to other potential guests.
You may have noticed a sixth screen in the middle of the flow. That’s one that most guests won’t see. Between Screens 2 and 3, the flow checks to see if that member already has a reservation for that date. If so, they are directed to a screen to ask them to cancel that reservation before making a new one. Again, this is so the available time is returned to the pool for other guests.
3. Allow for public access
Once you create a site, you need to allow for public access. In the Experience Builder Settings, the General section has a checkbox to allow Public Access.
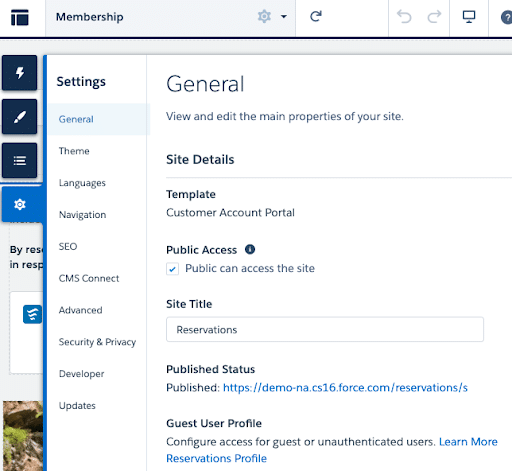
Checking the box will allow pages — and potentially, data — to be available without a user logging in with a username and password.
In our example, we made a page for Membership, added some text and images, and added the Screen Flow. On the Properties of the pages you want public, make sure they are set as such under the Page Access settings.
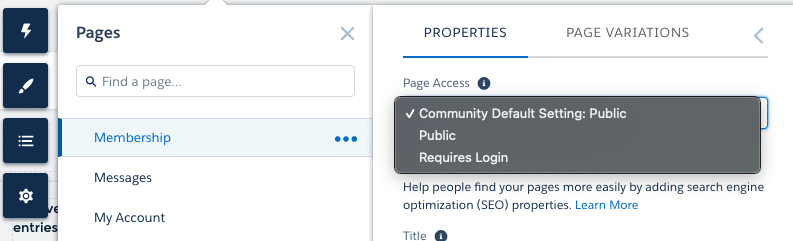
Page visibility options
At that point, you’ll have a URL to where your users can navigate to access your content.
4. Exposing and securing your data
Just as with any application, we need to make sure that the users can access the data they need — and that they don’t access data they shouldn’t!
When a site is created, it also creates a new Profile with a Guest User License. Just like Profiles with other license types (with a few exceptions), we can configure it to grant access to objects, fields, and records.
But for this type of configuration, we don’t need to do that at all. Because all of the data read and updated is done through flows, what’s simpler — and more secure — is to grant access to the flows themselves.
When saving a flow, we can open the Advanced section. In there, I set the flow to “Run as System Context Without Sharing” rather than the default of User or System Context. This change means that I don’t need to worry about sharing the Time Slots to the Guest User Profile, nor do I need to give the Profile access to create Reservation records.
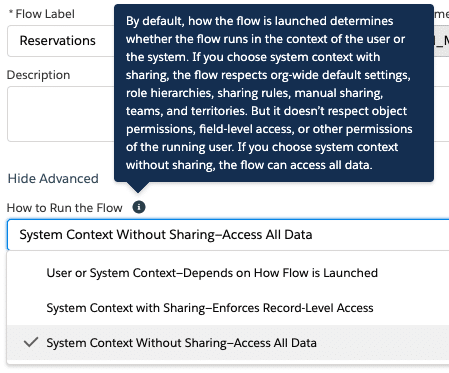
Advance Flow Settings options
Granting this level of power to the Guest User seems scary, but it’s actually more secure. That’s because I’m not actually giving the permissions to a public Guest User; I’m granting access only to the flow. And since I’ve configured the flow to only access and edit the things we want, it’s safer. This way, the Guest User doesn’t have any permissions of its own, so I can’t accidentally expose or allow edits to the wrong data.
There are some other security considerations, however. Because the flow can access member information, I want to take care not to expose it or allow access to the wrong membership.
For example, on Screen #1, the guest is required to enter both the Member Number and the ZIP Code. The sole reason the ZIP Code is required is to prevent someone from accidentally (or purposely) pulling up the incorrect membership, as the likelihood of them matching for a given Account is quite low.
Also, on the email screen, there are a couple of other strategies employed. One is that the primary membership email is displayed, but it’s masked. This way, a person who knew what the address was could tell whether it was correct, but anyone who didn’t know it wouldn’t be able to see the full address. The Masked Email is a custom formula which only shows some of the characters of Email while adding asterisks to hide the others:
IF(NOT(ISBLANK(Email)),
LEFT(Email, 2) &
“****@” &
MID(Email, FIND(“@”, Email)+1,2) &
“**.***”,
“No email on file”)
Finally, while the user can enter a secondary email address, the primary email will always be emailed when a reservation is made. This way, it’s impossible for the member to not know when their membership is used.
Business results:
The impact for the organization has been tremendous. We’ve been able to comply with local directives to keep in-building attendance levels within social distancing guidelines, while making it simple for our guests to make a reservation. We’ve avoided having members arrive for a visit only to not be able to enter right away, which is both good customer service and helps with the social distancing during entry. We were able to do this without any code or increased licensing costs!
In the first few months of using the application, we’ve been able to accept more than 20,000 reservations for more than 75,000 guests across 3,000 entry times. Even better, 99.2% of the reservations were made by the guests directly on the site, so we know that our constituents are able to use the system without issue. That’s the power of the Salesforce Platform!
Do try this at home
The use case here for Member Reservations may not apply to your organization, but the principles involved might.
Accept applications
Flow doesn’t necessarily need to validate any against existing data. Perhaps you have a program or service that your organization provides, and members of the public could request access to it. Start simple. Try setting up a flow that doesn’t read from any existing records and only creates a record on one object with no relationships.
Help users find information
Another use case for a public flow could be to surface the correct information based on specific needs. Try making a flow that asks a series of questions and, at the end, displays the contact information, location, or time that matches what the user is seeking. For example, maybe the user needs to know who to call, but that depends on where they live and the nature of the inquiry.
Advanced registrations
In our example, we’ve used a straightforward situation where a member pulls up their membership information and then chooses a visit date and time. These principles can apply to much more complex use cases. At the National Aquarium, we also created a similar application for schools to reserve virtual field trips for their students. That flow provides different options based on the type of school, county, grade level, class size, and more. Don’t be afraid to build in the complexity you need for your organization’s business requirements!
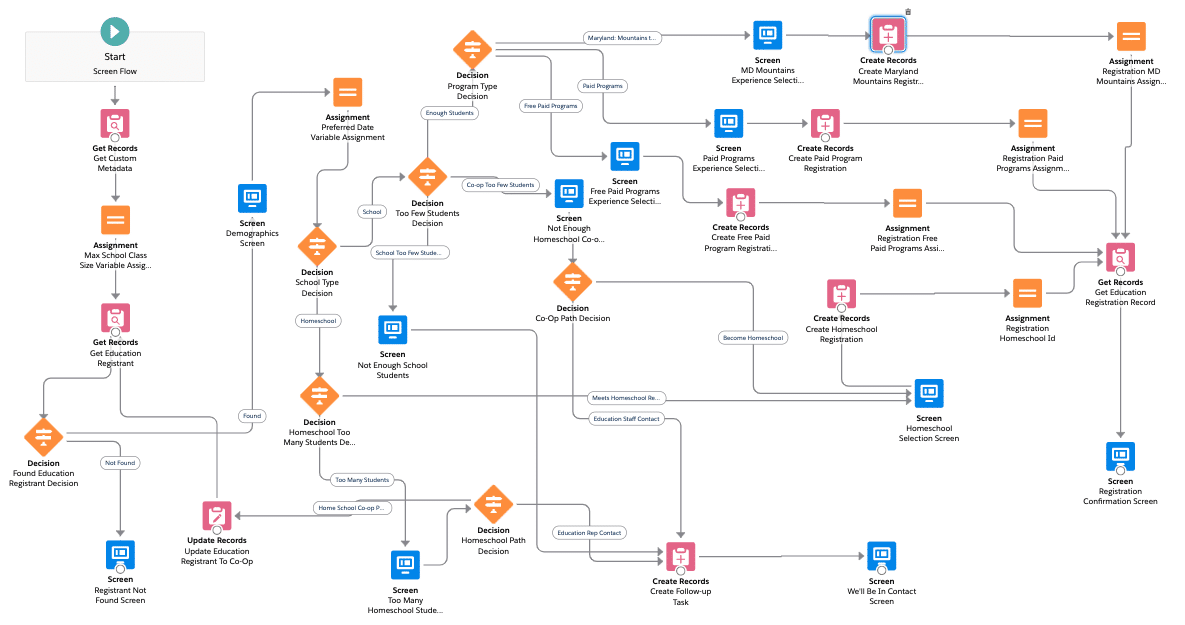
National Aquarium Online Experience Registration Flow
Let us know what you thought of this solution and tell us how you want to use it with #AwesomeAdmins #HowISolvedThis.
Resources