Welcome to another “How I Solved It.” In this series, we do a deep dive into a specific business problem and share how one #AwesomeAdmin chose to solve it. Once you learn how they solved their specific problem, you’ll be inspired to try their solution yourself! Watch how Sarah Pilzer uses a naming convention to identify elements in her flow and then receives a customized error message when something goes wrong. Read more details in the post below.
Key business problem
As a nonprofit Salesforce Admin, I rely on Flow to automate and create the walk-through screens necessary to our program registration process. The logic for this process is fairly complex with multiple branches and loops that a user can take when registering. Because there are several decision points that are repeated within the flow, I want to be able reuse outcome labels while still differentiating between the elements. I also need a way to both understand what happens at each step of the flow and quickly pinpoint problem areas when errors occur. The standard error emails from Flow contain extra details that I don’t need for troubleshooting, so I want to customize the information I receive as an admin when something goes wrong.
Background
The Country Dance & Song Society (CDSS) is a nonprofit arts organization that runs music and dance programs for adults and families. It’s part of our mission to connect and support people in building and sustaining vibrant communities through participatory dance, music, and song traditions that have roots in English and North American culture.
We use a combination of Accounts, Contacts, Opportunities, and custom objects to track program registrations. Each Camp Registration record may have one or more related Camp Registrant records, which each have their own set of Camp Preferences, Camp Waivers, and Camp Scholarship records. To sign up for a program, participants log in to our Experience Cloud site and follow a screen flow that creates and updates the registration records in Salesforce. There are many decision points in the registration process where the participant can either choose to continue, go back to a previous stage, or start over.
Here’s a zoomed out screenshot of the Register for Camp flow in its entirety. There’s a lot going on here!
The complexity of the logic in the flow, and the need to create and update multiple related records, means there are many potential points where an error may occur in the process. When something goes wrong, we need to both notify the user and provide staff the information they need to troubleshoot. As the admin, I receive the standard Flow error emails but they often include extra information, making it difficult to pinpoint exactly what happened. It would be better if I could send a customized email with only the specific information needed for debugging.
Complex flows also increase the need for good documentation. Because users were making similar navigation choices at different points in the flow, I wanted to reuse the words “Continue” and “Go Back” for decision outcomes—but Salesforce requires that every decision outcome have a unique application programming interface (API) name. I needed a naming convention that would differentiate between similarly named elements and identify where the element was located in the flow.
How I solved it
1. Use a naming convention
The label for each Screen, Get, Create, Update, Delete, Decision, and Apex action in the flow starts with an “element code.” This code combines letters to represent the type, and numbers to represent the order in which the element appears.
For example, the Register for Camp flow starts with an element coded as S01, where S stands for Screen and 01 indicates that this is the first time a screen element has been used in the flow. The next two elements are G01 and G02, which are the first and second Get elements, and then S02 which is the second Screen element in the flow.
You can start to see the pattern these codes follow:
[wptb id=182681]
Element API names start with the same code as the label followed by an underscore (instead of a colon) and then a description of the element. For example, the first screen element is labeled “S01: Instructions” which translates to the API name “S01_Instructions”.
This naming convention allows for flexible label names while preserving a more rigid structure for API names. For DML elements (Get, Create, Update, Delete), I used a standardized pattern for the API name: ElementCode_ObjectName_AdditionalDescription. For the labels, however, I followed a more natural language style to make them more readable on the flow canvas. For Apex actions, I included the full name of the action in the API name but will often leave that out from the label. As long as the API name and the label share the element code, then the rest of the name can differ.
Cloning elements in Flow will automatically add an “_0” to the end of the API name because each element must be unique. Here’s where using a naming convention really starts to shine! The element codes that come at the beginning of the API name serve the same purpose as adding an “_0” to the end but are much more informative while still being unique.
This feature is particularly apparent when it comes to Decision elements. There are several places in the Register for Camp flow where the user has the option to continue with the process or go back to a previous screen. I created Decision elements to determine what navigation the user chose, but I ran into an issue when I wanted to reuse common words as outcomes. The simple fix was to add the element code to create unique API names for each outcome. Now each outcome can be identified by the element code of its corresponding decision, and I can have multiple “Continue”, “Go Back”, “Yes”, and “No” labels.
2. Assign error variables
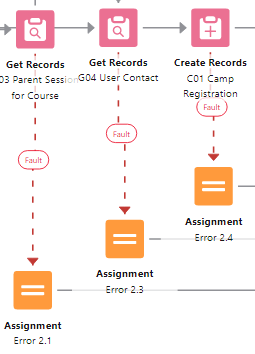
After I had a naming convention in place, it was easy to reference which elements were causing errors in my flow. I created a text variable called “var_Error_Element” that I could use to store the element code in the event that a DML element in the flow caused an error. To populate the variable, I connected each DML element to an Assignment element using the fault path. I also gave each Assignment element an error number that I could reference later when troubleshooting.
I created another text variable called “var_Error_VariableValues” (notice that variables also follow a naming convention) to store any additional information, such as the values from other relevant variables in the flow.
3. Send a custom error email
When an error occurs, the flow will send the admin an email with the full debug log up until the point where the error occurred. These emails contain a lot of useful information but are also overwhelming to read and difficult to interpret. I created a simplified error message text template with the variables set by the fault path Assignments to use as the body of a custom email.
This custom text template also allowed me to include any other information that I thought might be relevant for troubleshooting, such as the name, email, and ID of the flow’s running user.
I then used the “Send Email” Apex action to send myself the custom text template as an email. Make sure to include the Rich-Text-Formatted Body setting and set it = {!$GlobalConstant.True}. This ensures your email will appear the same as it’s formatted in the text template rather than as a block of HTML tags.
Business results
Now when an error occurs in the flow, I receive two emails: the standard one from Flow and my custom message. A side-by-side comparison of the emails shows how the custom error message provides the essential information needed for debugging in a shorter and easier to read format than the standard error message.
Standard Error Message
Custom Error Message
To troubleshoot an error, I can now copy the code element provided in the custom error message, G04, and paste it into the search bar in the Flow Builder Toolbox Manager. The element that caused the error will be displayed in the sidebar, and I can click on the magnifying glass icon to highlight it on the canvas.
Do try this at home
This example was real and it was used in a flow with a lot of elements. The naming convention and custom error message techniques, however, can be used for any flow, regardless of complexity.
I developed an element code that worked for me, but if you want to use something different for your naming convention, like “Screen-1” or “1stScreen,” that’s fine. If you’re consistent in your pattern, the specifics don’t matter as much as the fact that you’re using a naming convention at all.
The error message method could also be expanded for any time you want to send yourself an email when something specific happens in the flow. Want to know when the user clicks a certain button? Save that information to a variable, and have the flow email you before moving on to the next screen.
It’s completely up to you what to include in the error text template, so explore different options to find out what works for you. Flow provides access to a lot of system data with global variables, in addition to the variables you create. You can include the date and time that the flow interview began, details about the running user, the standard fault messages, etc. Because it’s formatted as rich text, you can even include images if you want!
Let us know what you thought of this solution, and tell us how you want to use it with #AwesomeAdmins #HowISolvedIt on social.
Welcome to a special edition episode of “How I Solved It.” In this series, we do a deep dive into a specific business problem and share how one Awesome Admin chose to solve it. But in this episode, we’ll show you how not one, not two, not three, but FOUR Awesome Admins solved the business […]
Welcome to another “How I Solved It.” In this series, we do a deep dive into a specific business problem and share how one Awesome Admin chose to solve it. Once you learn how they solved their specific problem, you’ll be inspired to try their solution yourself! Watch how Deanne Walters uses Flow to create […]
Welcome to another “How I Solved It.” In this series, we do a deep dive into a specific business problem and share how one Awesome Admin chose to solve it. Once you learn how they solved their specific problem, you’ll be inspired to try their solution yourself! Watch how Paolo Sambrano operationalized data collection using […]