Cloudy standing next to text that says "What Is a Record-Triggered Flow."

What Is a Record-Triggered Flow?

By

Are you an admin who has experience only with creating workflow rules and processes and have yet to dip your toes into building automation with record-triggered flows? Or are you a new admin looking to build your first record-triggered automation? You’re at the right place!

We’re going to give you a high-level overview of a record-triggered flow, teach you some basic flow terminology, and give you a simple example or two for you to follow along and create your first record-triggered flow. You ready? Let’s get started!

First things first. What’s a record-triggered flow?

A record-triggered flow allows you to automatically perform actions in Salesforce behind the scenes, without any user interaction, once a record is created and/or updated, or deleted. In some regards, it’s similar to a workflow rule and process, which are triggered when a record is created and/or updated. Record-triggered flow is the end-state record-triggered automation tool as we plan to retire workflow rules and processes in the near future.

Record-triggered flow Start element where you specify the flow trigger of record create, update, or delete

From the New Flow menu, select Record-Triggered Flow to start building your new flow.

Core New Flow menu screen with Record-Triggered Flow selected

What are example use cases solved with a record-triggered flow?

There are SO MANY use cases that can be solved with a record-triggered flow. That’s the cool thing about it. As admins, you can build all sorts of cool things with a record-triggered flow and you don’t need to write one line of code! Here are just a few that come to mind:

  • When a new user is created, automatically assign a user to permission sets, permission set groups, queues, and groups based on specific user attributes.
  • When a new case is created, assign the case to a specific queue based on the type of case and priority.
  • When an opportunity is closed won and meets a certain $ amount, send a notification to the opportunity owner’s manager.
  • When a complaint is submitted for an account, notify the account owner and create a follow-up task for the account owner that is due 2 days after the complaint creation date. Create another follow-up task 5 days later to follow up on the complaint resolution.
  • Send an email with an attachment when an event is created or the event date is revised.
  • When an opportunity in the closed lost stage is deleted, update the description field of the related account or contact record and notify the account or contact owner of the record deletion.
  • When a contact opts out of marketing campaigns, automatically remove the contact from campaigns.

What are some use cases that come to mind for you?

Can I have time-based actions/scheduled actions in flow like I did with workflow rules and processes?

Yes, you can! Your time-based actions in workflow rules or scheduled actions in processes are equivalent to a scheduled path in flow. In Flow Builder, you would configure a scheduled path in a flow that is optimized for actions and related records, or in an after-save flow (more on what that is in a bit).

Record-triggered flow with a scheduled path that runs 1 day from now

Unless you specifically configure a scheduled path in your record-triggered flow, your flow will run immediately. You specify a time source (any date field in the record that triggered the flow), offset number, and offset options (can be set to minutes, hours, days, or months before or after).

In the example below, the scheduled path is set to 1 day after the account’s last modified date.

Configured scheduled path to run 1 day from now using the account's last modified date

Before- and after-save flows. What are they and how do I configure either?

As you’re watching or reading tutorials about record-triggered flows, you might have heard people use the terms “before-save flow” and “after-save flow.” What do they mean?

A before-save flow is a record-triggered flow that runs its actions on the triggering record itself before it’s saved in Salesforce as a new record, an updated record, or a deleted record. This is very similar to the behavior of a before trigger but you configure this with clicks, not code. A before-save record-triggered flow can update a Salesforce record 10 times faster than a record-change process. Be mindful of the order of execution as it relates to automation for a specific object, as it may impact actions you expect to happen for a given record. A before-save flow runs before a before trigger in the order of execution.

An after-save flow is actions that are executed after the triggering record is created and/or updated. Unlike a delete trigger, there’s no after-save flow after a record is deleted. This type of flow includes many actions, such as sending an email alert or custom notification, updating the triggering or related record, invoking another flow (we’ll get to that in another blog post), creating a record, etc. Basically, if your actions aren’t limited to the triggering record itself, chances are you have an after-save flow.

Now that you have the terminology straight, you’re probably wondering why you don’t see either option when you’re looking at the Start element of a record-triggered flow.

Start element where you specify a before- or after-save flow by selecting Fast Field Updates or Actions and Related Records, respectively

To keep you on your toes (just kidding!), the Flow team was intentional in not calling them before-save or after-save but instead describing them as options you’re trying to accomplish with your flow. Are you making fast field updates or (performing) actions and related records?

Fast Field Updates (aka before-save flow) is when you’re only updating fields on the record that triggered the flow and nothing else before the record is created, updated, or deleted in Salesforce. Actions and Related Records (aka after-save flow) is when you’re performing various actions, such as sending an email or creating or making updates to any record after the triggering record is created or updated in Salesforce.

How do I get started?

It’s important to understand the requirements and overall process, and to do your analysis BEFORE you start building your automation. I recommend sketching it out and validating the process with business stakeholders before you log into Salesforce and go into Setup. It’s so much easier to make changes on paper than to have to reconfigure a flow. Remember, you’re automating manual steps, so think about what actions you take that you need to tell Salesforce to do on behalf of the user, including making decisions: If I search for open cases and I find some, now what do I do? What if I search for open cases and don’t find any; now what do I do? This process map becomes your guide to building your automation.

Show me an example of a before-save flow

Here’s a very simple use case for our before-save flow.

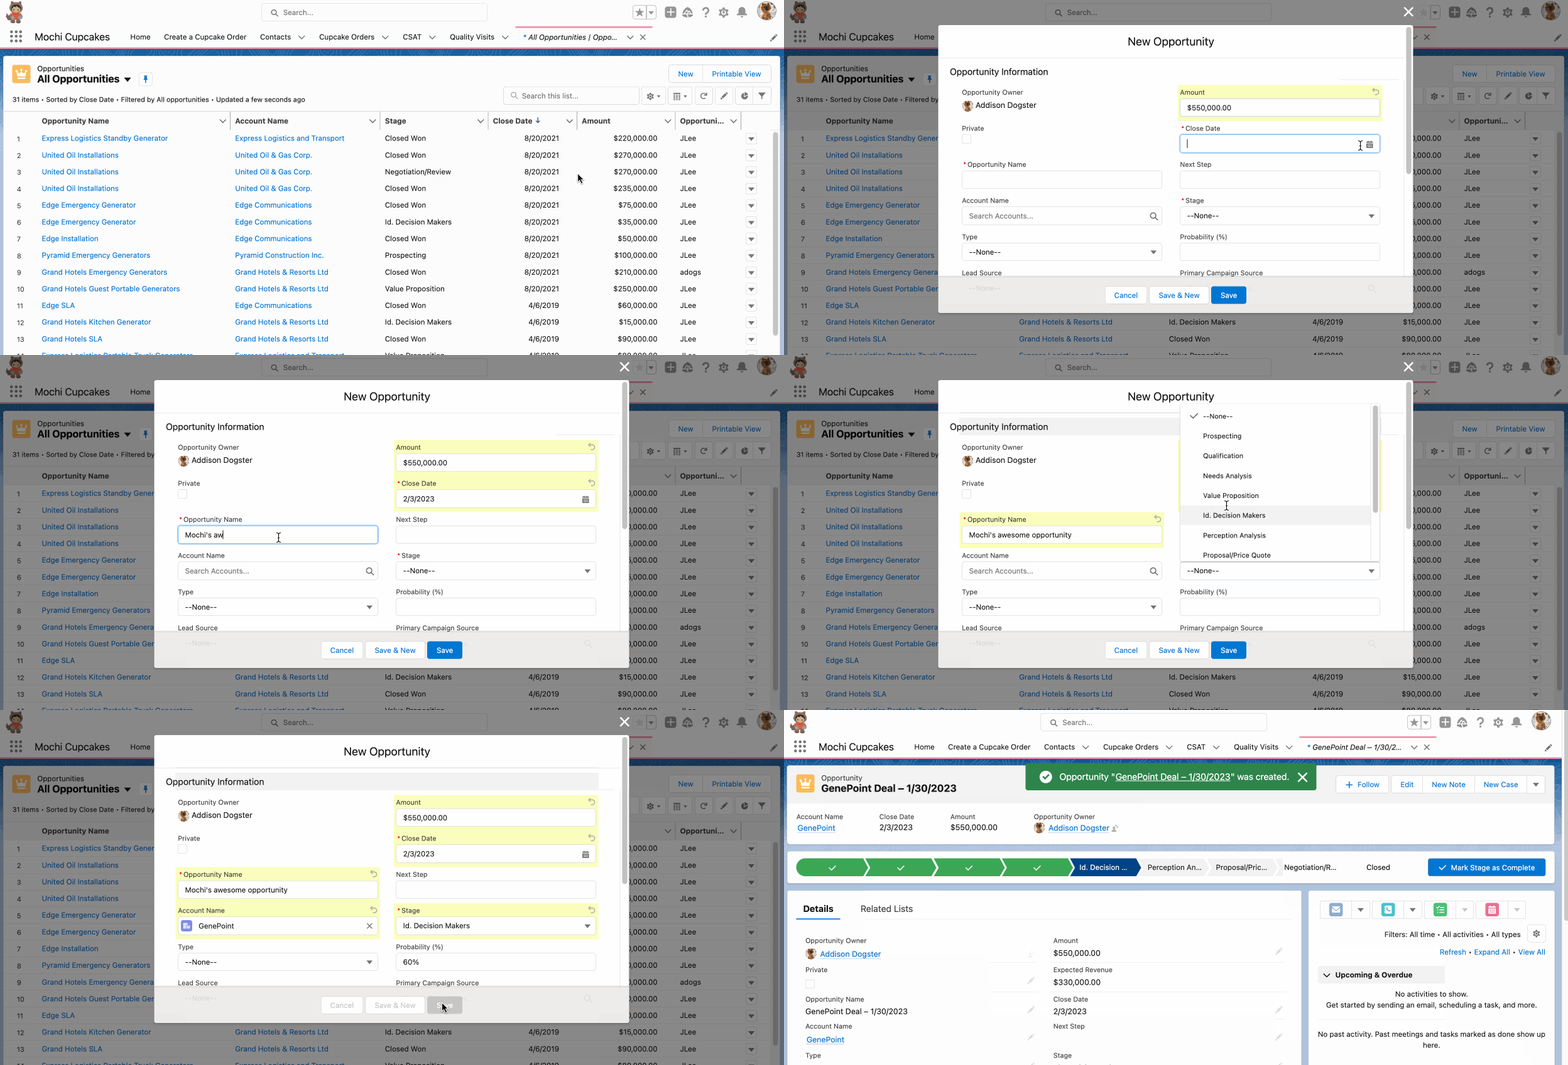
Our fictional company, Mochi Cupcakes, wants a standard naming convention for its opportunities that are associated to an account. Our #AwesomeAdmin, Addison Dogster, can implement this using a before-save flow to override the user’s provided opportunity name with the standard naming convention (<Account Name> Deal – <mm/dd/yyyy>, where the date is the record creation date) before the opportunity record is saved in Salesforce. In the animated GIF, you’ll see that the opportunity name “Mochi’s awesome opportunity” is overridden to “Genepoint Deal – 1/30/2023” upon record save in Salesforce.

Opportunity name is overridden to that of the standard naming convention

This is the simple before-save record-triggered flow with one formula resource and one Update Records element.

Configured before-save record-triggered flow to update an opportunity name to the standard naming convention

Addison configures the Start element to trigger on the Opportunity object when a record is created. To be selective of when her flow runs rather than triggering on all new opportunities, she defines the entry conditions to fire only when the account field is provided (that is, AccountId Is Null False—which means the AccountId is not blank; two negatives equal a positive). Since Addison wants this flow to update only the opportunity record that triggered the flow to run, she selects Fast Field Updates (aka before-save flow).

Configured Start element to run on the Opportunity object when an opportunity is created and the account field has a value, and is optimized for fast field updates

Addison will use a formula flow resource to set the opportunity name to a standard naming convention: <Account Name> Deal – <mm/dd/yyyy>. Addison is mindful that the opportunity name field is limited to only 120 characters, so she adds the LEFT syntax to her formula, which will return 120 characters from the beginning of a text string. Addison uses the flow’s current date to define the date shown in the standard opportunity naming convention.

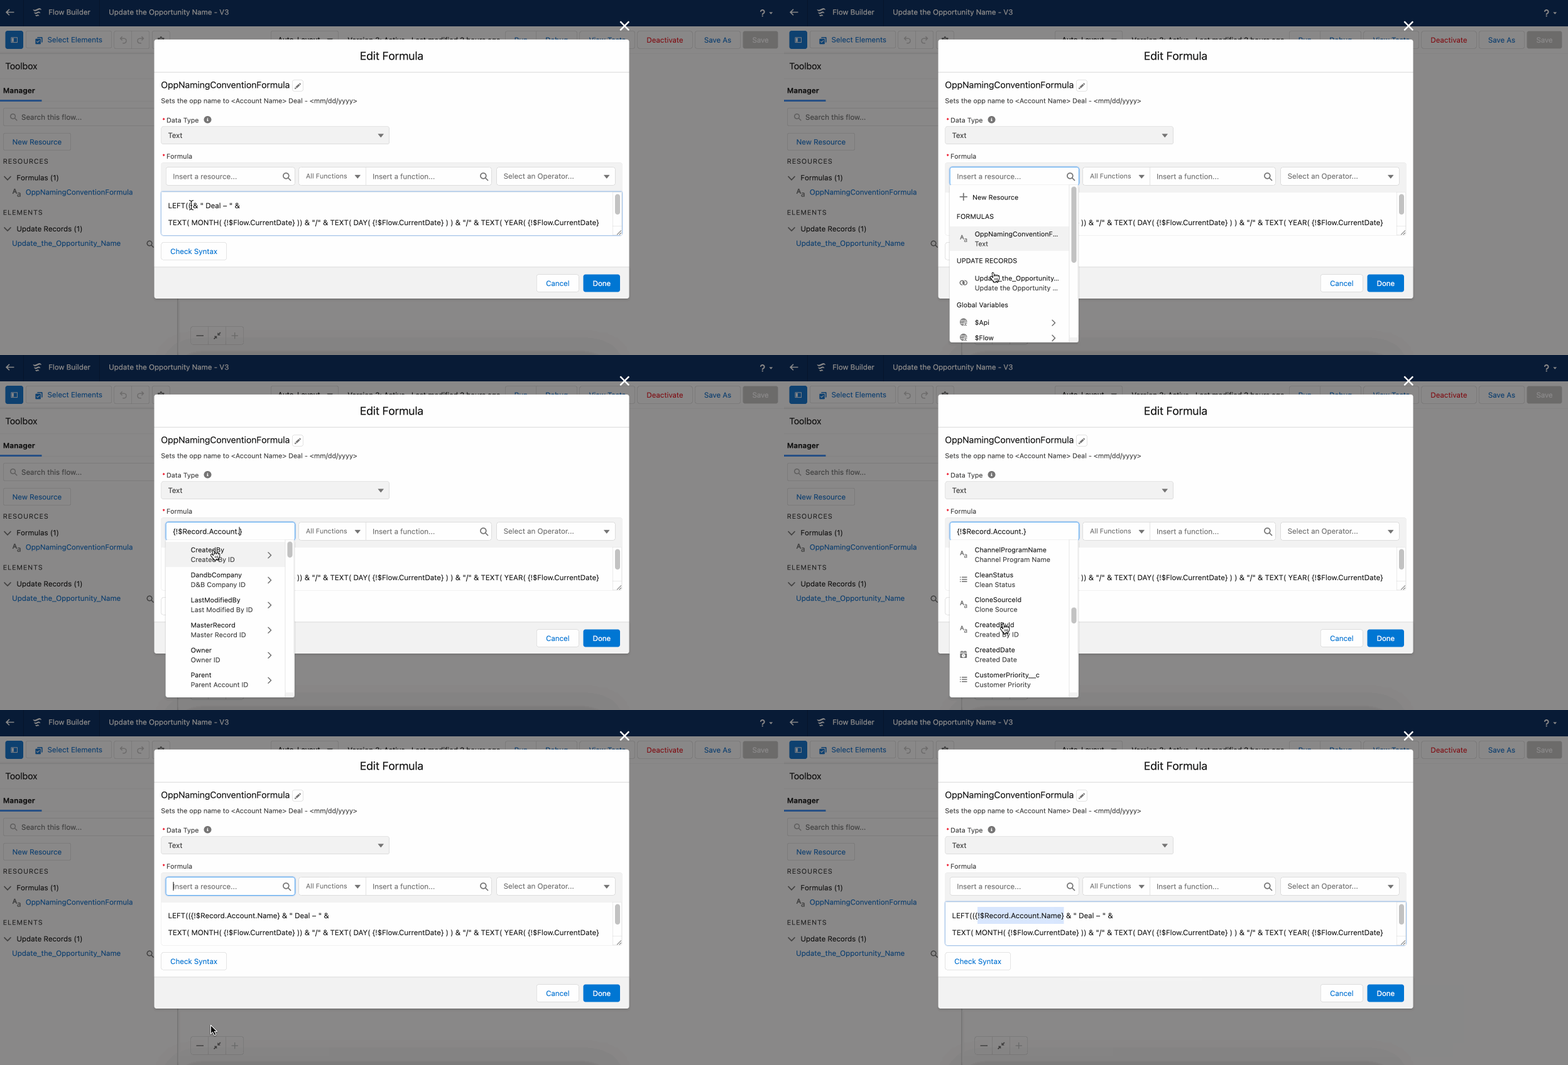
Addison dynamically pulls in the opportunity’s account name by using the resource $Record.Account.Name. Let’s break it down. $Record refers to the record that triggered the flow (in this case, it’s the opportunity record). The .Account looks at the opportunity record’s account field. The .Name specifically looks at the account name field.

In the animated GIF below, Addison shows you the steps of how to add the opportunity record’s account name field to the formula.

Steps of adding the opportunity’s account name to the formula resource

Here’s the configured formula resource.

Configured formula resource for the standard naming convention

You can copy and paste the code below for use in your flow.

LEFT(({!$Record.Account.Name} & " Deal – " &
TEXT( MONTH( {!$Flow.CurrentDate} )) & "/" & TEXT( DAY( {!$Flow.CurrentDate} ) ) & "/" & TEXT( YEAR( {!$Flow.CurrentDate} ))),120)

Addison uses the Update Records element to update the opportunity name to the text in her formula resource.

Configured Update Records element to update the opportunity name using the formula resource

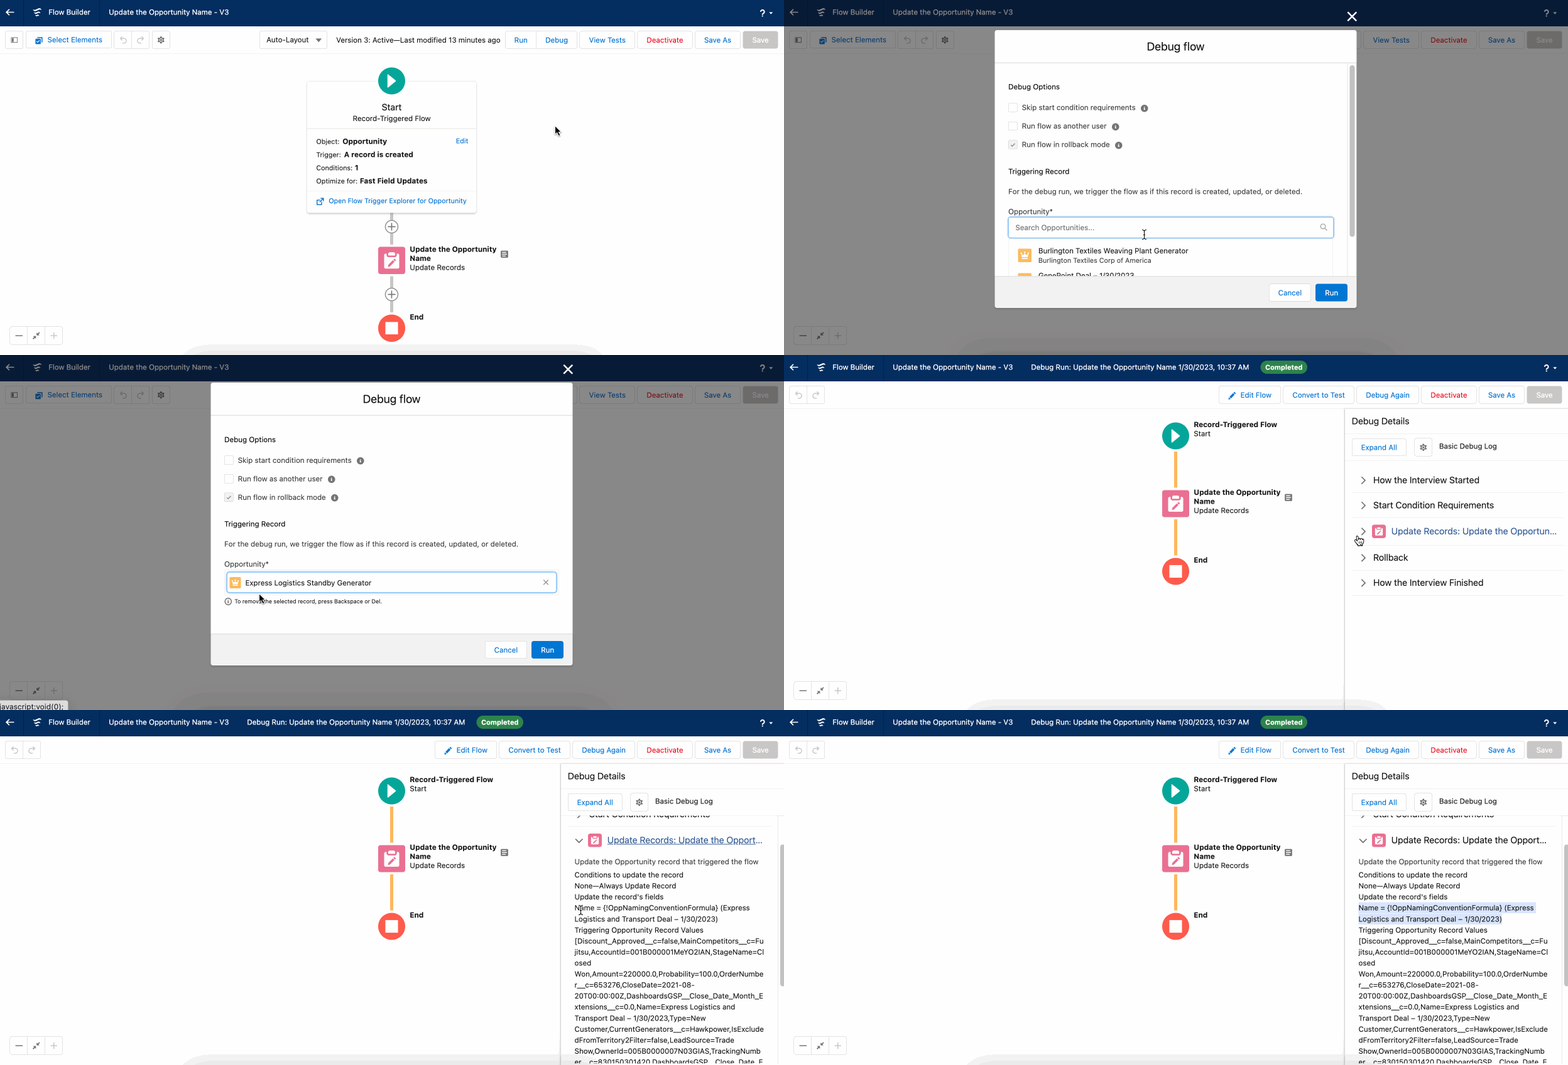
Before Addison saves and activates the flow, she tests it out using the Debug feature in flow. Addison selects an opportunity record (as though this was a newly created record) and views the results as shown in the animated GIF below to confirm that the opportunity name is updated as expected.

Use the Debug feature to test your record-triggered flow before saving and activating it

Show me an example of an after-save flow

Here’s our after-save flow use case.

Back at Mochi Cupcakes, when an account is closed (aka status = inactive), we want to update the status of all open cases to closed and send an email to the account owner.

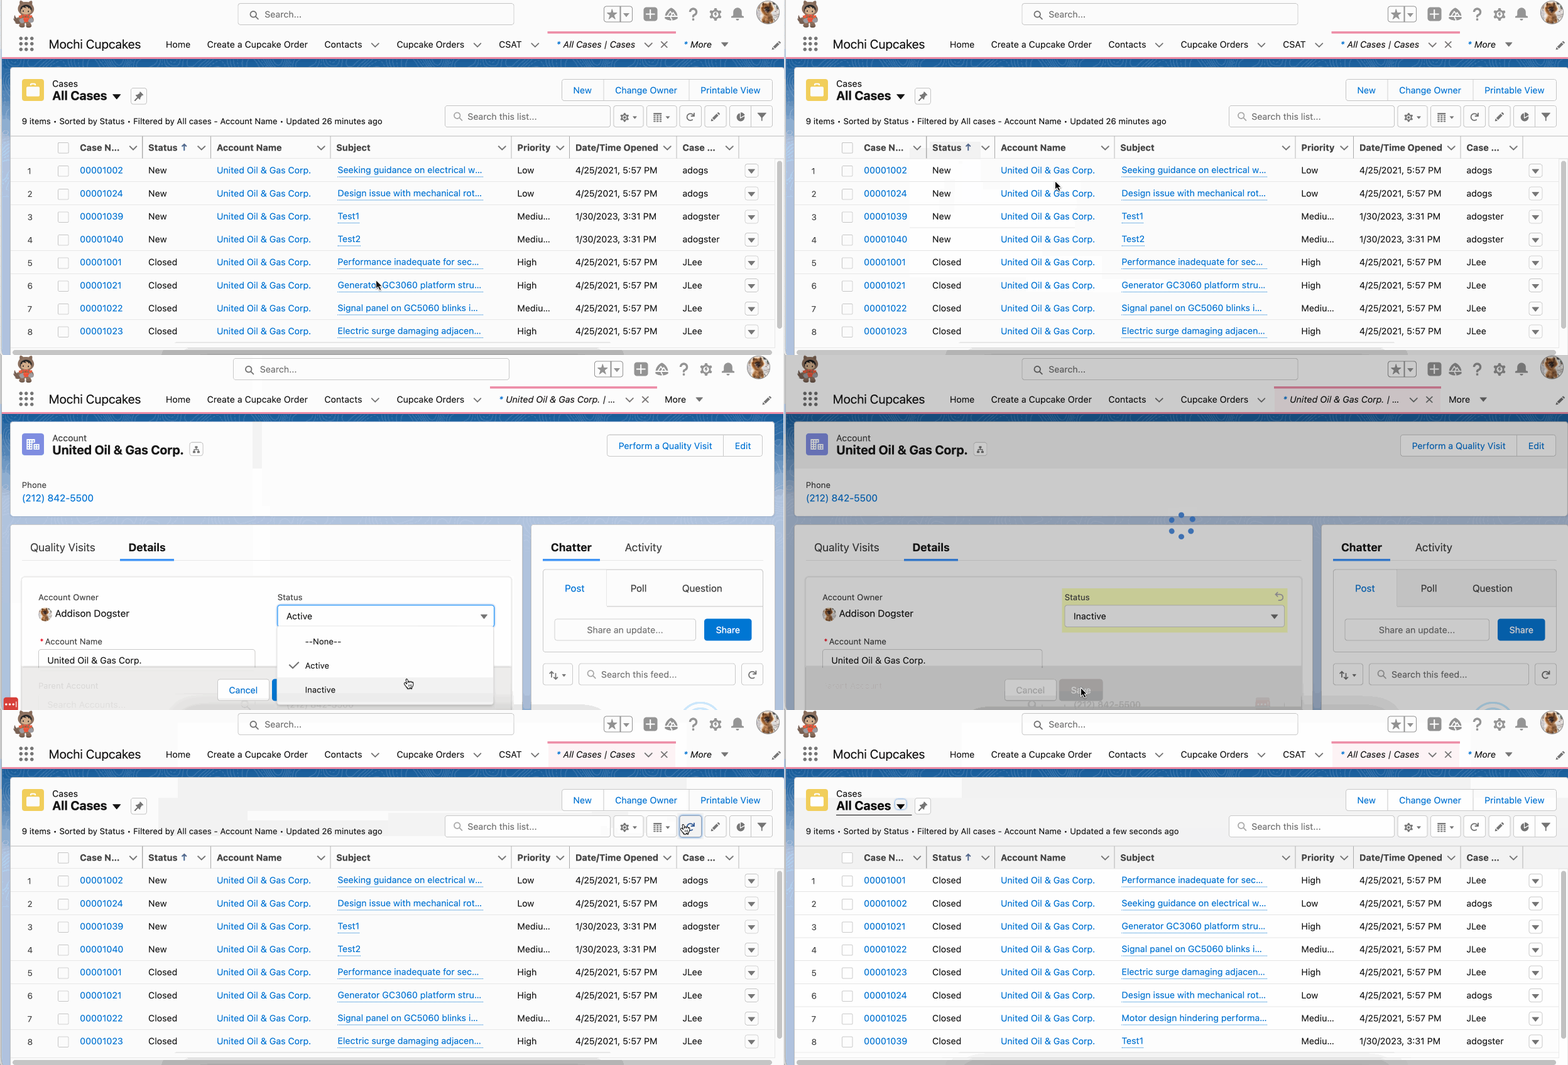
In the animated GIF, you can see that United Oil & Gas Corp. has several cases associated to it, and four are new. When the account’s status is updated to “Inactive,” the new cases are updated to “Closed” status. Note: The demo doesn’t show the step where the email was sent.

Demo of the account status update to “Inactive,” which updates the associated new cases to “Closed” status

Here’s the after-save record-triggered flow Addison built to meet the requested use case. The flow fires when an account’s status is updated to “Inactive.” In Step 1, flow retrieves the open cases associated to the account and updates the status to “Closed” with an Update Records element. In Step 2, the flow sends the email alert notifying the account owner that the account is closed.

Configured after-save record-triggered flow to update open cases and notify the account owner when an account is closed

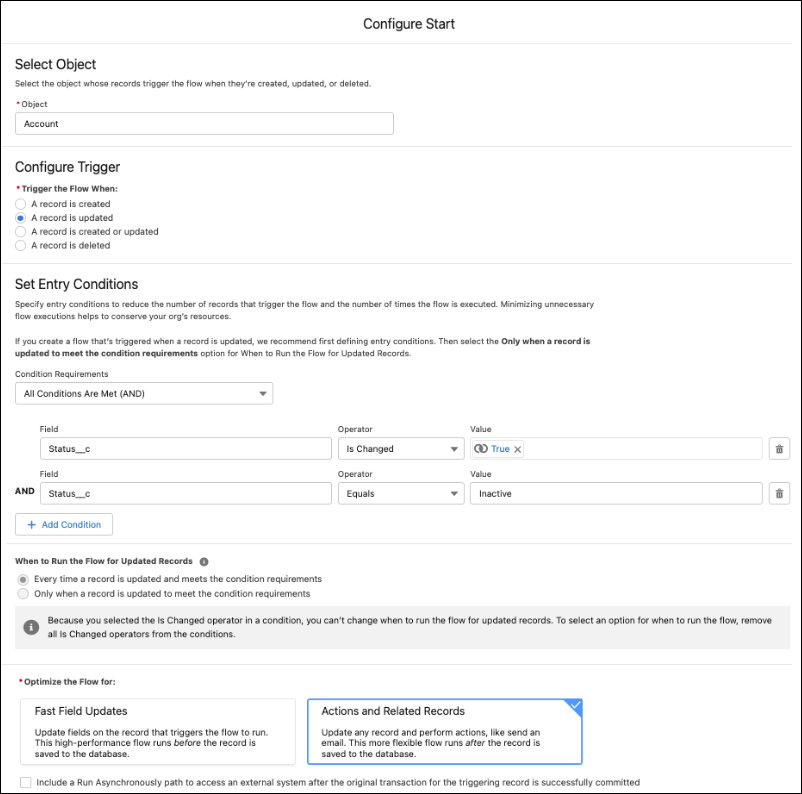
First, Addison configures the record-triggered flow to fire on the Account object when an account is updated, but only when the account status is changed and the status field is set to “Inactive” (so this automation doesn’t run every time an account is updated but only when it needs to).

Configured Start element for the Account object when an account status is updated to “Inactive”

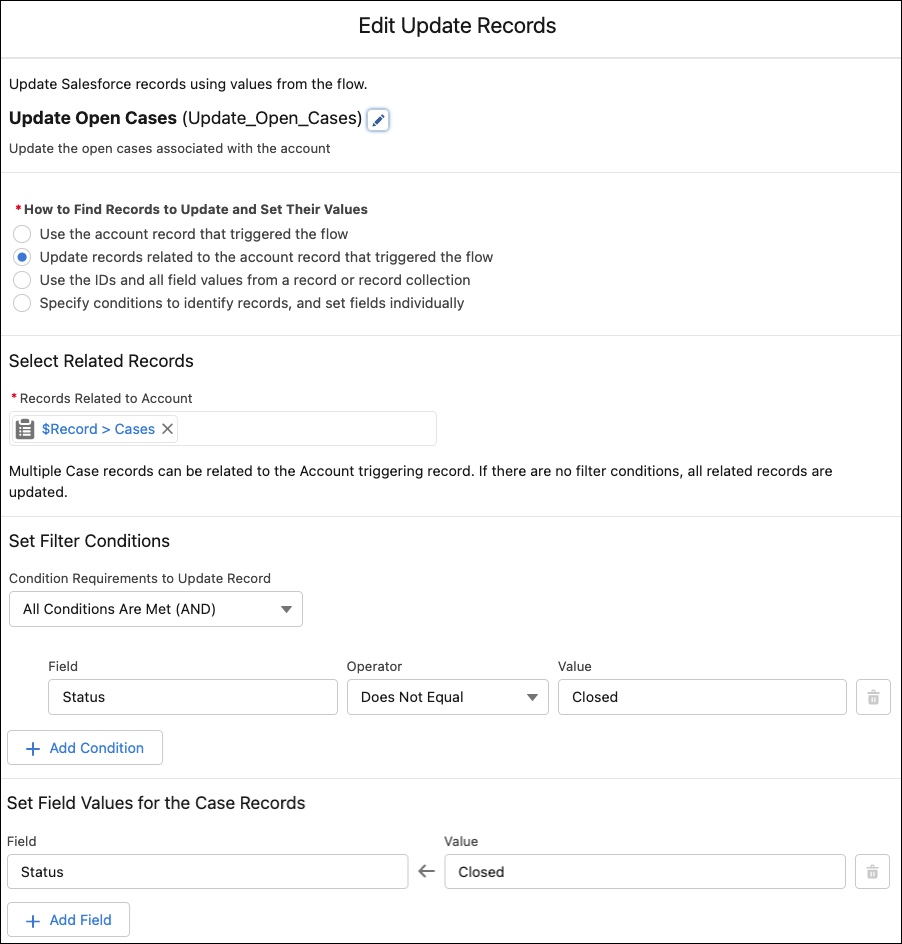
Addison uses the Update Records element to take the account’s related cases in open status and updates the status field to “Closed.” She specifies to update records related to the account record that triggered the flow and cases as the records related to the account. She sets the filter condition to look only at the cases where the status does not equal “Closed.” If any case records are found, then it will update the status to “Closed.” If no open cases are found, no records are updated as part of this step.

Update Records element to find open cases associated with the account and update the status to “Closed”

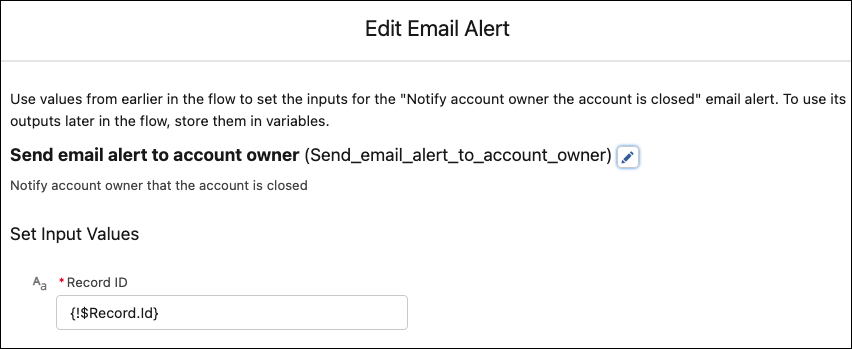
Lastly, Addison configures the Email Alert action that uses the “Notify account owner the account is closed” email alert and sets the record Id to that which triggered the flow: $Record.Id. $Record is a global variable that represents the record that triggered the flow; in this case, it’s the account record. .Id represents the field API name Id; in this case it’s the account Id. Note: You can also use the Send Email action to configure the email directly in flow instead of using an email alert.

Send email alert to the account owner to let them know the account is closed

Before Addison saves and activates the flow, she tests it out as another user and uses an account record that has a status of “Active,” updates the status field to “Inactive,” and confirms the results are as expected using the Debug feature in flow.

Get practicing. Build your first record-triggered flow!

I get it. It’s intimidating working with a new tool that you’re not familiar with. I felt exactly the same when I opened up Cloud Flow Designer, the old user interface for flow, and had no idea what to do. This was pre-Trailhead, pre- all these great flow resources, and pre-Flow Builder. You have so many helpful resources that I didn’t have when I started learning flow in 2015. The key is to not give up. I kept at it. I watched videos. I attended all the flow sessions I could get my hands on. I found blogs with use cases I related to and built the flow following the blog until it started to click. There’s no better way to get better at flow except to practice by building.

If you’re new to flow, there are two great blogs created to teach you the concepts used in flow via relatable videos. Check out 5 New Videos to Help You Understand Tricky Flow Concepts and 6 New Videos to Help You Understand Flow Builder. Also, watch videos from my Automate This! YouTube series. We cover various use cases solved with record-triggered flows, migration strategy by different Trailblazers, specific flow features you can use in your record-triggered flows, and much more! I live stream a new episode each month so be on the lookout.

Take one of the example flows from above and build it out in your own org. Or take the idea from either of these examples and build something similar but use different objects. Get out there and start building.

I can tell you that when I look back at my older flows, they were fairly basic and I’m sure I can find ways to streamline them and make them even better. It all comes from experience. But that experience comes when you start building.

Don’t forget to celebrate the wins. Celebrate the first flow you create. Celebrate the first flow you create on your own. Celebrate the first flow you build without any issues. You get the picture. Share those celebrations with others whether it’s your co-worker, your user group, etc. Show a screenshot of that badass flow on social media. Because you did it! You took the step and you’re a #Flownatic.

Resources

Overcome access dilemmas with permission sets

Use Permission Sets To Overcome Common Access Dilemmas

As an Awesome Admin, it’s probably in your nature to look for any way to optimize a process or situation! As part of that never-ending desire for optimization, I would bet that you’ve spent a lot of time thinking about your permissions setup in Salesforce. Salesforce provides multiple ways to grant permissions to users, each […]

READ MORE
Advance Your Admin Career With Dev Fundamentals

Advance Your Admin Career With Dev Fundamentals

Ready to take the next step in your admin career but unsure where to start? Take a page out of my book and learn development fundamentals to jumpstart your abilities as an advanced admin and extend your Salesforce Platform knowledge. Several years ago, I was at a career tipping point. I felt solid in my […]

READ MORE