Key business problem:
In Service Cloud, Omni-Channel, and list views, ownership of Cases, Leads, and other objects can be difficult in call centers or sales teams with high turnover. We don’t want to manually manage lots of queues and be a bottleneck for our business needs.
Background:
Working in a high-velocity business before High Velocity Sales was available, I was tasked with creating a way to assign declined orders to sales reps. We refined the requirements to evaluate failed payments based on their payment value. Putting this into high value and low-value ranges, we were able to have newer sales team members work on lower value customer issues and more skilled agents take higher value issues. As teams skilled up to take the more complex orders, or as we lost team members and had to replace them, I frequently had to update the queues a person was assigned to.
Now, we could have implemented skills-based routing to solve this challenge, but that would have forced us to use a different routing feature than we had already implemented — and it wasn’t really about skills for our use case.
Since that project, I’ve been asked to do something similar — use queues for management of different case types for customer issues and chat topics.
How I solved it:
1) Create a Team Management custom object
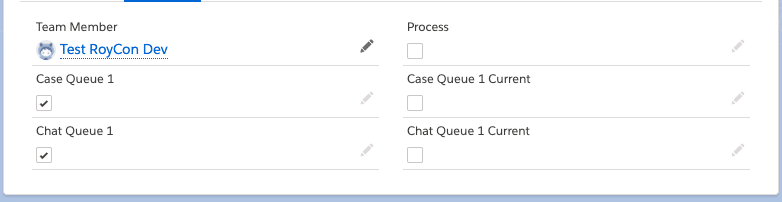
I created a new Team Management object to store the items that I was assigning users to: list of queues, permission sets, and so on. There are two fields for every queue. A hidden field will store the current value of queue membership in setup; this saves query time if you have a lot of queues to work through. I also used a custom Process field on the object. This field allows you to know that someone is editing a queue rather than a different field on the object. It becomes difficult if you have 10+ fields to use Process Builder logic to determine if there was a change. I added this field to the users to identify that they made a change to the queue assignments.
2) Create a flow to assign the queue membership using your custom object
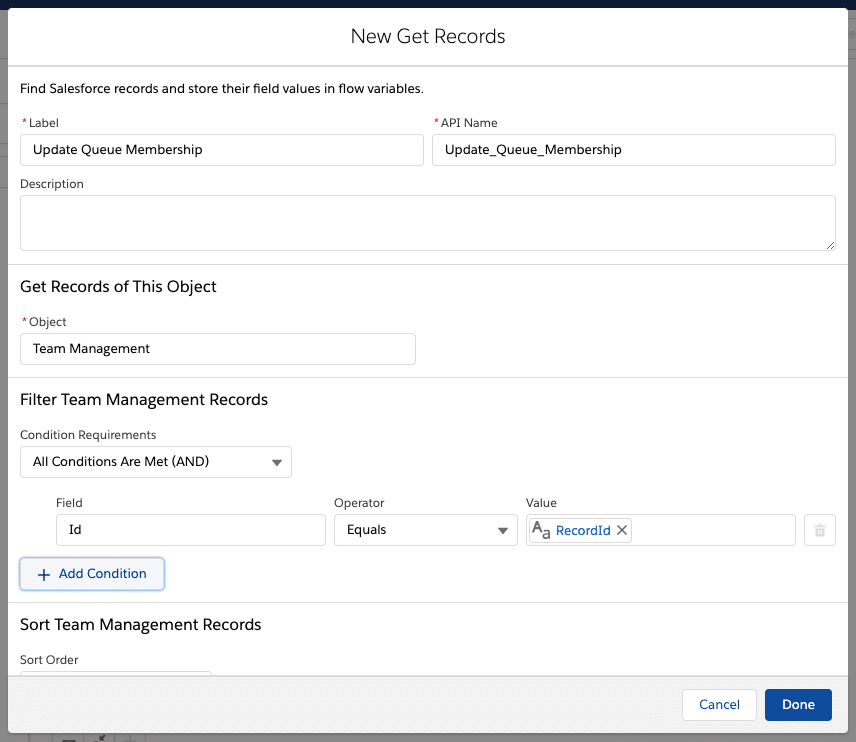
Create a new flow and get the record values for the Team Members record that was just updated. In the new flow, add an element for Get Records. In the filter conditions, you’ll need to make a new variable.
Pro Tip: Get in the habit of naming the first variable in the Get Records element as “RecordId.” When making an Input variable, you do not need to make a Record variable — just make a Text variable that allows input. “RecordId” is the standard name for passing variables from quick actions or buttons.
We only store the first record because we are specifically looking up only one record in the Filter Conditions. Additionally, Storing All Data on the record will save you time if you add more fields to the object for new queues in the future. This saves you from having to do a ton of extra work — let Salesforce do the work for you.
Now that we have the record in the flow, we have to make some decisions. The Decision flow element will have two points. You’ll make a Decision for adding a user to the queue and removing the user from the queue. You cannot use a Default Outcome, because if this queue membership wasn’t updated, you’ll skip this section and move to the next queue to add or remove.
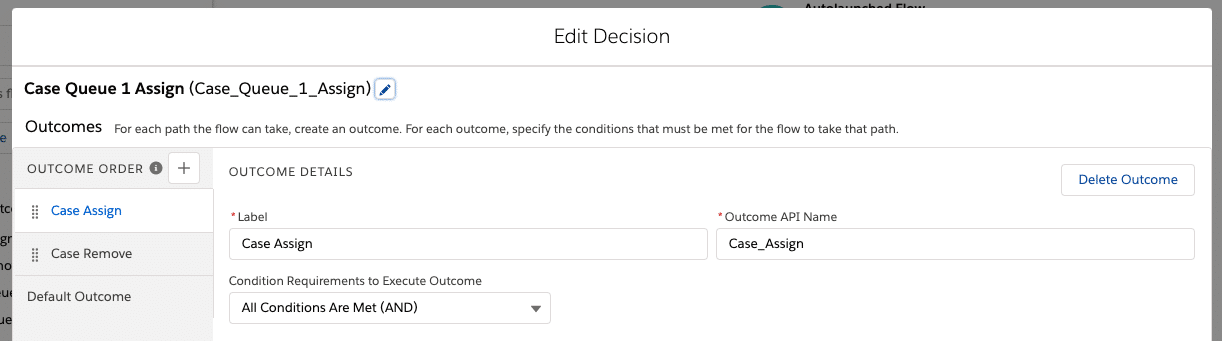
We’ll use two conditions for add and remove, but we’ll flip the logic between the two elements.
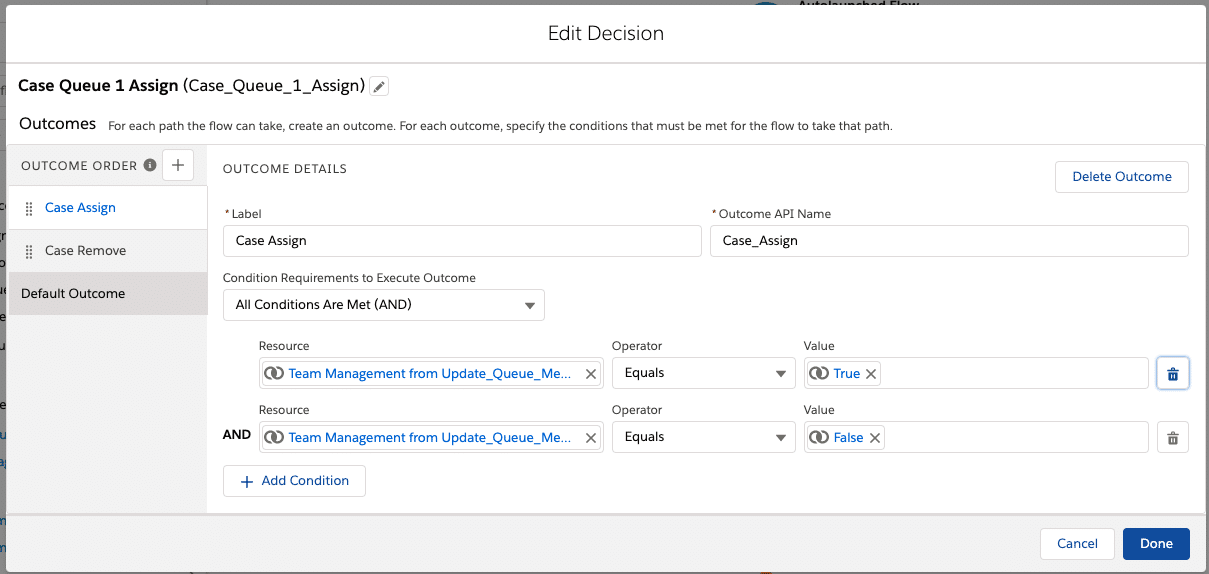
In the Resource fields, you’ll find the “Record (Single) Variable” created in your Get Records element. Then, select the user visible fields — Case Queue 1 from the Resource dropdown, set the Operator to “Equals,” and set the Value to “{!GlobalConstant.True}.”
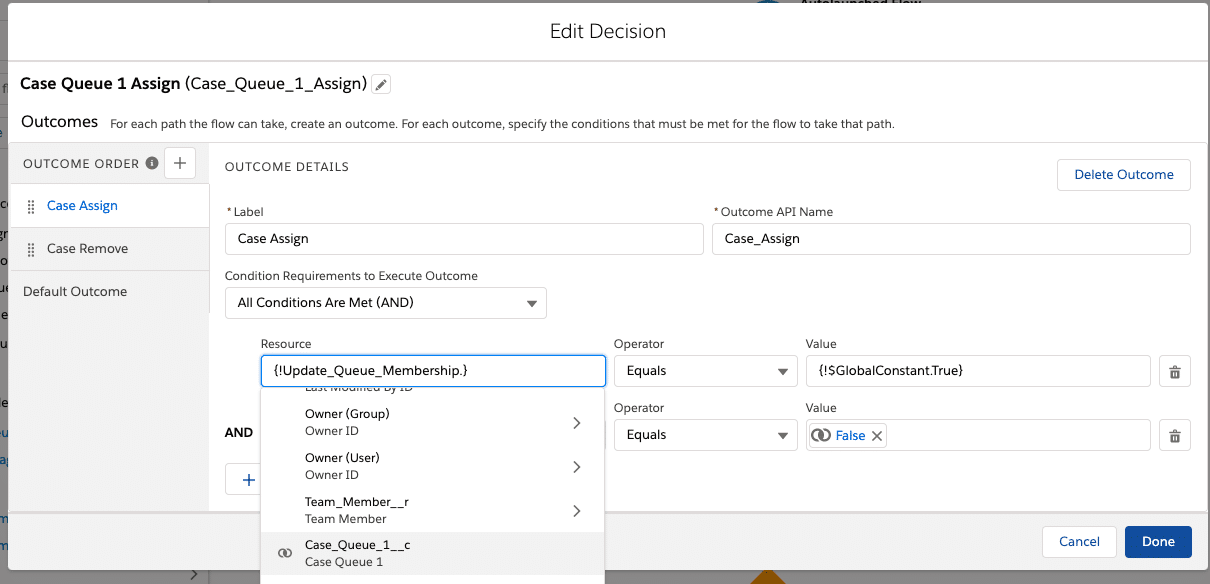
Add a condition, this time in the resource. Select the hidden field in the resource — Get Records element — then Case Queue 1 Current. Set the operator to “Equals” and select GlobalConstant.False.
The Flow logic here is that a user wants to put them in the queue, but they are not yet in the queue, so we have to add them in the next step.
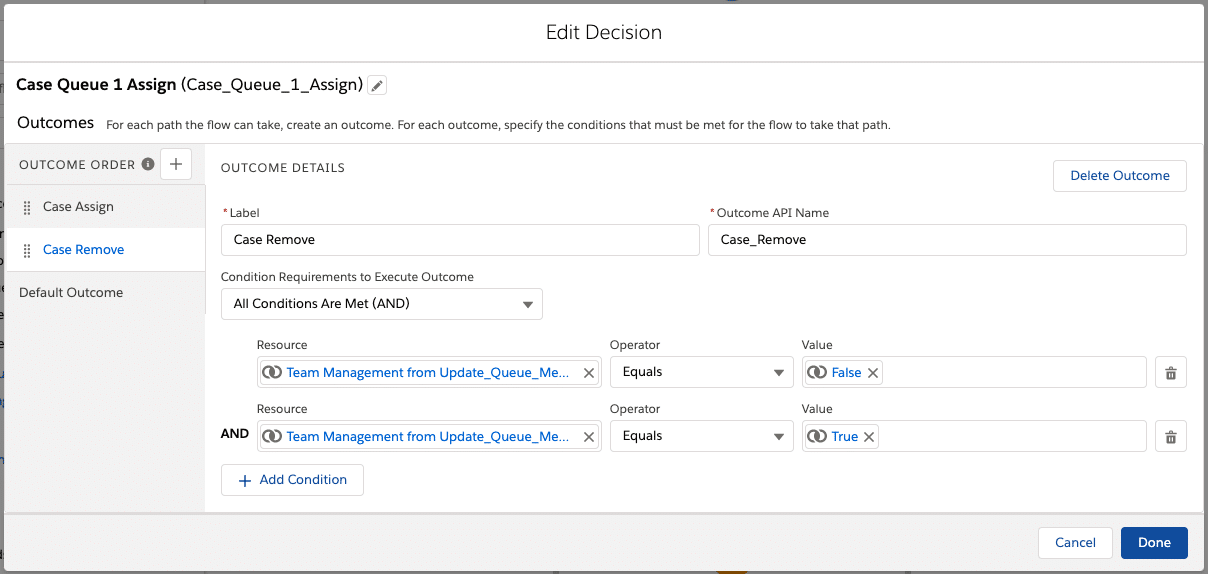
For the Case remove logic, we’ll just change the logic above to:
Case Queue 1 = GlobalConstant.False
Case Queue 1 Current = GlobalConstant.True
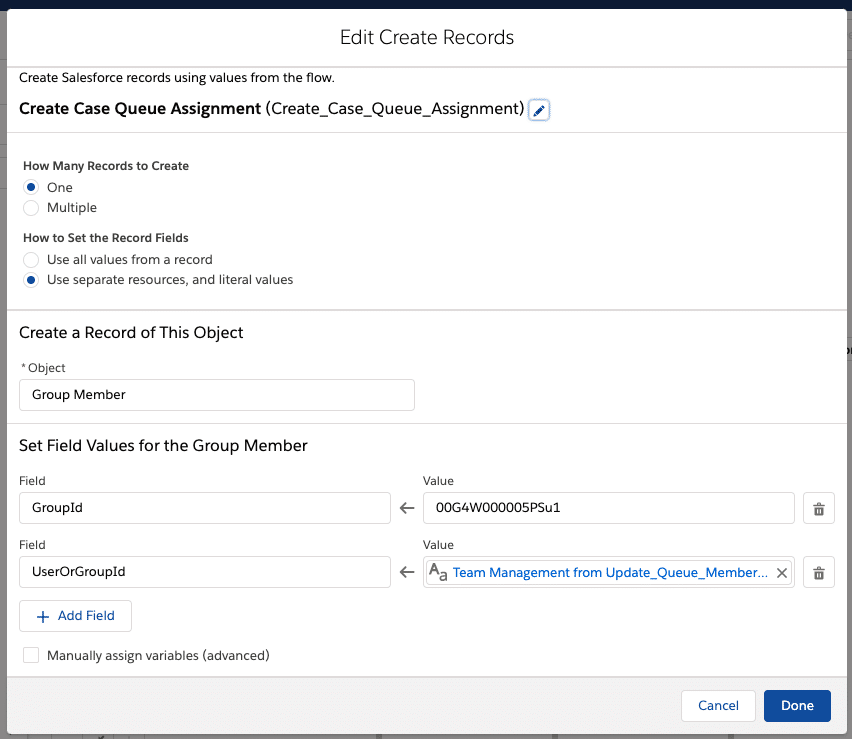
Now that we have the ability to make decisions, we are going to add the users to the queue or remove them from the queue. Add a Create Record element to add a user to a queue. Salesforce has a weird name for these — GroupMember — when identifying the object. There are only two fields you need to fill in when setting field values — GroupId is the queue ID from setup. To assign to the user, find the Get Records element and pick the Team Member field without the >. I select the ID field rather than going through the > – should save on some query time for your process.
Note: I typically get errors when I grab the ID from the URL in Lightning, so either switch to classic to grab it from the URL or export a list of queue IDs from the account.
Pro Tip: If you do not like the idea of storing an ID in your flow because you may have different IDs by environment (sandbox/production), then create a Custom Setting and use a formula to reference the IDs from the Custom Settings. This saves you from having to make versions just to pass a flow from one environment to the next.
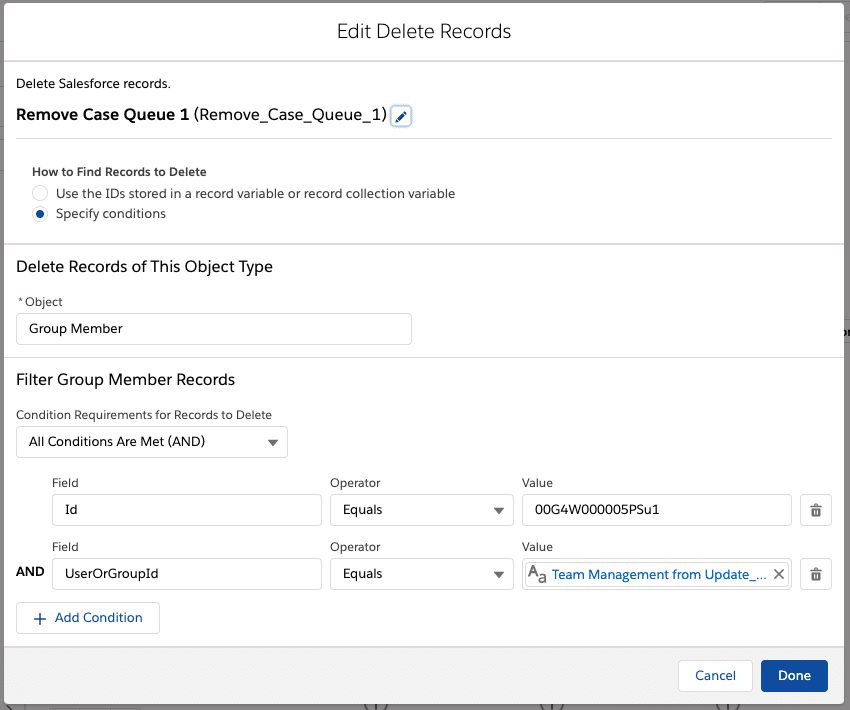
Now, under the Case Remove decision element, add a Delete Record element. To fill out these details, use the same logic as the Create Record element.
Now, you can replicate these Decision, Create Record, and Delete Record elements as much as you need to accomplish your goals.
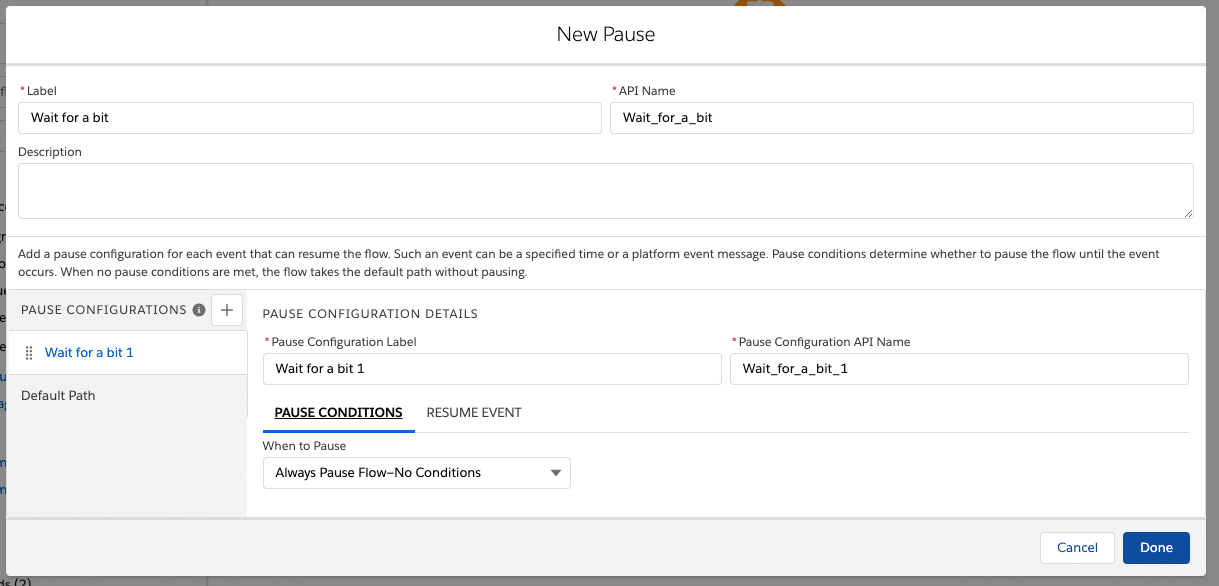
By this point, I hope you’re thinking, “What happens to that checkbox that started the process? When do we uncheck it?” After we’ve added all the add and remove steps for each queue, you’ll need to add a Wait element.
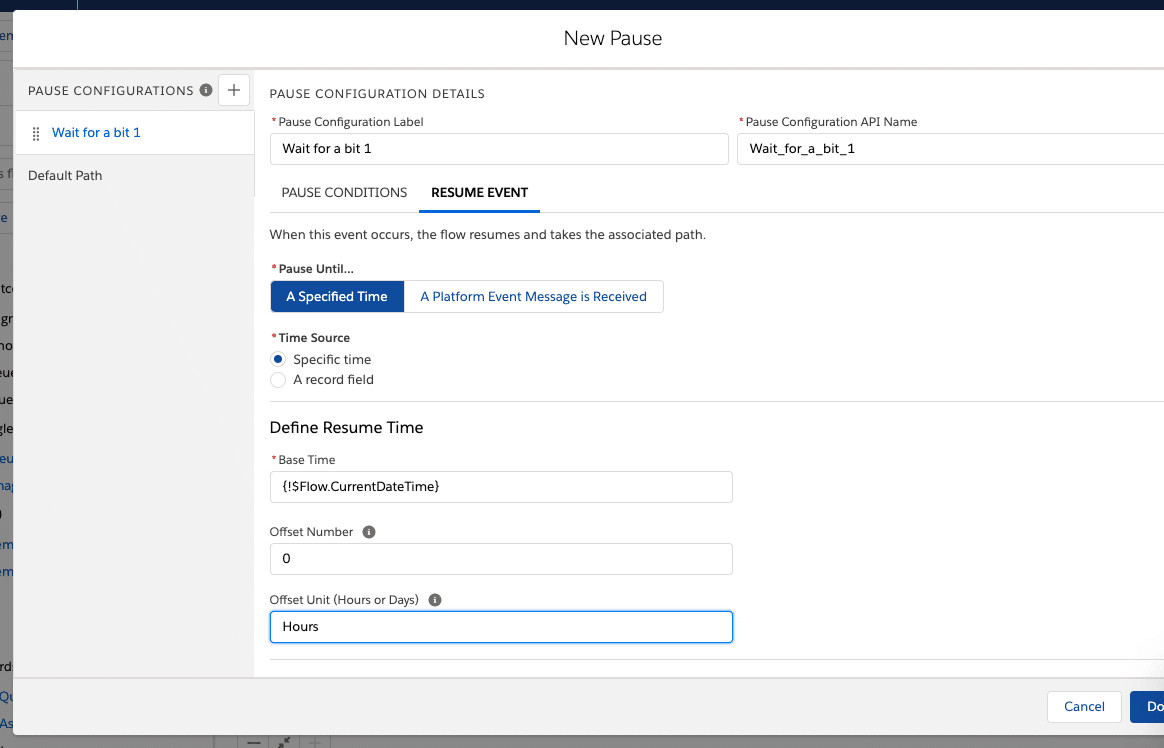
Salesforce has some rules about editing a Non-Setup object after a Setup object in the same automation or vice versa. By adding a Wait element, you can remove the Data Manipulation Language (DML) exception issues. Flow Wait elements are pretty basic in our use case. Ensure that Pause Conditions is set to “Always Pause Flow—No Conditions.” Then, click the Resume Event tab and set the Time Source to “Specific time,” then set the Base Time to “{!$Flow.CurrentDateTime}.” The Offset Number can be 0 Hours because you don’t need to wait long; you just need a pause to prevent DML exceptions.
From the Pause element, you need to update the original record. We need to have the Process field unchecked, and we need to update the hidden fields to match the end user facing fields. This is so that the next time the process runs, we don’t try to add people to queues they have already been added to.
Add an Update Records element and use the Filter Conditions to look for the original record you started with. Then, add the fields for Case Queue 1 Current, Chat Queue 1 Current, and Process. Map the fields as such:
Case Queue 1 Current → Team Management Case Queue 1
Chat Queue 1 Current → Team Management Chat Queue 1
Process → GlobalConstant.False
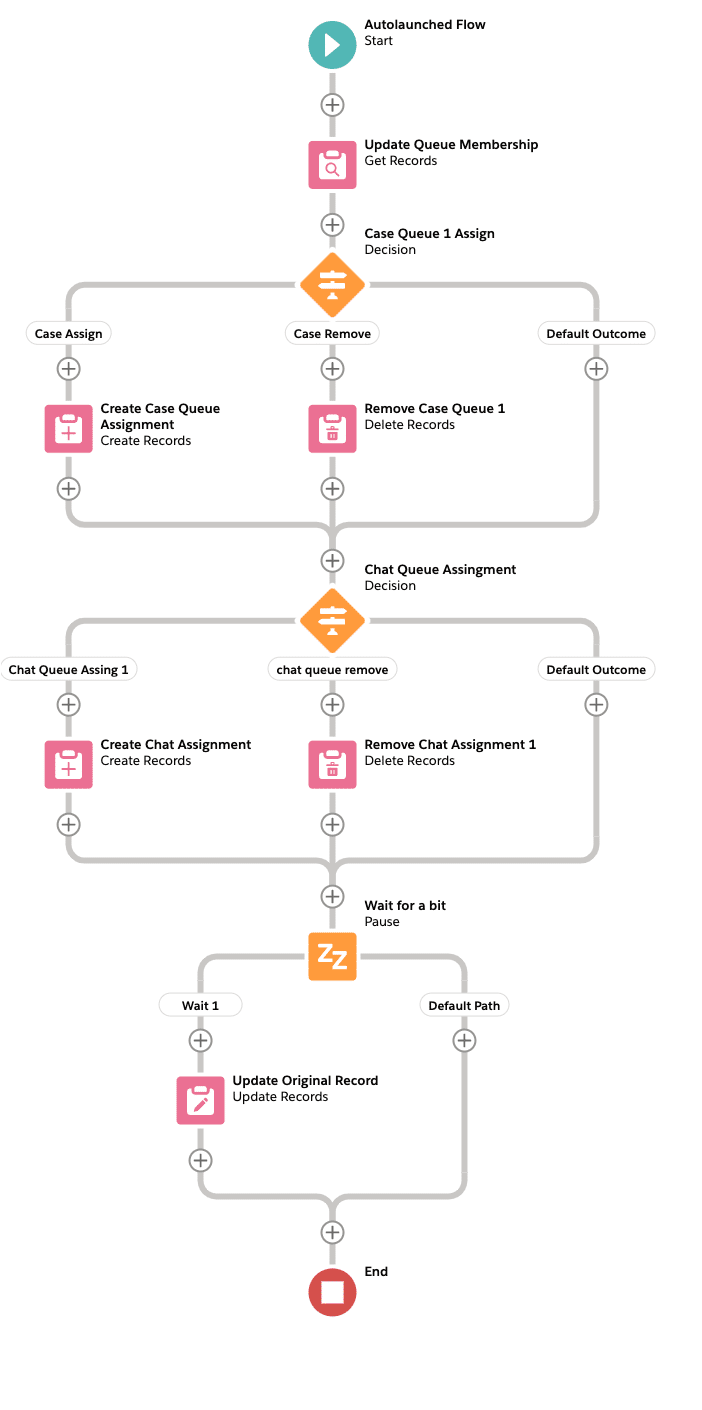
Save and activate this flow! Your finished flow should look like this:
Now that you have an active flow, we should create the Process Builder that will start the flow.
Create a Process Builder on the Team Management object every time a record is changed.
The only logic is when Process is set to “True.” But note an item mentioned earlier: Because you cannot edit a Setup object from a Non-Setup object, you need to have a delay. One of the few ways to get a Scheduled Action applied to Process Builder is to click Advanced and check the Yes box for only running when specific changes are made.
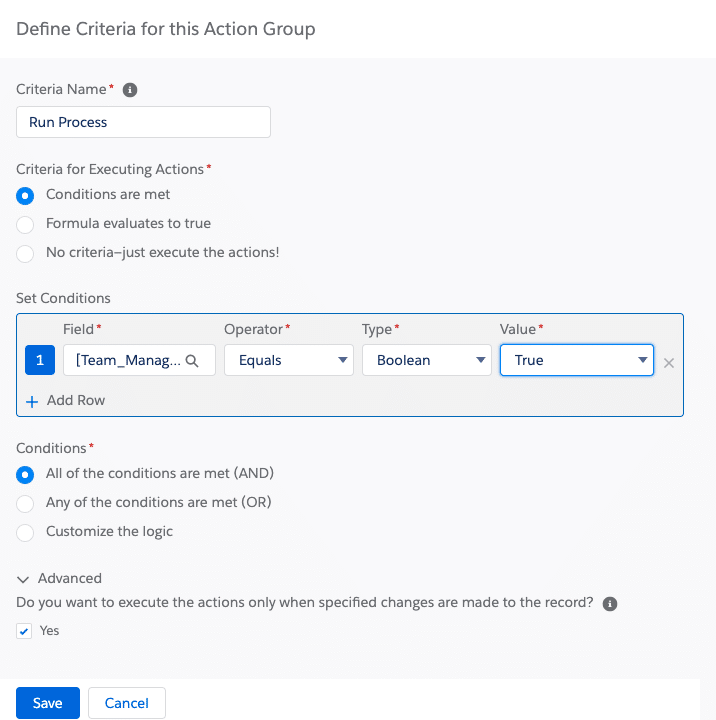
Set up a Scheduled action with a “0 Hours after LastModifiedDate,” similar to what we did in the flow earlier.
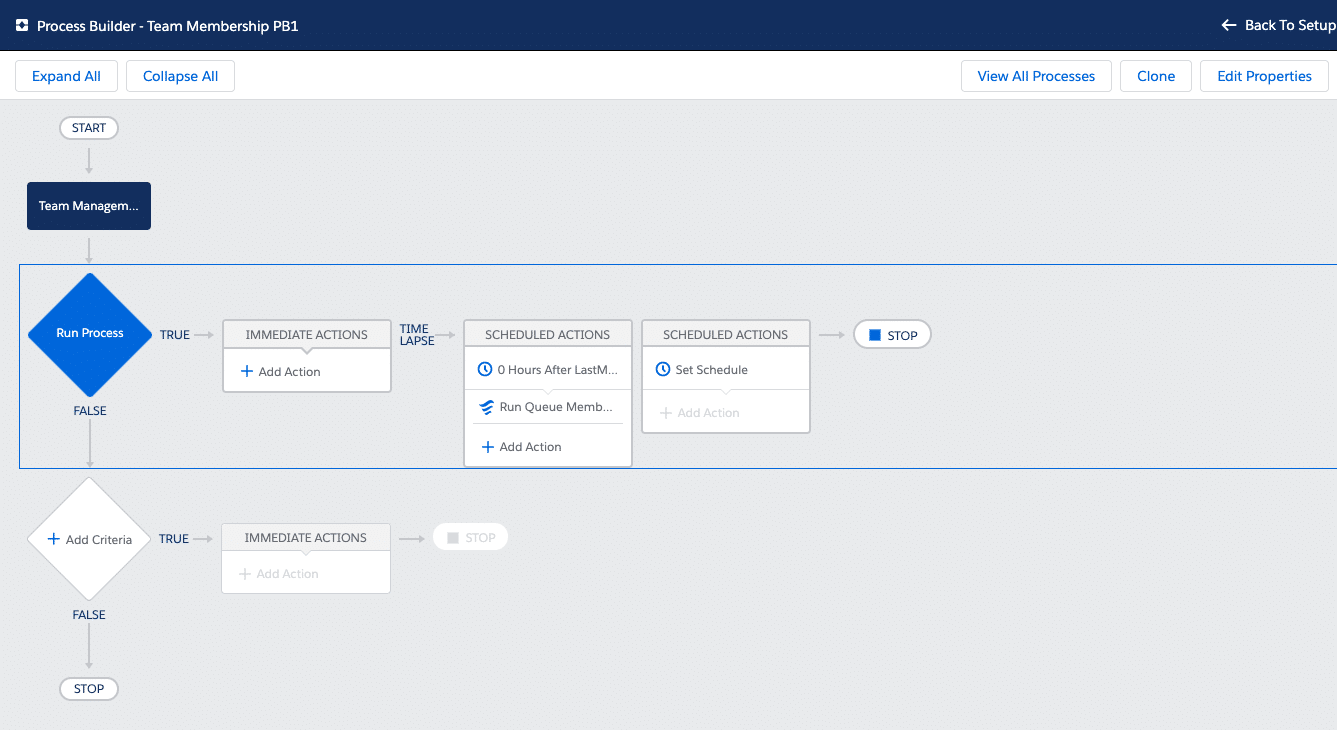
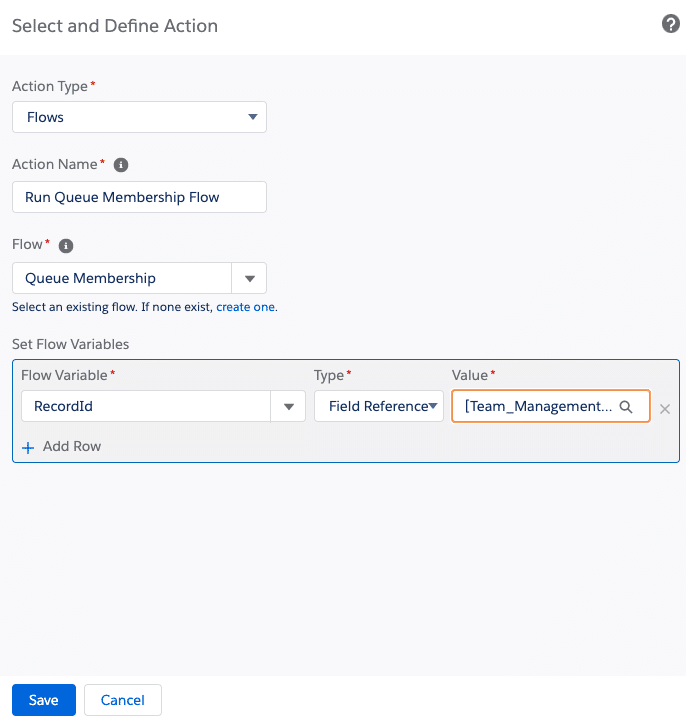
Once the Scheduled action has been set, add a Flows action type. Since we waited to start the Process Builder until we activated the flow, you’ll be able to find it in the Flow dropdown. Also, do not move too fast. I often save before the Set Flow Variable is displayed, and then I have to edit it a second time or get weird behavior in my testing. Make sure to set the RecordId variable type to “Field Reference.”
Save this item and activate the flow.
Some considerations:
We can’t leave fields we do not want users to know about or interact with on the page, and we should make sure we test. Note that because we added so many waits to this process, it will take 5-10 minutes to actually get the person added or removed from all the queues. This can be annoying to a call center manager because they may have made a mistake and may go in and try to correct the error quickly. So, we are going to make it error-proof to ensure a good end user experience.
Let’s go back to the Team Management record. We’re going to update this page to remove the hidden fields. In classic Salesforce, you can take them off the page layout or you can make an Admin Layout. Both of those options forget the power of Lightning. From the Team Management record, go to setup and click Edit Page in the upper right corner.
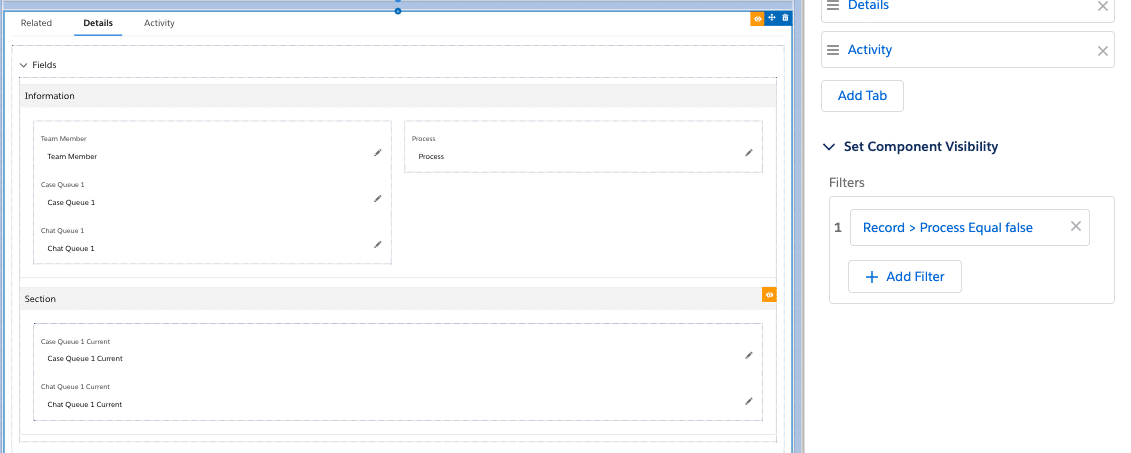
First, click into the Details section of the page layout; let’s convert this to a Dynamic Form. This will allow us to take the hidden fields that contain “Current” in the name and put them in their own Field section. In that Field section, you can set the visibility to only be visible to people on the System Admin profile.
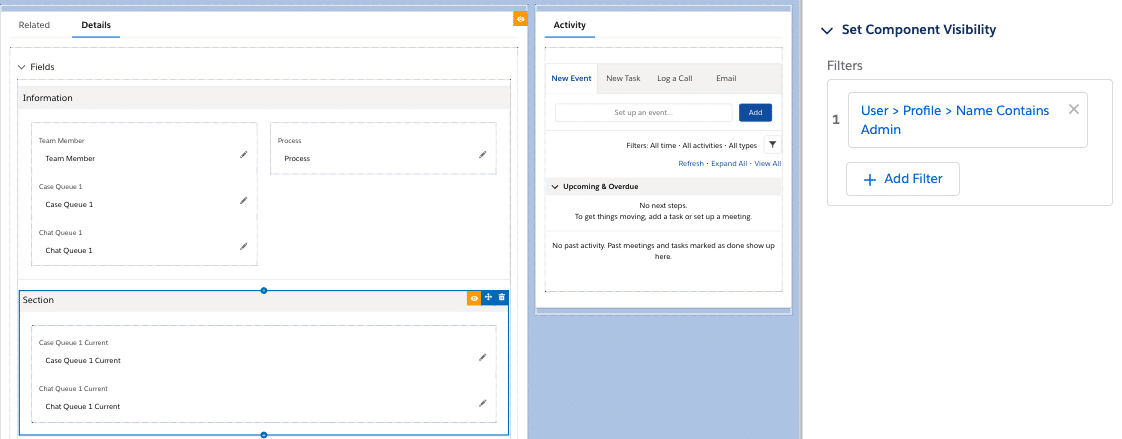
While we are looking at section visibility, I would make the Details section only visible when “Process Equal false.” This will take away all fields while the Flow process is running.
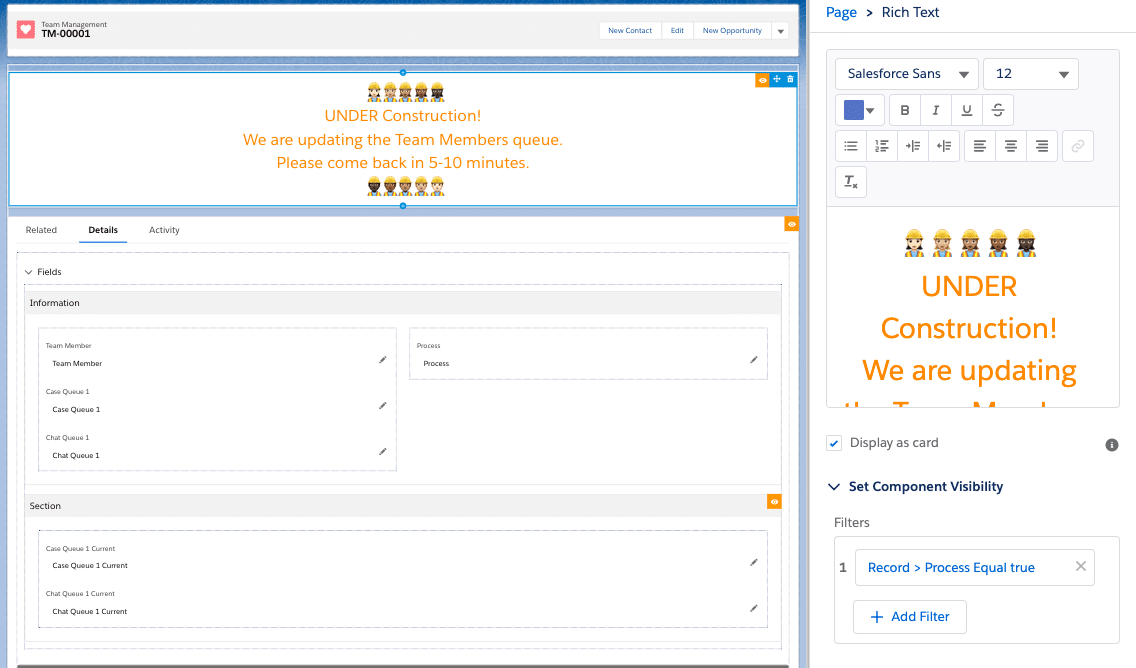
Now, I love adding a Rich Text section to make sure that we tell our users why we don’t want them to work with these records while the flows are running, and that when the message goes away they will be able to continue editing. For fun and whimsy, I would add some emojis or other images.
Save and activate this Lightning page for the Org, App, or Profiles. I prefer to activate by App so we don’t have a lot of conflict or people getting pages we don’t intend on other apps.
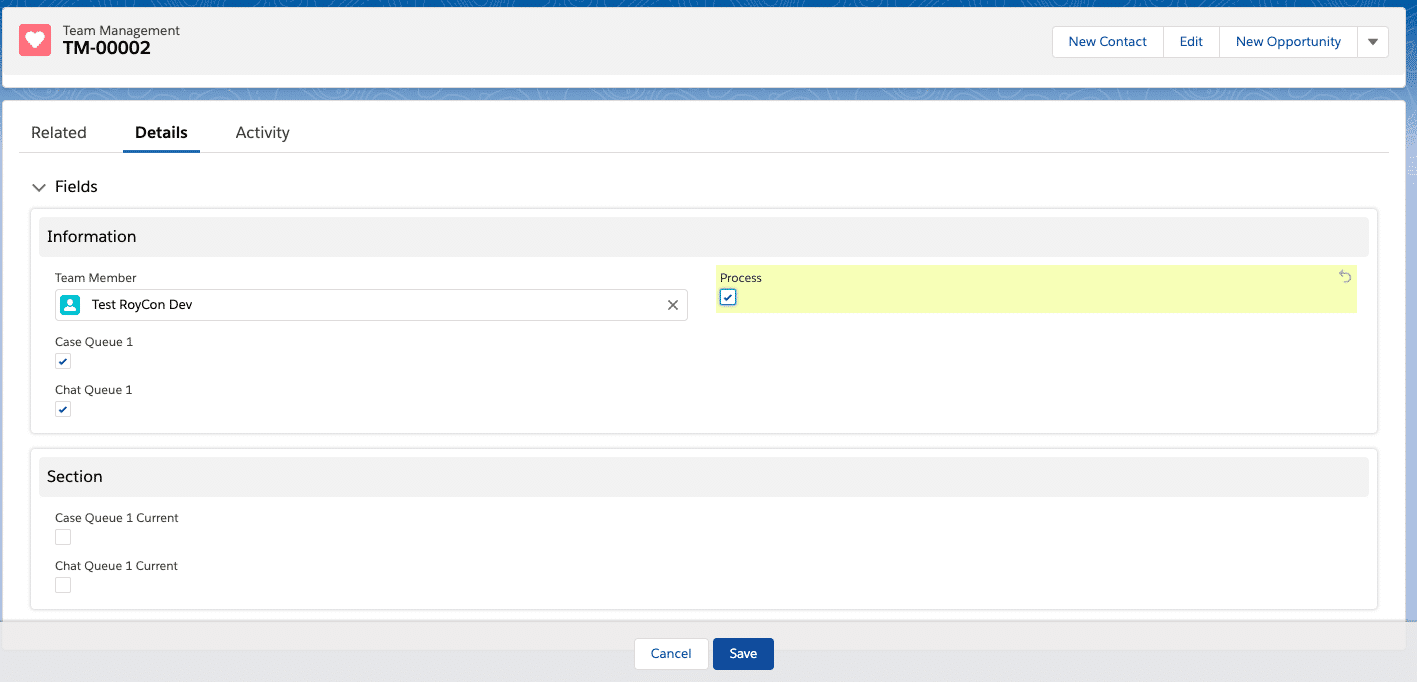
If you go back to the record page, you can update the Team Member record and check the Process checkbox.
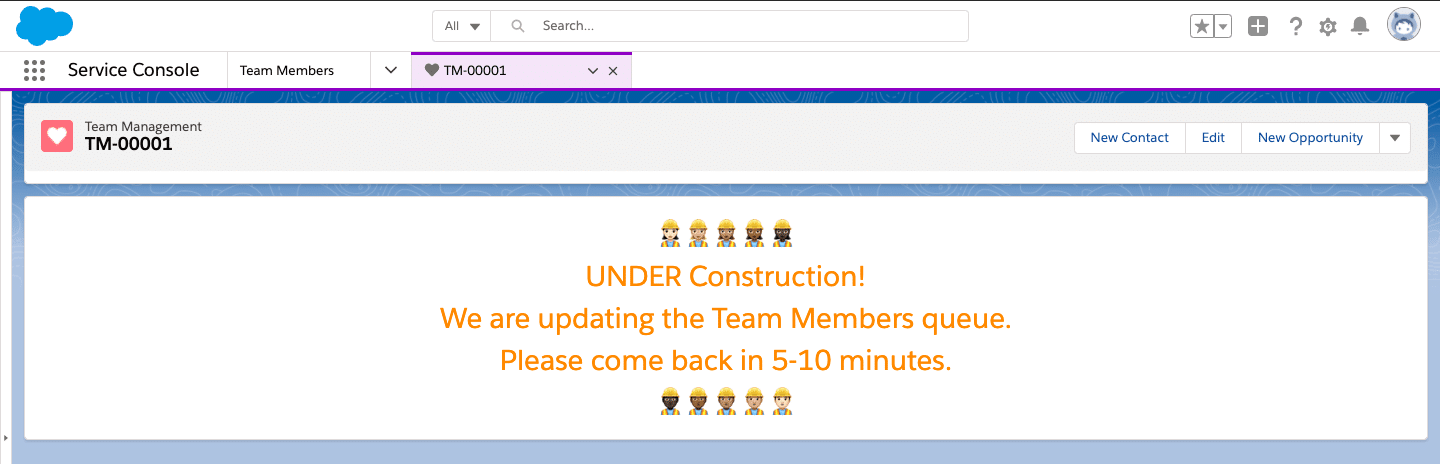
Once you save, you’ll notice your page goes to an “UNDER Construction!” page that we made.
Business results:
I have built this process, or something similar, at a few companies. As admins, our primary goal should be to democratize the system but keep the security and access to setup limited. We were able to dramatically reduce requests to the admins of the system and improve the end-user experience. Once agents were in training, their managers were able to add them to queues to start taking cases, chat, decline orders, and more. This brought value to those teams by not having capable agents waiting on an admin to update their access to the system.
We are now able to manage queue membership declaratively — and we don’t need an admin to do it!
Do try this at home
This example was real and it’s very simple. But the principle behind it could be applied in all sorts of ways. Let your imagination run wild! Here are a couple of examples to get your creative juices flowing:
- Give people access to new permission sets that you allow your end-users to assign (not all that exist in Salesforce)
- Add to a public group that affects sharing, list views, etc.
- Update a user’s role and profile if you have people moving between different departments often
Let us know what you think about this solution and tell us how you want to use it with #AwesomeAdmin & #HowISolvedThis on Twitter.
Resources
Jen Lee’s Blog
Automation Champion Blog