Welcome to another post in the “How I Solved This” series. In this series, we do a deep dive into a specific business problem and share how one #AwesomeAdmin chose to solve it. Once you learn how they solved their specific problem, you’ll be inspired to try their solution yourself! Let’s take a look at how Samantha Shain was able to document all of the options for seeding sandboxes with test data.
Key business problem
As an #AwesomeAdmin, I spend lots of time thinking about how to best equip and empower my team to make the most of our Salesforce instance. When we are onboarding a new hire, I want to provide a designated Salesforce environment where they can make changes, make mistakes, and, most importantly, learn! However, when I make new sandboxes, they are empty, and filling them with data takes WAY too long for a growing organization with lots of new hires. I banded together with a group of trusty Trailblazers to document all of the options for seeding sandboxes with test data. The Flow-based solution we designed transforms doing hours of work into clicking just one button — all with clicks, not code!
Background
My sandbox seeding journey is reminiscent of the old fable, Goldilocks and the Three Bears. There were lots of ways to do it, but each one was either too manual (point and click to create records one at a time), too expensive (purchase a third-party app), or required too many coding skills (what is Apex, again?). Like Goldilocks and her porridge, I needed a solution that was “just right.” For me, that meant it had to be quick to build and use, flexible, declarative, reliable, easy to maintain, and free.
Thanks to my trusty flow, from now on, whenever we hire a new staff member, I can spin up a sandbox in minutes with hand-picked data ready to go! My staff get higher quality, more consistent training, and I get the peace of mind knowing that we are not creating “test” data in Production. Imagine how much time you can save when you’re not manually creating data!
Word to the wise: This is an unusual application of Flow tools that avoids some tried and true “best practices” — but carefully and in service of a clear goal. This solution is perfect for small datasets in a sandbox environment. You might hit limits if you build a dataset that has too many records (~50 is our recommendation). The flow uses a lot of “Create” and “Get” Flow components because of some inherent Flow limitations. If this was scaled up for Production or large datasets, it would quickly become impractical. But for my admin goal, it was just right! Use with caution and creativity!
How I solved it
I created a flow that I can use to populate each new sandbox with data according to my exact specifications.
1. Draw it out
In order to create a dataset with realistic test data, I had to get up close and personal with my organization’s data model. For visual learners, looking at Schema Builder in Salesforce or an entity relationship diagram (ERD) can help you see how your objects are related to each other.
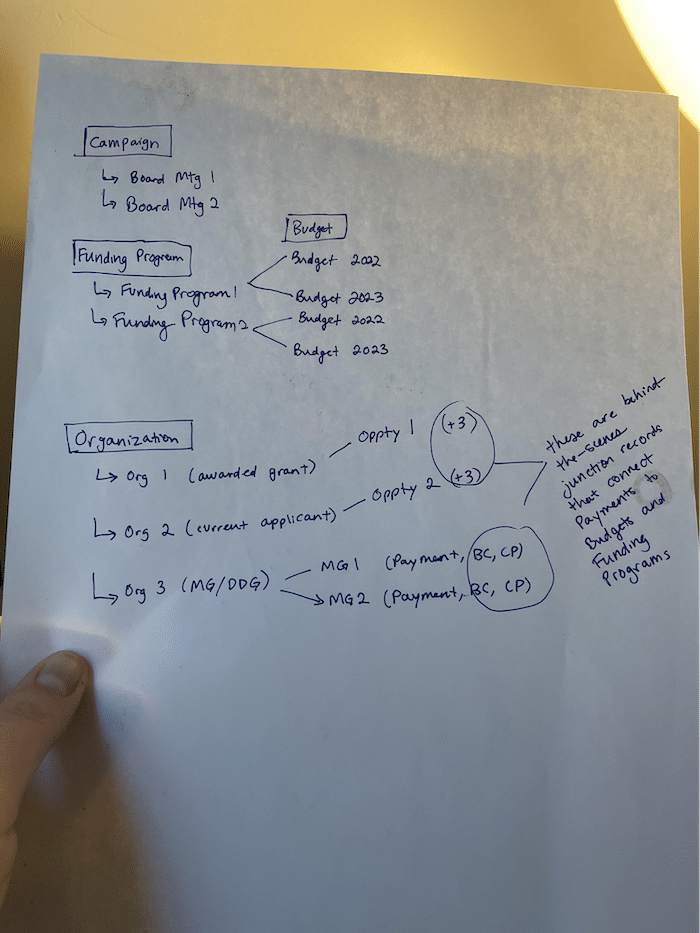
Once you know what objects you’re dealing with, it’s time to start thinking about scenarios. For us, this meant using a combination of record types, field values, and child records that represent different situations that we track in Salesforce. For example, I need at least one Organization Account that has an Awarded Grant (in other words, a closed-won opportunity). Separately, I need one organization record that has an active grant submission. And I need one Organization that has “matching gifts” attributed to different donors. For each of these scenarios to be realistic, I need to create associated data, like Payments, Contacts, and some tricky junction records that we will discuss later.
Here’s a picture of my little data map, coffee stains and all! I am thinking one record at a time, not just object-level.
2. Go with the flow
Now that we have our data model and scenarios sketched out, it’s time to start building our flow… in a sandbox, of course! Start off by refreshing or creating a new Developer Sandbox. Log in to that sandbox, then navigate to Flow in the Setup menu. New to Flow? Intimidated? This solution is a great way to get started! If I can do it, I know you can do it, too.
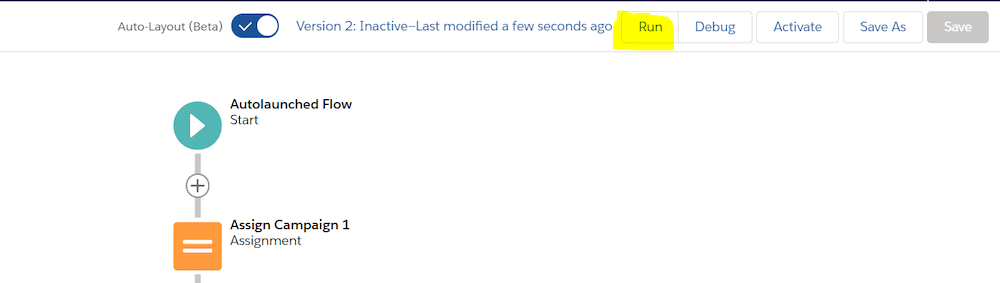
I decided to use an autolaunched flow (no trigger) for my solution. Why? Well, there’s no data in the system to “trigger” a flow and I didn’t need a Screen element to interact with. Autolaunched flow is a bit of a misleading name in this case — the flow will never “launch itself” but, rather, will wait until you click the “Run” button in a newly created or refreshed sandbox. I gave my flow a simple name: “Seed Sandbox.”
The first object that I worked on was Campaigns, because I knew that I needed to have Campaigns already created in order to populate the Primary Campaign Source field in Opportunities. If you know you are creating records where you need to populate a lookup field (like Contacts), make sure that a record has already been created so that you can link to it (account).
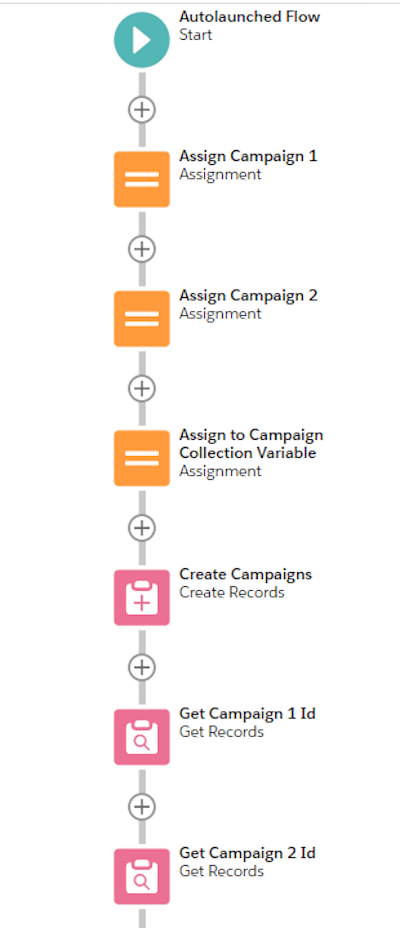
Below is a screenshot with all of the Flow elements that relate to Campaigns. I created two campaign records and, as you can see, I have six elements on my flow canvas. In the next step, we’ll dive into what they do. Each one has an important role to play in seeding our sandbox.
3. Learn your flow elements
Let’s zoom out of our elements for just a moment. Before you even create any elements, I think it’s helpful to create your Flow variables. To create a variable, click the New Resource button, then select Variable, give it a name, select Record for Data Type, and then select which object you are working with.
This is important — you need one variable for each record you are creating (so, one for Campaign 1, a different one for Campaign 2) and one “Collection Variable” for each object type you are working with (so, one Collection Variable for Campaigns, one Collection Variable for Organizations, etc.). This is why having a data map really comes in handy!
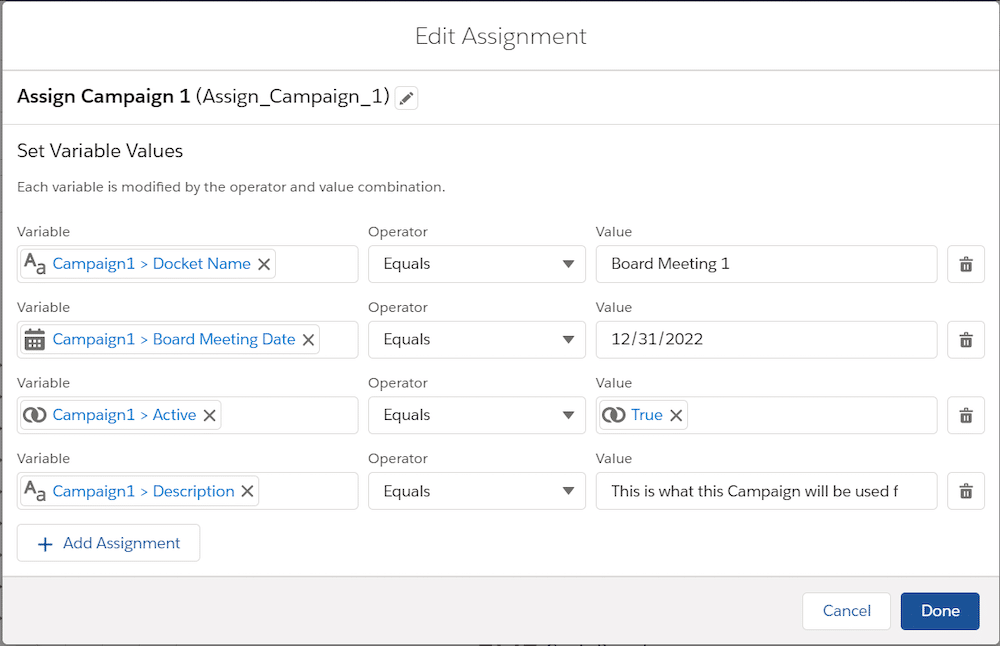
Once you have your variables defined, you can start assigning them values. This is where you are telling the flow exactly what fields should be populated in the records it is going to create. For my campaign records, I populated them with Name, Date, Description, etc.
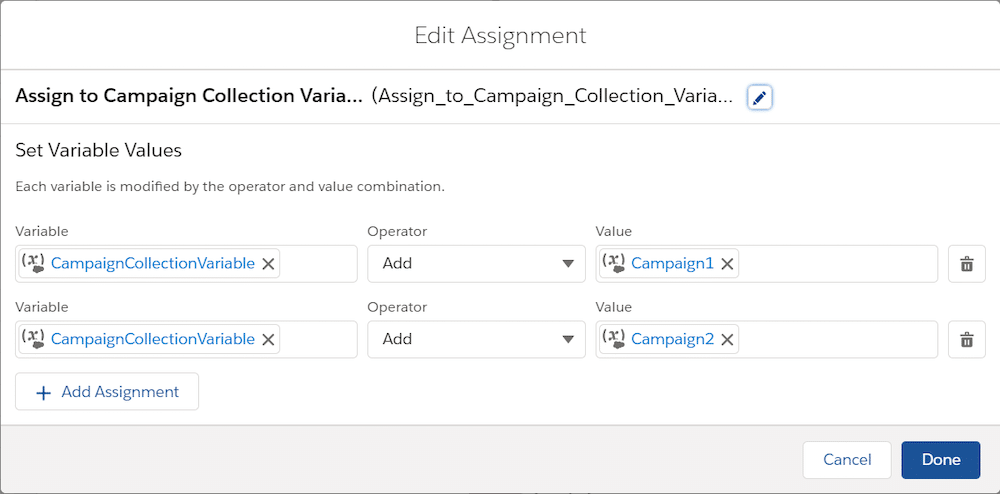
The “Add Campaign to Collection” assignment element is a bit tricky. Here’s a picture of how mine is set up. By putting records into a Collection, we save processing time in our flow. Salesforce will create them all at once instead of one record at a time. Putting records into Collection Variables is also called “bulkification” and is considered a best practice in flow building. Trust me, I learned the hard way!
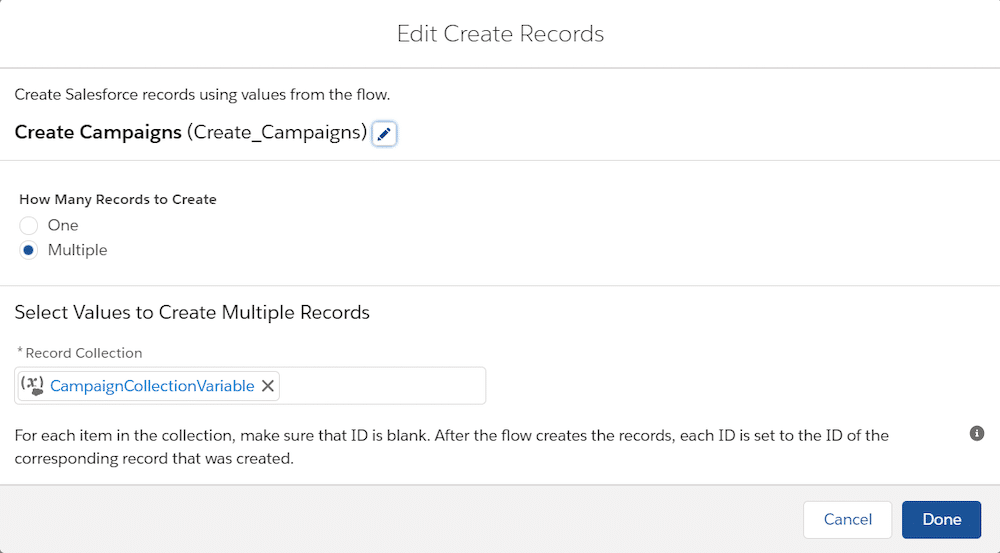
This whole order of operations culminates in the Create element. Here’s what that element definition looks like:
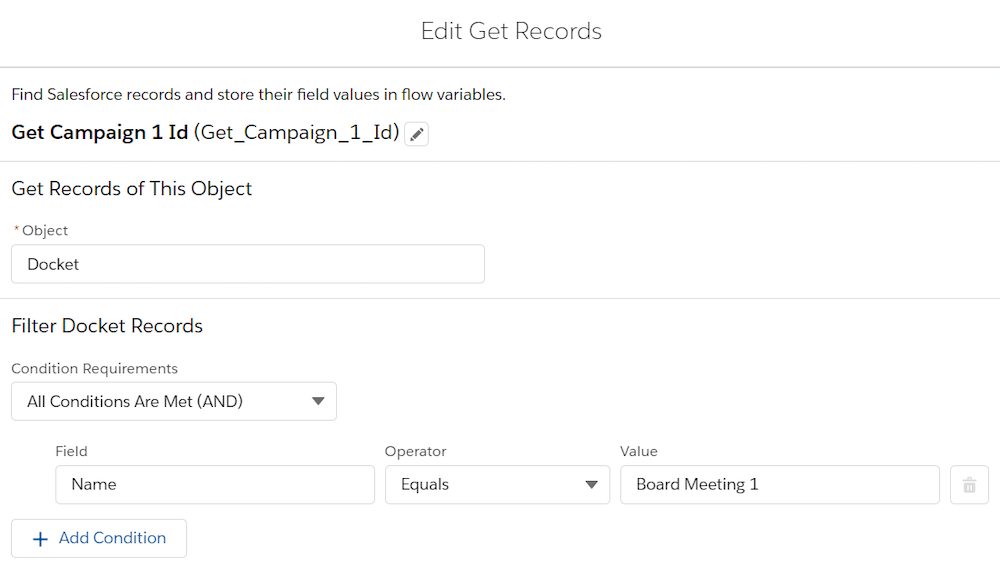
Last but not least, we need to use a Get element to update our variable definition with those brand new record Ids (so that we can reference these Campaigns in lookup fields on other records). It would be nice if Flow could intuitively “remember” the Id of the record it just created, but, unfortunately, it doesn’t. (Apex code, in this same situation, knows the Ids of records it has just created.) In our solution, each record has its own Get element. Let’s take a look at that Get Records element.
First, we search campaign records by Name to find the one that we just created. I copy-pasted the Campaign Name from the Assignment element that I used earlier.
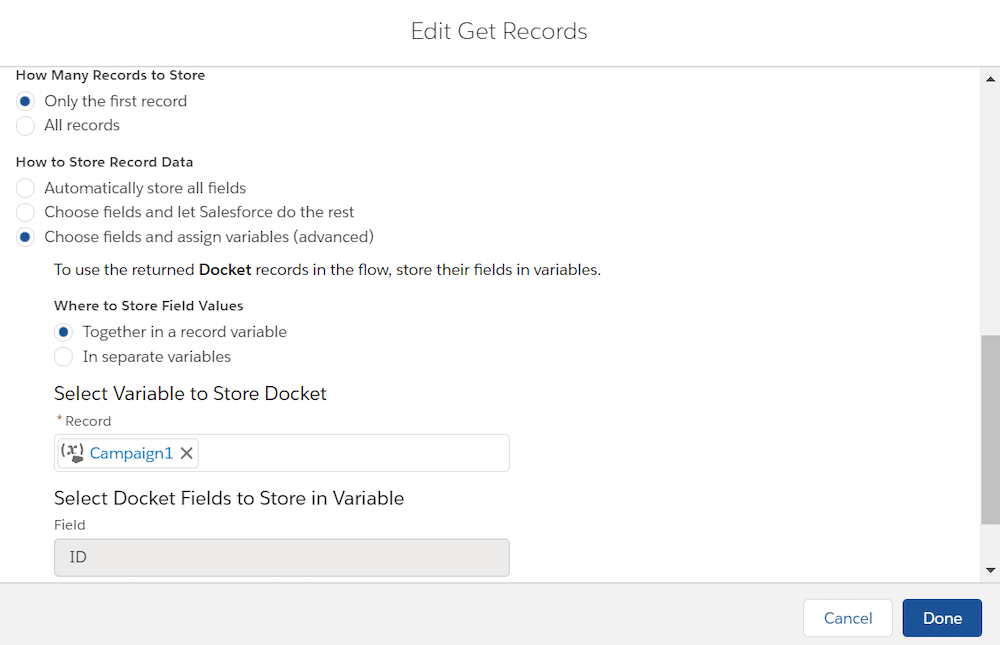
Then, I chose my “Campaign 1” variable and updated it to include an Id. This is a bit counter-intuitive because you aren’t making any other changes to the record, but it’s a necessary step to get to the goal.
Wow, that was a lot of work just to make two campaign records. It might seem like it would be faster to create two campaigns the old-fashioned way — just log in to your sandbox and make them manually! But, remember that you need to create them in each and every training sandbox you create. Once you start adding Accounts, Contacts, Opportunities, Payments, and all of the custom objects in all of these Salesforce orgs, you might decide you prefer to leverage the power of flow to do the work for you. I certainly do!
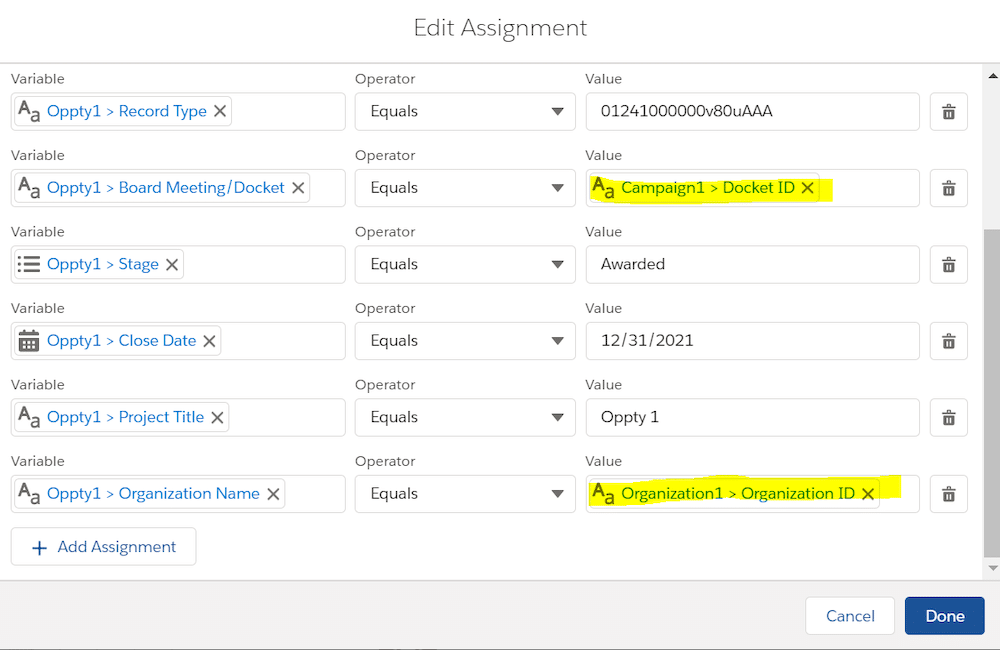
Growing up and watching lots of cooking TV shows, I always anticipated the moment when the chef would put cake batter into one oven and take a perfectly baked cake out of the other oven. This is my chance to skip ahead in the instructions and show you how my Opportunity Assignment references the Campaign we created above. Assume that I’ve already created Organizations, Contacts, etc.!
In the Assignment element below, I am populating a lookup field on an opportunity record (in this case, the field is called “Board Meeting/Docket” with the “Docket ID” that I had previously created and stored in my flow. And I use the same maneuver for the Organization ID (Account).
As you continue to build out the Assignment Variables, Collection Variables, Create element, and Get element for each record/object, your flow will get quite long. Don’t be afraid of a little scrolling. When you are done, you will have mapped out every record in your dataset. Next, it’s time to run it and populate your fresh sandbox with data.
4. Run your flow!
This step is simple! From your flow, click the Run button. Depending on how many records you are creating, it might take a minute or two to run.
5. Save your flow for posterity
You made it! Your flow is populating your sandbox with data just the way you want it. Miraculous!
However, your flow currently exists only in your current sandbox. You can use a change set to move your creation to Production. Remember, we are not going to run this flow in Production — you already have plenty of data there! We just need it stored as metadata in Production so that Salesforce will automatically put it in your next staff training sandbox. This is one of the most elegant parts of the solution — we are essentially storing proto-data as metadata.
6. Keep in mind
I LOVE the “Debug on Canvas” feature in Flow, which recently got an extra boost. When you are using it, make sure to check-off “Run flow in rollback mode,” otherwise you will spend a lot of time deleting records in your sandbox while you are testing.
If “auto layout” is turned OFF, you can select any Flow element and “copy” it, which saves quite a bit of time when you are making repetitive examples! Opportunity 1 and Opportunity 2 might be quite similar, after all…
Beware of limits. You can only use 150 data manipulation language (DML) expressions in a flow. Each “Create,” “Get,” “Update,” or “Delete” element is considered one DML in the back end of Flow. Therefore, the test dataset is intrinsically limited to around 140 records (across 10 objects), or fewer records if you are touching more objects. The formula is [# of records] + [# of objects] <= 150. Depending on the complexity of your org, there may be other limits you want to watch out for. Remember, if your org has other triggers/flows/automation that runs as you create data, you will hit these limits faster.
7. Extend the fun-ctionality
What if you need relative dates or other logic inside of your flow to make your dataset more realistic? You can do that with more advanced variable definitions.
This sounds blasphemous, but what if you want to make data with deliberate discrepancies? You can still run all of your dashboards and exception reports in your sandbox — this could be a great “teachable moment” for your new staff. Show-and-tell how to spot common mistakes and how to fix them!
What if you have multiple sandbox seeding flows for different scenarios? In a nonprofit context, you might need very different datasets for training Communications, Development (Fundraising), or Programs. In this case, you can create multiple flows that you run using the respective “Run” button. Alternatively, you could create a screen flow that you add to the Home page in an app in your sandbox, and use that interactive element to launch your preferred flow. Food for thought!
What if you need to generate more than 50 records? Unfortunately, declarative Flow cannot accommodate that but lots of other solutions certainly can! Refer to the extensive, community-written Data Generation Guide for options.
What if you need to generate different data each time? Refer to the Data Generation Guide to learn about Snowfakery, or this useful post on the Salesforce Architects blog.
Business results
In mere minutes, I can populate any sandbox with a small, but highly customized, test and training dataset. Now, I can make enduring training materials that match the records in the sandbox. This will improve the quality of my training and save me time in the long run. Also, training in the sandbox will help us keep our data in Production squeaky clean!
Do try this at home
Let us know what you thought of this solution and tell us how you want to use it with #AwesomeAdmins #HowISolvedThis.
A special thank you to everyone who contributed to this post including the Open Source Commons Data Generation Toolkit team, Jessie Rymph, and Michael Kolodner.
Relevant Trailhead badges