How to Use Salesforce to Manage Your Documentation

How to Use Salesforce to Manage Your Documentation

By

No matter the size of your organization, or how many admins you have on your team (if you have a team!), one of the last things you probably enjoy doing is writing documentation. I hear you—it’s hard to start writing documentation, know what to capture, and figure out where to put it so you’ll actually go back to it as a reference.

We’ve talked about the importance and value of documenting your changes, but have you ever considered where? I’ll be the first one to admit that it’s really easy to become overwhelmed and distracted by all the different tools out there to capture system changes. And there’s a lot of great ideas and conversations around documenting in a place where your business works, but what if that place doesn’t exist yet? What if there are too many places and none really meet your needs? What if you don’t have any budget to purchase that beloved tool you’ve read rave reviews about? Are you doomed to be bound to Word documents or endless Powerpoint slides? I say, no!

We’re in the business of solving problems for our businesses, so what if we built for ourselves the solution we need? What if you built your documentation repository right in Salesforce where you already work? I know, it’s an exciting idea, so let’s see an example in action.

Why consider Salesforce for documentation?

This idea is not new or original, but it’s often overlooked because there are so many different tools out there. Here’s why you should consider using Salesforce for documentation.

It’s available at no extra cost to your business

Maybe you’re just starting out with a new org. Maybe you inherited an org and there’s zero documentation (what admin doesn’t know that story?). Maybe your department doesn’t have the budget for an additional tool. Or maybe the current tool doesn’t really fit your needs and you want something different.

Building a custom app to track change requests and enhancements is no different than building a custom app for a business process. And you already know about the cool automation you can build for yourself—and validation rules. 😉

You can customize it for your needs

No paid solution is ever perfect, and even those that allow you to customize a solution start to feel like a side gig to your main gig. Building your own solutions means you can start with the fields/information you need to capture now and not worry about conforming to other processes that just don’t fit. And bonus: Using Salesforce to track and document the system changes you make allows you to stay in one place while you work. Who doesn’t love that?!

It grows with you

To quote author Marshall Goldsmith, “What got you here won’t get you there.” The same logic applies here. Things you needed to track when you started will and should change as you grow. You won’t get it perfect on the first try, and that’s okay. Having your own custom app to track changes means you can change your mind and add/change fields and add apps (woah!) to further organize your work. Who doesn’t love scalability?

Pro-tip: Don’t try to think of everything on day one—you’ll risk over-engineering it for yourself. Aim for the 80/20 rule. If you can get 80% of what you need on day one, you can iterate and improve for that 20% that might look different as your team and business grows.

You can easily share your work queue

Building your solution in Salesforce makes it a lot easier to share your workload with requestors, managers, and others. Expose as much or as little as you want with our friend Field-Level Security, and inform people where their request is in the queue without having to reply to an email, Slack, Teams notice, or the carrier pigeon they asked you with. And when something is done, you’ve got a great platform to announce what’s gone live.

You get awesome analytics

Raise your hand if you were waiting for this one! 🙂 Yup, there’s power in numbers. Building your own custom fields and objects allows you to also capture the details you need to answer questions like:

  • How many new features did I/we deploy this month/quarter/year?
  • How many could I/we not get to? (smells like a great metric to advocate for headcount)
  • How many bug fixes did we do?
  • What’s the average time it takes to complete this type of request? (Ooooo, don’t you love that for future planning?!)
  • Which department/person/team is consuming the most of my/our time?
  • Are we fairly dividing our time across teams/departments?
  • Which features are must-haves versus nice-to-haves?

You are only limited by your imagination! So, instead of “Why should I use Salesforce to track my changes?”, I hope you’re thinking, “Why shouldn’t I use Salesforce?!”

Example solve

Now, you might be wondering, “Those are pretty good reasons to consider using Salesforce for my documentation, but how does it come together?” I’m so glad you asked!

Like any business challenge presented to you, there’s always more than one way to solve it. For example, some folks love to use the Case object because so much comes out-of-the-box. Our custom app below, which we’ll call SFDC Requests, is just one example of the many great ways to use Salesforce for your documentation. As you read on, consider which elements work for you and your business.

Decide what you need to track

Like any solve, you first have to determine not only what’s important to track for communication up and out about your work but also what’s helpful for you, #AwesomeAdmin, when you need to return to your past solve (or onboard a new admin!). Which feature/tool will you use to solve it (Flow, formulas, validation rules)? Who asked for it, and when is it needed by? How much time will it take, what’s the business case, and how will you solve it? Answering these questions helps you populate the list of fields to build.

Add intake details

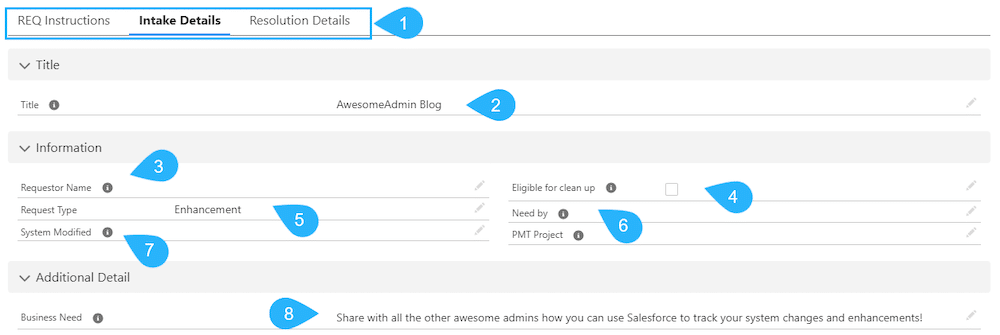
Here’s an example of the intake details you can capture when creating a change request.

Possible fields in Intake Details that an admin can build to capture change request details.

Built for efficiency, this quickly captures the key pieces you need to log a request so that you can both prioritize it and know the goal when you return to work on it.

1. Lightning is your friend! Use tabs to help break apart the process; for example, what’s needed upon creation versus what’s a resolution field.

a. Pro-tip: Create a tab that’s a text box where you can drop links or process related instructions to yourself or your team when they fill in information. (That’s the REQ Instructions tab in the screenshot above.)

2. Capture the subject of the ask for quick filtering in list views. Keep it obvious and full of keywords so you can leverage Salesforce Einstein Search.

3. Who asked for it? Great to know when you have follow-up questions.

4. Is this a feature you can improve or lean out in the future? Easily flag enhancements you know are quick fixes or that future features will improve.

5. Is this a new feature or a bug fix? (Can you smell the beautiful analytics now?)

6. When does the requestor need or wish to have it by? (Hello, prioritization!)

7. Maybe you’re not modifying Salesforce but another application like Account Engagement (aka Pardot—I’m with you, Pardashians). Who said this could only be used for Salesforce? 😉

8. What’s the business need and problem they’re trying to solve? Context is magic when you, and future admins, come back to this solve.

Add resolution details

Here’s an example of the resolution details you can capture when completing a change request.

Possible fields in Resolution Details that an admin can build to capture change request details.

9. How urgent is this request above all others? This field can live anywhere and is best placed based on your business process for prioritizing requests that come in.

10. How long does it take (in the time interval you like) to complete the request? Be sure to define what goes in here. Do you include the meetings you sat through to discuss and test? Create test material? Train? Build? There’s no wrong answer except an inconsistent one, so define it for you and your team, and stick to it. This number is helpful when you need to advocate for more time on a solution or adding headcount!

11. Which objects are used? Despite how much flack multi-select picklists get, you, #AwesomeAdmin, know how to handle them. Here, you can list all of the active objects in your system, and you can flag which ones are modified in the solve. Read that again… Yup, imagine knowing which objects were impacted when you need to troubleshoot an issue.*

12. Do you have a team lead or a person responsible for the ask, but someone different executing on it? Having two fields can be helpful, but usually ‘owner’ is sufficient for who is managing the request.

13. When will/did you finish it? (And how did that compare to when they needed it? I know, I know! The analytical possibilities are endless!)

14. Another multi-select picklist of the different tools you can use to solve the request. Is it Flow? A validation rule? Why type it when you can select it?*

*See the additional screenshot of numbers 11 & 14 for examples of the information you can pre-fill for easy tracking.

Impacted Objects and Tools Used that an admin can pre-fill for easy tracking.

Hopefully, the above fields got you thinking about all the great ways you can easily and quickly capture for your change requests. But there’s always more. Here are some pro-tips to take your documentation to the next level!

Pro-tips (because you’re awesome, and your solves are too)

  • Use paths to easily identify where the request is in the workflow.

A sales path on the change request record.

  • Lightning is your friend! Use the ability to customize the layout to your advantage and make it ergonomic for you and your admins.
  • Add additional features like Tasks, Topics, Notes, and more to set reminders for yourself and capture meeting minutes. (Woah, what a great use case for Notes!)
  • Got Slack? For those who use Slack and sometimes need to vet a request’s impact before building it, a fun way to share the love is to build in a ‘post to Slack’ screen flow. This screen flow is built to push the request link to a team channel for input before building. Once the message is sent, the screen flow updates with a hyperlink to the very same thread in Slack to both know you asked and also jump right to that thread for feedback details.

A change request layout with arrows highlighting key Salesforce tools/features.

  • Running projects and not just managing system changes? Consider downloading the free PMT Project app from Salesforce Labs. You can customize this app and even connect your change requests’ custom object to larger initiatives. For example, onboarding a new department or process? Create a project with the app to document the large effort of migrating a department or process, and keep track of the system changes you need to make for the overall project by linking those change requests to the project. It’s a great way to organize larger efforts that have many moving parts. Learn more about PMT Projects here.

Analytics

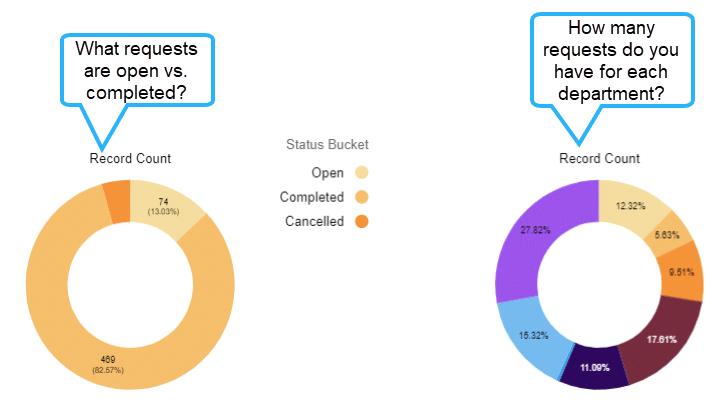
Hopefully, now you’re all in on the awesome ideas and ways to build your own documentation app in Salesforce. You’ve seen a lot of fields that help you better organize your work and also have some great details when you return to a solve. So, what does this information offer you when it comes to answering some of those big questions we asked earlier? Here’s just an example, but any field—yes, even your time fields—can be reported on! Again, you’re only limited by your imagination and business needs.

Example of report charts in Salesforce.

Get building!

Now it’s your turn to build the documentation app of your dreams, right inside of Salesforce. Remember, this app is for you/your team to not just better organize and capture what you’ve done, but to do so in a fun way that meets your business style and need. We’re huge advocates of Salesforce for the rest of our business—let’s give ourselves a win too. Have fun and maybe even treat yourself to some screen flows, action buttons, and ‘Ooooh, I always forget that field’ validation rules.

So, what are you waiting for?! Get building! 😀

Resources

conditional field formatting Winter '25

Conditional Field Formatting | Winter ’25 Be Release Ready

Winter ’25 is almost here! Learn more about Conditional Field Formatting and check out Be Release Ready to discover more resources to help you prepare for Winter ’25.  The challenge with configuring visual indicators today Creating custom visual indicators to call attention to key fields is a common Salesforce configuration requirement. Visual indicators make it […]

READ MORE